Samsung LN46B540P8F Research

View Results Below
Free Samsung LN46B540P8F manuals!
Problems with Samsung LN46B540P8F?
Ask a Question
Free Samsung LN46B540P8F manuals!
Problems with Samsung LN46B540P8F?
Ask a Question
Related Manual Pages


Similar Questions

Manual Please. How To Set Up Directv On This?
just got this tv and dont know how to hook it up to directv and my blue-ray.
just got this tv and dont know how to hook it up to directv and my blue-ray.
(Posted by whittlegirls 6 years ago)

How Do I Remove The Base So I Can Mount The Tv On The Wall
(Posted by scottraugh 8 years ago)

Hello, I Am Looking For A Base For A Samsung 46' Tv, Model # Ln46b540p8ftxrzc.
We lost the base and we need something that will work and not a wall mount, it has to be a stand.
We lost the base and we need something that will work and not a wall mount, it has to be a stand.
(Posted by spope2450 9 years ago)

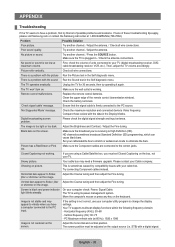
Samsung Ln46b540p8f Shut Off.
After a loundpopping sound, "like sqeezing an empty water bottle", my Tv shut off completely with no...
After a loundpopping sound, "like sqeezing an empty water bottle", my Tv shut off completely with no...
(Posted by cksx20 10 years ago)

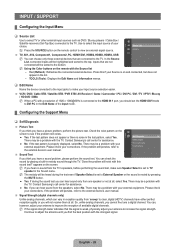
Usb Input
Our Samsung tv model LN46b540P8FXZC has a usb input on the side but no usb option in the source menu...
Our Samsung tv model LN46b540P8FXZC has a usb input on the side but no usb option in the source menu...
(Posted by justinkg 11 years ago)
Related Terms
The following terms were also used when searching for Samsung LN46B540P8F Research:- ln46b540p8f
- samsung ln46b540p8f
- ln46b540p8f review
- samsung ln46b540p8f tv
- samsung ln46b540p8f lcd tv
- samsung ln46b540p8f manual
- samsung ln46b540p8f price
- samsung ln46b540p8f review
- samsung ln46b540p8f reviews
- samsung ln46b540p8f screen
- samsung ln46b540p8f specifications
- samsung ln46b540p8f specs
- samsung ln46b540p8f stand
- samsung ln46b540p8f 2009
- samsung ln46b540p8f xza
- samsung model ln46b540p8f
- samsung model ln46b540p8f tv stand parts
- samsung tv ln46b540p8f
- samsung tv model ln46b540p8f
- samsung tv model ln46b540p8fxzc
- tv ln46b540p8f
- tv model ln46b540p8f
- tv model ln46b540p8fxzc
- ln46b540p8f service manual
- ln46b540p8f 2009
- ln46b540p8f firmware updates
- ln46b540p8f hdcp
- ln46b540p8f lcd tv
- ln46b540p8f manual
- ln46b540p8f price