User Manual (ENGLISH)
Page 3
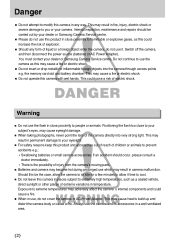
...metallic or inflammable foreign objects into very strong light. You must contact your dealer or Samsung Camera Service centre. Do not continue to use which may adversely affect the cameraŖs internal components and could increase the risk of explosion. ƈ Should any ...flash too close proximity to flammable or explosive gases, as a sealed vehicle, direct sunlight or other places of the camera directly into the camera through access points e.g. Warning ƈ Do not use , do not cover the camera or AC Power Adapter. Should this be carried out by your dealer or Samsung Camera...
...metallic or inflammable foreign objects into very strong light. You must contact your dealer or Samsung Camera Service centre. Do not continue to use which may adversely affect the cameraŖs internal components and could increase the risk of explosion. ƈ Should any ...flash too close proximity to flammable or explosive gases, as a sealed vehicle, direct sunlight or other places of the camera directly into the camera through access points e.g. Warning ƈ Do not use , do not cover the camera or AC Power Adapter. Should this be carried out by your dealer or Samsung Camera...
User Manual (ENGLISH)
Page 4
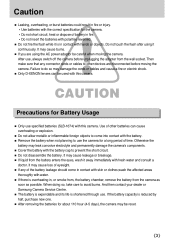
...with the battery. ƈ Remove the battery when not planning to use the camera for a long period of time. Do not touch the flash after using the AC power adaptor be careful when moving the camera. If the battery capacity is shortened through use. Use of other devices are ...using it continuously. It may be used with the battery cap to avoid burns. And then contact your dealer or Samsung Camera Service Centre...
...with the battery. ƈ Remove the battery when not planning to use the camera for a long period of time. Do not touch the flash after using the AC power adaptor be careful when moving the camera. If the battery capacity is shortened through use. Use of other devices are ...using it continuously. It may be used with the battery cap to avoid burns. And then contact your dealer or Samsung Camera Service Centre...
User Manual (ENGLISH)
Page 5
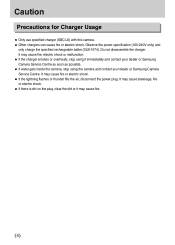
...the plug, clear the dirt or it immediately and contact your dealer or Samsung Camera Service Centre as soon as possible. ƈ If water gets inside the camera, stop using the camera and contact your dealer or Samsung Camera Service Centre. Do not disassemble the charger. It may cause fire or ...electric shock. ƈ If the lightning flashes or thunder fills the air, disconnect the power plug. ...
...the plug, clear the dirt or it immediately and contact your dealer or Samsung Camera Service Centre as soon as possible. ƈ If water gets inside the camera, stop using the camera and contact your dealer or Samsung Camera Service Centre. Do not disassemble the charger. It may cause fire or ...electric shock. ƈ If the lightning flashes or thunder fills the air, disconnect the power plug. ...
User Manual (ENGLISH)
Page 7
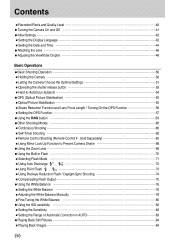
...Attaching the Lens 46 ƃAdjusting the Viewfinder Dioptre 48 Basic Operations ƃBasic Shooting Operation 50 ƈHolding the Camera 50 ƈLetting the Camera Choose the Optimal Settings 51 ƈOperating the shutter release button 53 ƈHard-to-Autofocus Subjects 54 ƃ...to Prevent Camera Shake 68 ƃUsing the Zoom Lens 69 ƃUsing the Built-in Flash 70 ƈSelecting Flash Mode 71 ƈUsing Auto Discharge , 72 ƈUsing Fill-in Flash 73 ƈUsing Red-eye Reduction Flash / Daylight-Sync Shooting 74 ƈCompensating Flash Output 75 ...
...Attaching the Lens 46 ƃAdjusting the Viewfinder Dioptre 48 Basic Operations ƃBasic Shooting Operation 50 ƈHolding the Camera 50 ƈLetting the Camera Choose the Optimal Settings 51 ƈOperating the shutter release button 53 ƈHard-to-Autofocus Subjects 54 ƃ...to Prevent Camera Shake 68 ƃUsing the Zoom Lens 69 ƃUsing the Built-in Flash 70 ƈSelecting Flash Mode 71 ƈUsing Auto Discharge , 72 ƈUsing Fill-in Flash 73 ƈUsing Red-eye Reduction Flash / Daylight-Sync Shooting 74 ƈCompensating Flash Output 75 ...
User Manual (ENGLISH)
Page 9
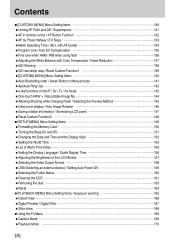
... functions on the P / Sv / Tv / Av mode 142 ƈOne-touch RAW + / Recordable Image No 144 ƈAllowing Shooting while Charging Flash / Selecting the Preview Method 145 ƈInitial zoom display / Auto Image Rotation 146 ƈSaving rotation information / Illuminating LCD panel 147 ƈReset Custom...Removing the dust 163 ƈReset 164 ƃ[PLAYBACK MENU] Menu Setting Items / Exposure warning 165 ƈInstant View 166 ƈDigital Preview / Digital Filter 167 ƈSlide show 168 ƃUsing the Fn Menu 169 ƈCapture Mode 169 ƈPlayback Mode 170 ŝ8Ş
... functions on the P / Sv / Tv / Av mode 142 ƈOne-touch RAW + / Recordable Image No 144 ƈAllowing Shooting while Charging Flash / Selecting the Preview Method 145 ƈInitial zoom display / Auto Image Rotation 146 ƈSaving rotation information / Illuminating LCD panel 147 ƈReset Custom...Removing the dust 163 ƈReset 164 ƃ[PLAYBACK MENU] Menu Setting Items / Exposure warning 165 ƈInstant View 166 ƈDigital Preview / Digital Filter 167 ƈSlide show 168 ƃUsing the Fn Menu 169 ƈCapture Mode 169 ƈPlayback Mode 170 ŝ8Ş

User Manual (ENGLISH)
Page 10
...) Mode 181 ƈUsing M (Hyper-manual) Mode 182 ƈEV Bar 184 ƈUsing the B (Bulb) Mode 186 ƈUsing the X (Flash X-Sync Speed) Mode 187 ƈUsing the USER Mode 187 Basic Function ƃChecking the Composition, Exposure and Focus Before Shooting 190 ƃFocusing 192... ƃSetting the Exposure 199 ƃUsing the Built-in Flash 208 ƃUsing an External Flash (Optional 212 Software information ƃSoftware Notes 218 ƃAbout the software 219 ƃSetting up the application software 220...
...) Mode 181 ƈUsing M (Hyper-manual) Mode 182 ƈEV Bar 184 ƈUsing the B (Bulb) Mode 186 ƈUsing the X (Flash X-Sync Speed) Mode 187 ƈUsing the USER Mode 187 Basic Function ƃChecking the Composition, Exposure and Focus Before Shooting 190 ƃFocusing 192... ƃSetting the Exposure 199 ƃUsing the Built-in Flash 208 ƃUsing an External Flash (Optional 212 Software information ƃSoftware Notes 218 ƃAbout the software 219 ƃSetting up the application software 220...
User Manual (ENGLISH)
Page 16
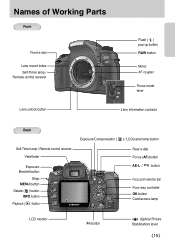
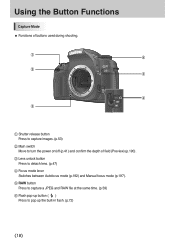
Names of Working Parts Front Front e-dial Lens mount index Self-Timer lamp / Remote control receiver Flash ( ) pop-up button RAW button Mirror AF coupler Focus mode lever Lens unlock button Lens information contacts Back Self-Timer lamp / Remote control receiver Viewfinder ...
Names of Working Parts Front Front e-dial Lens mount index Self-Timer lamp / Remote control receiver Flash ( ) pop-up button RAW button Mirror AF coupler Focus mode lever Lens unlock button Lens information contacts Back Self-Timer lamp / Remote control receiver Viewfinder ...
User Manual (ENGLISH)
Page 17
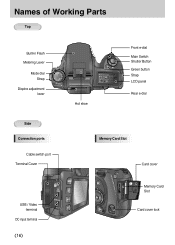
Names of Working Parts Top Built-in Flash Metering Lever Mode dial Strap Dioptre adjustment lever Side Connection ports Cable switch port Terminal Cover Hot shoe Front e-dial Main Switch Shutter Button Green button Strap LCD panel Rear e-dial Memory Card Slot Card cover USB / Video terminal DC input terminal ŝ16Ş Memory Card Slot Card cover lock
Names of Working Parts Top Built-in Flash Metering Lever Mode dial Strap Dioptre adjustment lever Side Connection ports Cable switch port Terminal Cover Hot shoe Front e-dial Main Switch Shutter Button Green button Strap LCD panel Rear e-dial Memory Card Slot Card cover USB / Video terminal DC input terminal ŝ16Ş Memory Card Slot Card cover lock
User Manual (ENGLISH)
Page 19
...) and Manual focus mode (p.197). ڽRAW button Press to capture a JPEG and RAW file at the same time. (p.59) ھFlash pop-up button ( ) Press to pop up the built-in...
...) and Manual focus mode (p.197). ڽRAW button Press to capture a JPEG and RAW file at the same time. (p.59) ھFlash pop-up button ( ) Press to pop up the built-in...
User Manual (ENGLISH)
Page 24
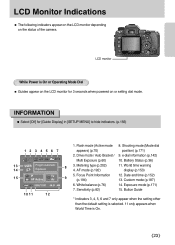
...23Ş Metering type (p.202) 4. Date and time (p.152) 13. INFORMATION ƃ Select [Off] for 3 seconds when powered on the status of the camera. AF mode (p.192) 5. Sensitivity (p.82) 8. Button Guide * Indicators 3, 4, 5, 6 and 7 only appear when the setting other than the default setting... (p.171) 15. LCD Monitor Indications ƈ The following indicators appear on the LCD monitor depending on or setting dial mode. Flash mode (Active mode appears) (p.70) 2. World time warning display (p.153) 12. Drive mode / Auto Bracket / Multi Exposure (p.60) 3. e-dial...
...23Ş Metering type (p.202) 4. Date and time (p.152) 13. INFORMATION ƃ Select [Off] for 3 seconds when powered on the status of the camera. AF mode (p.192) 5. Sensitivity (p.82) 8. Button Guide * Indicators 3, 4, 5, 6 and 7 only appear when the setting other than the default setting... (p.171) 15. LCD Monitor Indications ƈ The following indicators appear on the LCD monitor depending on or setting dial mode. Flash mode (Active mode appears) (p.70) 2. World time warning display (p.153) 12. Drive mode / Auto Bracket / Multi Exposure (p.60) 3. e-dial...

User Manual (ENGLISH)
Page 25
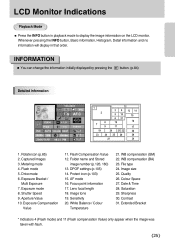
Shutter Speed (p.199) 7. Flash Exposure Value (p.75) 10. Colour space (p.126) 19. Quality level (p.123) 22. Sharpness (p.124) 28. Metering mode (p.202) 4. Aperture Value (p.200) 8. Extended Bracket (p.127) 12. ... Monitor Indications Capture Mode ƈ Press the INFO button in capture mode to display the capture function settings on the LCD monitor for 15 seconds. Flash mode (p.70) 5.
Shutter Speed (p.199) 7. Flash Exposure Value (p.75) 10. Colour space (p.126) 19. Quality level (p.123) 22. Sharpness (p.124) 28. Metering mode (p.202) 4. Aperture Value (p.200) 8. Extended Bracket (p.127) 12. ... Monitor Indications Capture Mode ƈ Press the INFO button in capture mode to display the capture function settings on the LCD monitor for 15 seconds. Flash mode (p.70) 5.
User Manual (ENGLISH)
Page 26
...by pressing the PB button. (p.84) Detailed Information 1. White Balance / Colour Temperature 21. Shutter Speed 9. Flash mode 5. Exposure Bracket / Multi Exposure 7. Aperture Value 10. Flash Compensation Value 12. Focus point information 17. Sensitivity 20. Image tone 19. WB compensation (GM) 22. ...Extended Bracket * Indicators 4 (Flash mode) and 11 (Flash compensation Value) only appear when the image was taken with flash. ŝ25Ş LCD Monitor Indications Playback Mode ƈ Press the INFO button in ...
...by pressing the PB button. (p.84) Detailed Information 1. White Balance / Colour Temperature 21. Shutter Speed 9. Flash mode 5. Exposure Bracket / Multi Exposure 7. Aperture Value 10. Flash Compensation Value 12. Focus point information 17. Sensitivity 20. Image tone 19. WB compensation (GM) 22. ...Extended Bracket * Indicators 4 (Flash mode) and 11 (Flash compensation Value) only appear when the image was taken with flash. ŝ25Ş LCD Monitor Indications Playback Mode ƈ Press the INFO button in ...
User Manual (ENGLISH)
Page 28
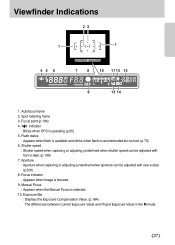
... frame 3. indicator : Blinks when OPS is selected. 10. Manual Focus : Appears when the Manual Focus is operating (p.55) 5. Focus point (p.194) 4. Flash status : Appears when flash is available and blinks when flash is focused. 9. Focus indicator : Appears when image is recommended but not set. (p.70) 6. Aperture : Aperture when capturing or adjusting (underlined when...
... frame 3. indicator : Blinks when OPS is selected. 10. Manual Focus : Appears when the Manual Focus is operating (p.55) 5. Focus point (p.194) 4. Flash status : Appears when flash is available and blinks when flash is focused. 9. Focus indicator : Appears when image is recommended but not set. (p.70) 6. Aperture : Aperture when capturing or adjusting (underlined when...
User Manual (ENGLISH)
Page 29
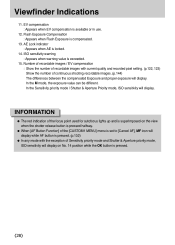
EV compensation : Appears when EV compensation is compensated. 13. Flash Exposure Compensation : Appears when Flash Exposure is available or in use. 12. Number of recordable images / EV compensation : Show the number of recordable images with the exception of continuous shooting ...
EV compensation : Appears when EV compensation is compensated. 13. Flash Exposure Compensation : Appears when Flash Exposure is available or in use. 12. Number of recordable images / EV compensation : Show the number of recordable images with the exception of continuous shooting ...
User Manual (ENGLISH)
Page 30
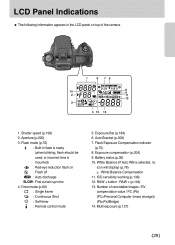
... storage)) (Pb=PictBridge) 14. Battery status (p.36) 10. Exposure Bar (p.184) 6. Number of the camera. 1. Auto Bracket (p.206) 7. RAW + button : RAW + (p.144) 13. Flash mode (p.70) : Built-in the LCD panel on : Flash off : Auto discharge SLOW: First curtain synchro 4. Flash Exposure Compensation indicator (p.75) 8. White Balance (If Auto WB is ready (when blinking...
... storage)) (Pb=PictBridge) 14. Battery status (p.36) 10. Exposure Bar (p.184) 6. Number of the camera. 1. Auto Bracket (p.206) 7. RAW + button : RAW + (p.144) 13. Flash mode (p.70) : Built-in the LCD panel on : Flash off : Auto discharge SLOW: First curtain synchro 4. Flash Exposure Compensation indicator (p.75) 8. White Balance (If Auto WB is ready (when blinking...
User Manual (ENGLISH)
Page 37
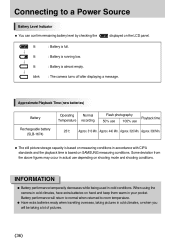
...Battery is full. : Battery is running low. : Battery is based on SAMSUNG measuring conditions. Approx. 320 Min. Approx. 300 Min. ƈ The still picture storage capacity is almost empty. : The camera turns off after displaying a message. Approximate Playback Time (new batteries) Battery ...Rechargeable battery (SLB-1674) Operating Normal Temperature recording Flash photography Playback time 50% use 100% use depending on hand ...
...Battery is full. : Battery is running low. : Battery is based on SAMSUNG measuring conditions. Approx. 320 Min. Approx. 300 Min. ƈ The still picture storage capacity is almost empty. : The camera turns off after displaying a message. Approximate Playback Time (new batteries) Battery ...Rechargeable battery (SLB-1674) Operating Normal Temperature recording Flash photography Playback time 50% use 100% use depending on hand ...
User Manual (ENGLISH)
Page 50
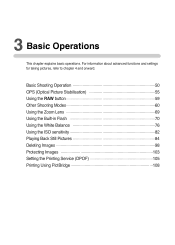
For information about advanced functions and settings for taking pictures, refer to chapter 4 and onward. Basic Shooting Operation 50 OPS (Optical Picture Stabilisation 55 Using the RAW button 59 Other Shooting Modes 60 Using the Zoom Lens 69 Using the Built-in Flash 70 Using the White Balance 76 Using the ISO sensitivity 82 Playing Back Still Pictures 84 Deleting Images 98 Protecting Images 103 Setting the Printing Service (DPOF 105 Printing Using PictBridge 108 3 Basic Operations This chapter explains basic operations.
For information about advanced functions and settings for taking pictures, refer to chapter 4 and onward. Basic Shooting Operation 50 OPS (Optical Picture Stabilisation 55 Using the RAW button 59 Other Shooting Modes 60 Using the Zoom Lens 69 Using the Built-in Flash 70 Using the White Balance 76 Using the ISO sensitivity 82 Playing Back Still Pictures 84 Deleting Images 98 Protecting Images 103 Setting the Printing Service (DPOF 105 Printing Using PictBridge 108 3 Basic Operations This chapter explains basic operations.
User Manual (ENGLISH)
Page 53
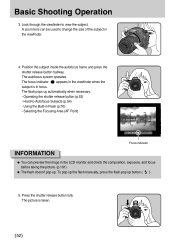
..., and focus before taking the picture. (p.191) ƃ The flash doesn't pop up. Press the shutter release button fully. Operating the shutter release button (p.53) - The flash pops up button ( ). 5. The picture is in Flash (p.70) - Basic Shooting Operation 3. A zoom lens can preview the...autofocus system operates. Hard-to view the subject. Look through the viewfinder to -Autofocus Subjects (p.54) - To pop up the flash manually, press the flash pop up automatically when necessary. - The focus indicator appears in the viewfinder when the subject is taken. ŝ52Ş...
..., and focus before taking the picture. (p.191) ƃ The flash doesn't pop up. Press the shutter release button fully. Operating the shutter release button (p.53) - The flash pops up button ( ). 5. The picture is in Flash (p.70) - Basic Shooting Operation 3. A zoom lens can preview the...autofocus system operates. Hard-to view the subject. Look through the viewfinder to -Autofocus Subjects (p.54) - To pop up the flash manually, press the flash pop up automatically when necessary. - The focus indicator appears in the viewfinder when the subject is taken. ŝ52Ş...

User Manual (ENGLISH)
Page 57
...the Shake Reduction switch off the OPS switch when using the [ OPS] menu. Wait for about 2 seconds) right after turning on the camera or restoring from Auto Power Off. OPS (Optical Picture Stabilisation) Shake Reduction Function and Lens Focal Length ƈ The OPS function operates ...by using the camera with an external flash. ŝ56Ş Press the shutter release button halfway. If a lens that information is automatically acquired is pressed halfway, ...
...the Shake Reduction switch off the OPS switch when using the [ OPS] menu. Wait for about 2 seconds) right after turning on the camera or restoring from Auto Power Off. OPS (Optical Picture Stabilisation) Shake Reduction Function and Lens Focal Length ƈ The OPS function operates ...by using the camera with an external flash. ŝ56Ş Press the shutter release button halfway. If a lens that information is automatically acquired is pressed halfway, ...
User Manual (ENGLISH)
Page 63
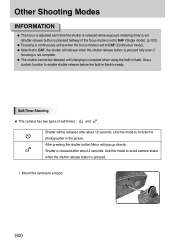
... a tripod. ŝ62Ş After pressing the shutter button Mirror will be released until charging is complete when using the built-in flash. Other Shooting Modes INFORMATION ƃ The focus is adjusted each time the shutter is released while exposure metering timer is set (shutter release.... ƃ The shutter cannot be released after about 12 seconds. Use a custom function to avoid camera shake when the shutter release button is pressed. 1. Self-Timer Shooting ƈ This camera has two types of self-timers : and . Use this mode to enable shutter release before the ...
... a tripod. ŝ62Ş After pressing the shutter button Mirror will be released until charging is complete when using the built-in flash. Other Shooting Modes INFORMATION ƃ The focus is adjusted each time the shutter is released while exposure metering timer is set (shutter release.... ƃ The shutter cannot be released after about 12 seconds. Use a custom function to avoid camera shake when the shutter release button is pressed. 1. Self-Timer Shooting ƈ This camera has two types of self-timers : and . Use this mode to enable shutter release before the ...


