User Manual (ENGLISH)
Page 7
...;Continuous Shooting 60 ƈSelf-Timer Shooting 62 ƈRemote Control Shooting (Remote Control F : Sold Separately 65 ƈUsing Mirror Lock Up Function to Prevent Camera Shake 68 ƃUsing the Zoom Lens 69 ƃUsing the Built-in Flash 70 ƈSelecting Flash Mode 71 ƈUsing Auto Discharge , 72 ƈUsing Fill-in Flash 73 ƈUsing Red-eye Reduction Flash / Daylight-Sync Shooting 74 ƈCompensating Flash Output 75 ƃUsing the White Balance 76 ƈSetting the White Balance 76 ƈAdjusting the White Balance Manually 78...
...;Continuous Shooting 60 ƈSelf-Timer Shooting 62 ƈRemote Control Shooting (Remote Control F : Sold Separately 65 ƈUsing Mirror Lock Up Function to Prevent Camera Shake 68 ƃUsing the Zoom Lens 69 ƃUsing the Built-in Flash 70 ƈSelecting Flash Mode 71 ƈUsing Auto Discharge , 72 ƈUsing Fill-in Flash 73 ƈUsing Red-eye Reduction Flash / Daylight-Sync Shooting 74 ƈCompensating Flash Output 75 ƃUsing the White Balance 76 ƈSetting the White Balance 76 ƈAdjusting the White Balance Manually 78...
User Manual (ENGLISH)
Page 9
... White Balance with Color Temperature / Noise Reduction 137 ƈISO Warning 138 ƈISO sensitivity step / Reset Custom Function1 139 ƈ[CUSTOM2 MENU] Menu Setting Items 140 ƈAuto Bracketing order / Green Button in Manual mode 141 ƈAperture Ring Use 142 ƈe-dial functions on the P / Sv / Tv / Av mode 142 ƈOne-touch RAW + / Recordable Image No 144 ƈAllowing Shooting while Charging Flash / Selecting the Preview Method 145 ƈInitial zoom display / Auto Image...
... White Balance with Color Temperature / Noise Reduction 137 ƈISO Warning 138 ƈISO sensitivity step / Reset Custom Function1 139 ƈ[CUSTOM2 MENU] Menu Setting Items 140 ƈAuto Bracketing order / Green Button in Manual mode 141 ƈAperture Ring Use 142 ƈe-dial functions on the P / Sv / Tv / Av mode 142 ƈOne-touch RAW + / Recordable Image No 144 ƈAllowing Shooting while Charging Flash / Selecting the Preview Method 145 ƈInitial zoom display / Auto Image...
User Manual (ENGLISH)
Page 30
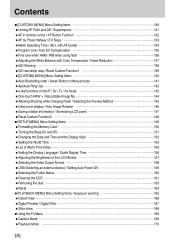
... or incorrect lens is selected, no icon will display) (p.76) ± : White Balance Compensation 11. Drive mode (p.60) : Single frame : Continuous Shot : Self-timer : Remote control mode 5. Flash Exposure Compensation indicator (p.75) 8. Exposure Bar (p.184) 6. Battery status (p.36) 10. Number of the camera. 1. LCD Panel Indications ƈ The following information appears in flash is ready (when blinking, flash should be used; Shutter speed (p.199) 2. ISO sensitivity warning (p.138) 12. White Balance (If Auto WB is mounted) : Red-eye reduction flash on top of recordable images...
... or incorrect lens is selected, no icon will display) (p.76) ± : White Balance Compensation 11. Drive mode (p.60) : Single frame : Continuous Shot : Self-timer : Remote control mode 5. Flash Exposure Compensation indicator (p.75) 8. Exposure Bar (p.184) 6. Battery status (p.36) 10. Number of the camera. 1. LCD Panel Indications ƈ The following information appears in flash is ready (when blinking, flash should be used; Shutter speed (p.199) 2. ISO sensitivity warning (p.138) 12. White Balance (If Auto WB is mounted) : Red-eye reduction flash on top of recordable images...

User Manual (ENGLISH)
Page 40
... format Memory Cards used for a long time. (4) the card is ejected or the battery is removed while the data on compatible Memory Cards, visit the Samsung Camera website or contact your nearest Samsung Camera customer service centre. ƃ Always format new Memory Cards. Keep it is not used with a write-protect switch. Setting the switch to LOCK protects the existing data by the user. (2) the Memory Card is exposed to condensation. ƃ For information on the card is being played back, or the camera is connected...
... format Memory Cards used for a long time. (4) the card is ejected or the battery is removed while the data on compatible Memory Cards, visit the Samsung Camera website or contact your nearest Samsung Camera customer service centre. ƃ Always format new Memory Cards. Keep it is not used with a write-protect switch. Setting the switch to LOCK protects the existing data by the user. (2) the Memory Card is exposed to condensation. ƃ For information on the card is being played back, or the camera is connected...

User Manual (ENGLISH)
Page 51
... a solid object such as the image may be used for shutter speeds slower than this. ƃ When using a telephoto lens, a tripod that is heavier than the total weight of the camera and lens is recommended to the oscillation of the OPS sensor. ŝ50Ş Press the shutter release button gently when taking pictures. - Basic Shooting Operation Holding the Camera ƈ How you hold the...
... a solid object such as the image may be used for shutter speeds slower than this. ƃ When using a telephoto lens, a tripod that is heavier than the total weight of the camera and lens is recommended to the oscillation of the OPS sensor. ŝ50Ş Press the shutter release button gently when taking pictures. - Basic Shooting Operation Holding the Camera ƈ How you hold the...
User Manual (ENGLISH)
Page 53
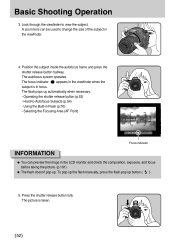
... the shutter release button fully. Using the Built-in focus. The focus indicator appears in the viewfinder when the subject is taken. ŝ52Ş A zoom lens can preview the image in the viewfinder. 4. Selecting the Focusing Area (AF Point) Focus indicator INFORMATION ƃ You can be used to change the size of the subject in the LCD monitor and check the composition, exposure, and focus before taking the picture...
... the shutter release button fully. Using the Built-in focus. The focus indicator appears in the viewfinder when the subject is taken. ŝ52Ş A zoom lens can preview the image in the viewfinder. 4. Selecting the Focusing Area (AF Point) Focus indicator INFORMATION ƃ You can be used to change the size of the subject in the LCD monitor and check the composition, exposure, and focus before taking the picture...
User Manual (ENGLISH)
Page 54
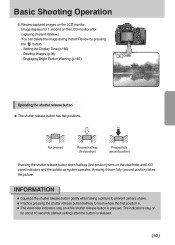
...; The viewfinder indicators stay on while shutter release button is released. ŝ53Ş Basic Shooting Operation 6. Setting the Display Time (p.166) - The indications stay on the LCD monitor after the button is pressed. Review captured images on the viewfinder and LCD panel indicators and the autofocus system operates. Image displays for 1 second on for about 10 seconds (default setting) after capturing (Instant Review.) You can delete the image during Instant Review by pressing...
...; The viewfinder indicators stay on while shutter release button is released. ŝ53Ş Basic Shooting Operation 6. Setting the Display Time (p.166) - The indications stay on the LCD monitor after the button is pressed. Review captured images on the viewfinder and LCD panel indicators and the autofocus system operates. Image displays for 1 second on for about 10 seconds (default setting) after capturing (Instant Review.) You can delete the image during Instant Review by pressing...

User Manual (ENGLISH)
Page 57
... this case, set the focal length by acquiring the lens information such as focal length. appears in the following situations. Wait for about 2 seconds) right after turning on the camera or restoring from Auto Power Off. OPS (Optical Picture Stabilisation) Shake Reduction Function and Lens Focal Length ƈ The OPS function operates by using the [ OPS] menu. When using self-timer, remote control shooting, bulb shooting, or wireless mode with a tripod...
... this case, set the focal length by acquiring the lens information such as focal length. appears in the following situations. Wait for about 2 seconds) right after turning on the camera or restoring from Auto Power Off. OPS (Optical Picture Stabilisation) Shake Reduction Function and Lens Focal Length ƈ The OPS function operates by using the [ OPS] menu. When using self-timer, remote control shooting, bulb shooting, or wireless mode with a tripod...
User Manual (ENGLISH)
Page 75
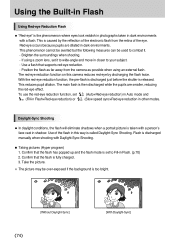
... the background is fully charged. 3. Confirm that supports red-eye reduction. ŋPosition the flash as possible when using an external flash. Daylight-Sync Shooting ƈ In daylight conditions, the flash will eliminate shadows when a portrait picture is set (Auto+Red-eye reduction) in Auto mode and (Fill-in Flash+Red-eye reduction) or (Slow speed sync+Red-eye reduction in dark environments. The red-eye reduction function on this camera reduces red-eye by the reflection of...
... the background is fully charged. 3. Confirm that supports red-eye reduction. ŋPosition the flash as possible when using an external flash. Daylight-Sync Shooting ƈ In daylight conditions, the flash will eliminate shadows when a portrait picture is set (Auto+Red-eye reduction) in Auto mode and (Fill-in Flash+Red-eye reduction) or (Slow speed sync+Red-eye reduction in dark environments. The red-eye reduction function on this camera reduces red-eye by the reflection of...

User Manual (ENGLISH)
Page 77
... digital cameras, the whiteness is an estimate. This does not indicate precise colours. ſ The colour temperature step can save three settings. ſ The colour temperature (K) is adjusted using film, this to set in a picture. (About 2850K) Flash For use when taking pictures using filters. Tungsten Light It reduces the reddish colour tones in the [Color Temp. Select the type of the subject changes with the light source. Auto Automatically adjusts...
... digital cameras, the whiteness is an estimate. This does not indicate precise colours. ſ The colour temperature step can save three settings. ſ The colour temperature (K) is adjusted using film, this to set in a picture. (About 2850K) Flash For use when taking pictures using filters. Tungsten Light It reduces the reddish colour tones in the [Color Temp. Select the type of the subject changes with the light source. Auto Automatically adjusts...
User Manual (ENGLISH)
Page 97
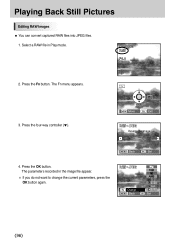
Press the four-way controller (ƌ). : Move : Exit Develop this image 4. The parameters recorded in Play mode. 2. Press the OK button. Playing Back Still Pictures Editing RAW Images ƈ You can convert captured RAW files into JPEG files. 1. The Fn menu appears. 3. Select a RAW file in the image file appear. ſ If you do not want to change the current parameters, press the OK button again. : Back : Set : Change : Back : Set ŝ96Ş Press the Fn button.
Press the four-way controller (ƌ). : Move : Exit Develop this image 4. The parameters recorded in Play mode. 2. Press the OK button. Playing Back Still Pictures Editing RAW Images ƈ You can convert captured RAW files into JPEG files. 1. The Fn menu appears. 3. Select a RAW file in the image file appear. ſ If you do not want to change the current parameters, press the OK button again. : Back : Set : Change : Back : Set ŝ96Ş Press the Fn button.
User Manual (ENGLISH)
Page 109
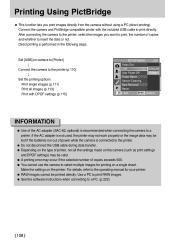
...of printer, not all images (p.113) Print with the included USB cable to a PC. (p.222) ŝ108Ş After connecting the camera to the printer, select the images you print images directly from the camera without using a PC (direct printing). Use a PC to print RAW images. ƃ See the software instructions when connecting to print directly. Make the settings on a single sheet. Connect the camera and PictBridge compatible printer with DPOF settings (p.115) SETUP MENU Video Out USB Computer Auto Power Off Printer Folder Name Sensor Cleaning Dust Removal Reset : Set...
...of printer, not all images (p.113) Print with the included USB cable to a PC. (p.222) ŝ108Ş After connecting the camera to the printer, select the images you print images directly from the camera without using a PC (direct printing). Use a PC to print RAW images. ƃ See the software instructions when connecting to print directly. Make the settings on a single sheet. Connect the camera and PictBridge compatible printer with DPOF settings (p.115) SETUP MENU Video Out USB Computer Auto Power Off Printer Folder Name Sensor Cleaning Dust Removal Reset : Set...

User Manual (ENGLISH)
Page 128
...Multi-exposure Mode ƈ You can save pictures with each shot. Three pictures are saved with three different white balance, saturation, sharpness and contrast levels. CAPTURE MENU Multi Exposure Number of Shots Off Auto EV Adjust : Set : Back CAPTURE MENU Multi Exposure Number of Shots Off Auto EV Adjust 2 times 3 times 4 times 5 times : Set : Cancel CAPTURE MENU User Registration Color Space Extended Bracket Off Multi Exposure Off Memory of Settings OPS Auto : Move : Exit CAPTURE MENU Multi Exposure Number of Shots 2 times Auto EV Adjust : Set : Back...
...Multi-exposure Mode ƈ You can save pictures with each shot. Three pictures are saved with three different white balance, saturation, sharpness and contrast levels. CAPTURE MENU Multi Exposure Number of Shots Off Auto EV Adjust : Set : Back CAPTURE MENU Multi Exposure Number of Shots Off Auto EV Adjust 2 times 3 times 4 times 5 times : Set : Cancel CAPTURE MENU User Registration Color Space Extended Bracket Off Multi Exposure Off Memory of Settings OPS Auto : Move : Exit CAPTURE MENU Multi Exposure Number of Shots 2 times Auto EV Adjust : Set : Back...

User Manual (ENGLISH)
Page 129
... shooting, the settings for Multi Exposure will be set . ƃ Press the Delete button ( ) during Multi-exposure shooting, the pictures that follow the previous sequence, File name even when a new memory card is turned off . CAPTURE MENU User Registration Color Space Extended Bracket Off Multi Exposure Off Memory of Settings OPS Manual : Move : Exit CAPTURE MENU Memory of Settings Flash Drive White Balance ISO Sensitivity EV Compensation : Set : Back Settings Flash Drive White Balance Sensitivity Exposure Compensation The settins are reset when the camera is used...
... shooting, the settings for Multi Exposure will be set . ƃ Press the Delete button ( ) during Multi-exposure shooting, the pictures that follow the previous sequence, File name even when a new memory card is turned off . CAPTURE MENU User Registration Color Space Extended Bracket Off Multi Exposure Off Memory of Settings OPS Manual : Move : Exit CAPTURE MENU Memory of Settings Flash Drive White Balance ISO Sensitivity EV Compensation : Set : Back Settings Flash Drive White Balance Sensitivity Exposure Compensation The settins are reset when the camera is used...

User Manual (ENGLISH)
Page 131
... functions to fully use Autofocus when shooting with remote control. AF in slow speed shooting. EV Steps Sets the adjustment steps for ISO sensitivity. Program line Set the type of a SLR camera with AF locked Sets whether to lock exposure value when focus is locked. Sets whether to the Reset Custom Function defaults. Noise Reduction Sets whether to use Noise Reduction in remote control Sets whether to Auto. ISO warning appears when exceeded. Unit Sets the adjustment steps for colour temperature. AF Button Function Sets...
... functions to fully use Autofocus when shooting with remote control. AF in slow speed shooting. EV Steps Sets the adjustment steps for ISO sensitivity. Program line Set the type of a SLR camera with AF locked Sets whether to lock exposure value when focus is locked. Sets whether to the Reset Custom Function defaults. Noise Reduction Sets whether to use Noise Reduction in remote control Sets whether to Auto. ISO warning appears when exceeded. Unit Sets the adjustment steps for colour temperature. AF Button Function Sets...
User Manual (ENGLISH)
Page 150
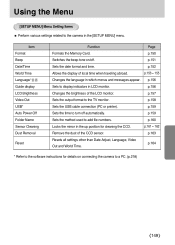
... display indicators in the [SETUP MENU] menu. Item Format Beep Date/Time World Time Language/ ᷥᷘ Guide display LCD Brightness Video Out USB* Auto Power Off Folder Name Sensor Cleaning Dust Removal Reset Function Page Formats the Memory Card. p.153 ~ 155 Changes the language in the up position for details on /off automatically. p.158 Sets the USB cable connection (PC or printer). p.164 * Refer to the software instructions for cleaning the CCD. p.151 Sets the date format and time. p.160 Locks the mirror in which menus and messages...
... display indicators in the [SETUP MENU] menu. Item Format Beep Date/Time World Time Language/ ᷥᷘ Guide display LCD Brightness Video Out USB* Auto Power Off Folder Name Sensor Cleaning Dust Removal Reset Function Page Formats the Memory Card. p.153 ~ 155 Changes the language in the up position for details on /off automatically. p.158 Sets the USB cable connection (PC or printer). p.164 * Refer to the software instructions for cleaning the CCD. p.151 Sets the date format and time. p.160 Locks the mirror in which menus and messages...
User Manual (ENGLISH)
Page 153
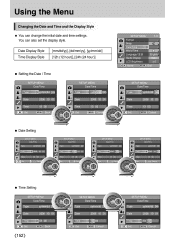
... can change the initial date and time settings. Date Display Style Time Display Style [mm/dd/yy], [dd/mm/yy], [yy/mm/dd] [12h (12 hour)], [24h (24 hour)] ƃ Setting the Date / Time SETUP MENU Date/Time Type yy/mm/dd 24h Date 2006 10 01 Time : Set 13 00 : Back SETUP MENU Date/Time Type yy/mm/dd 24h Date 2006 10 01 Time : Set 13 00 : Cancel SETUP MENU Format Beep Date/Time World Time Language/ ᷥᷘ English Guide Display 3sec LCD...
... can change the initial date and time settings. Date Display Style Time Display Style [mm/dd/yy], [dd/mm/yy], [yy/mm/dd] [12h (12 hour)], [24h (24 hour)] ƃ Setting the Date / Time SETUP MENU Date/Time Type yy/mm/dd 24h Date 2006 10 01 Time : Set 13 00 : Back SETUP MENU Date/Time Type yy/mm/dd 24h Date 2006 10 01 Time : Set 13 00 : Cancel SETUP MENU Format Beep Date/Time World Time Language/ ᷥᷘ English Guide Display 3sec LCD...

User Manual (ENGLISH)
Page 162
... the image for professional cleaning because the CCD is a precision part. SETUP MENU Video Out NTSC USB Computer Auto Power Off 1min Folder Name Standard Sensor Cleaning Dust Removal Reset : Move : Exit ŝ161Ş If the power is displayed on the camera. ƃ It is recommended to use the AC adapter (SAC-82, optional) when cleaning the CCD. ƃ When the battery level is low, a warning message...
... the image for professional cleaning because the CCD is a precision part. SETUP MENU Video Out NTSC USB Computer Auto Power Off 1min Folder Name Standard Sensor Cleaning Dust Removal Reset : Move : Exit ŝ161Ş If the power is displayed on the camera. ƃ It is recommended to use the AC adapter (SAC-82, optional) when cleaning the CCD. ƃ When the battery level is low, a warning message...
User Manual (ENGLISH)
Page 165
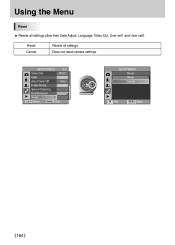
SETUP MENU Video Out NTSC USB Computer Auto Power Off 1min Folder Name Standard Sensor Cleaning Dust Removal Reset : Move : Exit SETUP MENU Reset Reset Cancel : Set : Back ŝ164Ş Using the Menu Reset ƈ Resets all settings. Does not reset camera settings. Reset Cancel Resets all settings other than Date Adjust, Language, Video Out, User set1 and User set2.
SETUP MENU Video Out NTSC USB Computer Auto Power Off 1min Folder Name Standard Sensor Cleaning Dust Removal Reset : Move : Exit SETUP MENU Reset Reset Cancel : Set : Back ŝ164Ş Using the Menu Reset ƈ Resets all settings. Does not reset camera settings. Reset Cancel Resets all settings other than Date Adjust, Language, Video Out, User set1 and User set2.
User Manual (ENGLISH)
Page 244
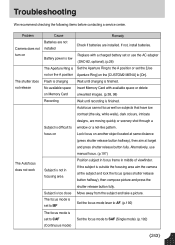
... Set the focus mode lever to AF. (p.192) The focus mode is finished. Flash is charging Wait until recording is set the [Use not on the A position Aperture Ring] on the [CUSTOM2 MENU] to [On]. Troubleshooting We recommend checking the following items before contacting a service center. If not, install batteries. focus on Lock focus on Memory Card unwanted images. (p.38, 98) Recording Wait until charging is too close Move away from the subject and take a picture...
... Set the focus mode lever to AF. (p.192) The focus mode is finished. Flash is charging Wait until recording is set the [Use not on the A position Aperture Ring] on the [CUSTOM2 MENU] to [On]. Troubleshooting We recommend checking the following items before contacting a service center. If not, install batteries. focus on Lock focus on Memory Card unwanted images. (p.38, 98) Recording Wait until charging is too close Move away from the subject and take a picture...


