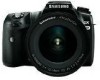
User Manual (ENGLISH)
Page 2
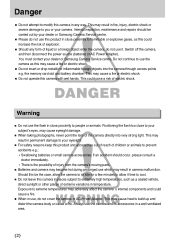
...which , if not avoided, will help prevent danger and injury to others. For Safe Use of Your Camera Thank you for buying a Samsung Digital Camera. ƃ Prior to using this camera, please read this manual are registered trademarks of their respective companies. ſ Specifications are registered trademarks of ...product names appearing in this user manual thoroughly. ƃ When you require After Sales service, please bring the camera and the cause of the camera malfunction (such as battery, Memory card etc.) to the After Sales centre. ƃ To avoid disappointment please ensure that your...
...which , if not avoided, will help prevent danger and injury to others. For Safe Use of Your Camera Thank you for buying a Samsung Digital Camera. ƃ Prior to using this camera, please read this manual are registered trademarks of their respective companies. ſ Specifications are registered trademarks of ...product names appearing in this user manual thoroughly. ƃ When you require After Sales service, please bring the camera and the cause of the camera malfunction (such as battery, Memory card etc.) to the After Sales centre. ƃ To avoid disappointment please ensure that your...
User Manual (ENGLISH)
Page 3
...a well-ventilated area. ŝ2Ş Warning ƈ Do not use which may result in permanent damage to your dealer or Samsung Camera Service centre. You must contact your eyesight. ƈ For safety reasons keep this product and accessories out of reach of extreme ...adversely affect the cameraŖs internal components and could pose a risk of the camera directly into the camera through access points e.g. Danger ƈ Do not attempt to modify this may become hot during prolonged use the flash in close proximity to people or animals. the memory card slot and battery...
...a well-ventilated area. ŝ2Ş Warning ƈ Do not use which may result in permanent damage to your dealer or Samsung Camera Service centre. You must contact your eyesight. ƈ For safety reasons keep this product and accessories out of reach of extreme ...adversely affect the cameraŖs internal components and could pose a risk of the camera directly into the camera through access points e.g. Danger ƈ Do not attempt to modify this may become hot during prolonged use the flash in close proximity to people or animals. the memory card slot and battery...

User Manual (ENGLISH)
Page 6
...2 Warning 2 Caution 3 Precautions for Battery Usage 3 Precautions for Charger Usage 4 Contents 5 Contents of the Operating Manual 10 Before Using Your Camera ƃGX-10 Camera Characteristics 12 ƃChecking the Contents of the Package 14 ƃNames of Working Parts 15 ƈFront 15 ƈBack 15 ƈ... battery 34 ƈBattery Level Indicator / Approximate Playback Time (new batteries 36 ƈUsing the Optional AC Adapter 37 ƃUsing the memory card 38 ƈInserting / Removing the Memory Card 38 ƈPrecautions When Using the Memory Card 39 ŝ5Ş
...2 Warning 2 Caution 3 Precautions for Battery Usage 3 Precautions for Charger Usage 4 Contents 5 Contents of the Operating Manual 10 Before Using Your Camera ƃGX-10 Camera Characteristics 12 ƃChecking the Contents of the Package 14 ƃNames of Working Parts 15 ƈFront 15 ƈBack 15 ƈ... battery 34 ƈBattery Level Indicator / Approximate Playback Time (new batteries 36 ƈUsing the Optional AC Adapter 37 ƃUsing the memory card 38 ƈInserting / Removing the Memory Card 38 ƈPrecautions When Using the Memory Card 39 ŝ5Ş
User Manual (ENGLISH)
Page 9
...ƈSaving rotation information / Illuminating LCD panel 147 ƈReset Custom Function2 148 ƃ[SETUP MENU] Menu Setting Items 149 ƈFormatting the Memory Card 150 ƈTurning the Beep On and Off 151 ƈChanging the Date and Time and the Display Style 152 ƈSetting the World Time... ƈRemoving the dust 163 ƈReset 164 ƃ[PLAYBACK MENU] Menu Setting Items / Exposure warning 165 ƈInstant View 166 ƈDigital Preview / Digital Filter 167 ƈSlide show 168 ƃUsing the Fn Menu 169 ƈCapture Mode 169 ƈPlayback Mode 170 ŝ8Ş
...ƈSaving rotation information / Illuminating LCD panel 147 ƈReset Custom Function2 148 ƃ[SETUP MENU] Menu Setting Items 149 ƈFormatting the Memory Card 150 ƈTurning the Beep On and Off 151 ƈChanging the Date and Time and the Display Style 152 ƈSetting the World Time... ƈRemoving the dust 163 ƈReset 164 ƃ[PLAYBACK MENU] Menu Setting Items / Exposure warning 165 ƈInstant View 166 ƈDigital Preview / Digital Filter 167 ƈSlide show 168 ƃUsing the Fn Menu 169 ƈCapture Mode 169 ƈPlayback Mode 170 ŝ8Ş
User Manual (ENGLISH)
Page 17
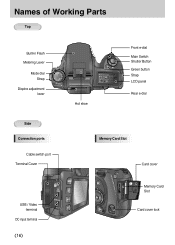
Names of Working Parts Top Built-in Flash Metering Lever Mode dial Strap Dioptre adjustment lever Side Connection ports Cable switch port Terminal Cover Hot shoe Front e-dial Main Switch Shutter Button Green button Strap LCD panel Rear e-dial Memory Card Slot Card cover USB / Video terminal DC input terminal ŝ16Ş Memory Card Slot Card cover lock
Names of Working Parts Top Built-in Flash Metering Lever Mode dial Strap Dioptre adjustment lever Side Connection ports Cable switch port Terminal Cover Hot shoe Front e-dial Main Switch Shutter Button Green button Strap LCD panel Rear e-dial Memory Card Slot Card cover USB / Video terminal DC input terminal ŝ16Ş Memory Card Slot Card cover lock

User Manual (ENGLISH)
Page 32
Be sure to taking pictures. 2 Getting Started This chapter explains your first steps from purchasing the camera to read it and follow the instructions. Attaching the Strap 32 Connecting to a Power Source 33 Using the memory card 38 Turning the Camera On and Off 41 Initial Settings 42 Attaching the Lens 46 Adjusting the Viewfinder Dioptre 48 31
Be sure to taking pictures. 2 Getting Started This chapter explains your first steps from purchasing the camera to read it and follow the instructions. Attaching the Strap 32 Connecting to a Power Source 33 Using the memory card 38 Turning the Camera On and Off 41 Initial Settings 42 Attaching the Lens 46 Adjusting the Viewfinder Dioptre 48 31
User Manual (ENGLISH)
Page 38
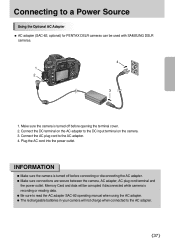
... adapter, AC plug cord terminal and the power outlet. Connecting to the DC input terminal on the camera. 3. Connect the AC plug cord to the AC adapter. ŝ37Ş Memory Card and data will not charge when connected to the AC adapter. 4. Plug the AC cord into the power... ƃ Make sure the camera is recording or reading data. ƃ Be sure to read the AC adapter SAC-82 operating manual when using the AC adapter. ƃ The rechargeable batteries in your camera will be used with SAMSUNG DSLR cameras. 4 1 2 3 1. Make sure the camera is turned off before opening the...
... adapter, AC plug cord terminal and the power outlet. Connecting to the DC input terminal on the camera. 3. Connect the AC plug cord to the AC adapter. ŝ37Ş Memory Card and data will not charge when connected to the AC adapter. 4. Plug the AC cord into the power... ƃ Make sure the camera is recording or reading data. ƃ Be sure to read the AC adapter SAC-82 operating manual when using the AC adapter. ƃ The rechargeable batteries in your camera will be used with SAMSUNG DSLR cameras. 4 1 2 3 1. Make sure the camera is turned off before opening the...
User Manual (ENGLISH)
Page 39
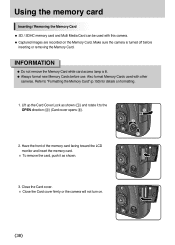
... rotate it to "Formatting the Memory Card" (p.150) for details on formatting. 1. Also format Memory Cards used with other cameras. Make sure the camera is lit. ƃ Always format new Memory Cards before inserting or removing the Memory Card. Using the memory card Inserting / Removing the Memory Card ƈ SD / SDHC memory card and Multi Media Card can be used with this camera. ƈ Captured images are recorded...
... rotate it to "Formatting the Memory Card" (p.150) for details on formatting. 1. Also format Memory Cards used with other cameras. Make sure the camera is lit. ƃ Always format new Memory Cards before inserting or removing the Memory Card. Using the memory card Inserting / Removing the Memory Card ƈ SD / SDHC memory card and Multi Media Card can be used with this camera. ƈ Captured images are recorded...

User Manual (ENGLISH)
Page 40
... connected to condensation. ƃ For information on the Memory Card may be damaged beyond use. ƃ Data on compatible Memory Cards, visit the Samsung Camera website or contact your nearest Samsung Camera customer service centre. ƃ Always format new Memory Cards. Also format Memory Cards used for data that is deleted if (1) the Memory Card is mishandled by preventing the recording of new data...
... connected to condensation. ƃ For information on the Memory Card may be damaged beyond use. ƃ Data on compatible Memory Cards, visit the Samsung Camera website or contact your nearest Samsung Camera customer service centre. ƃ Always format new Memory Cards. Also format Memory Cards used for data that is deleted if (1) the Memory Card is mishandled by preventing the recording of new data...
User Manual (ENGLISH)
Page 41
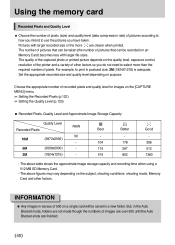
...saved in a new folder. The quality of the captured photo or printed picture depends on a single card will be recorded on the subject, shooting conditions, shooting mode, Memory Card and other factors so you have taken. Choose the appropriate number of 500 on the quality level, exposure... 30 10M (3872x2592) - 6M (3008x2000) - - - - 104 178 306 174 297 512 2M (1824x1216) - 474 802 1360 - Using the memory card Recorded Pixels and Quality Level ƈ Choose the number of pixels (size) and quality level (data compression rate) of pictures according to how you intend...
...saved in a new folder. The quality of the captured photo or printed picture depends on a single card will be recorded on the subject, shooting conditions, shooting mode, Memory Card and other factors so you have taken. Choose the appropriate number of 500 on the quality level, exposure... 30 10M (3872x2592) - 6M (3008x2000) - - - - 104 178 306 174 297 512 2M (1824x1216) - 474 802 1360 - Using the memory card Recorded Pixels and Quality Level ƈ Choose the number of pixels (size) and quality level (data compression rate) of pictures according to how you intend...

User Manual (ENGLISH)
Page 91
To start continuous playback, use the four-way controller (ȜȞ) to select an image to be displayed first. The most recently captured image (image with the largest file number) is displayed first on your Memory Card successively. Press the Fn button. Playing Back Still Pictures Slideshow ƈ You can play back all images recorded on the LCD monitor. 2. Press the button and use the menu screen displayed on the LCD monitor. 1. The Fn menu appears. ŝ90Ş : Move : Exit
To start continuous playback, use the four-way controller (ȜȞ) to select an image to be displayed first. The most recently captured image (image with the largest file number) is displayed first on your Memory Card successively. Press the Fn button. Playing Back Still Pictures Slideshow ƈ You can play back all images recorded on the LCD monitor. 2. Press the button and use the menu screen displayed on the LCD monitor. 1. The Fn menu appears. ŝ90Ş : Move : Exit
User Manual (ENGLISH)
Page 100
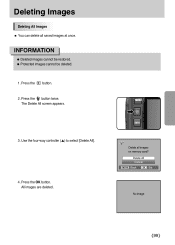
Delete All Cancel : Back : Set No image ŝ99Ş Press the button twice. All images are deleted. INFORMATION ƃ Deleted images cannot be restored. ƃ Protected images cannot be deleted. 1. The Delete All screen appears. 3. Delete all saved images at once. Press the button. 2. Deleting Images Deleting All Images ƈ You can delete all images on memory card? Press the OK button. Use the four-way controller (Ɗ) to select [Delete All]. 4.
Delete All Cancel : Back : Set No image ŝ99Ş Press the button twice. All images are deleted. INFORMATION ƃ Deleted images cannot be restored. ƃ Protected images cannot be deleted. 1. The Delete All screen appears. 3. Delete all saved images at once. Press the button. 2. Deleting Images Deleting All Images ƈ You can delete all images on memory card? Press the OK button. Use the four-way controller (Ɗ) to select [Delete All]. 4.
User Manual (ENGLISH)
Page 104
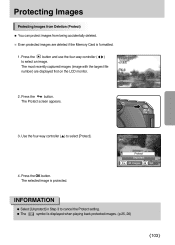
... 3 to cancel the Protect setting. ƃ The symbol is protected. The most recently captured images (image with the largest file number) are deleted if the Memory Card is formatted. 1. Press the OK button. The Protect screen appears. 3. The selected image is displayed when playing back protected images. (p.25, 26) ŝ103Ş...
... 3 to cancel the Protect setting. ƃ The symbol is protected. The most recently captured images (image with the largest file number) are deleted if the Memory Card is formatted. 1. Press the OK button. The Protect screen appears. 3. The selected image is displayed when playing back protected images. (p.25, 26) ŝ103Ş...
User Manual (ENGLISH)
Page 105
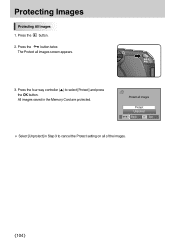
Press the button. 2. Press the button twice. All images saved in Step 3 to select [Protect] and press the OK button. Protect all images Protect Unprotect : Back : Set ſ Select [Unprotect] in the Memory Card are protected. The Protect all of the images. ŝ104Ş Press the four-way controller (Ɗ) to cancel the Protect setting on all images screen appears. 3. Protecting Images Protecting All Images 1.
Press the button. 2. Press the button twice. All images saved in Step 3 to select [Protect] and press the OK button. Protect all images Protect Unprotect : Back : Set ſ Select [Unprotect] in the Memory Card are protected. The Protect all of the images. ŝ104Ş Press the four-way controller (Ɗ) to cancel the Protect setting on all images screen appears. 3. Protecting Images Protecting All Images 1.
User Manual (ENGLISH)
Page 106
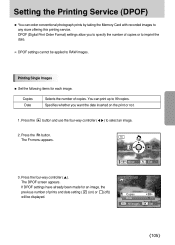
DPOF (Digital Print Order Format) settings allow you want the date inserted on ) or (off)) will be applied to specify the number of prints and date setting ( (... the four-way controller (ȜȞ) to 99 copies. Copies Date Selects the number of copies. You can order conventional photograph prints by taking the Memory Card with recorded images to imprint the date. ſ DPOF settings cannot be displayed. : Move : Exit Copies Date : All images : Set ŝ105Ş The Fn...
DPOF (Digital Print Order Format) settings allow you want the date inserted on ) or (off)) will be applied to specify the number of prints and date setting ( (... the four-way controller (ȜȞ) to 99 copies. Copies Date Selects the number of copies. You can order conventional photograph prints by taking the Memory Card with recorded images to imprint the date. ſ DPOF settings cannot be displayed. : Move : Exit Copies Date : All images : Set ŝ105Ş The Fn...

User Manual (ENGLISH)
Page 129
... Instant Review to discard pictures created to save when the camera is turned off. After using numbers that point and create again from 0001 even after deleting all or inserting a new memory card. ŝ128Ş Memory setting ƈ You can select which settings to that ...follow the previous sequence, File name even when a new memory card is turned off . The settings are maintained when the camera is used together. CAPTURE MENU User...
... Instant Review to discard pictures created to save when the camera is turned off. After using numbers that point and create again from 0001 even after deleting all or inserting a new memory card. ŝ128Ş Memory setting ƈ You can select which settings to that ...follow the previous sequence, File name even when a new memory card is turned off . The settings are maintained when the camera is used together. CAPTURE MENU User...
User Manual (ENGLISH)
Page 145
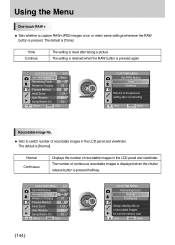
... 1time Remaining Count Release in Charging Off Preview Method Initial Zoom 1.2X Auto Rotation On Saving Rotation Info. The number of recordable images for current memory card : Set : Back ŝ144Ş The default is [1time]. 1time Continue The setting is reset after one shooting : Set : Back Recordable Image No. ƈ Sets...
... 1time Remaining Count Release in Charging Off Preview Method Initial Zoom 1.2X Auto Rotation On Saving Rotation Info. The number of recordable images for current memory card : Set : Back ŝ144Ş The default is [1time]. 1time Continue The setting is reset after one shooting : Set : Back Recordable Image No. ƈ Sets...
User Manual (ENGLISH)
Page 150
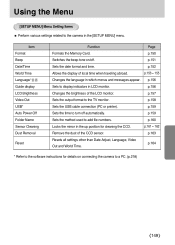
...when traveling abroad. p.159 Sets the method used to the TV monitor. p.150 Switches the beep tone on connecting the camera to a PC. (p.218) ŝ149Ş p.153 ~ 155 Changes the language in LCD monitor. p.157 ...SETUP MENU] menu. Using the Menu [SETUP MENU] Menu Setting Items ƈ Perform various settings related to the camera in the up position for details on /off automatically. p.152 Allows the display of the LCD monitor. p.158 ... Folder Name Sensor Cleaning Dust Removal Reset Function Page Formats the Memory Card. p.151 Sets the date format and time.
...when traveling abroad. p.159 Sets the method used to the TV monitor. p.150 Switches the beep tone on connecting the camera to a PC. (p.218) ŝ149Ş p.153 ~ 155 Changes the language in LCD monitor. p.157 ...SETUP MENU] menu. Using the Menu [SETUP MENU] Menu Setting Items ƈ Perform various settings related to the camera in the up position for details on /off automatically. p.152 Allows the display of the LCD monitor. p.158 ... Folder Name Sensor Cleaning Dust Removal Reset Function Page Formats the Memory Card. p.151 Sets the date format and time.
User Manual (ENGLISH)
Page 151
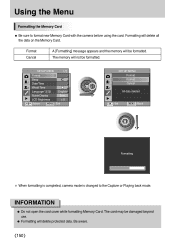
... All data deleted : Set : Back Formatting ſ When formatting is completed, camera mode is changed to format new Memory Card with the camera before using the card. INFORMATION ƃ Do not open the card cover while formatting Memory Card. Format Cancel A [Formatting] message appears and the memory will be damaged beyond use. ƃ Formatting will delete protected data. The...
... All data deleted : Set : Back Formatting ſ When formatting is completed, camera mode is changed to format new Memory Card with the camera before using the card. INFORMATION ƃ Do not open the card cover while formatting Memory Card. Format Cancel A [Formatting] message appears and the memory will be damaged beyond use. ƃ Formatting will delete protected data. The...
User Manual (ENGLISH)
Page 169
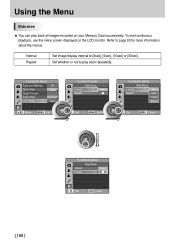
PLAYBACK MENU Exposure Warning Off Quick View 1sec Digital Preview Digital Filter Slide Show 3sec : Move : Exit PLAYBACK MENU Slide Show Interval 3sec Repeat : Set : Back PLAYBACK MENU Slide Show Interval ...3sec Repeat 5sec 10sec 30sec : Set : Cancel ŝ168Ş PLAYBACK MENU Slide Show Interval 3sec Repeat : Set : Back To start continuous playback, use the menu screen displayed on your Memory Card...
PLAYBACK MENU Exposure Warning Off Quick View 1sec Digital Preview Digital Filter Slide Show 3sec : Move : Exit PLAYBACK MENU Slide Show Interval 3sec Repeat : Set : Back PLAYBACK MENU Slide Show Interval ...3sec Repeat 5sec 10sec 30sec : Set : Cancel ŝ168Ş PLAYBACK MENU Slide Show Interval 3sec Repeat : Set : Back To start continuous playback, use the menu screen displayed on your Memory Card...


