User Manual (KOREAN)
Page 26
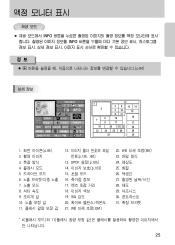
INFO INFO 정보 p.84) 1 p.85) 2 3 4 5 6 7 8 9 10 11 12 p.126, 160) 13. ISO 감도 20 21. WB BA) 23 24. 해상도 25. 화질 26. 색공간 27 28. 채도 29 30 31 * 4 11 25 WB GM) 22. DPOF 설정(p.105) 14 p.103) 15 16 17 18 19.
INFO INFO 정보 p.84) 1 p.85) 2 3 4 5 6 7 8 9 10 11 12 p.126, 160) 13. ISO 감도 20 21. WB BA) 23 24. 해상도 25. 화질 26. 색공간 27 28. 채도 29 30 31 * 4 11 25 WB GM) 22. DPOF 설정(p.105) 14 p.103) 15 16 17 18 19.
User Manual (ENGLISH)
Page 21
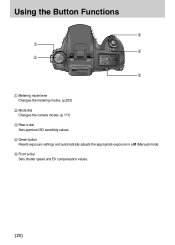
Using the Button Functions ڻ ڹMetering mode lever Changes the metering modes. (p.202) ںMode dial Changes the camera modes. (p.171) ڻRear e-dial Sets aperture ISO sensitivity values. ڼGreen button Resets exposure settings and automatically adjusts the appropriate exposure in a M (Manual) mode. ڽFront e-dial Sets shutter speed and EV compensation values. ŝ20Ş
Using the Button Functions ڻ ڹMetering mode lever Changes the metering modes. (p.202) ںMode dial Changes the camera modes. (p.171) ڻRear e-dial Sets aperture ISO sensitivity values. ڼGreen button Resets exposure settings and automatically adjusts the appropriate exposure in a M (Manual) mode. ڽFront e-dial Sets shutter speed and EV compensation values. ŝ20Ş

User Manual (ENGLISH)
Page 25
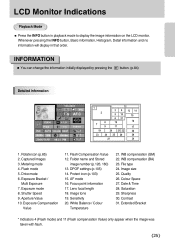
Detailed Information 1. Custom mode (p.187) 3. Exposure Compensation Value (p.204) 9. White balance (p.76) 16. File type (p.122) 20. Lens focal length (p.57) 26. Saturation (p.124) 27. World tiem (p.153) 31. Drive mode (p.60) 6. Exposure Bracket / Multi Exposure (p.206, 127) 11. Focus point location (p....
Detailed Information 1. Custom mode (p.187) 3. Exposure Compensation Value (p.204) 9. White balance (p.76) 16. File type (p.122) 20. Lens focal length (p.57) 26. Saturation (p.124) 27. World tiem (p.153) 31. Drive mode (p.60) 6. Exposure Bracket / Multi Exposure (p.206, 127) 11. Focus point location (p....
User Manual (ENGLISH)
Page 26
... ƃ You can change the information initially displayed by pressing the PB button. (p.84) Detailed Information 1. Exposure Bracket / Multi Exposure 7. Protect icon (p.103) 15. Sensitivity 20. Captured images 3. Shutter Speed 9. File type 24. Image size 25. Saturation 29. Extended Bracket * Indicators 4 (Flash mode) and 11 (Flash compensation Value) only appear when...
... ƃ You can change the information initially displayed by pressing the PB button. (p.84) Detailed Information 1. Exposure Bracket / Multi Exposure 7. Protect icon (p.103) 15. Sensitivity 20. Captured images 3. Shutter Speed 9. File type 24. Image size 25. Saturation 29. Extended Bracket * Indicators 4 (Flash mode) and 11 (Flash compensation Value) only appear when...
User Manual (ENGLISH)
Page 58
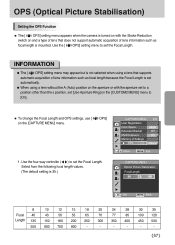
...setting menu to set the Focal Length. OPS] 1. OPS (Optical Picture Stabilisation) Setting the OPS Function ƈ The [ OPS] setting menu appears when the camera is turned on with the Shake Reduction switch on the [CAPTURE MENU] menu. INFORMATION ƃ The [ OPS] setting menu may appear but is mounted. Select...that supports automatic acquisition of Settings OPS Manual : Move : Exit CAPTURE MENU Optical Picture Stabilization Focal Length : Set : Back 8 10 12 15 18 20 24 28 30 35 Focal 40 43 50 55 65 70 77 85 100 120 Length 135 150 180 200 250 300 350 400 450...
...setting menu to set the Focal Length. OPS] 1. OPS (Optical Picture Stabilisation) Setting the OPS Function ƈ The [ OPS] setting menu appears when the camera is turned on with the Shake Reduction switch on the [CAPTURE MENU] menu. INFORMATION ƃ The [ OPS] setting menu may appear but is mounted. Select...that supports automatic acquisition of Settings OPS Manual : Move : Exit CAPTURE MENU Optical Picture Stabilization Focal Length : Set : Back 8 10 12 15 18 20 24 28 30 35 Focal 40 43 50 55 65 70 77 85 100 120 Length 135 150 180 200 250 300 350 400 450...
User Manual (ENGLISH)
Page 87
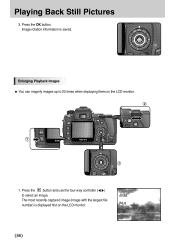
Playing Back Still Pictures 3. Enlarging Playback Images ƈ You can magnify images up to select an image. Press the OK button. The most recently captured image (image with the largest file number) is saved. Image rotation information is displayed first on the LCD monitor. 1. Press the button and use the four-way controller (ȜȞ) to 20 times when displaying them on the LCD monitor. ŝ86Ş
Playing Back Still Pictures 3. Enlarging Playback Images ƈ You can magnify images up to select an image. Press the OK button. The most recently captured image (image with the largest file number) is saved. Image rotation information is displayed first on the LCD monitor. 1. Press the button and use the four-way controller (ȜȞ) to 20 times when displaying them on the LCD monitor. ŝ86Ş
User Manual (ENGLISH)
Page 88
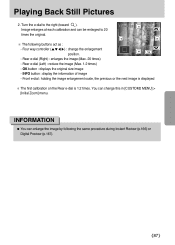
Rear e-dial (Right) : enlarges the image (Max. 20 times) - INFO button : display the information of image - Playing Back Still Pictures 2. Front e-dial : holding the image enlargement scale, the previous or the next image ... is 1.2 times. INFORMATION ƃ You can enlarge the image by following buttons act as : - Turn the e-dial to 20 times the original. ſ The following the same procedure during Instant Review (p.166) or Digital Preview (p.167). ŝ87Ş Rear e-dial (Left) : reduce the image (Max. 1.2 times) - Four way controller change this...
Rear e-dial (Right) : enlarges the image (Max. 20 times) - INFO button : display the information of image - Playing Back Still Pictures 2. Front e-dial : holding the image enlargement scale, the previous or the next image ... is 1.2 times. INFORMATION ƃ You can enlarge the image by following buttons act as : - Turn the e-dial to 20 times the original. ſ The following the same procedure during Instant Review (p.166) or Digital Preview (p.167). ŝ87Ş Rear e-dial (Left) : reduce the image (Max. 1.2 times) - Four way controller change this...

User Manual (ENGLISH)
Page 138
Kelvin Mired Sets the colour temperature by 20 Mired. Unit Kelvin Noise Reduction On : Move : Exit CUSTOM1 MENU Color Temp. Color Temp. On Uses Noise Reduction in slow speed shooting : Set : Back ŝ...
Kelvin Mired Sets the colour temperature by 20 Mired. Unit Kelvin Noise Reduction On : Move : Exit CUSTOM1 MENU Color Temp. Color Temp. On Uses Noise Reduction in slow speed shooting : Set : Back ŝ...
User Manual (ENGLISH)
Page 208
... Bracket and Multi exposure are not used for subsequent consecutive frames. ƃ The auto bracketing exposure setting will be taken before the flash is 20 seconds), the camera returns to change only the flash output continuously. In this case, auto focusing works for taking the first picture. ƃ You can take one...
... Bracket and Multi exposure are not used for subsequent consecutive frames. ƃ The auto bracketing exposure setting will be taken before the flash is 20 seconds), the camera returns to change only the flash output continuously. In this case, auto focusing works for taking the first picture. ƃ You can take one...
User Manual (ENGLISH)
Page 249
Speed Recharging Time External Flash Modes 23.5mm x 15.7mm CCD Approx. 10.20 Mega-pixel Approx. 10.75 Mega-pixel PENTAX KAF2 bayonet mount Schneider D-XENON, D-XENOGON Lens * All PENTAX DSLR lenses are available. * KAF2 mount lenses, KAF ...
Speed Recharging Time External Flash Modes 23.5mm x 15.7mm CCD Approx. 10.20 Mega-pixel Approx. 10.75 Mega-pixel PENTAX KAF2 bayonet mount Schneider D-XENON, D-XENOGON Lens * All PENTAX DSLR lenses are available. * KAF2 mount lenses, KAF ...
User Manual (ENGLISH)
Page 256
Index Drive Mode 60 E e-dial 20 Error Message 241 EV Compensation 204 Exposure 199 Exposure Mode 129 Exposure Warning 165 External flash 212 INFO button 84 Instant Review 166 ISO Sensitivity ...
Index Drive Mode 60 E e-dial 20 Error Message 241 EV Compensation 204 Exposure 199 Exposure Mode 129 Exposure Warning 165 External flash 212 INFO button 84 Instant Review 166 ISO Sensitivity ...
