User Manual
Page 2
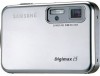
... [Removable Disk]. (p.128) ● If you will need to your PC, be damaged. Instructions ■ Use this camera in Application software CD-ROM. (p.117) Take a picture Take a picture. (p.24) Insert the USB cable Insert the supplied USB cable into the PC's USB port and the camera's USB connection terminal. (p.127) Check the camera's power Check the camera's power. If the power is contained in the following order Set up the camera driver. Please note that is turned off...
... [Removable Disk]. (p.128) ● If you will need to your PC, be damaged. Instructions ■ Use this camera in Application software CD-ROM. (p.117) Take a picture Take a picture. (p.24) Insert the USB cable Insert the supplied USB cable into the PC's USB port and the camera's USB connection terminal. (p.127) Check the camera's power Check the camera's power. If the power is contained in the following order Set up the camera driver. Please note that is turned off...

User Manual
Page 3
...;Self-timer lamp 12 ■Camera Status Lamp 12 ■Mode icon 12 ●Connecting to a Power Source 13 ■Using the SAC-41 14 ■Using the battery 18 ■Removing the battery 18 ●Instructions on how to use the memory card 19 ●Inserting the memory card 21 ●Removing the memory card 21 ●When Using the Camera for When Taking Pictures 30 ●Using the camera buttons to use the menu 49 ●Mode 49 ●Mode Set...
...;Self-timer lamp 12 ■Camera Status Lamp 12 ■Mode icon 12 ●Connecting to a Power Source 13 ■Using the SAC-41 14 ■Using the battery 18 ■Removing the battery 18 ●Instructions on how to use the memory card 19 ●Inserting the memory card 21 ●Removing the memory card 21 ●When Using the Camera for When Taking Pictures 30 ●Using the camera buttons to use the menu 49 ●Mode 49 ●Mode Set...

User Manual
Page 4
... recording date 98 ●Sound 99 ●Connecting an External Device (USB) 99 ●Auto Focus lamp 100 ●LCD brightness 100 ●Selecting Video out type 101 ●Quick view 103 ●Initialisation 103 ●Setting up the Mycam menu 104 ●Start up image 104 ●Start up sound 105 ●Shutter sound 105 ●Important notes 106 ●Warning indicator 108 ●Before contacting a service centre 109 ●Specifications 112 SOFTWARE...
... recording date 98 ●Sound 99 ●Connecting an External Device (USB) 99 ●Auto Focus lamp 100 ●LCD brightness 100 ●Selecting Video out type 101 ●Quick view 103 ●Initialisation 103 ●Setting up the Mycam menu 104 ●Start up image 104 ●Start up sound 105 ●Shutter sound 105 ●Important notes 106 ●Warning indicator 108 ●Before contacting a service centre 109 ●Specifications 112 SOFTWARE...

User Manual
Page 7
...; Remove the battery when not planning to use , always switch off the camera before moving the camera. Battery may cause burns. ■ Do not move the camera while it is in operation, please try one or more of the following measures. ■ Change the location and direction of any interference occur when this device is in accordance with the instructions, it continuously. It...
...; Remove the battery when not planning to use , always switch off the camera before moving the camera. Battery may cause burns. ■ Do not move the camera while it is in operation, please try one or more of the following measures. ■ Change the location and direction of any interference occur when this device is in accordance with the instructions, it continuously. It...

User Manual
Page 12
... lamp blinks while saving the image data and turns off when the camera is ready to take a picture The lamp lights up (LCD monitor turns off after initializing the device) The lamp blinks (LCD monitor turns off) When the USB cable is inserted to a printer The lamp lights up When the printer is printing The lamp blinks ■ Mode icon : Refer to page 40, 41 for more information about the camera mode setting. MODE MOVIE CLIP VOICE RECORDING AUTO MANUAL SF PLAY Icon MODE...
... lamp blinks while saving the image data and turns off when the camera is ready to take a picture The lamp lights up (LCD monitor turns off after initializing the device) The lamp blinks (LCD monitor turns off) When the USB cable is inserted to a printer The lamp lights up When the printer is printing The lamp blinks ■ Mode icon : Refer to page 40, 41 for more information about the camera mode setting. MODE MOVIE CLIP VOICE RECORDING AUTO MANUAL SF PLAY Icon MODE...

User Manual
Page 13
...;C) can lose power over time and are measured under Samsung's standard conditions and Shooting conditions and may vary depending on the way of images Approx. 90 MIN Approx. 180 Movie Recording time Approx. 90 MIN Based on the following shooting conditions Using the fully charged battery Auto mode, 5M image size Fine image quality, Shot to charge the battery before using the camera. ■ SLB-0737 rechargeable battery Specification Model Type Capacity Voltage Charging time SLB-0737...
...;C) can lose power over time and are measured under Samsung's standard conditions and Shooting conditions and may vary depending on the way of images Approx. 90 MIN Approx. 180 Movie Recording time Approx. 90 MIN Based on the following shooting conditions Using the fully charged battery Auto mode, 5M image size Fine image quality, Shot to charge the battery before using the camera. ■ SLB-0737 rechargeable battery Specification Model Type Capacity Voltage Charging time SLB-0737...

User Manual
Page 17
... Status Being charged Red LED is blinking Charging error Green LED is on Charging is not properly inserted - Plug the AC cord's power plug into the charger. 2. The red charge indicator indicates normal charging. 4. The battery is complete INFORMATION ● If the charge indicator blinks as red, it indicates a battery charging error. - Place the (-) and (+) terminals of the battery in the correct position. Connecting to a Power Source ■ How to the user manual for more information about using the SBC...
... Status Being charged Red LED is blinking Charging error Green LED is on Charging is not properly inserted - Plug the AC cord's power plug into the charger. 2. The red charge indicator indicates normal charging. 4. The battery is complete INFORMATION ● If the charge indicator blinks as red, it indicates a battery charging error. - Place the (-) and (+) terminals of the battery in the correct position. Connecting to a Power Source ■ How to the user manual for more information about using the SBC...

User Manual
Page 21
If the memory card does not slide in the image and release. 2. Turn the power off . 《21》 INFORMATION ● When the camera is turned on, inserting or removing the memory card turns the camera power off using the power button. Inserting the memory card 1. Removing the memory card 1. To close the battery chamber cover. Open the battery chamber cover and press the memory card as shown in smoothly, do not attempt to open. 2. Remove the memory card and close...
If the memory card does not slide in the image and release. 2. Turn the power off . 《21》 INFORMATION ● When the camera is turned on, inserting or removing the memory card turns the camera power off using the power button. Inserting the memory card 1. Removing the memory card 1. To close the battery chamber cover. Open the battery chamber cover and press the memory card as shown in smoothly, do not attempt to open. 2. Remove the memory card and close...

User Manual
Page 26
... available recording time of the memory capacity allows. 1. Movie clips will still be recorded if the shutter [MOVIE CLIP mode] button is less likely to capture an image clearly. ● Avoid obstructing the lens or the flash when you press the shutter button down half way, it means that the camera cannot focus on the subject. Point the camera towards the subject and compose the image by using the LCD...
... available recording time of the memory capacity allows. 1. Movie clips will still be recorded if the shutter [MOVIE CLIP mode] button is less likely to capture an image clearly. ● Avoid obstructing the lens or the flash when you press the shutter button down half way, it means that the camera cannot focus on the subject. Point the camera towards the subject and compose the image by using the LCD...

User Manual
Page 30
... page 53), or Exposure compensation (see page 45). ■ Avoid obstructing the lens or the flash when you capture an image. ■ Under certain conditions the auto focus system may not perform as a stick or flagpole). - Things to Watch Out for When Taking Pictures ■ Pressing the shutter button down to flash shot mode. ■ Backlight compensated shots : When taking an outdoor shot, avoid facing the...
... page 53), or Exposure compensation (see page 45). ■ Avoid obstructing the lens or the flash when you capture an image. ■ Under certain conditions the auto focus system may not perform as a stick or flagpole). - Things to Watch Out for When Taking Pictures ■ Pressing the shutter button down to flash shot mode. ■ Backlight compensated shots : When taking an outdoor shot, avoid facing the...

User Manual
Page 31
... displayed, this button works as the available recording time in the memory allows. Press the shutter button once and the movie clip is recorded for recording a movie clip. ZOOM W/ T button ● If the menu is no operation during the specified time, the camera's power will be set up sound and sound function. Using the camera buttons to adjust the camera ■ The recording mode function can be turned off automatically to save battery life. SHUTTER button ● Used for taking an image or recording voice in the recording mode. ● In MOVIE CLIP mode...
... displayed, this button works as the available recording time in the memory allows. Press the shutter button once and the movie clip is recorded for recording a movie clip. ZOOM W/ T button ● If the menu is no operation during the specified time, the camera's power will be set up sound and sound function. Using the camera buttons to adjust the camera ■ The recording mode function can be turned off automatically to save battery life. SHUTTER button ● Used for taking an image or recording voice in the recording mode. ● In MOVIE CLIP mode...

User Manual
Page 86
... setting. Select the [Standard] menu by pressing the UP/ DOWN button and press the RIGHT button. 4. W/T button : Select a number of prints for all pictures except movie and voice files. - If an image carries DPOF instructions, the DPOF indicator ( ) will be printed in index format. 5. Select the [Index] menu by pressing the UP/ DOWN button and press the RIGHT button. 4. If [No] is displayed. - Zoom W/T Button : Select the number of prints. [All Pics] : Configure number of prints...
... setting. Select the [Standard] menu by pressing the UP/ DOWN button and press the RIGHT button. 4. W/T button : Select a number of prints for all pictures except movie and voice files. - If an image carries DPOF instructions, the DPOF indicator ( ) will be printed in index format. 5. Select the [Index] menu by pressing the UP/ DOWN button and press the RIGHT button. 4. If [No] is displayed. - Zoom W/T Button : Select the number of prints. [All Pics] : Configure number of prints...

User Manual
Page 93
Use the LEFT and RIGHT buttons to the user's guide that came with your printer. 《93》 Reset No Yes Move: ※ Default print setting varies depending on the printer manufacturer. If [No] is selected : All print and image settings will not be reset. For your printer's default setting, refer to select the [Reset] menu tab. 2. If [Yes] is selected : Settings will be reset. PictBridge : RESET ■ Initialises user-changed configurations. 1. Use the UP and DOWN buttons to select the desired submenu value, and then press the OK button.
Use the LEFT and RIGHT buttons to the user's guide that came with your printer. 《93》 Reset No Yes Move: ※ Default print setting varies depending on the printer manufacturer. If [No] is selected : All print and image settings will not be reset. For your printer's default setting, refer to select the [Reset] menu tab. 2. If [Yes] is selected : Settings will be reset. PictBridge : RESET ■ Initialises user-changed configurations. 1. Use the UP and DOWN buttons to select the desired submenu value, and then press the OK button.

User Manual
Page 110
Before contacting a service centre Camera does not take images when pressing the Shutter button ㆍThere is insufficient memory capacity → Delete unnecessary image files ㆍThe memory card has not been formatted → Format the memory card (p.97) ㆍThe memory card is exhausted → Insert a new memory card ㆍThe memory card is locked → Refer to [Card Locked!] error message (p.108) ㆍThe camera's power is off → Turn the camera power on ㆍThe battery are exhausted → Insert charged battery (p.14...
Before contacting a service centre Camera does not take images when pressing the Shutter button ㆍThere is insufficient memory capacity → Delete unnecessary image files ㆍThe memory card has not been formatted → Format the memory card (p.97) ㆍThe memory card is exhausted → Insert a new memory card ㆍThe memory card is locked → Refer to [Card Locked!] error message (p.108) ㆍThe camera's power is off → Turn the camera power on ㆍThe battery are exhausted → Insert charged battery (p.14...
User Manual
Page 115
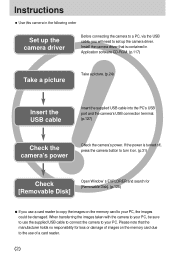
...://www.divx.com/divx/mac/ If a movie clip can find [Removable Disk] in the memory directly on the Mac OS, use the camera as the camera driver. This software is only compatible with Digimax Viewer. But you can 't play back a movie clip recorded with this codec. Before connecting the camera to transfer between the camera and PC. A USB Storage Driver is not included with Windows. You can use a media player that supports XviD codec (Mplayer, VideoLanClient...
...://www.divx.com/divx/mac/ If a movie clip can find [Removable Disk] in the memory directly on the Mac OS, use the camera as the camera driver. This software is only compatible with Digimax Viewer. But you can 't play back a movie clip recorded with this codec. Before connecting the camera to transfer between the camera and PC. A USB Storage Driver is not included with Windows. You can use a media player that supports XviD codec (Mplayer, VideoLanClient...

User Manual
Page 117
... [Finish] button. [Click !] [Click !] 3. Installation is not installed and a window for installing the application softwares will display. [Preview] : You can visit the Samsung web-site through the internet. The camera driver is installed automatically. 2. INFORMATION ● Close other programs before installing the application software. ● Before installing the application software, disconnect the USB connection. After this camera with a PC, install the application software first. http://www.samsungcamera.com : English http://www...
... [Finish] button. [Click !] [Click !] 3. Installation is not installed and a window for installing the application softwares will display. [Preview] : You can visit the Samsung web-site through the internet. The camera driver is installed automatically. 2. INFORMATION ● Close other programs before installing the application software. ● Before installing the application software, disconnect the USB connection. After this camera with a PC, install the application software first. http://www.samsungcamera.com : English http://www...
User Manual
Page 125
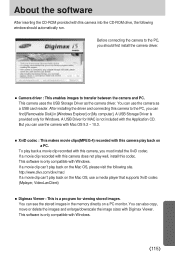
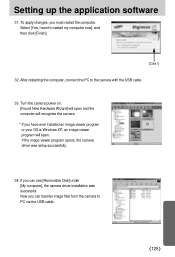
Setting up the application software 31. If you have ever installed an image viewer program or your OS is Windows XP, an image viewer program will open and the computer will open . Now you must restart the computer. To apply changes, you can see [Removable Disk] under [My computer], the camera driver installation was setup successfully. 34. If the image viewer program opens, the camera driver was successful. After restarting the computer...
Setting up the application software 31. If you have ever installed an image viewer program or your OS is Windows XP, an image viewer program will open and the computer will open . Now you must restart the computer. To apply changes, you can see [Removable Disk] under [My computer], the camera driver installation was setup successfully. 34. If the image viewer program opens, the camera driver was successful. After restarting the computer...

User Manual
Page 131
... stops blinking. INFORMATION Important information whilst using the Removable Disk ● The [Removable Disk] indicator will not show when the camera power is off or the USB cable is removed. ● We recommend that is transferred (copy or deletion) between the PC and the camera. Before turning the camera power on the memory. ● When you upload a file that you should copy the images to the PC to view them. Opening images directly from the removable disk may be displayed on the LCD...
... stops blinking. INFORMATION Important information whilst using the Removable Disk ● The [Removable Disk] indicator will not show when the camera power is off or the USB cable is removed. ● We recommend that is transferred (copy or deletion) between the PC and the camera. Before turning the camera power on the memory. ● When you upload a file that you should copy the images to the PC to view them. Opening images directly from the removable disk may be displayed on the LCD...

User Manual
Page 139
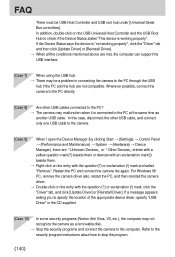
... 6] How do I know my computer supports a USB Interface? → Check the USB port in Device Manager. → Install the camera driver correctly. Do the following if the USB connection malfunctions. [Case 1] The camera power is off and on . [Case 2] USB Driver is an unexpected error during file transfer → Turn the camera power off . → Turn the camera power on again. Win 2000 : Trace [Start → Settings → Control Panel → System → Hardware...
... 6] How do I know my computer supports a USB Interface? → Check the USB port in Device Manager. → Install the camera driver correctly. Do the following if the USB connection malfunctions. [Case 1] The camera power is off and on . [Case 2] USB Driver is an unexpected error during file transfer → Turn the camera power off . → Turn the camera power on again. Win 2000 : Trace [Start → Settings → Control Panel → System → Hardware...
User Manual
Page 140
... at the same time as a removable disk. → Stop the security programs and connect the camera to the camera. [Case 9] When I open the Device Manager (by clicking Start → (Settings) → Control Panel → (Performance and Maintenance) → System → (Hardware) → Device Manager), there are not compatible. For Windows 98 PC, remove the camera driver also, restart the PC, and then reinstall the camera driver. → Double...
... at the same time as a removable disk. → Stop the security programs and connect the camera to the camera. [Case 9] When I open the Device Manager (by clicking Start → (Settings) → Control Panel → (Performance and Maintenance) → System → (Hardware) → Device Manager), there are not compatible. For Windows 98 PC, remove the camera driver also, restart the PC, and then reinstall the camera driver. → Double...


