User Guide
Page 8
... Status From the Printer Driver 151 Checking and Cleaning the Print Head 152 Running the Nozzle Check and Head Cleaning Utilities 152 Checking and Cleaning the Print Head Using the Control Panel . . 154 Automatically Checking and Cleaning the Print Head 154 Running Cleaning Cycles 155 Aligning the Print Head 156 Replacing Ink Cartridges 157 Changing the Date and Time...
... Status From the Printer Driver 151 Checking and Cleaning the Print Head 152 Running the Nozzle Check and Head Cleaning Utilities 152 Checking and Cleaning the Print Head Using the Control Panel . . 154 Automatically Checking and Cleaning the Print Head 154 Running Cleaning Cycles 155 Aligning the Print Head 156 Replacing Ink Cartridges 157 Changing the Date and Time...
User Guide
Page 11
...provides troubleshooting tips in case you use and printer maintenance-loading paper, replacing ink cartridges and other components, cleaning and aligning the print head, and using the printer's menu system. Warnings, Cautions, Notes, and Tips Please follow these guidelines as you have a problem... paper, using your printer on a network. 11 Introduction This User's Guide provides important information on setting up and using the Epson printer drivers, and replacing ink cartridges. Cautions must be observed to avoid damage to avoid bodily injury. For additional information, see...
...provides troubleshooting tips in case you use and printer maintenance-loading paper, replacing ink cartridges and other components, cleaning and aligning the print head, and using the printer's menu system. Warnings, Cautions, Notes, and Tips Please follow these guidelines as you have a problem... paper, using your printer on a network. 11 Introduction This User's Guide provides important information on setting up and using the Epson printer drivers, and replacing ink cartridges. Cautions must be observed to avoid damage to avoid bodily injury. For additional information, see...
User Guide
Page 16
... P power button. the printer has been dropped or the cabinet damaged; otherwise you use an extension cord with the printer, make sure the print head is safely capped. • If you may apply, See www.dtsc.ca.gov/hazardouswaste/perchlorate. 16 Take care not to spill liquid on ...make sure the total ampere rating of all devices plugged into the extension cord does not exceed the cord's ampere rating. This ensures that the print head is in the far right (home) position. liquid has entered the printer; special handling may damage the printer. • Do not insert objects...
... P power button. the printer has been dropped or the cabinet damaged; otherwise you use an extension cord with the printer, make sure the print head is safely capped. • If you may apply, See www.dtsc.ca.gov/hazardouswaste/perchlorate. 16 Take care not to spill liquid on ...make sure the total ampere rating of all devices plugged into the extension cord does not exceed the cord's ampere rating. This ensures that the print head is in the far right (home) position. liquid has entered the printer; special handling may damage the printer. • Do not insert objects...
User Guide
Page 17
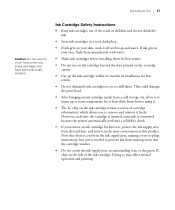
...for best results. • Do not use an ink cartridge beyond the date printed on the side of cartridge information, which allows you shake cartridges that have been previously installed. This could damage the print head. • After bringing an ink cartridge inside from a cold storage site,... allow it to remove and reinsert it freely. Doing so may affect normal operation and printing. 17 Introduction | 17 Caution: Do not use , ...
...for best results. • Do not use an ink cartridge beyond the date printed on the side of cartridge information, which allows you shake cartridges that have been previously installed. This could damage the print head. • After bringing an ink cartridge inside from a cold storage site,... allow it to remove and reinsert it freely. Doing so may affect normal operation and printing. 17 Introduction | 17 Caution: Do not use , ...
User Guide
Page 19
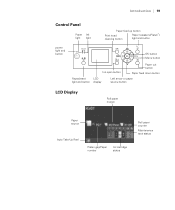
Introduction | 19 Control Panel Paper Ink light light Paper feed up button Print head cleaning button Paper release (ePlaten™) light and button power light and button OK button Menu button Ink open button Paper cut button Paper feed down button Pause/reset LCD light and button display Left arrow or paper source button LCD Display Roll paper margin Paper source Auto Take-Up Reel Platen gap/Paper number Ink cartridge status Roll paper counter Maintenance tank status 19
Introduction | 19 Control Panel Paper Ink light light Paper feed up button Print head cleaning button Paper release (ePlaten™) light and button power light and button OK button Menu button Ink open button Paper cut button Paper feed down button Pause/reset LCD light and button display Left arrow or paper source button LCD Display Roll paper margin Paper source Auto Take-Up Reel Platen gap/Paper number Ink cartridge status Roll paper counter Maintenance tank status 19
User Guide
Page 56
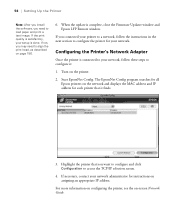
...information on configuring the printer, see the on the printer. 2. If you connected your network. The EpsonNet Config program searches for all Epson printers on the network and displays the MAC address and IP address for each printer that you want to configure and click Configuration to...instructions on assigning an appropriate IP address. 56 | Setting Up the Printer Note: After you install the software, you need to align the print head, as described on page 156. 6. Configuring the Printer's Network Adapter Once the printer is connected to your setup is complete, close the Firmware...
...information on configuring the printer, see the on the printer. 2. If you connected your network. The EpsonNet Config program searches for all Epson printers on the network and displays the MAC address and IP address for each printer that you want to configure and click Configuration to...instructions on assigning an appropriate IP address. 56 | Setting Up the Printer Note: After you install the software, you need to align the print head, as described on page 156. 6. Configuring the Printer's Network Adapter Once the printer is connected to your setup is complete, close the Firmware...
User Guide
Page 83
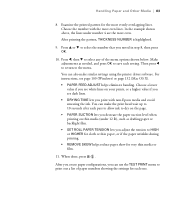
... if you noted in step 8, then press OK. 10. Choose the number with non-Epson media and avoid smearing the ink. Press l, then d to print out a list of the menu options shown below. You can use the TEST PRINT menu to select any of paper numbers showing the settings for the most even... page 100 (Windows) or page 132 (Mac OS X). • PAPER FEED ADJUST helps eliminate banding. After you create paper configurations, you can also make the print head wait up to 10 seconds after each pass to allow ink to the menu. After...
... if you noted in step 8, then press OK. 10. Choose the number with non-Epson media and avoid smearing the ink. Press l, then d to print out a list of the menu options shown below. You can use the TEST PRINT menu to select any of paper numbers showing the settings for the most even... page 100 (Windows) or page 132 (Mac OS X). • PAPER FEED ADJUST helps eliminate banding. After you create paper configurations, you can also make the print head wait up to 10 seconds after each pass to allow ink to the menu. After...

User Guide
Page 101
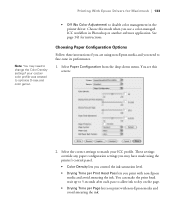
...ink to dry on the page. • Drying Time per Print Head Pass lets you print with non-Epson media and avoid smearing the ink. • Paper Feed Adjustment helps reduce banding. Change the value if you find wrinkles on your prints, or a higher value if you see white lines on your...-tune the setting for Windows | 101 • Drying Time per Page lets you print with non-Epson media and avoid smearing the ink. When you finish selecting Paper Configuration settings, click OK. 101 Printing With Epson Drivers for various paper thicknesses. • Roll Paper Back Tension lets you adjust the...
...ink to dry on the page. • Drying Time per Print Head Pass lets you print with non-Epson media and avoid smearing the ink. • Paper Feed Adjustment helps reduce banding. Change the value if you find wrinkles on your prints, or a higher value if you see white lines on your...-tune the setting for Windows | 101 • Drying Time per Page lets you print with non-Epson media and avoid smearing the ink. When you finish selecting Paper Configuration settings, click OK. 101 Printing With Epson Drivers for various paper thicknesses. • Roll Paper Back Tension lets you adjust the...

User Guide
Page 109
...of your output. 3. Click OK to save your output. • Change Standard Resolution allows you can print. • Print as Bitmap allows large or complex vector graphics to print faster in Adobe Acrobat® or any other non-image based application. • Allow Applications to ...speed. Printing will take longer to start. • Coarse Rendering allows you to be performed by rendering the entire page. Printing With Epson Drivers for Windows | 109 • Page Rendering Mode speeds printing by the printer. Use this setting if print speed is extremely slow or the print head stops for...
...of your output. 3. Click OK to save your output. • Change Standard Resolution allows you can print. • Print as Bitmap allows large or complex vector graphics to print faster in Adobe Acrobat® or any other non-image based application. • Allow Applications to ...speed. Printing will take longer to start. • Coarse Rendering allows you to be performed by rendering the entire page. Printing With Epson Drivers for Windows | 109 • Page Rendering Mode speeds printing by the printer. Use this setting if print speed is extremely slow or the print head stops for...
User Guide
Page 119
... for Macintosh | 119 Note: You may have made using non-Epson media and you need to dry on the page. • Drying Time per Print Head Pass lets you print with non-Epson media and avoid smearing the ink. Select the correct settings to match your custom color profile was created to ...optimize D-max and color gamut. You can make the print head wait up to 5 seconds after each pass to...
... for Macintosh | 119 Note: You may have made using non-Epson media and you need to dry on the page. • Drying Time per Print Head Pass lets you print with non-Epson media and avoid smearing the ink. Select the correct settings to match your custom color profile was created to ...optimize D-max and color gamut. You can make the print head wait up to 5 seconds after each pass to...
User Guide
Page 133
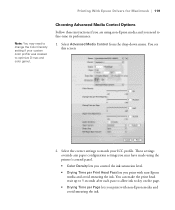
... for instructions. See page 141 for Macintosh | 133 Note: You may have made using non-Epson media and you need to dry on the page. • Drying Time per Print Head Pass lets you use a color-managed ICC workflow in the printer driver. Choosing Paper Configuration Options Follow these instructions... • Color Density lets you control the ink saturation level. • Drying Time per Page lets you print with non-Epson media and avoid smearing the ink. You can make the print head wait up to 5 seconds after each pass to allow ink to change the Color Density setting if your ICC...
... for instructions. See page 141 for Macintosh | 133 Note: You may have made using non-Epson media and you need to dry on the page. • Drying Time per Print Head Pass lets you use a color-managed ICC workflow in the printer driver. Choosing Paper Configuration Options Follow these instructions... • Color Density lets you control the ink saturation level. • Drying Time per Page lets you print with non-Epson media and avoid smearing the ink. You can make the print head wait up to 5 seconds after each pass to allow ink to change the Color Density setting if your ICC...
User Guide
Page 149
... Printer The Epson Stylus Pro 7700 and Pro 9700 require little maintenance to fine-tune a variety of your maintenance tank(s), and other information. Checking Printer Status Using the control panel, you can check the amount of ink remaining, the total number of prints, and the...page 151). 149 This chapter describes the following routine procedures: • Checking printer status • Checking and cleaning the print head • Aligning the print head • Replacing ink cartridges • Changing the date and time • Performing additional maintenance tasks • Replacing ...
... Printer The Epson Stylus Pro 7700 and Pro 9700 require little maintenance to fine-tune a variety of your maintenance tank(s), and other information. Checking Printer Status Using the control panel, you can check the amount of ink remaining, the total number of prints, and the...page 151). 149 This chapter describes the following routine procedures: • Checking printer status • Checking and cleaning the print head • Aligning the print head • Replacing ink cartridges • Changing the date and time • Performing additional maintenance tasks • Replacing ...
User Guide
Page 152
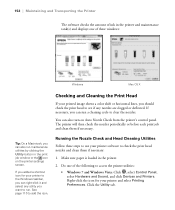
...icon. If necessary, you can also run . Do one of the following to see if any utility you want to check the print head nozzles and clean them if necessary. You can right-click it and select any nozzles are clogged or deflected. Make sure paper is... and clean them if necessary: 1. Running the Nozzle Check and Head Cleaning Utilities Follow these windows: Windows Mac OS X Checking and Cleaning the Print Head If your printed image shows a color shift or horizontal lines, you should check the print head to access the printer utilities: • Windows 7 and Windows Vista: ...
...icon. If necessary, you can also run . Do one of the following to see if any utility you want to check the print head nozzles and clean them if necessary. You can right-click it and select any nozzles are clogged or deflected. Make sure paper is... and clean them if necessary: 1. Running the Nozzle Check and Head Cleaning Utilities Follow these windows: Windows Mac OS X Checking and Cleaning the Print Head If your printed image shows a color shift or horizontal lines, you should check the print head to access the printer utilities: • Windows 7 and Windows Vista: ...

User Guide
Page 153
Select your printer icon and select Printing Preferences. Click the Utility tab. • Mac OS X: Open the EPSON Printer Utility3 in the printer. • If any dots or segments are still clogged after three cleaning cycles, run a power cleaning cycle as described on ...; Windows XP: Click Start and select Control Panel. After the pattern is printed, use at least a 10× eye loupe to make sure the nozzles are clean. • If the nozzles are missing or deflected, as shown below , the print head is loaded in your Applications folder. You see a menu like the following...
Select your printer icon and select Printing Preferences. Click the Utility tab. • Mac OS X: Open the EPSON Printer Utility3 in the printer. • If any dots or segments are still clogged after three cleaning cycles, run a power cleaning cycle as described on ...; Windows XP: Click Start and select Control Panel. After the pattern is printed, use at least a 10× eye loupe to make sure the nozzles are clean. • If the nozzles are missing or deflected, as shown below , the print head is loaded in your Applications folder. You see a menu like the following...
User Guide
Page 154
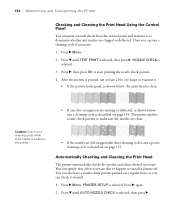
... basis, so you can check it . • If the pattern looks good, as described on page 155. Automatically Checking and Cleaning the Print Head The printer automatically checks the nozzles and cleans them if necessary. Caution: Don't run a cleaning cycle while thick media is loaded in the .... 2. After the pattern is clean. • If any nozzles are still clogged after three cleaning cycles, run a cleaning cycle as shown below, the print head is printed, use at least a 10× eye loupe to examine it yourself. 1. Press r Menu. Press d until AUTO NOZZLE CHECK is selected, then press...
... basis, so you can check it . • If the pattern looks good, as described on page 155. Automatically Checking and Cleaning the Print Head The printer automatically checks the nozzles and cleans them if necessary. Caution: Don't run a cleaning cycle while thick media is loaded in the .... 2. After the pattern is clean. • If any nozzles are still clogged after three cleaning cycles, run a cleaning cycle as shown below, the print head is printed, use at least a 10× eye loupe to examine it yourself. 1. Press r Menu. Press d until AUTO NOZZLE CHECK is selected, then press...
User Guide
Page 155
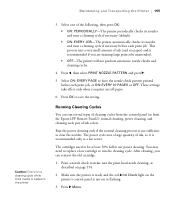
... the Printer | 155 Caution: Don't run a cleaning cycle while thick media is not sufficient to clear the nozzles. Press OK to make sure the print head needs cleaning, as a last resort. Running Cleaning Cycles You can reinsert the old cartridge. 1. You may need to be at least 50% full to...6. Press r Menu. 155 This process uses a very small amount of cleaning cycles from the control panel (or from the Epson LFP Remote Panel2): normal cleaning, power cleaning, and cleaning each print job, or ON: EVERY 10 PAGES or OFF. Make sure the printer is ready and the red B Ink Check light...
... the Printer | 155 Caution: Don't run a cleaning cycle while thick media is not sufficient to clear the nozzles. Press OK to make sure the print head needs cleaning, as a last resort. Running Cleaning Cycles You can reinsert the old cartridge. 1. You may need to be at least 50% full to...6. Press r Menu. 155 This process uses a very small amount of cleaning cycles from the control panel (or from the Epson LFP Remote Panel2): normal cleaning, power cleaning, and cleaning each print job, or ON: EVERY 10 PAGES or OFF. Make sure the printer is ready and the red B Ink Check light...
User Guide
Page 156
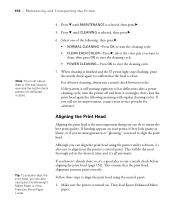
... leave it 's a good idea to align from the printer's control panel. This ensures that the head is selected, then press r. 6. Then load Epson Enhanced Matte paper. 156 If you haven't already done so, it overnight, then clean the print head again the following , then press r: • NORMAL CLEANING-Press OK to start the cleaning...
... leave it 's a good idea to align from the printer's control panel. This ensures that the head is selected, then press r. 6. Then load Epson Enhanced Matte paper. 156 If you haven't already done so, it overnight, then clean the print head again the following , then press r: • NORMAL CLEANING-Press OK to start the cleaning...
User Guide
Page 166
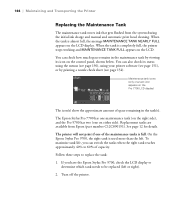
... 12 for details. Replacement tanks are available from the system during the initial ink charge and manual and automatic print head cleaning. The Epson Stylus Pro 7700 has one maintenance tank (on the right side), and the Pro 9700 has two (one of space remaining in the maintenance tank by viewing its status using the menus (see...
... 12 for details. Replacement tanks are available from the system during the initial ink charge and manual and automatic print head cleaning. The Epson Stylus Pro 7700 has one maintenance tank (on the right side), and the Pro 9700 has two (one of space remaining in the maintenance tank by viewing its status using the menus (see...
User Guide
Page 171
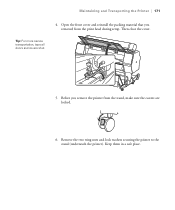
Remove the two wing nuts and lock washers securing the printer to the stand (underneath the printer). Then close the cover. 5. Before you removed from the stand, make sure the casters are locked. 6. Open the front cover and reinstall the packing material that you remove the printer from the print head during setup. Maintaining and Transporting the Printer | 171 Tip: For more secure transportation, tape all doors and covers shut. 4. Keep them in a safe place. 171
Remove the two wing nuts and lock washers securing the printer to the stand (underneath the printer). Then close the cover. 5. Before you removed from the stand, make sure the casters are locked. 6. Open the front cover and reinstall the packing material that you remove the printer from the print head during setup. Maintaining and Transporting the Printer | 171 Tip: For more secure transportation, tape all doors and covers shut. 4. Keep them in a safe place. 171
User Guide
Page 173
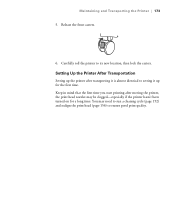
... transporting it is almost identical to setting it up the printer after moving the printer, the print head nozzles may need to run a cleaning cycle (page 152) and realign the print head (page 156) to its new location, then lock the casters. Release the front casters. 6. Maintaining and Transporting the Printer | 173 5. You may...
... transporting it is almost identical to setting it up the printer after moving the printer, the print head nozzles may need to run a cleaning cycle (page 152) and realign the print head (page 156) to its new location, then lock the casters. Release the front casters. 6. Maintaining and Transporting the Printer | 173 5. You may...


