Ricoh Pro C651EX Support Question
Ricoh Pro C651EX Support Question
Find answers below for this question about Ricoh Pro C651EX.Need a Ricoh Pro C651EX manual? We have 1 online manual for this item!
Question posted by x81912 on September 7th, 2012
Print Size Needed - 600m X 320mm
setting up bypass tray will only givem 487 x 320 - Ricoh says we can print up to 630
What setting must I use?
Current Answers
Answer #1: Posted by freginold on September 8th, 2012 4:45 AM
freginold

Member since:
December 20th, 2011 Points: 23,253,885

Member since:
December 20th, 2011 Points: 23,253,885
If you're setting the bypass tray up for copying, you can tell the machine exactly what size to use on the screen. Put the paper in the bypass tray, then select the bypass tray on the screen and press the # button. Choose the option for custom-sized paper, and specify the exact dimensions, then hit OK to save the settings temporarily.
If you're using the bypass tray to print, go into your print driver's properties or preferences window and select the option for custom-sized paper (under the Paper tab). Also be sure to specify that the input tray is the bypass tray.
If you're using the bypass tray to print, go into your print driver's properties or preferences window and select the option for custom-sized paper (under the Paper tab). Also be sure to specify that the input tray is the bypass tray.
Related Ricoh Pro C651EX Manual Pages
Quick Reference Guide - Page 2
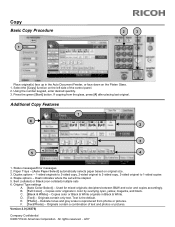
... from photos or pictures. Sort (collated) or Stack (non-collated) multiple sets 6. Used for mixed originals; deciphers between B&W and color and copies accordingly. Delicate tones and gray scale is the default. Originals contain a combination of the control panel. 2.
Using the number keypad, enter desired quantity. 3. Status messages/Error messages 2. D. [Text...
Quick Reference Guide - Page 3
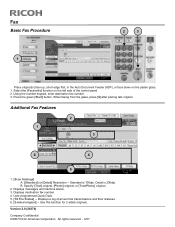
... function for 2-sided originals. Additional Fax Features
2
1 3
6
4
5
1. [Scan Settings] A. [Standard] or [Detail] Resolution -- Displays a log of the control panel. 2. Version 2.0 (26376)
Company Confidential ©2007 Ricoh Americas Corporation.
Standard is 200dpi. Using the number keypad, enter destination fax number. 3. User-programmed Quick Dials. 5. [TX File Status...
Quick Reference Guide - Page 4

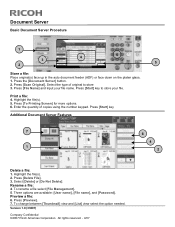
... or [Manual Entry] enter an address. 3. Additional Scan Features
1
6
2
3
4
5
7
1. [Scan Settings] changes the default Text selection.
Version 1.0 (52342) Company Confidential ©2007 Ricoh Americas Corporation. Press the green [Start] button. Select [Scanner] from the available one file. 4. [Text] is used to add a message to E-Mail
Basic Scan Procedure
2 1
3
Place original...
Quick Reference Guide - Page 5
... using the number keypad. Highlight the file(s). 5. To change between [Thumbnail] view and [List] view select the option needed.
All rights reserved. - 4/07 Press [To Printing ...Screen] for more options. 6. Highlight the file(s). 2. To rename a file select [File Management]. 5. Version 1.0 (33097)
Company Confidential ©2007 Ricoh...
Quick Reference Guide - Page 6
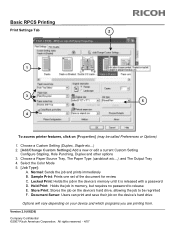
... release E. Version 2.0 (68236) Company Confidential ©2007 Ricoh Americas Corporation. Choose a Paper Source Tray, The Paper Type (cardstock etc...), and The Output Tray 4. Locked Print: Holds the job in memory, but requires no password to be called Preferences or Options)
1. Choose a Custom Setting (Duplex, Staple etc...) 2. [Add/Change Custom Settings] Add a new or edit a current Custom...
Quick Reference Guide - Page 7
...Printing
Print Quality Tab 1
2
3
4
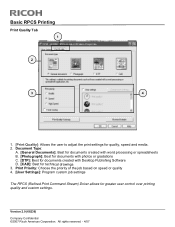
1. [Print Quality]: Allows the user to adjust the print settings for greater user control over printing quality and custom settings. Print Priority: Choose the priority of the job based on speed or quality 4. [User Settings]: Program custom job settings
The RPCS (Refined Print...Version 2.0 (68236)
Company Confidential ©2007 Ricoh Americas Corporation.
Quick Reference Guide - Page 8
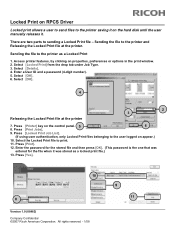
...file - Select [Details]. 4. Press [Yes].
10
8
Version 1.0 (88482) Company Confidential ©2007 Ricoh Americas Corporation. Press [Locked Print Job List].
(If using user authentication, only Locked Print files belonging to the user logged on properties, preferences or options in the print window. 2. Press [Printer] key on the hard disk until the user manually releases it. Sending...
Quick Reference Guide - Page 9
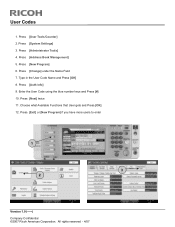
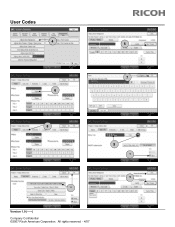
Enter the User Code using the blue number keys and Press [#] 10. Press [Change] under the Name Field 7. All rights reserved. - 4/07 Press [Address Book Management] 5. Press [System Settings] 3. Press [New Program] 6. Press [User Tools/Counter] 2. Press [Next... users to enter
1
3 2
Version 1.0 (-----) Company Confidential ©2007 Ricoh Americas Corporation. User Codes
1.
Quick Reference Guide - Page 10
User Codes
4
5
7 6
8
11
Version 1.0 (-----) Company Confidential ©2007 Ricoh Americas Corporation. All rights reserved. - 4/07
9
10
12
Quick Reference Guide - Page 11
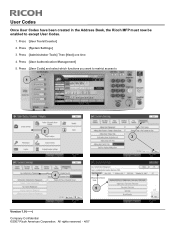
...] Then [Next] one time 4. Press [System Settings] 3. All rights reserved. - 4/07 Press [User Code] and select which functions you want to restrict access to except User Codes.
1. Press [User Tools/Counter] 2. User Codes
Once User Codes have been created in the Address Book, the Ricoh MFP must now be enabled to
1
2 3
4 5
Version...
Quick Reference Guide - Page 12
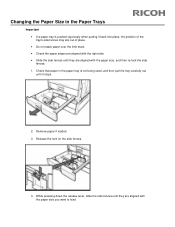
... then re-lock the side fences. 1. Changing the Paper Size in the paper tray is pushed vigorously when putting it stops.
2. Remove paper if loaded. 3. Check that paper in the Paper Trays
Important • If a paper tray is not being used, and then pull the tray carefully out until it back into place, the position of...
Quick Reference Guide - Page 13
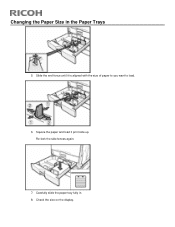
Slide the end fence until it print side up. Carefully slide the paper tray fully in the Paper Trays
5. Check the size on the display. Changing the Paper Size in . 8. Re-lock the side fences again.
7. Square the paper and load it is aligned with the size of paper to you want to load.
6.
Quick Reference Guide - Page 14

... on the left is automatically shifted to 1,100 sheets of the tray. • Tray 1 uses 81/2 11 paper. You can load paper even while making copies from tray 1. To load paper into Tray 1
Important • When paper loaded in . • For the right side of tray 1, align the right edge of the paper with the right...
Quick Reference Guide - Page 15
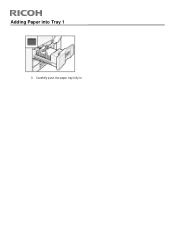
Carefully push the paper tray fully in. Adding Paper into Tray 1
3.
Quick Reference Guide - Page 19
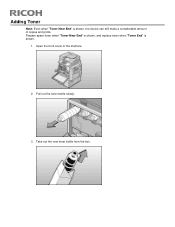
Take out the new toner bottle from the box. Adding Toner
Note: Even when "Toner Near End" is shown.
1. Prepare spare toner when "Toner Near End" is shown, and replace toner when "Toner End" is shown, the device can still make a considerable amount of the machine.
2. Open the front cover of copies and prints. Pull out the toner bottle slowly.
3.
Similar Questions

Print Driver For Ricoh C651ex
I am trying to install print driver for my C651ex on another computer and can not seemed to find the...
I am trying to install print driver for my C651ex on another computer and can not seemed to find the...
(Posted by razeitprinting 9 years ago)

Ricoh Printers Pro 8110s Manual
How to print from a USB flash drive?
How to print from a USB flash drive?
(Posted by markgilmore301 9 years ago)

I Need To Buy Sd Printer For Ricoh Mp W3600
(Posted by mohdmohd20091 10 years ago)

I Am Using Mac Osx 10.8 Which Driver Do I Need For My Ricoh C651pro
(Posted by vpsales 11 years ago)

Printing Issues With Coated Cardstock
"I'm having trouble printing on a coated card stock. Any advice?"
"I'm having trouble printing on a coated card stock. Any advice?"
(Posted by Anonymous-63526 11 years ago)