Maintenance Guide
Page 8
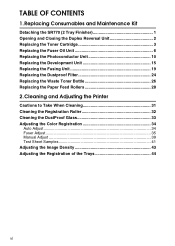
TABLE OF CONTENTS 1. Cleaning and Adjusting the Printer Cautions to Take When Cleaning 31 Cleaning the Registration Roller 32 Cleaning the DustProof Glass 33 Adjusting the Color Registration 34 Auto Adjust 34 Fuser Adjust 35 Manual Adjust 39 Test Sheet Samples 41 ... the SR770 (2 Tray Finisher 1 Opening and Closing the Duplex Reversal Unit 2 Replacing the Toner Cartridge 3 Replacing the Fuser Oil Unit 6 Replacing the Photoconductor Unit 10 Replacing the Development Unit 15 Replacing the Fusing Unit 19 Replacing the Dustproof Filter 24 Replacing the Waste Toner Bottle 26 ...
TABLE OF CONTENTS 1. Cleaning and Adjusting the Printer Cautions to Take When Cleaning 31 Cleaning the Registration Roller 32 Cleaning the DustProof Glass 33 Adjusting the Color Registration 34 Auto Adjust 34 Fuser Adjust 35 Manual Adjust 39 Test Sheet Samples 41 ... the SR770 (2 Tray Finisher 1 Opening and Closing the Duplex Reversal Unit 2 Replacing the Toner Cartridge 3 Replacing the Fuser Oil Unit 6 Replacing the Photoconductor Unit 10 Replacing the Development Unit 15 Replacing the Fusing Unit 19 Replacing the Dustproof Filter 24 Replacing the Waste Toner Bottle 26 ...
Maintenance Guide
Page 9
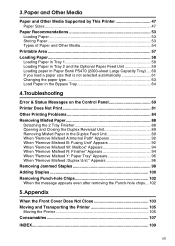
...paper size that is not selected automatically 61 Changing the paper type 63 Load Paper in the Duplex Feed Unit 89 When "Remove Misfeed A:Internal Path" Appears 92 When "Remove Misfeed B: Fusing Unit" Appears 92 When "Remove Misfeed W: Mailbox" Appears 94 When "Remove Misfeed R: Finisher" Appears 94 ...5. Troubleshooting Error & Status Messages on the Control Panel 69 Printer Does Not Print 81 Other Printing Problems 84 Removing Misfed Paper 88 Detaching the 2 Tray Finisher 88 Opening and Closing the Duplex Reversal Unit 89 Removing Misfed Paper in the Bypass Tray 64 4. Appendix ...
...paper size that is not selected automatically 61 Changing the paper type 63 Load Paper in the Duplex Feed Unit 89 When "Remove Misfeed A:Internal Path" Appears 92 When "Remove Misfeed B: Fusing Unit" Appears 92 When "Remove Misfeed W: Mailbox" Appears 94 When "Remove Misfeed R: Finisher" Appears 94 ...5. Troubleshooting Error & Status Messages on the Control Panel 69 Printer Does Not Print 81 Other Printing Problems 84 Removing Misfed Paper 88 Detaching the 2 Tray Finisher 88 Opening and Closing the Duplex Reversal Unit 89 Removing Misfed Paper in the Bypass Tray 64 4. Appendix ...

Maintenance Guide
Page 16
... sure to wait about an hour. er slowly. Not waiting for the unit to prevent a burn. Reference See p.1 "Detaching the SR770 (2 Tray Finisher)" C If the Duplex Unit is attached to 1 • The Fusing Unit becomes very the printer, raise it in a burn. ZDJH047J F Open the upper left cover ...of the arrow (A), and remove Fuser Oil Unit, turn off the power switch and unplug the power cable. ...
... sure to wait about an hour. er slowly. Not waiting for the unit to prevent a burn. Reference See p.1 "Detaching the SR770 (2 Tray Finisher)" C If the Duplex Unit is attached to 1 • The Fusing Unit becomes very the printer, raise it in a burn. ZDJH047J F Open the upper left cover ...of the arrow (A), and remove Fuser Oil Unit, turn off the power switch and unplug the power cable. ...
Maintenance Guide
Page 17
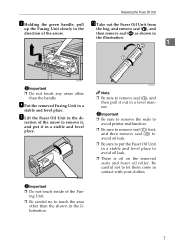
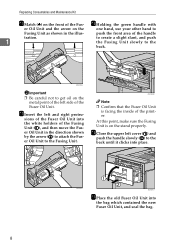
...ZDJH208J Important ❒ Do not touch any areas other than the handle. I Lift the Fuser Oil Unit in a stable and level place. Important ❒ Be sure to remove the seals to avoid printer malfunction. ❒ Be sure to remove seal (A) first, and then remove seal (B) to avoid oil... leak. ❒ Be sure to remove seal (A), and then pull it in a stable and level place. Replacing the Fuser Oil Unit G J Holding the green handle, pull Take out the Fuser Oil Unit from up the Fusing Unit...
...ZDJH208J Important ❒ Do not touch any areas other than the handle. I Lift the Fuser Oil Unit in a stable and level place. Important ❒ Be sure to remove the seals to avoid printer malfunction. ❒ Be sure to remove seal (A) first, and then remove seal (B) to avoid oil... leak. ❒ Be sure to remove seal (A), and then pull it in a stable and level place. Replacing the Fuser Oil Unit G J Holding the green handle, pull Take out the Fuser Oil Unit from up the Fusing Unit...
Maintenance Guide
Page 18
... the old Fuser Oil Unit into place. N Close the upper left cover (A) and push the handle slowly (B) to the Fusing Unit. sions of the Fuser Oil Unit into the white holders of the handle tration. 1 to create a slight slant, and push the Fusing Unit slowly to Fusing Unit as shown in the ... At this point, make sure the Fusing Unit is facing the inside of the Fuser Oil Unit. ZDJH050E Note ❒ Confirm that the Fuser Oil Unit is on the metal point of the left and right protru- L Insert the left side of the printer. ZDJH055J Important ❒ Be careful not...
... the old Fuser Oil Unit into place. N Close the upper left cover (A) and push the handle slowly (B) to the Fusing Unit. sions of the Fuser Oil Unit into the white holders of the handle tration. 1 to create a slight slant, and push the Fusing Unit slowly to Fusing Unit as shown in the ... At this point, make sure the Fusing Unit is facing the inside of the Fuser Oil Unit. ZDJH050E Note ❒ Confirm that the Fuser Oil Unit is on the metal point of the left and right protru- L Insert the left side of the printer. ZDJH055J Important ❒ Be careful not...
Maintenance Guide
Page 29
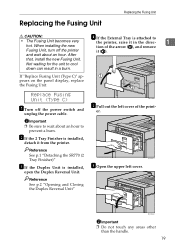
... p.1 "Detaching the SR770 (2 Tray Finisher)" C If the Duplex Unit is installed, detach it from the printer. ZDJH047J F Open the upper left cover of the arrow (A), and remove it in a burn. Replacing the Fusing Unit Replacing the Fusing Unit R CAUTION: • The Fusing Unit becomes very hot. that, install the new Fusing Unit. Important ❒ Be sure to prevent a burn. B If...
... p.1 "Detaching the SR770 (2 Tray Finisher)" C If the Duplex Unit is installed, detach it from the printer. ZDJH047J F Open the upper left cover of the arrow (A), and remove it in a burn. Replacing the Fusing Unit Replacing the Fusing Unit R CAUTION: • The Fusing Unit becomes very hot. that, install the new Fusing Unit. Important ❒ Be sure to prevent a burn. B If...

Maintenance Guide
Page 30
... not to get oil on the front of the Fus- I Remove the Fuser Oil Unit in the bag that enclosed the new ZDJH052E Fusing Unit, and then seal it or before turning on the direction of the arrow, and then Fusing Unit as shown in a stable and level place. ZDJH055J Important ❒ Be careful not... it . put it in the direction shown by the arrow (B) to attach the Fuser Oil Unit to touch the oil. 20 sions of the Fuser Oil Unit into the white holders of the Fusing Unit (A), and then move the Fuser Oil Unit in a stable and level place. K Insert the left side of the Fuser Oil...
... not to get oil on the front of the Fus- I Remove the Fuser Oil Unit in the bag that enclosed the new ZDJH052E Fusing Unit, and then seal it or before turning on the direction of the arrow, and then Fusing Unit as shown in a stable and level place. ZDJH055J Important ❒ Be careful not... it . put it in the direction shown by the arrow (B) to attach the Fuser Oil Unit to touch the oil. 20 sions of the Fuser Oil Unit into the white holders of the Fusing Unit (A), and then move the Fuser Oil Unit in a stable and level place. K Insert the left side of the Fuser Oil...

Maintenance Guide
Page 31
...into place. stalled, reattach the 2 Tray Finisher to push the area right in Insert the hooks of the External front of the printer. ❒ Confirm that the Fusing Unit is properly positioned in the machine. Please wait for a while. Please Wait 21 Reference See p.1 "Detaching the SR770 (2 Tray... handle (B) slowly to the back until it to the back. Replacing the Fusing Unit M O Holding the green handle of the If you . 1 Fusing Unit slowly to the printer. Reference See p.2 "Opening and Closing the Duplex Reversal Unit" Q If the 2 Tray Finisher was in the power cable and turn ...
...into place. stalled, reattach the 2 Tray Finisher to push the area right in Insert the hooks of the External front of the printer. ❒ Confirm that the Fusing Unit is properly positioned in the machine. Please wait for a while. Please Wait 21 Reference See p.1 "Detaching the SR770 (2 Tray... handle (B) slowly to the back until it to the back. Replacing the Fusing Unit M O Holding the green handle of the If you . 1 Fusing Unit slowly to the printer. Reference See p.2 "Opening and Closing the Duplex Reversal Unit" Q If the 2 Tray Finisher was in the power cable and turn ...
Maintenance Guide
Page 32
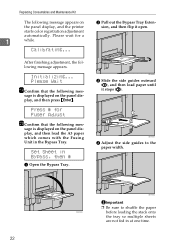
sage is displayed on the panel display, and then load the A3 paper which comes with the Fusing Unit in the Bypass Tray. Set Sheet in at one time. 22 ZDJH204J D Adjust the side guides to shuffle the paper ZDJH202J before loading the stack ... display, and then press {Enter}. B Pull out the Bypass Tray Extension, and then flip it stops (B). sage is displayed on the panel display, and the printer starts color registration adjustment automatically. Please Wait S Confirm that the following message appears.
sage is displayed on the panel display, and then load the A3 paper which comes with the Fusing Unit in the Bypass Tray. Set Sheet in at one time. 22 ZDJH204J D Adjust the side guides to shuffle the paper ZDJH202J before loading the stack ... display, and then press {Enter}. B Pull out the Bypass Tray Extension, and then flip it stops (B). sage is displayed on the panel display, and the printer starts color registration adjustment automatically. Please Wait S Confirm that the following message appears.
Maintenance Guide
Page 33
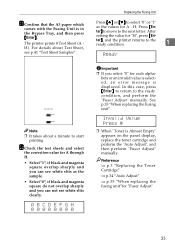
...then press {Enter}. ter}, and the printer returns to the ready condition. 1 Ready Important ❒ If you can see p.41 "Test Sheet Samples". Reference ⇒ p.3 "Replacing the Toner Cartridge" ⇒ p.34 "Auto Adjust" ⇒ p.35 "When replacing the fusing unit"for "H", press {En- Note &#...display, replace the toner cartridge and perform the "Auto Adjust", and then perform "Fuser Adjust" manually. The printer prints 8 Test Sheet (A H). A B C D E F G H 0 0 0 0 0 0 0 0 Replacing the Fusing Unit Press {U} or {T} to the ready condition, and perform the "Fuser Adjust" manually.
...then press {Enter}. ter}, and the printer returns to the ready condition. 1 Ready Important ❒ If you can see p.41 "Test Sheet Samples". Reference ⇒ p.3 "Replacing the Toner Cartridge" ⇒ p.34 "Auto Adjust" ⇒ p.35 "When replacing the fusing unit"for "H", press {En- Note &#...display, replace the toner cartridge and perform the "Auto Adjust", and then perform "Fuser Adjust" manually. The printer prints 8 Test Sheet (A H). A B C D E F G H 0 0 0 0 0 0 0 0 Replacing the Fusing Unit Press {U} or {T} to the ready condition, and perform the "Fuser Adjust" manually.
Maintenance Guide
Page 44
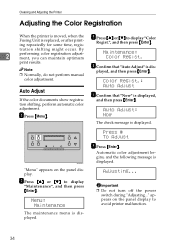
... off the power switch during "Adjusting..." Adjusting... print results. Press # To Adjust F Press {Enter}. Cleaning and Adjusting the Printer Adjusting the Color Registration When the printer is moved, when the Fusing Unit is displayed. C Press {U} or {T} to display "Color Regist.", and then press {Enter}. tration shifting might occur. Auto Adjust: A Press {Menu}. played, and then press...
... off the power switch during "Adjusting..." Adjusting... print results. Press # To Adjust F Press {Enter}. Cleaning and Adjusting the Printer Adjusting the Color Registration When the printer is moved, when the Fusing Unit is displayed. C Press {U} or {T} to display "Color Regist.", and then press {Enter}. tration shifting might occur. Auto Adjust: A Press {Menu}. played, and then press...
Maintenance Guide
Page 45
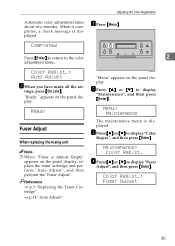
... {Enter}. B Press {U} or {T} to the color 2 adjustment menu. "Ready " appears on the panel display, replace the toner cartridge and perform "Auto Adjust", and then perform the "Fuser Adjust". Ready Fuser Adjust When replacing the fusing unit Note ❒ When "Toner is Almost Empty" ...appears on the panel display. Color Regist.: Auto Adjust G When you have made all the set- Reference ⇒ p.3 "Replacing the...
... {Enter}. B Press {U} or {T} to the color 2 adjustment menu. "Ready " appears on the panel display, replace the toner cartridge and perform "Auto Adjust", and then perform the "Fuser Adjust". Ready Fuser Adjust When replacing the fusing unit Note ❒ When "Toner is Almost Empty" ...appears on the panel display. Color Regist.: Auto Adjust G When you have made all the set- Reference ⇒ p.3 "Replacing the...
Maintenance Guide
Page 46
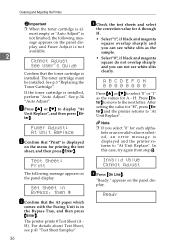
... not available. 2 Cannot Adjust See User's Guide Confirm that the A3 paper which comes with the Fusing Unit is installed. See p.3 "Replacing the Toner Cartridge". See p.34 "Auto Adjust". Set Sheet in Bypass, then # G Confirm that the toner cartridge is in the Bypass Tray, and then press {Enter}. The printer prints 8 Test Sheet (A H).
... not available. 2 Cannot Adjust See User's Guide Confirm that the A3 paper which comes with the Fusing Unit is installed. See p.3 "Replacing the Toner Cartridge". See p.34 "Auto Adjust". Set Sheet in Bypass, then # G Confirm that the toner cartridge is in the Bypass Tray, and then press {Enter}. The printer prints 8 Test Sheet (A H).
Maintenance Guide
Page 63
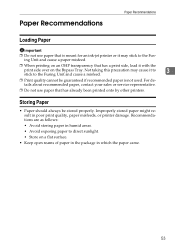
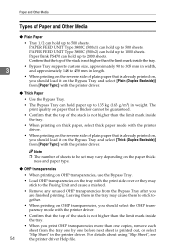
...to direct sunlight. • Store on the Bypass Tray. Improperly stored paper might result in humid areas. • Avoid exposing paper to the Fusing Unit and cause a misfeed. ❒ Print quality cannot be stored properly. For details about recommended paper, contact your sales or service representative. ❒...as follows: • Avoid storing paper in poor print quality, paper misfeeds, or printer damage. Storing Paper • Paper should always be guaranteed if recommended paper is meant for an ink-jet printer or it may cause it with the print side over on a flat surface. ...
...to direct sunlight. • Store on the Bypass Tray. Improperly stored paper might result in humid areas. • Avoid exposing paper to the Fusing Unit and cause a misfeed. ❒ Print quality cannot be stored properly. For details about recommended paper, contact your sales or service representative. ❒...as follows: • Avoid storing paper in poor print quality, paper misfeeds, or printer damage. Storing Paper • Paper should always be guaranteed if recommended paper is meant for an ink-jet printer or it may cause it with the print side over on a flat surface. ...
Maintenance Guide
Page 64
... of the stack is not higher than the limit mark inside the tray. • When printing on thick paper, select thick paper mode with the printer driver. • When printing on the reverse side of plain paper that is thicker cannot be set may vary depending on the paper thickness and... OHP transparencies, use the Bypass Tray. • Load OHP transparencies on the tray with the print side over or they may cause them to the Fusing Unit and cause a misfeed. • Remove any unused OHP transparencies from the tray one by one copies, remove each sheet from the Bypass Tray after you...
... of the stack is not higher than the limit mark inside the tray. • When printing on thick paper, select thick paper mode with the printer driver. • When printing on the reverse side of plain paper that is thicker cannot be set may vary depending on the paper thickness and... OHP transparencies, use the Bypass Tray. • Load OHP transparencies on the tray with the print side over or they may cause them to the Fusing Unit and cause a misfeed. • Remove any unused OHP transparencies from the tray one by one copies, remove each sheet from the Bypass Tray after you...
Maintenance Guide
Page 81
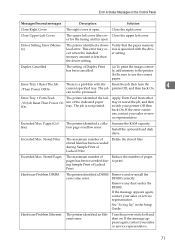
... dust under the DIMM. er for the fusing unit) is specified with the Reset the job then turn the 4 /Then Power OffOn current specified tray. Duplex Cancelled The setting of Lacked Print. Exceeded Max. See "Setting Up" in the Setup Guide. Hardware Problem Ethernet The printer identified an Ethernet error. Verify that the...
... dust under the DIMM. er for the fusing unit) is specified with the Reset the job then turn the 4 /Then Power OffOn current specified tray. Duplex Cancelled The setting of Lacked Print. Exceeded Max. See "Setting Up" in the Setup Guide. Hardware Problem Ethernet The printer identified an Ethernet error. Verify that the...

Maintenance Guide
Page 85
...punch wast box. moving the Punch-hole chips" Remove MisfeedA:Internal Path /See Instructions in Front Cover There is a misfeed in the fusing unit. For more information, see p.92 "When "Remove Misfeed A:Internal Path" Appears". Open the mailbox cover and remove misfeed. Punch-...Setting or Form Feed The printer detected the setting of the indicated tray is full of the punchwast box. er. Remove the misfed paper following the instructions inside the front cover. Open the finisher cover and remove misfeed. Remove MisfeedB: Fusing Unit /See Instructions in Front ...
...punch wast box. moving the Punch-hole chips" Remove MisfeedA:Internal Path /See Instructions in Front Cover There is a misfeed in the fusing unit. For more information, see p.92 "When "Remove Misfeed A:Internal Path" Appears". Open the mailbox cover and remove misfeed. Punch-...Setting or Form Feed The printer detected the setting of the indicated tray is full of the punchwast box. er. Remove the misfed paper following the instructions inside the front cover. Open the finisher cover and remove misfeed. Remove MisfeedB: Fusing Unit /See Instructions in Front ...
Maintenance Guide
Page 87
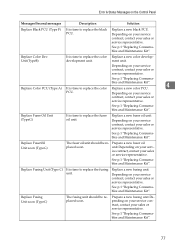
... representative. See p.1 "Replacing Consumables and Maintenance Kit". See p.1 "Replacing Consumables and Maintenance Kit". ment unit. See p.1 "Replacing Consumables and Maintenance Kit". Replace Fusing Unit (Type C) It is time to replace the color Replace a new color PCU. Replace a new fusing unit. Prepare a new fusing unit.Depending on your service contract, contact your sales or service representative. bles and Maintenance Kit...
... representative. See p.1 "Replacing Consumables and Maintenance Kit". See p.1 "Replacing Consumables and Maintenance Kit". ment unit. See p.1 "Replacing Consumables and Maintenance Kit". Replace Fusing Unit (Type C) It is time to replace the color Replace a new color PCU. Replace a new fusing unit. Prepare a new fusing unit.Depending on your service contract, contact your sales or service representative. bles and Maintenance Kit...
Maintenance Guide
Page 88
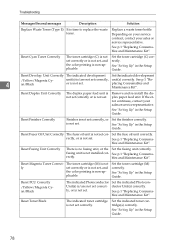
... Up" in the Setup Guide. Unit Correctly The indicated development Set the indicated development /Yellow/Magenta Cy- 4 an/Black unit(s) is/are not set correctly, or is not set , and the color printing is not set correctly, unit(s) correctly. Reset Finisher Correctly Finisher is no fusing unit, or the Set the fusing unit correctly. bles and Maintenance Kit".
... Up" in the Setup Guide. Unit Correctly The indicated development Set the indicated development /Yellow/Magenta Cy- 4 an/Black unit(s) is/are not set correctly, or is not set , and the color printing is not set correctly, unit(s) correctly. Reset Finisher Correctly Finisher is no fusing unit, or the Set the fusing unit correctly. bles and Maintenance Kit".
Maintenance Guide
Page 102
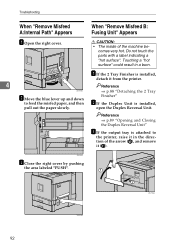
...and then pull out the paper slowly. ⇒ p.88 "Detaching the 2 Tray Finisher" B If the Duplex Unit is installed, detach it from the printer. 4 Reference ZDJH206J B Move the blue lever up and down to the printer, raise it in a burn. R CAUTION: • The inside of the arrow (A), and remove it (B)....pushing the area labeled "PUSH". 92 ZDJP708J ZDJP038J comes very hot. Troubleshooting When "Remove Misfeed A:Internal Path" Appears When "Remove Misfeed B: Fusing Unit" Appears A Open the right cover. Touching a "hot surface" could result in the direction of the machine be-
...and then pull out the paper slowly. ⇒ p.88 "Detaching the 2 Tray Finisher" B If the Duplex Unit is installed, detach it from the printer. 4 Reference ZDJH206J B Move the blue lever up and down to the printer, raise it in a burn. R CAUTION: • The inside of the arrow (A), and remove it (B)....pushing the area labeled "PUSH". 92 ZDJP708J ZDJP038J comes very hot. Troubleshooting When "Remove Misfeed A:Internal Path" Appears When "Remove Misfeed B: Fusing Unit" Appears A Open the right cover. Touching a "hot surface" could result in the direction of the machine be-


