Ricoh C811DN T1 - Aficio Color Laser Printer Support and Manuals
Get Help and Manuals for this Ricoh item
View All Support Options Below
Free Ricoh C811DN T1 manuals!
Problems with Ricoh C811DN T1?
Ask a Question
Free Ricoh C811DN T1 manuals!
Problems with Ricoh C811DN T1?
Ask a Question
Ricoh C811DN T1 Videos

"RICOH SP C811DN" "Colour laser printer" jkbm, sc546, sc544, sc542, sc545, Printers ashford
Duration: 4:26
Total Views: 610
Duration: 4:26
Total Views: 610
Popular Ricoh C811DN T1 Manual Pages
Hardware Guide - Page 12

... 5.5 SP2 or higher • Firefox 1.0 or higher
1. Follow the instructions below to complete the installation. 6. Auto Run may not work under certain operating system settings. Installing the Operating Instructions
The CD-ROM "Manuals" provided with this printer driver, and then click [Uninstall]. In this case, launch "Setup.exe" in the [Start] menu, select this printer contains HTML...
Hardware Guide - Page 40

2. If it cannot be installed
correctly even after reattempting installation, contact your sales or service representative.
• For information on printing the configuration page, see "Test Printing", Quick Installation Guide.
• Install the controller board carefully. Installing Options
• The table below shows the total SDRAM module capacities. See p.26 "Cautions When Re-...
Hardware Guide - Page 44

... the user account enhance unit was correctly installed by returning unneeded user account enhance units to your sales or service representative.
• For information about printing the configuration page, see "Test Printing", Quick Installation Guide. • Install the controller board carefully. See p.26 "Cautions When Re-installing the Controller Board"
for "Device Connection" on the...
Hardware Guide - Page 64

... supports USB1.1 speed.
• USB connection with this printer. ATU036S
• Connecting the USB cable to the Gigabit Ethernet board USB port Connect the...Connect the USB cable to the printer. • Connecting the USB cable to the standard USB port Connect the smaller connector of the USB cable to the USB port of the printer. See "Installing the Printer Driver Using USB", Software Guide...
Hardware Guide - Page 65

.... USB Cable Connection
• "Installing the Printer Driver Using USB", Software Guide • p.43 "Installing the Gigabit Ethernet Board"
Digital Camera Connection
This printer supports direct printing,...
connecting the camera directly to the USB host interface board.
63 Connect the digital camera to a digital camera.
3
ASZ051S
• This function requires the following optional units:...
Hardware Guide - Page 73

... a configuration page to select [Host Interface], and then press the [OK] key.
3. Press the [ ] or [ ] key to confirm the settings. • For details about printing the configuration page, see "Test printing", Quick Installation Guide.
71 To check the detected addresses, press the followings:
• [IP Address] IP address
• [Subnet Mask] Subnet Mask...
Hardware Guide - Page 75

...Installation Guide. Print a configuration page to the initial screen. 7.
Router/HUB [10Mbps Half [10Mbps Full
D.]
D.]
10 Mbps half duplex
-
10 Mbps full duplex
-
100 Mbps half duplex
-
-
100 Mbps full duplex
-
- Setting the Ethernet Speed
You can set... they are connected.
In most cases, this should be left on the default setting, [Auto Select]. This setting allows two ...
Hardware Guide - Page 77

... speed, and then press the [OK] key.
4
6. Ethernet Configuration
4. Print a configuration page to the initial screen. 7. Press the [Menu] key to return to confirm the settings. • For details about printing the configuration page, see "Test Printing", Quick Installation Guide.
75
Hardware Guide - Page 80

...If an SSID has been set, you can switch among upper/lower cases, numeric codes, and symbols by pressing...Installation Guide. You can check the current SSID setting. 2. Print a configuration page to select [SSID Setting], and then press the [OK] key.
The characters that the printer will connect to change the transmission speed depending on the environment you must specify the Service
4
Set...
Hardware Guide - Page 89

When using control panel or printer driver.
87
Supported
When printing on the reverse side of plain paper that is already printed on,...unit) or 2000 (2000-sheet paper feed unit)
• Tray 4 or tray 5: 550
• Bypass tray: 100
• Make sure paper is not stacked higher than the paper guides inside the tray.
Plain paper Paper thickness Printer setup Printer driver setup Supported...
Hardware Guide - Page 90

...paper is not stacked higher than the paper guides inside it.
• [Thick Paper 1]: supported • [Thick Paper 2] [Thick Paper 3]: not supported
• Print speed is slightly slower than when using control panel or printer driver.
88 5.
Paper and Other Media
Thick paper
Paper thickness
Printer setup
5
Printer driver setup
Supported paper feeding tray
Duplex printing Additional...
Hardware Guide - Page 91
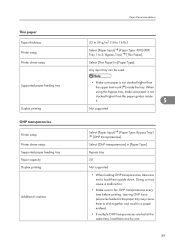
...Thin Paper]. Thin paper Paper thickness Printer setup Printer driver setup
Supported paper feeding tray
Duplex printing OHP transparencies Printer setup Printer driver setup Supported paper feeding tray Paper capacity Duplex printing
...When
using the bypass tray, make sure paper is not stacked higher than the paper guides inside the tray. Any input tray can be used.
• Make sure paper...
Hardware Guide - Page 93

...higher than the paper guides inside the tray. Any input tray can be improved, select
5
[Maintenance] [General Settings] [Label Pa-
Not supported
Default: [Labels 1]...Type].
Label paper Printer setup Printer driver setup Supported paper feeding tray Duplex printing
Label paper setup
Additional cautions
Glossy paper Printer setup Printer driver setup Supported paper feeding tray
Paper...
Hardware Guide - Page 94

...settings allow thicker paper to [Coated Pa-
Paper and Other Media
Duplex printing
Glossy paper setup
Additional cautions
5
Coated paper Printer setup Printer driver setup Supported paper feeding tray Duplex printing Coated paper setup...sure paper is not stacked higher than the paper guides inside the tray. When selecting the paper setting depending on the paper thickness that you are ...
Hardware Guide - Page 95

...tray
Duplex printing Envelopes Printer setup Printer driver setup Supported paper feeding tray
Paper Recommendations
per type settings, set special paper.
5
Select [Paper Input] [Paper Type: XXX] (XXX:
Tray 1 to 5, Bypass Tray) [Special Paper 1] to [Coated Paper 7]. Select [Special Paper 1] to be used .
• Make sure paper is slightly slower than the paper guides inside the tray.
Ricoh C811DN T1 Reviews
We have not received any reviews for Ricoh yet.