User's Guide
Page 12
... a Location 2.4 Installing the Toner Cartridge 2.5 Loading Paper 2.7 Making Connections 2.11 Turning the Machine On 2.15 Changing the Display Language 2.16 Setting the Machine ID 2.17 Entering Characters Using the Number Keypad 2.18 Setting the Date and Time 2.20 Changing the Clock Mode 2.21 Setting the Paper Size and Type 2.21 Setting Sounds 2.22 Speaker, Ringer, Key Sound, and Alarm Sound 2.22 Speaker Volume 2.23 Using the Save Modes 2.24 Power Save Mode 2.24 Scan Lamp Save Mode 2.24 About the Software 2.26 Printer Driver Features 2.27 Installing the Software in Windows...
... a Location 2.4 Installing the Toner Cartridge 2.5 Loading Paper 2.7 Making Connections 2.11 Turning the Machine On 2.15 Changing the Display Language 2.16 Setting the Machine ID 2.17 Entering Characters Using the Number Keypad 2.18 Setting the Date and Time 2.20 Changing the Clock Mode 2.21 Setting the Paper Size and Type 2.21 Setting Sounds 2.22 Speaker, Ringer, Key Sound, and Alarm Sound 2.22 Speaker Volume 2.23 Using the Save Modes 2.24 Power Save Mode 2.24 Scan Lamp Save Mode 2.24 About the Software 2.26 Printer Driver Features 2.27 Installing the Software in Windows...
User's Guide
Page 13
... Special Materials 3.3 Loading Paper 3.4 In the Standard Tray 3.4 In the Multipurpose Tray 3.6 Using the Manual Feed Mode 3.8 Selecting an Output Location 3.10 Printing to the Front Output Tray (Face down 3.10 Printing to the Rear Output Slot (Face up 3.11 Chapter 4: PRINTING TASKS Printing a Document in Windows 4.2 Canceling a Print Job 4.3 Printer Settings 4.4 Layout tab 4.5 Paper Tab 4.6 Graphics Tab 4.8 Extras Tab 4.10 About Tab 4.11 Printer Tab 4.11 Using a Favorite Setting 4.12 Using Help 4.12 Printing Multiple Pages on One Sheet of Paper 4.13 Printing Posters 4.14...
... Special Materials 3.3 Loading Paper 3.4 In the Standard Tray 3.4 In the Multipurpose Tray 3.6 Using the Manual Feed Mode 3.8 Selecting an Output Location 3.10 Printing to the Front Output Tray (Face down 3.10 Printing to the Rear Output Slot (Face up 3.11 Chapter 4: PRINTING TASKS Printing a Document in Windows 4.2 Canceling a Print Job 4.3 Printer Settings 4.4 Layout tab 4.5 Paper Tab 4.6 Graphics Tab 4.8 Extras Tab 4.10 About Tab 4.11 Printer Tab 4.11 Using a Favorite Setting 4.12 Using Help 4.12 Printing Multiple Pages on One Sheet of Paper 4.13 Printing Posters 4.14...

User's Guide
Page 17
Appendix B: INSTALLING MACHINE OPTIONS Installing Memory DIMM B.2 Removing a Memory DIMM B.4 Installing an Optional Tray B.5 Setting Tray 2 in the Printer Properties B.7 Appendix C: SPECIFICATIONS General Specifications C.2 Scanner and Copier Specifications C.3 Printer Specifications C.4 Facsimile Specifications C.5 Paper Specifications C.6 Overview C.6 Supported Sizes of Paper C.7 Guidelines for Using Paper C.8 Paper Specifications C.9 Paper Output Capacity C.9 Paper Storage Environment C.9 xvi
Appendix B: INSTALLING MACHINE OPTIONS Installing Memory DIMM B.2 Removing a Memory DIMM B.4 Installing an Optional Tray B.5 Setting Tray 2 in the Printer Properties B.7 Appendix C: SPECIFICATIONS General Specifications C.2 Scanner and Copier Specifications C.3 Printer Specifications C.4 Facsimile Specifications C.5 Paper Specifications C.6 Overview C.6 Supported Sizes of Paper C.7 Guidelines for Using Paper C.8 Paper Specifications C.9 Paper Output Capacity C.9 Paper Storage Environment C.9 xvi
User's Guide
Page 24
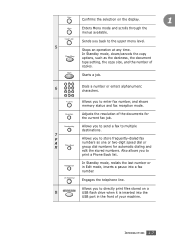
... to send a fax to print a Phone Book list. Allows you to multiple destinations. Allows you to directly print files stored on the display. 1 Menu Enters Menu mode and scrolls through the menus available. Allows you to store frequently-dialed fax numbers as the darkness, the document type setting, the copy size, and the number of the documents for automatic dialing and edit the stored numbers. Clear/Stop In Standby mode, clears/cancels the copy options, such as one or two-digit speed dial or group dial numbers...
... to send a fax to print a Phone Book list. Allows you to multiple destinations. Allows you to directly print files stored on the display. 1 Menu Enters Menu mode and scrolls through the menus available. Allows you to store frequently-dialed fax numbers as the darkness, the document type setting, the copy size, and the number of the documents for automatic dialing and edit the stored numbers. Clear/Stop In Standby mode, clears/cancels the copy options, such as one or two-digit speed dial or group dial numbers...
User's Guide
Page 27
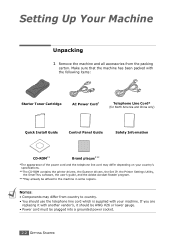
... China only) Quick Install Guide Control Panel Guide Safety Information CD-ROM** Brand plaque*** *The appearance of the power cord and the telephone line cord may differ from the packing carton. If you are replacing it with your country's specifications. **The CD-ROM contains the printer drivers, the Scanner drivers, the Set IP, the Printer Settings Utility, the SmarThru software, the user's guide, and the Adobe Acrobat Reader program. ***May already...
... China only) Quick Install Guide Control Panel Guide Safety Information CD-ROM** Brand plaque*** *The appearance of the power cord and the telephone line cord may differ from the packing carton. If you are replacing it with your country's specifications. **The CD-ROM contains the printer drivers, the Scanner drivers, the Set IP, the Printer Settings Utility, the SmarThru software, the user's guide, and the Adobe Acrobat Reader program. ***May already...
User's Guide
Page 51
... Windows, you must install the MFP driver. Use this program, you have set up your machine and connected it to take full advantage of the machine. For information about using the program, see page 2.48. • Network Scan Driver- The Set IP can install selectively or all the following tabs: Scan Settings, Phonebook, Printer, and Firmware Update. The Printer Settings Utility window provides the following components: • Printer Driver- The Multi Direct Print Type S IPP port is the accompanying Windows-based software for scanning documents...
... Windows, you must install the MFP driver. Use this program, you have set up your machine and connected it to take full advantage of the machine. For information about using the program, see page 2.48. • Network Scan Driver- The Set IP can install selectively or all the following tabs: Scan Settings, Phonebook, Printer, and Firmware Update. The Printer Settings Utility window provides the following components: • Printer Driver- The Multi Direct Print Type S IPP port is the accompanying Windows-based software for scanning documents...
User's Guide
Page 75
... numbers list. Allows you to set the margin of print image on the page. Allows you can include in the group. Shows the numbers included in the Printer Settings Utility to your machine. 2.50 GETTING STARTED Enter a name for the group. When you to set the PCL emulation configuration. After selecting a number, click Add to move it and click Remove. Allows you click Group dial, the following window opens. Downloads the settings...
... numbers list. Allows you to set the margin of print image on the page. Allows you can include in the group. Shows the numbers included in the Printer Settings Utility to your machine. 2.50 GETTING STARTED Enter a name for the group. When you to set the PCL emulation configuration. After selecting a number, click Add to move it and click Remove. Allows you click Group dial, the following window opens. Downloads the settings...
User's Guide
Page 85
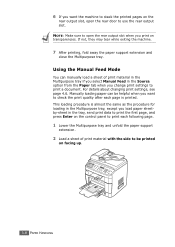
... the paper support extension. 2 Load a sheet of print material with the side to be helpful when you select Manual Feed in the tray, send print data to print the first page, and press Enter on the control panel to print each page is almost the same as the procedure for loading in the Multipurpose tray, except you load paper sheetby-sheet in the Source option from the Paper tab when you change print settings to print a document. For details about changing print settings, see page 4.6. Using the Manual Feed Mode...
... the paper support extension. 2 Load a sheet of print material with the side to be helpful when you select Manual Feed in the tray, send print data to print the first page, and press Enter on the control panel to print each page is almost the same as the procedure for loading in the Multipurpose tray, except you load paper sheetby-sheet in the Source option from the Paper tab when you change print settings to print a document. For details about changing print settings, see page 4.6. Using the Manual Feed Mode...
User's Guide
Page 90
This chapter includes: • Printing a Document in Windows and how to a Selected Paper Size • Printing a Reduced or Enlarged Document • Using Watermarks • Using Overlays 4 PRINTING TASKS This chapter explains how to print your documents in Windows • Printer Settings • Printing Multiple Pages on One Sheet of Paper • Printing Posters • Fitting Your Document to use the print settings.
This chapter includes: • Printing a Document in Windows and how to a Selected Paper Size • Printing a Reduced or Enlarged Document • Using Watermarks • Using Overlays 4 PRINTING TASKS This chapter explains how to print your documents in Windows • Printer Settings • Printing Multiple Pages on One Sheet of Paper • Printing Posters • Fitting Your Document to use the print settings.

User's Guide
Page 93
... Windows NT 4.0, select Document Default. 5. When the printer properties are displayed, you are needed for Windows XP. This User's Guide shows the Printing Preferences window for your print job. To make your operating system. For Windows XP, select Printers and Faxes. 3. The printer's properties window may differ, depending on your changes permanent, make them in the Printers folder. If you access printer properties through the Printers folder, you need when using the current program. Follow this procedure: 1. Your printer's Printing Preferences window...
... Windows NT 4.0, select Document Default. 5. When the printer properties are displayed, you are needed for Windows XP. This User's Guide shows the Printing Preferences window for your print job. To make your operating system. For Windows XP, select Printers and Faxes. 3. The printer's properties window may differ, depending on your changes permanent, make them in the Printers folder. If you access printer properties through the Printers folder, you need when using the current program. Follow this procedure: 1. Your printer's Printing Preferences window...

User's Guide
Page 96
... Make sure that Type is set to Auto Select, the machine automatically picks up print material in the First Page option. 6 Scaling Scaling allows you to print the first page using a different paper type from None, Fit to Page, and Reduce/Enlarge. Use the Manual Feed source when printing to Printer Default. PRINTING TASKS 4.7 If the paper source is set to automatically or manually scale your print job on a page. To use cotton paper, set the Tray 2 in printer properties (see page B.7), you load...
... Make sure that Type is set to Auto Select, the machine automatically picks up print material in the First Page option. 6 Scaling Scaling allows you to print the first page using a different paper type from None, Fit to Page, and Reduce/Enlarge. Use the Manual Feed source when printing to Printer Default. PRINTING TASKS 4.7 If the paper source is set to automatically or manually scale your print job on a page. To use cotton paper, set the Tray 2 in printer properties (see page B.7), you load...
User's Guide
Page 100
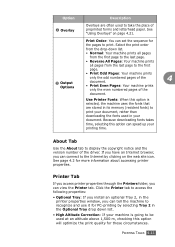
... can set the sequence for the pages to be used at an altitude above 1,500 m, checking this option can connect to take the place of the document. Printer Tab If you access printer properties through the Printers folder, you can speed up your printing time. Option Description 2 Overlay Overlays are stored in its memory (resident fonts) to print your document, rather than downloading the fonts used in your machine is going to print. PRINTING...
... can set the sequence for the pages to be used at an altitude above 1,500 m, checking this option can connect to take the place of the document. Printer Tab If you access printer properties through the Printers folder, you can speed up your printing time. Option Description 2 Overlay Overlays are stored in its memory (resident fonts) to print your document, rather than downloading the fonts used in your machine is going to print. PRINTING...
User's Guide
Page 131
... scan and save documents in the USB flash drive by selecting it from the list of available applications via the Scan-to . NOTES: • To scan with your machine, you must install the MFP driver. • Scanning is done through the same LPT or USB port currently assigned for your machine to an application: Use the Scan-to scan. Before assigning the software program, you must configure the scan list using the Printer Settings Utility. Scanning Basics This machine...
... scan and save documents in the USB flash drive by selecting it from the list of available applications via the Scan-to . NOTES: • To scan with your machine, you must install the MFP driver. • Scanning is done through the same LPT or USB port currently assigned for your machine to an application: Use the Scan-to scan. Before assigning the software program, you must configure the scan list using the Printer Settings Utility. Scanning Basics This machine...
User's Guide
Page 156
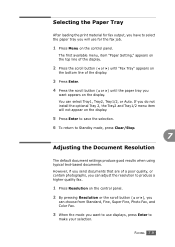
... use for fax output, you have to select the paper tray you can select Tray1, Tray2, Tray1/2, or Auto. If you do not install the optional Tray 2, the Tray2 and Tray1/2 menu item will use displays, press Enter to make your selection. FAXING 7.9 Selecting the Paper Tray After loading the print material for the fax job. 1 Press Menu on the display. 5 Press Enter to save the selection. 6 To return to Standby mode, press Clear/Stop. 7 Adjusting the Document Resolution The default document settings...
... use for fax output, you have to select the paper tray you can select Tray1, Tray2, Tray1/2, or Auto. If you do not install the optional Tray 2, the Tray2 and Tray1/2 menu item will use displays, press Enter to make your selection. FAXING 7.9 Selecting the Paper Tray After loading the print material for the fax job. 1 Press Menu on the display. 5 Press Enter to save the selection. 6 To return to Standby mode, press Clear/Stop. 7 Adjusting the Document Resolution The default document settings...
User's Guide
Page 183
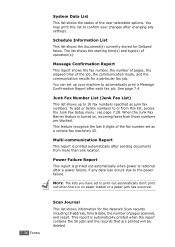
... starting time(s) and type(s) of the job, the communication mode, and the communication results for a particular fax job. Message Confirmation Report This report shows the fax number, the number of pages, the elapsed time of operation(s). Junk Fax Number List (Junk Fax List) This list shows up your changes after changing any data loss occurs due to automatically print a Message Confirmation Report after a power failure, if any settings. To add or delete numbers to or from this list to confirm your machine to the power failure. Power Failure Report This report is printed...
... starting time(s) and type(s) of the job, the communication mode, and the communication results for a particular fax job. Message Confirmation Report This report shows the fax number, the number of pages, the elapsed time of operation(s). Junk Fax Number List (Junk Fax List) This list shows up your changes after changing any data loss occurs due to automatically print a Message Confirmation Report after a power failure, if any settings. To add or delete numbers to or from this list to confirm your machine to the power failure. Power Failure Report This report is printed...
User's Guide
Page 184
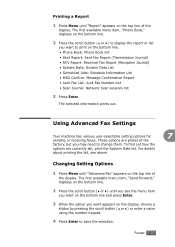
... available menu item, "Send Forward," displays on the bottom line. • Phone Book: Phone Book list • Sent Report: Sent Fax Report (Transmission Journal) • RCV Report: Received Fax Report (Reception Journal) • System Data: System Data List • Scheduled Jobs: Schedule Information List • MSG Confirm: Message Confirmation Report • Junk Fax List: Junk Fax Number List • Scan Journal: Network Scan sessions list 3 Press Enter. Using Advanced Fax Settings Your machine has various user-selectable setting options for 7 sending or receiving faxes.
... available menu item, "Send Forward," displays on the bottom line. • Phone Book: Phone Book list • Sent Report: Sent Fax Report (Transmission Journal) • RCV Report: Received Fax Report (Reception Journal) • System Data: System Data List • Scheduled Jobs: Schedule Information List • MSG Confirm: Message Confirmation Report • Junk Fax List: Junk Fax Number List • Scan Journal: Network Scan sessions list 3 Press Enter. Using Advanced Fax Settings Your machine has various user-selectable setting options for 7 sending or receiving faxes.
User's Guide
Page 189
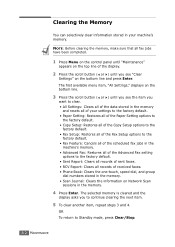
... Settings: Clears all of the data stored in the memory and resets all of received faxes. • Phone Book: Clears the one-touch, speed dial, and group dial numbers stored in the memory. • Scan Journal: Clears the information on Network Scan sessions in the machine's memory. • Advanced Fax: Restores all of the Advanced Fax setting options to the factory default. • Sent Report: Clears all records of sent faxes. • RCV Report: Clears all fax jobs have been completed. 1 Press Menu on the control panel...
... Settings: Clears all of the data stored in the memory and resets all of received faxes. • Phone Book: Clears the one-touch, speed dial, and group dial numbers stored in the memory. • Scan Journal: Clears the information on Network Scan sessions in the machine's memory. • Advanced Fax: Restores all of the Advanced Fax setting options to the factory default. • Sent Report: Clears all records of sent faxes. • RCV Report: Clears all fax jobs have been completed. 1 Press Menu on the control panel...

User's Guide
Page 221
... you use. See page 4.5. If possible, attach the cable and the machine to ensure that the paper size in the printer driver settings matches the paper in the tray. Try a print job that you have already printed successfully. The printer cable is blank. The maximum print speed of the page or try a new printer cable. From the Start menu, choose Settings and Printers. Ensure that your application. Try printing a job from another computer and try a print job that you know works. Exit Windows...
... you use. See page 4.5. If possible, attach the cable and the machine to ensure that the paper size in the printer driver settings matches the paper in the tray. Try a print job that you have already printed successfully. The printer cable is blank. The maximum print speed of the page or try a new printer cable. From the Start menu, choose Settings and Printers. Ensure that your application. Try printing a job from another computer and try a print job that you know works. Exit Windows...
User's Guide
Page 229
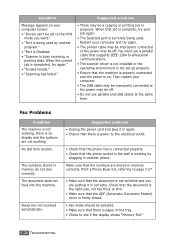
... the tray. • Check to the H/W mode you are not working by another phone. Check that the document is the right size, not too thick or thin. • Make sure that the ADF (Automatic Document Feeder) cover is firmly closed. • Fax mode should be off . • Do not use a parallel cable that supports IEEE-1284 bi-directional communications. • The scanner driver is not installed or the operating environment is not set...
... the tray. • Check to the H/W mode you are not working by another phone. Check that the document is the right size, not too thick or thin. • Make sure that the ADF (Automatic Document Feeder) cover is firmly closed. • Fax mode should be off . • Do not use a parallel cable that supports IEEE-1284 bi-directional communications. • The scanner driver is not installed or the operating environment is not set...
User's Guide
Page 276
...copying 5.8 printing 4.17 replacing toner cartridge 8.8 reports, print 7.35 resolution faxing 7.9 printing 4.8 S scanning contol panel 6.3 SmarThru 6.4 USB flash drive 10.3 WIA driver 6.7 searching Phone Book 7.26 Secure Receiving mode 7.34 sending a fax automatically 7.11 manually 7.12 Set IP Installing 2.46 Using 2.47 sharing printer, set A.2 SmarThru install 2.28 uninstall 2.45 software uninstall Windows 2.44 sounds, set 2.22 specifications facsimile C.5 general C.2 paper C.6 printer C.4 scanner and copier C.3 speed dial dialing 7.22 storing 7.21 system requirements Windows 2.28 T tel line...
...copying 5.8 printing 4.17 replacing toner cartridge 8.8 reports, print 7.35 resolution faxing 7.9 printing 4.8 S scanning contol panel 6.3 SmarThru 6.4 USB flash drive 10.3 WIA driver 6.7 searching Phone Book 7.26 Secure Receiving mode 7.34 sending a fax automatically 7.11 manually 7.12 Set IP Installing 2.46 Using 2.47 sharing printer, set A.2 SmarThru install 2.28 uninstall 2.45 software uninstall Windows 2.44 sounds, set 2.22 specifications facsimile C.5 general C.2 paper C.6 printer C.4 scanner and copier C.3 speed dial dialing 7.22 storing 7.21 system requirements Windows 2.28 T tel line...


