User's Guide
Page 2
... to scan and edit images and to change without prior notice. In no event will the company be liable for scanning and saving documents, and printing documents stored on the USB flash drive. It also provides all of the detailed instructions for using your machine for direct, indirect incidental or consequential...
... to scan and edit images and to change without prior notice. In no event will the company be liable for scanning and saving documents, and printing documents stored on the USB flash drive. It also provides all of the detailed instructions for using your machine for direct, indirect incidental or consequential...
User's Guide
Page 12
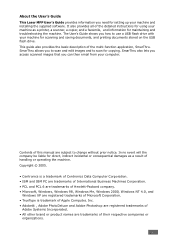
... Mode 2.24 About the Software 2.26 Printer Driver Features 2.27 Installing the Software in Windows 2.28 System Requirements 2.28 Installing Software for Local Printing 2.29 Installing Software for Network Printing 2.34 Installing the SmarThru 4 2.41 Repairing Software 2.43 Removing Software 2.44 Uninstalling the MFP Driver 2.44 Uninstalling the SmarThru 2.45 Uninstalling the...
... Mode 2.24 About the Software 2.26 Printer Driver Features 2.27 Installing the Software in Windows 2.28 System Requirements 2.28 Installing Software for Local Printing 2.29 Installing Software for Network Printing 2.34 Installing the SmarThru 4 2.41 Repairing Software 2.43 Removing Software 2.44 Uninstalling the MFP Driver 2.44 Uninstalling the SmarThru 2.45 Uninstalling the...
User's Guide
Page 13
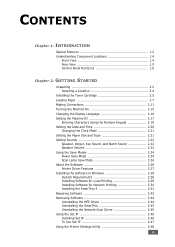
...Using the Manual Feed Mode 3.8 Selecting an Output Location 3.10 Printing to the Front Output Tray (Face down 3.10 Printing to the Rear Output Slot (Face up 3.11 Chapter 4: PRINTING TASKS Printing a Document in Windows 4.2 Canceling a Print Job 4.3 Printer Settings 4.4 Layout tab 4.5 Paper Tab 4.6 Graphics...11 Printer Tab 4.11 Using a Favorite Setting 4.12 Using Help 4.12 Printing Multiple Pages on One Sheet of Paper 4.13 Printing Posters 4.14 Fitting Your Document to a Selected Paper Size 4.16 Printing a Reduced or Enlarged Document 4.17 Using Watermarks 4.18 Using an Existing ...
...Using the Manual Feed Mode 3.8 Selecting an Output Location 3.10 Printing to the Front Output Tray (Face down 3.10 Printing to the Rear Output Slot (Face up 3.11 Chapter 4: PRINTING TASKS Printing a Document in Windows 4.2 Canceling a Print Job 4.3 Printer Settings 4.4 Layout tab 4.5 Paper Tab 4.6 Graphics...11 Printer Tab 4.11 Using a Favorite Setting 4.12 Using Help 4.12 Printing Multiple Pages on One Sheet of Paper 4.13 Printing Posters 4.14 Fitting Your Document to a Selected Paper Size 4.16 Printing a Reduced or Enlarged Document 4.17 Using Watermarks 4.18 Using an Existing ...

User's Guide
Page 15
... Transmission 7.25 Searching for a Number in Memory 7.26 Searching Sequentially through the Memory 7.26 Searching with a Particular First Letter 7.26 Printing a Phone Book List 7.27 Sending Broadcast Faxes 7.28 Sending a Delayed Fax 7.29 Sending a Priority Fax 7.31 Adding Documents To ...a Scheduled Fax 7.32 Canceling a Scheduled Fax 7.33 Using Secure Receiving Mode 7.34 Printing Reports 7.35 Using Advanced Fax Settings 7.37 Changing Setting Options 7.37 Advanced Fax Setting Options 7.38 Chapter 8: MAINTENANCE Clearing the Memory ...
... Transmission 7.25 Searching for a Number in Memory 7.26 Searching Sequentially through the Memory 7.26 Searching with a Particular First Letter 7.26 Printing a Phone Book List 7.27 Sending Broadcast Faxes 7.28 Sending a Delayed Fax 7.29 Sending a Priority Fax 7.31 Adding Documents To ...a Scheduled Fax 7.32 Canceling a Scheduled Fax 7.33 Using Secure Receiving Mode 7.34 Printing Reports 7.35 Using Advanced Fax Settings 7.37 Changing Setting Options 7.37 Advanced Fax Setting Options 7.38 Chapter 8: MAINTENANCE Clearing the Memory ...
User's Guide
Page 16
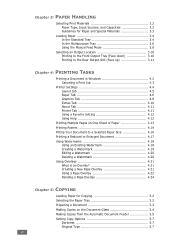
...Clearing LCD Error Messages 9.12 Solving Other Problems 9.16 Paper Feeding Problems 9.16 Printing Problems 9.17 Printing Quality Problems 9.19 Copying Problems 9.24 Scanning Problems 9.25 Fax Problems 9.26 Solving Network Printing Problems 9.28 General Problems 9.28 Windows Problems 9.29 Network Scan Problems 9.29 Chapter... the Default Settings 10.6 Deleting an Image File 10.7 Formatting the USB Flash Drive 10.8 Viewing the USB Memory Status 10.9 Printing From the USB Flash Drive 10.10 Backing Up Data 10.11 Appendix A: USING YOUR MACHINE ON A NETWORK Setting Up a Locally...
...Clearing LCD Error Messages 9.12 Solving Other Problems 9.16 Paper Feeding Problems 9.16 Printing Problems 9.17 Printing Quality Problems 9.19 Copying Problems 9.24 Scanning Problems 9.25 Fax Problems 9.26 Solving Network Printing Problems 9.28 General Problems 9.28 Windows Problems 9.29 Network Scan Problems 9.29 Chapter... the Default Settings 10.6 Deleting an Image File 10.7 Formatting the USB Flash Drive 10.8 Viewing the USB Memory Status 10.9 Printing From the USB Flash Drive 10.10 Backing Up Data 10.11 Appendix A: USING YOUR MACHINE ON A NETWORK Setting Up a Locally...
User's Guide
Page 18
Your machine provides printing, copying, scanning, and faxing functions! 1 INTRODUCTION Thank you for purchasing this multifunctional product. This chapter includes: • Special Features • Understanding Component Locations
Your machine provides printing, copying, scanning, and faxing functions! 1 INTRODUCTION Thank you for purchasing this multifunctional product. This chapter includes: • Special Features • Understanding Component Locations
User's Guide
Page 19
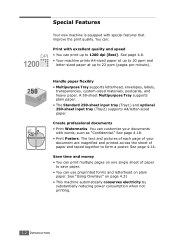
... Standard 250-sheet input tray (Tray1) and optional 250-sheet input tray (Tray2) supports A4/letter-sized paper. Create professional documents • Print Watermarks. You can use preprinted forms and letterhead on page 4.21 • This machine automatically conserves electricity by substantially reducing power consumption when not...at up to 20 ppm and letter-sized paper at up to save paper. • You can customize your document are magnified and printed across the sheet of paper to 1200 dpi [Best]. The text and pictures of each page of your documents with special features that...
... Standard 250-sheet input tray (Tray1) and optional 250-sheet input tray (Tray2) supports A4/letter-sized paper. Create professional documents • Print Watermarks. You can use preprinted forms and letterhead on page 4.21 • This machine automatically conserves electricity by substantially reducing power consumption when not...at up to 20 ppm and letter-sized paper at up to save paper. • You can customize your document are magnified and printed across the sheet of paper to 1200 dpi [Best]. The text and pictures of each page of your documents with special features that...
User's Guide
Page 20
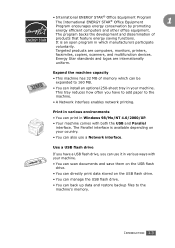
... multifunction devices. The Parallel interface is an open program in which can be expanded to 160 MB. • You can print in various ways with both the USB and Parallel interface. Targeted products are internationally uniform. INTRODUCTION 1.3 The program backs the ...development and dissemination of memory which manufacturers participate voluntarily. Print in various environments • You can install an optional 250-sheet tray in your machine. It is available depending on your...
... multifunction devices. The Parallel interface is an open program in which can be expanded to 160 MB. • You can print in various ways with both the USB and Parallel interface. Targeted products are internationally uniform. INTRODUCTION 1.3 The program backs the ...development and dissemination of memory which manufacturers participate voluntarily. Print in various environments • You can install an optional 250-sheet tray in your machine. It is available depending on your...
User's Guide
Page 23
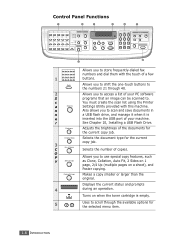
...-to Special Copy Reduce/Enlarge Enter Clear/Stop Menu Upper Level Start Symbols Facsimile Resolution Broadcasting Facsimile Phone Book Redial/Pause On Hook Dial Direct Print 1 Shift 2 S c a Scan-to scroll through 40. Also allows you to scan and save documents in a USB flash drive, and manage it when it is empty...
...-to Special Copy Reduce/Enlarge Enter Clear/Stop Menu Upper Level Start Symbols Facsimile Resolution Broadcasting Facsimile Phone Book Redial/Pause On Hook Dial Direct Print 1 Shift 2 S c a Scan-to scroll through 40. Also allows you to scan and save documents in a USB flash drive, and manage it when it is empty...
User's Guide
Page 24
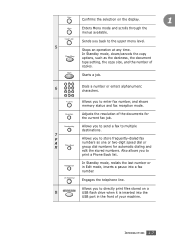
...front of your machine. Adjusts the resolution of copies. Allows you to multiple destinations. Engages the telephone line. Allows you back to print a Phone Book list. INTRODUCTION 1.7 Clear/Stop In Standby mode, clears/cancels the copy options, such as one or two-digit ... operation at any time. Start Starts a job. 6 Symbols Facsimile Resolution Broadcasting 7 F A Phone Book X Redial/Pause On Hook Dial 8 Direct Print Dials a number or enters alphanumeric characters. Enter Confirms the selection on a USB flash drive when it is inserted into the USB port in Edit mode...
...front of your machine. Adjusts the resolution of copies. Allows you to multiple destinations. Engages the telephone line. Allows you back to print a Phone Book list. INTRODUCTION 1.7 Clear/Stop In Standby mode, clears/cancels the copy options, such as one or two-digit ... operation at any time. Start Starts a job. 6 Symbols Facsimile Resolution Broadcasting 7 F A Phone Book X Redial/Pause On Hook Dial 8 Direct Print Dials a number or enters alphanumeric characters. Enter Confirms the selection on a USB flash drive when it is inserted into the USB port in Edit mode...
User's Guide
Page 31
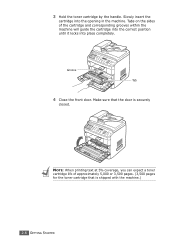
Tabs on the sides of approximately 5,000 or 3,500 pages. (3,500 pages for the toner cartridge that the door is shipped with the machine.) 2.6 GETTING STARTED Groove Tab 4 Close the front door. Slowly insert the cartridge into place completely. NOTE: When printing text at 5% coverage, you can expect a toner cartridge life of the cartridge and corresponding grooves within the machine will guide the cartridge into the correct position until it locks into the opening in the machine. Make sure that is securely closed. 3 Hold the toner cartridge by the handle.
Tabs on the sides of approximately 5,000 or 3,500 pages. (3,500 pages for the toner cartridge that the door is shipped with the machine.) 2.6 GETTING STARTED Groove Tab 4 Close the front door. Slowly insert the cartridge into place completely. NOTE: When printing text at 5% coverage, you can expect a toner cartridge life of the cartridge and corresponding grooves within the machine will guide the cartridge into the correct position until it locks into the opening in the machine. Make sure that is securely closed. 3 Hold the toner cartridge by the handle.

User's Guide
Page 32
Then tap the stack on facing down. GETTING STARTED 2.7 Loading Paper The paper tray can hold a maximum of 250 sheets of 20 lb plain paper. 2 To load a stack of Letter-sized paper: 1 Pull open the paper tray and remove it up. 3 Insert the paper stack into the paper tray with the side to be printed on a flat surface to even it from the machine. 2 Fan the edges of the paper stack to separate the pages. For details, see page 2.9. NOTE: If you want to load a different sized paper, you need to adjust the paper guides.
Then tap the stack on facing down. GETTING STARTED 2.7 Loading Paper The paper tray can hold a maximum of 250 sheets of 20 lb plain paper. 2 To load a stack of Letter-sized paper: 1 Pull open the paper tray and remove it up. 3 Insert the paper stack into the paper tray with the side to be printed on a flat surface to even it from the machine. 2 Fan the edges of the paper stack to separate the pages. For details, see page 2.9. NOTE: If you want to load a different sized paper, you need to adjust the paper guides.
User's Guide
Page 33
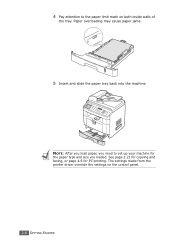
The settings made from the printer driver override the settings on both inside walls of the tray. See page 2.21 for copying and faxing, or page 4.6 for the paper type and size you need to the paper limit mark on the control panel. 2.8 GETTING STARTED 4 Pay attention to set up your machine for PC-printing. NOTE: After you load paper, you loaded. Paper overloading may cause paper jams. 5 Insert and slide the paper tray back into the machine.
The settings made from the printer driver override the settings on both inside walls of the tray. See page 2.21 for copying and faxing, or page 4.6 for the paper type and size you need to the paper limit mark on the control panel. 2.8 GETTING STARTED 4 Pay attention to set up your machine for PC-printing. NOTE: After you load paper, you loaded. Paper overloading may cause paper jams. 5 Insert and slide the paper tray back into the machine.

User's Guide
Page 42
... STARTED 2.17 The display asks you to enter the fax number. The Machine ID, containing your 2 telephone number and name (or company name), will be printed at the top of the display.
... STARTED 2.17 The display asks you to enter the fax number. The Machine ID, containing your 2 telephone number and name (or company name), will be printed at the top of the display.

User's Guide
Page 43
For example, to enter the letter O, press 6, labeled with the letter you want . If the next letter is printed on the display. For example, when you set up your company's name) and telephone number. When you store one-, two-, or three-digit speed dial ...
For example, to enter the letter O, press 6, labeled with the letter you want . If the next letter is printed on the display. For example, when you set up your company's name) and telephone number. When you store one-, two-, or three-digit speed dial ...
User's Guide
Page 45
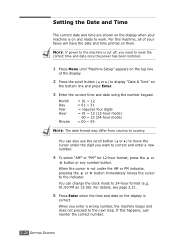
... work. Setting the Date and Time The current date and time are shown on the display when your faxes will have the date and time printed on them. You can change the clock mode to correct and enter a new number. 4 To select "AM" or "PM" for 12-hour format, press the...
... work. Setting the Date and Time The current date and time are shown on the display when your faxes will have the date and time printed on them. You can change the clock mode to correct and enter a new number. 4 To select "AM" or "PM" for 12-hour format, press the...
User's Guide
Page 46
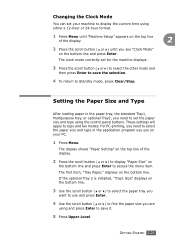
For PC-printing, you need to save it. 5 Press Upper Level. The display shows "Paper Setting" on the top line of the display. 2 Press the scroll button ( or ) ...
For PC-printing, you need to save it. 5 Press Upper Level. The display shows "Paper Setting" on the top line of the display. 2 Press the scroll button ( or ) ...

User's Guide
Page 49
Scan Lamp Save Mode Scan Lamp Save mode allows you to Standby mode, press Clear/Stop. The lamp automatically wakes up after a job is printed before it is not in actual use to the power save the scan lamp. Press Enter. 2.24 GETTING STARTED The available options are 5, 10, 15, ...
Scan Lamp Save Mode Scan Lamp Save mode allows you to Standby mode, press Clear/Stop. The lamp automatically wakes up after a job is printed before it is not in actual use to the power save the scan lamp. Press Enter. 2.24 GETTING STARTED The available options are 5, 10, 15, ...
User's Guide
Page 51
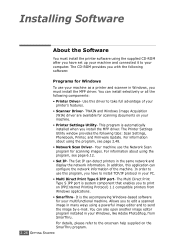
...see page 2.48. • Network Scan Driver- It is the accompanying Windows-based software for scanning documents on your computer. The Multi Direct Print Type S IPP port is automatically installed when you install the MFP driver. For information about using the program, see page 6.12. •... Acquisition (WIA) driver are available for your printer's features. • Scanner Driver- In order to use your PC. • Multi Direct Print Type S IPP port- For details, please refer to send the image by e-mail. For information about using a powerful image editor and to the...
...see page 2.48. • Network Scan Driver- It is the accompanying Windows-based software for scanning documents on your computer. The Multi Direct Print Type S IPP port is automatically installed when you install the MFP driver. For information about using the program, see page 6.12. •... Acquisition (WIA) driver are available for your printer's features. • Scanner Driver- In order to use your PC. • Multi Direct Print Type S IPP port- For details, please refer to send the image by e-mail. For information about using a powerful image editor and to the...
User's Guide
Page 52
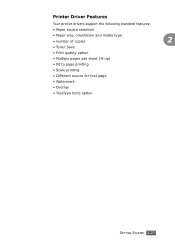
Printer Driver Features Your printer drivers support the following standard features: • Paper source selection • Paper size, orientation and media type • number of copies 2 • Toner Save • Print quality option • Multiple pages per sheet (N-up) • Fit to page printing • Scale printing • Different source for first page • Watermark • Overlay • TrueType fonts option GETTING STARTED 2.27
Printer Driver Features Your printer drivers support the following standard features: • Paper source selection • Paper size, orientation and media type • number of copies 2 • Toner Save • Print quality option • Multiple pages per sheet (N-up) • Fit to page printing • Scale printing • Different source for first page • Watermark • Overlay • TrueType fonts option GETTING STARTED 2.27


