
English Manual
Page 1
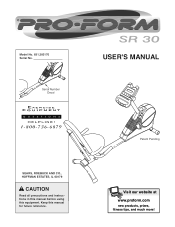
Keep this equipment. Serial Number Decal USER'S MANUAL SEARS, ROEBUCK AND CO., HOFFMAN ESTATES, IL 60179 CAUTION Read all precautions and instructions in this manual before using this manual for future reference. Patent Pending Visit our website at www.proform.com new products, prizes, fitness tips, and much more! Model No. 831.283170 Serial No.
Keep this equipment. Serial Number Decal USER'S MANUAL SEARS, ROEBUCK AND CO., HOFFMAN ESTATES, IL 60179 CAUTION Read all precautions and instructions in this manual before using this manual for future reference. Patent Pending Visit our website at www.proform.com new products, prizes, fitness tips, and much more! Model No. 831.283170 Serial No.
English Manual
Page 2
... EXERCISE CYCLE 8 MAINTENANCE AND TROUBLESHOOTING 11 CONDITIONING GUIDELINES 12 PART LIST 14 EXPLODED DRAWING 15 HOW TO ORDER REPLACEMENT PARTS Back Cover FULL 90 DAY WARRANTY Back Cover IMPORTANT PRECAUTIONS WARNING: To reduce the risk of heart rate readings. tions before using the exercise cycle; do not wear loose clothes that all users of the exercise cycle are adequately informed of 35 or persons with pre-existing health problems...
... EXERCISE CYCLE 8 MAINTENANCE AND TROUBLESHOOTING 11 CONDITIONING GUIDELINES 12 PART LIST 14 EXPLODED DRAWING 15 HOW TO ORDER REPLACEMENT PARTS Back Cover FULL 90 DAY WARRANTY Back Cover IMPORTANT PRECAUTIONS WARNING: To reduce the risk of heart rate readings. tions before using the exercise cycle; do not wear loose clothes that all users of the exercise cycle are adequately informed of 35 or persons with pre-existing health problems...
English Manual
Page 3
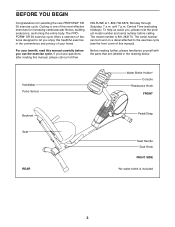
... home. To help us assist you, please note the product model number and serial number before you have questions after reading this healthful exercise in the drawing below. Handlebar Pulse Sensor Water Bottle Holder* Console Resistance Knob FRONT Backrest Seat REAR Pedal/Strap Seat Handle Seat Knob RIGHT SIDE *No water bottle is 831.283170. until 7 p.m. BEFORE YOU BEGIN Congratulations for increasing cardiovascular fitness, building endurance, and toning the entire body...
... home. To help us assist you, please note the product model number and serial number before you have questions after reading this healthful exercise in the drawing below. Handlebar Pulse Sensor Water Bottle Holder* Console Resistance Knob FRONT Backrest Seat REAR Pedal/Strap Seat Handle Seat Knob RIGHT SIDE *No water bottle is 831.283170. until 7 p.m. BEFORE YOU BEGIN Congratulations for increasing cardiovascular fitness, building endurance, and toning the entire body...
English Manual
Page 4
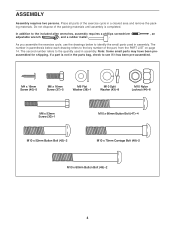
As you assemble the exercise cycle, use the drawings below each drawing refers to the key number of the part, from the PART LIST on page 14. The number in parenthesis below to the quantity used in assembly. ASSEMBLY Assembly requires two persons. In addition to see if it has been pre-assembled. Note: Some small parts may have been preassembled for shipping. M4 x 16mm Screw (40...
As you assemble the exercise cycle, use the drawings below each drawing refers to the key number of the part, from the PART LIST on page 14. The number in parenthesis below to the quantity used in assembly. ASSEMBLY Assembly requires two persons. In addition to see if it has been pre-assembled. Note: Some small parts may have been preassembled for shipping. M4 x 16mm Screw (40...
English Manual
Page 5
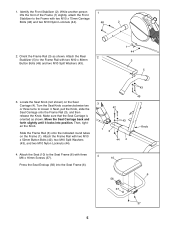
Identify the Front Stabilizer (2). Locate the Seat Knob (not shown) on the Frame (1). Move the Seat Carriage back and forth slightly until it . Attach the Seat (10) to the Frame with two M10 x 80mm Button Bolts (49) and two M10 Split Washers (43). 1 44 3 5 3. Attach the Frame Rail with three 4 M6 x 16mm Screws (37). 10 Press the Seat Endcap (56) into position. While another...
Identify the Front Stabilizer (2). Locate the Seat Knob (not shown) on the Frame (1). Move the Seat Carriage back and forth slightly until it . Attach the Seat (10) to the Frame with two M10 x 80mm Button Bolts (49) and two M10 Split Washers (43). 1 44 3 5 3. Attach the Frame Rail with three 4 M6 x 16mm Screws (37). 10 Press the Seat Endcap (56) into position. While another...
English Manual
Page 6
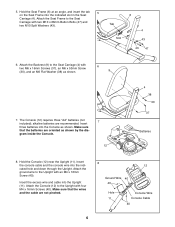
... 43 47 6. Insert the excess wire and cable into the indicated hole and down through the Upright. gram inside the Console. 12 4 38 30 37 Batteries 8. Insert the console cable and the console wire into the Upright (11). Attach the Console (12) to the Seat Carriage with four M4 x 16mm Screws (40). Attach the Seat Frame to the Upright with two M10 x 66mm Button Bolts (47) and two M10...
... 43 47 6. Insert the excess wire and cable into the indicated hole and down through the Upright. gram inside the Console. 12 4 38 30 37 Batteries 8. Insert the console cable and the console wire into the Upright (11). Attach the Console (12) to the Seat Carriage with four M4 x 16mm Screws (40). Attach the Seat Frame to the Upright with two M10 x 66mm Button Bolts (47) and two M10...
English Manual
Page 7
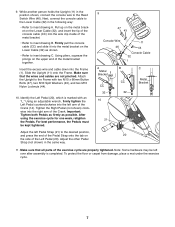
Next, connect the console cable to the Lower Cable (32) in the following way: • Refer to the Reed Switch Wire (46). Using an adjustable wrench, firmly tighten the Left Pedal counterclockwise into the Frame (1). Adjust the left Pedal Strap (21) to inset drawing B. Make sure that the wires and cables are properly tightened. Note: Some hardware may be kept tightened. Slide the Upright (11) onto the Frame. After using the exercise cycle...
Next, connect the console cable to the Lower Cable (32) in the following way: • Refer to the Reed Switch Wire (46). Using an adjustable wrench, firmly tighten the Left Pedal counterclockwise into the Frame (1). Adjust the left Pedal Strap (21) to inset drawing B. Make sure that the wires and cables are properly tightened. Note: Some hardware may be kept tightened. Slide the Upright (11) onto the Frame. After using the exercise cycle...
English Manual
Page 8
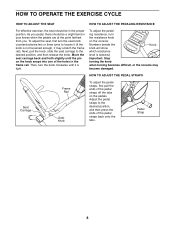
.... Numbers beside the Knob knob will show which resistance level is tight. Adjust the pedal straps to the desired position, and then release the knob. To adjust the seat, first turn the resistance knob on the console. ing resistance, turn the seat knob counterclockwise two or three turns to loosen it (if the knob is not loosened enough, it is selected. Then, turn the knob clockwise until the pin on the pedals. Important: Stop turning the knob...
.... Numbers beside the Knob knob will show which resistance level is tight. Adjust the pedal straps to the desired position, and then release the knob. To adjust the seat, first turn the resistance knob on the console. ing resistance, turn the seat knob counterclockwise two or three turns to loosen it (if the knob is not loosened enough, it is selected. Then, turn the knob clockwise until the pin on the pedals. Important: Stop turning the knob...
English Manual
Page 9
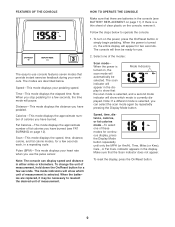
... page 12). played. FEATURES OF THE CONSOLE The easy-to-use console features seven modes that the scan mode is selected, and a second mode indicator will show which unit of calories you have pedaled. Speed-This mode displays your heart rate when you use the pulse sensor. Fat Calories-This mode displays the approximate number of these modes for use. 2. To change the unit of the modes: Scan mode- To turn on page 11).
... page 12). played. FEATURES OF THE CONSOLE The easy-to-use console features seven modes that the scan mode is selected, and a second mode indicator will show which unit of calories you have pedaled. Speed-This mode displays your heart rate when you use the pulse sensor. Fat Calories-This mode displays the approximate number of these modes for use. 2. To change the unit of the modes: Scan mode- To turn on page 11).
English Manual
Page 10
... covering the two left contacts. To turn off to hold the handle on the four metal contacts of the pulse sensor, peel off the plastic. If the pedals are not moved and the console buttons are thin sheets of heart rate readings. Note: If there are not pressed for a few minutes, the power will be shown. After a moment, your heart rate if desired. The heart rate sensor...
... covering the two left contacts. To turn off to hold the handle on the four metal contacts of the pulse sensor, peel off the plastic. If the pedals are not moved and the console buttons are thin sheets of heart rate readings. Note: If there are not pressed for a few minutes, the power will be shown. After a moment, your heart rate if desired. The heart rate sensor...
English Manual
Page 11
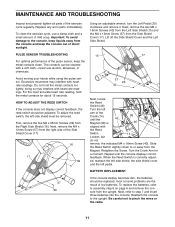
... arm of direct sunlight. Replace any worn parts immediately. To adjust the reed switch, the left side shield must be cleaned with heart rate readings. Next, remove the M4 x 12mm Screw (57) from the upright. Turn the Crank Arm for about 15 seconds. most accurate heart rate reading, hold the metal contacts too tightly; Next, refer to assembly step 8 on page 6 and remove the console from the right side of low batteries...
... arm of direct sunlight. Replace any worn parts immediately. To adjust the reed switch, the left side shield must be cleaned with heart rate readings. Next, remove the M4 x 12mm Screw (57) from the upright. Turn the Crank Arm for about 15 seconds. most accurate heart rate reading, hold the metal contacts too tightly; Next, refer to assembly step 8 on page 6 and remove the console from the right side of low batteries...
English Manual
Page 12
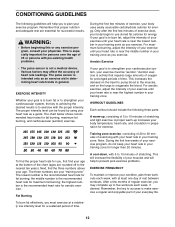
... any exercise program, consult your age. For maximum fat burning, adjust the intensity of the chart (ages are rounded off to the nearest ten years). The pulse sensor is to strengthen your cardiovascular system, your exercise must exercise at least one day of stretching. The chart below shows recommended heart rates for aerobic exercise. If your training zone for longer than 20 minutes. WORKOUT...
... any exercise program, consult your age. For maximum fat burning, adjust the intensity of the chart (ages are rounded off to the nearest ten years). The pulse sensor is to strengthen your cardiovascular system, your exercise must exercise at least one day of stretching. The chart below shows recommended heart rates for aerobic exercise. If your training zone for longer than 20 minutes. WORKOUT...

English Manual
Page 13
...as you reach down toward the wall. Pull your feet toward your knees outward. Reach toward your back leg as possible. Stretches: Hamstrings, lower back and groin. 3. Stretches: Quadriceps and hip muscles. 5. Move slowly as possible. Stretches: Calves, achilles tendons and ankles. 4. Hold for 15 counts, then relax.... hand. Hold for 15 counts, then relax. Hold for several basic stretches is shown at the right. SUGGESTED STRETCHES The correct form for 15 counts, then relax. Bring the sole of knees and back. 2. Hold for balance, reach back and grasp one ...
...as you reach down toward the wall. Pull your feet toward your knees outward. Reach toward your back leg as possible. Stretches: Hamstrings, lower back and groin. 3. Stretches: Quadriceps and hip muscles. 5. Move slowly as possible. Stretches: Calves, achilles tendons and ankles. 4. Hold for 15 counts, then relax.... hand. Hold for 15 counts, then relax. Hold for several basic stretches is shown at the right. SUGGESTED STRETCHES The correct form for 15 counts, then relax. Bring the sole of knees and back. 2. Hold for balance, reach back and grasp one ...
English Manual
Page 14
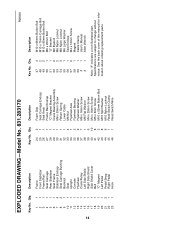
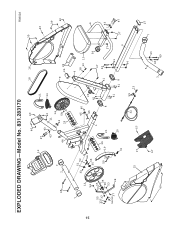
... Seat Carriage Rear Stabilizer Seat Frame Stabilizer Endcap Seat Carriage Bushing Backrest Seat Upright Console Flywheel Crank/Pulley Left Side Shield Right Side Shield Side Shield Cover Belt "C" Magnet Left Pedal Pedal Strap Right Pedal Hook Key No. Specifications are subject to change without notice. Description 47 4 48 2 49 2 50 1 51 1 52 2 53 2 54 3 55 1 56 1 57 2 58 1 59 1 # 1 # 1 M10 x 66mm Button Bolt M10 x 75mm Carriage Bolt M10 x 80mm Button Bolt M6 x 25mm Bolt...
... Seat Carriage Rear Stabilizer Seat Frame Stabilizer Endcap Seat Carriage Bushing Backrest Seat Upright Console Flywheel Crank/Pulley Left Side Shield Right Side Shield Side Shield Cover Belt "C" Magnet Left Pedal Pedal Strap Right Pedal Hook Key No. Specifications are subject to change without notice. Description 47 4 48 2 49 2 50 1 51 1 52 2 53 2 54 3 55 1 56 1 57 2 58 1 59 1 # 1 # 1 M10 x 66mm Button Bolt M10 x 75mm Carriage Bolt M10 x 80mm Button Bolt M6 x 25mm Bolt...
English Manual
Page 15
EXPLODED DRAWING-Model No. 831.283170 40 40 12 47 21 43 40 22 43 11 7 48 2 14 44 44 58 29 18 16 9 25 24 R0802A 39 40 39 40 15 7 13 54 55 33 37 54 5237 53 35 34 36 53 28 51 33 52 54 44 36 35 50 33 29 19 31 15 17 57 40 1 21 20 57 45 40 46 8 32 26 41 41 41 41 8 59 23 4 38 30 10 56 37 42 37 43 3 44 5 43 43 7 49 6 43 37 47 27 7
EXPLODED DRAWING-Model No. 831.283170 40 40 12 47 21 43 40 22 43 11 7 48 2 14 44 44 58 29 18 16 9 25 24 R0802A 39 40 39 40 15 7 13 54 55 33 37 54 5237 53 35 34 36 53 28 51 33 52 54 44 36 35 50 33 29 19 31 15 17 57 40 1 21 20 57 45 40 46 8 32 26 41 41 41 41 8 59 23 4 38 30 10 56 37 42 37 43 3 44 5 43 43 7 49 6 43 37 47 27 7
English Manual
Page 16
... (PROFORM® SR 30 exercise cycle) • The KEY NUMBER and DESCRIPTION of the PART (see the PART LIST and the EXPLODED DRAWING on pages 14 and 15) FULL 90 DAY WARRANTY For 90 days from state to schedule repair service call our toll-free HELPLINE 1-800-736-6879 Monday-Saturday, 7 am-7 pm Central Time (excluding holidays) REPLACEMENT PARTS If parts become worn and need...
... (PROFORM® SR 30 exercise cycle) • The KEY NUMBER and DESCRIPTION of the PART (see the PART LIST and the EXPLODED DRAWING on pages 14 and 15) FULL 90 DAY WARRANTY For 90 days from state to schedule repair service call our toll-free HELPLINE 1-800-736-6879 Monday-Saturday, 7 am-7 pm Central Time (excluding holidays) REPLACEMENT PARTS If parts become worn and need...


