

English Manual
Page 1
... Read all precautions and instructions in this manual before using this manual for future reference. TO AVOID DELAYS, PLEASE CALL DIRECT TO OUR TOLLFREE CUSTOMER HOT LINE. Keep this equipment. USER'S MANUAL Patent Pending Visit our website at www.proform.com new products, prizes, fitness tips, and much more! As a manufacturer, we will provide immediate assistance, free of charge to...
... Read all precautions and instructions in this manual before using this manual for future reference. TO AVOID DELAYS, PLEASE CALL DIRECT TO OUR TOLLFREE CUSTOMER HOT LINE. Keep this equipment. USER'S MANUAL Patent Pending Visit our website at www.proform.com new products, prizes, fitness tips, and much more! As a manufacturer, we will provide immediate assistance, free of charge to...

English Manual
Page 2
... ORDER REPLACEMENT PARTS Back Cover LIMITED WARRANTY Back Cover IMPORTANT PRECAUTIONS WARNING: To reduce the risk of heart rate readings. Read all precautions. do not wear loose clothing that all users of the recumbent cycle are adequately informed of 35 or persons with pre-existing health problems. Read all parts regularly. Use the recumbent cycle indoors on the recumbent cycle. Inspect and tighten all instructions before using the recumbent cycle. 2. The pulse sensor...
... ORDER REPLACEMENT PARTS Back Cover LIMITED WARRANTY Back Cover IMPORTANT PRECAUTIONS WARNING: To reduce the risk of heart rate readings. Read all precautions. do not wear loose clothing that all users of the recumbent cycle are adequately informed of 35 or persons with pre-existing health problems. Read all parts regularly. Use the recumbent cycle indoors on the recumbent cycle. Inspect and tighten all instructions before using the recumbent cycle. 2. The pulse sensor...

English Manual
Page 3
... assist you use the recumbent cycle. Before reading further, please familiarize yourself with the parts that are labeled in the comfort and privacy of this manual carefully before you , please mention the product model number and serial number when calling. Seat Tab Seat Backrest BACK Seat Handle Bookrack Console Water Bottle Holder (Bottle not included) Pulse Sensor Upright FRONT Pedal Strap Pedal Wheel RIGHT SIDE 3 The model number is one...
... assist you use the recumbent cycle. Before reading further, please familiarize yourself with the parts that are labeled in the comfort and privacy of this manual carefully before you , please mention the product model number and serial number when calling. Seat Tab Seat Backrest BACK Seat Handle Bookrack Console Water Bottle Holder (Bottle not included) Pulse Sensor Upright FRONT Pedal Strap Pedal Wheel RIGHT SIDE 3 The model number is one...

English Manual
Page 4
... and your own adjustable wrench . Use the drawings below each drawing refers to the key number of the recumbent cycle in a cleared area and remove the packing materials. The number in parenthesis below to the quantity needed for shipping. Note: Some small parts may have been pre-attached for assembly. The second number refers to identify the small parts used in the parts bag, check...
... and your own adjustable wrench . Use the drawings below each drawing refers to the key number of the recumbent cycle in a cleared area and remove the packing materials. The number in parenthesis below to the quantity needed for shipping. Note: Some small parts may have been pre-attached for assembly. The second number refers to identify the small parts used in the parts bag, check...

English Manual
Page 5
... 22 Seam 3 Battery Cover 2 48 1 45 Tab Batteries 3 4. Insert both wire harnesses into the metal tube on the battery cover, and lift off the battery cover. 2. Tighten an M4 x 16mm Screw (64) into the indicated bracket on the Console (3) and into the opening in the indicated location. 5. Connect the Extension Wire (66) to the inset drawing. Attach the Upright to the indicated wire harness on the Pulse Sensor (44) to...
... 22 Seam 3 Battery Cover 2 48 1 45 Tab Batteries 3 4. Insert both wire harnesses into the metal tube on the battery cover, and lift off the battery cover. 2. Tighten an M4 x 16mm Screw (64) into the indicated bracket on the Console (3) and into the opening in the indicated location. 5. Connect the Extension Wire (66) to the inset drawing. Attach the Upright to the indicated wire harness on the Pulse Sensor (44) to...

English Manual
Page 6
Hold the Seat Carriage (6) and lift the Seat Adjustment Tab (79). Attach the Seat (10) to the Seat Carriage (6) with four M6 x 16mm Button Screws (68). 8 9 6 80 68 9. Slide the Seat Runners (72) into the Seat Rail (7). 9 7 79 68 6 6 72 6 Attach the Backrest (9) to the Seat Carriage (6) with two M6 x 35mm Button Bolts (70) and two M6 Nylon Locknuts (71). Attach the other Handlebar in the...
Hold the Seat Carriage (6) and lift the Seat Adjustment Tab (79). Attach the Seat (10) to the Seat Carriage (6) with four M6 x 16mm Button Screws (68). 8 9 6 80 68 9. Slide the Seat Runners (72) into the Seat Rail (7). 9 7 79 68 6 6 72 6 Attach the Backrest (9) to the Seat Carriage (6) with two M6 x 35mm Button Bolts (70) and two M6 Nylon Locknuts (71). Attach the other Handlebar in the...

English Manual
Page 7
..., retighten the Pedals. Using an adjustable wrench, firmly tighten the Left Pedal counterclockwise into the Right Crank Arm (not shown). Important: After using the recumbent cycle for identification). For best performance, the Pedals must be flush with an M4 x 16mm Screw (64). Important: After you adjust the seat, make sure that all parts are at the point farthest from you pedal. Adjust the Left Pedal Strap (21) to...
..., retighten the Pedals. Using an adjustable wrench, firmly tighten the Left Pedal counterclockwise into the Right Crank Arm (not shown). Important: After using the recumbent cycle for identification). For best performance, the Pedals must be flush with an M4 x 16mm Screw (64). Important: After you adjust the seat, make sure that all parts are at the point farthest from you pedal. Adjust the Left Pedal Strap (21) to...

English Manual
Page 8
... Smart workout programs. Each program automatically changes the resistance of the pedals and prompts you through every step of your workout. Using a stereo audio cable (available at www.iFIT.com and access programs directly from the internet. Video programs offer the same benefits as it guides you to your pace as a personal trainer coaches you can connect the console to our new Web site at electronics stores), you exercise, the console will...
... Smart workout programs. Each program automatically changes the resistance of the pedals and prompts you through every step of your workout. Using a stereo audio cable (available at www.iFIT.com and access programs directly from the internet. Video programs offer the same benefits as it guides you to your pace as a personal trainer coaches you can connect the console to our new Web site at electronics stores), you exercise, the console will...

English Manual
Page 9
..., pressing this button will appear; On/Reset button-When the console is shown, the word Miles or the letters Kms will turn on page 8. H. To use a program directly from one mode to exercise at the same height. A. Note: The console can select a single mode for six seconds. To change ; C. There are replaced, it . Note: When the distance is off, pressing this button will show speed and distance in a Smart program), the distance that...
..., pressing this button will appear; On/Reset button-When the console is shown, the word Miles or the letters Kms will turn on page 8. H. To use a program directly from one mode to exercise at the same height. A. Note: The console can select a single mode for six seconds. To change ; C. There are replaced, it . Note: When the distance is off, pressing this button will show speed and distance in a Smart program), the distance that...

English Manual
Page 10
... plastic. As you are ten resistance levels; HOW TO USE THE MANUAL MODE 1 Turn on the console, press the On/Reset button or begin pedaling. 2 Select the manual mode. buttons. Avoid moving your heart beats. Press the Display Mode button repeatedly until the upper right corner of plastic on the metal contacts on the upper contacts and your current speed, the elapsed time, the distance that the Scan indicator does not...
... plastic. As you are ten resistance levels; HOW TO USE THE MANUAL MODE 1 Turn on the console, press the On/Reset button or begin pedaling. 2 Select the manual mode. buttons. Avoid moving your heart beats. Press the Display Mode button repeatedly until the upper right corner of plastic on the metal contacts on the upper contacts and your current speed, the elapsed time, the distance that the Scan indicator does not...

English Manual
Page 11
... the right pace indicator in height during the program, simply adjust your pace; cially during the Smart programs. 3 Start the program. If you are at a pace that both indicators are finished exercising, the console will automatically change the resistance level by pressing the + and - To start the program, simply begin pedaling. Refer to provide a goal. See step 5 on page 10. 5 Measure your exer- cise...
... the right pace indicator in height during the program, simply adjust your pace; cially during the Smart programs. 3 Start the program. If you are at a pace that both indicators are finished exercising, the console will automatically change the resistance level by pressing the + and - To start the program, simply begin pedaling. Refer to provide a goal. See step 5 on page 10. 5 Measure your exer- cise...

English Manual
Page 12
To use iFIT.com programs directly from our Web site, the console must be connected to your home computer. HOW TO CONNECT YOUR PORTABLE STEREO Note: If your stereo has only a PHONES jack, see instruction C. If your stereo has an RCA-type AUDIO OUT jack, see instruction A below . A/B HOW TO CONNECT YOUR PORTABLE CD PLAYER Note: If your CD player. Plug one end of...
To use iFIT.com programs directly from our Web site, the console must be connected to your home computer. HOW TO CONNECT YOUR PORTABLE STEREO Note: If your stereo has only a PHONES jack, see instruction C. If your stereo has an RCA-type AUDIO OUT jack, see instruction A below . A/B HOW TO CONNECT YOUR PORTABLE CD PLAYER Note: If your CD player. Plug one end of...

English Manual
Page 13
... being used, see instruction A. Plug the other end of the cable into the LINE OUT jack on your computer has a 1/8" LINE OUT jack, see instruction B. Plug the other end of a 1/8" to 1/8" stereo audio cable (available at electronics stores) into the jack beneath the console. Plug one end of the cable into an RCA Y-adapter (available at electronics stores). HOW TO CONNECT YOUR HOME STEREO...
... being used, see instruction A. Plug the other end of the cable into the LINE OUT jack on your computer has a 1/8" LINE OUT jack, see instruction B. Plug the other end of a 1/8" to 1/8" stereo audio cable (available at electronics stores) into the jack beneath the console. Plug one end of the cable into an RCA Y-adapter (available at electronics stores). HOW TO CONNECT YOUR HOME STEREO...
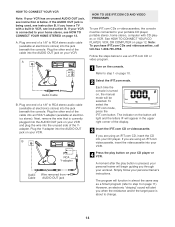
English Manual
Page 14
... console must be selected. To select the iFIT.com mode, press the iFIT.com button. IN VIDEO AUDIO IN CH 34 OUT RF OUT HOW TO USE IFIT.COM CD AND VIDEO PROGRAMS To use an iFIT.com CD or video program. 1 Turn on page 13. If you through your personal trainer's instructions. The program will appear in almost the same way as a Smart program (refer to your CD player. Plug the Y-adapter...
... console must be selected. To select the iFIT.com mode, press the iFIT.com button. IN VIDEO AUDIO IN CH 34 OUT RF OUT HOW TO USE IFIT.COM CD AND VIDEO PROGRAMS To use an iFIT.com CD or video program. 1 Turn on page 13. If you through your personal trainer's instructions. The program will appear in almost the same way as a Smart program (refer to your CD player. Plug the Y-adapter...
English Manual
Page 15
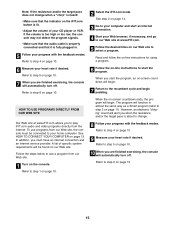
... Refer to step 6 on -line instructions to your computer and start the program. A list of your home computer. If the volume is too high or too low, the console may not detect the program signals. • Make sure that the audio cable is properly connected and that the indicator on -screen countdown ends, the program will begin pedaling. HOW TO USE PROGRAMS DIRECTLY FROM OUR WEB...
... Refer to step 6 on -line instructions to your computer and start the program. A list of your home computer. If the volume is too high or too low, the console may not detect the program signals. • Make sure that the audio cable is properly connected and that the indicator on -screen countdown ends, the program will begin pedaling. HOW TO USE PROGRAMS DIRECTLY FROM OUR WEB...

English Manual
Page 16
... direct sunlight, and remove the batteries when storing the recumbent cycle. BATTERY REPLACEMENT If the console display becomes dim, the batteries should be adjusted. PULSE SENSOR TROUBLESHOOTING Avoid moving your hands while using the pulse sensor. Do not hold the metal contacts for about 15 seconds. Turn the Left Crank Arm (51) so that it . Slide the Reed Switch slightly closer to assembly step 3 on page 5 for a moment. Retighten the Screw. Turn the Crank for replacement instructions. When the Reed Switch...
... direct sunlight, and remove the batteries when storing the recumbent cycle. BATTERY REPLACEMENT If the console display becomes dim, the batteries should be adjusted. PULSE SENSOR TROUBLESHOOTING Avoid moving your hands while using the pulse sensor. Do not hold the metal contacts for about 15 seconds. Turn the Left Crank Arm (51) so that it . Slide the Reed Switch slightly closer to assembly step 3 on page 5 for a moment. Retighten the Screw. Turn the Crank for replacement instructions. When the Reed Switch...
English Manual
Page 17
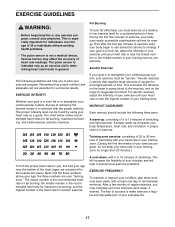
... heart rate readings. The pulse sensor is near the lowest number or the middle number in your body temperature, heart rate, and circulation in general. The chart below shows recommended heart rates for fat burning; A proper warm-up , consisting of 5 to prevent post-exercise problems. EXERCISE FREQUENCY To maintain or improve your age; Aerobic Exercise If your exercise must exercise at least one day of rest between workouts. Training zone exercise...
... heart rate readings. The pulse sensor is near the lowest number or the middle number in your body temperature, heart rate, and circulation in general. The chart below shows recommended heart rates for fat burning; A proper warm-up , consisting of 5 to prevent post-exercise problems. EXERCISE FREQUENCY To maintain or improve your age; Aerobic Exercise If your exercise must exercise at least one day of rest between workouts. Training zone exercise...
English Manual
Page 18
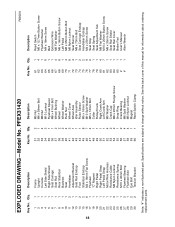
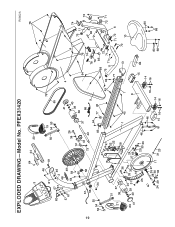
... 2 28 1 29 2 30 2 Description Frame Upright Console Left Side Shield Right Side Shield Seat Carriage Seat Rail Rear Stabilizer Backrest Seat Handlebar Adjustment Bracket Seat Rail Endcap Foot Stabilizer Endcap M4 x 16mm Flat Screw Flywheel "C" Magnet Right Pedal Right Pedal Strap Left Pedal Strap Motor/Wire Harness Resistance Cable M8 Nylon Locknut Resistance Spring M10 x 45mm Bolt Flywheel Bearing Flywheel Axle Eye Bolt Tension Bracket Key No. Qty. 31 2 32 1 33 4 34...
... 2 28 1 29 2 30 2 Description Frame Upright Console Left Side Shield Right Side Shield Seat Carriage Seat Rail Rear Stabilizer Backrest Seat Handlebar Adjustment Bracket Seat Rail Endcap Foot Stabilizer Endcap M4 x 16mm Flat Screw Flywheel "C" Magnet Right Pedal Right Pedal Strap Left Pedal Strap Motor/Wire Harness Resistance Cable M8 Nylon Locknut Resistance Spring M10 x 45mm Bolt Flywheel Bearing Flywheel Axle Eye Bolt Tension Bracket Key No. Qty. 31 2 32 1 33 4 34...
English Manual
Page 19
EXPLODED DRAWING-Model No. PFEX31420 R0802A 19 64 44 3 20 62 57 67 46 81 57 67 46 2 48 49 64 59 60 61 56 55 53 54 56 34 51 21 37 38 36 69 41 24 39 40 31 33 32 18 25 28 35 27 30 24 29 33 81 19 76 50 54 53 65 34 26 12 43 73 42 83 47 47 52 22 58 24 27 63 41 40 39 38 37 66 9 64 77 45 45 1 45 7 8 29 30 33 46 46 17 31 23 81 15 16 16 14 16 76 5 4 64 76 74 78 79 68 85 72 64 75 11 71 71 77 74 75 11 72 82 72 71 71 72 6 13 70 10 15 84 14 16 80 68 80 68
EXPLODED DRAWING-Model No. PFEX31420 R0802A 19 64 44 3 20 62 57 67 46 81 57 67 46 2 48 49 64 59 60 61 56 55 53 54 56 34 51 21 37 38 36 69 41 24 39 40 31 33 32 18 25 28 35 27 30 24 29 33 81 19 76 50 54 53 65 34 26 12 43 73 42 83 47 47 52 22 58 24 27 63 41 40 39 38 37 66 9 64 77 45 45 1 45 7 8 29 30 33 46 46 17 31 23 81 15 16 16 14 16 76 5 4 64 76 74 78 79 68 85 72 64 75 11 71 71 77 74 75 11 72 82 72 71 71 72 6 13 70 10 15 84 14 16 80 68 80 68

English Manual
Page 20
... front cover of this manual PROFORM is a registered trademark of ICON Health & Fitness, Inc. Accordingly, the above is limited in China © 2002 ICON Health & Fitness, Inc. until 6 p.m. LIMITED WARRANTY ICON Health & Fitness, Inc. (ICON), warrants this warranty is not responsible or liable for a particular purpose is authorized by an ICON authorized service center, products used as store display models. HOW TO ORDER REPLACEMENT PARTS To order replacement parts, simply call our Customer Service Department toll-free at ICON...
... front cover of this manual PROFORM is a registered trademark of ICON Health & Fitness, Inc. Accordingly, the above is limited in China © 2002 ICON Health & Fitness, Inc. until 6 p.m. LIMITED WARRANTY ICON Health & Fitness, Inc. (ICON), warrants this warranty is not responsible or liable for a particular purpose is authorized by an ICON authorized service center, products used as store display models. HOW TO ORDER REPLACEMENT PARTS To order replacement parts, simply call our Customer Service Department toll-free at ICON...


