

User Manual
Page 2
® TABLE OF CONTENTS IMPORTANT PRECAUTIONS 3 BEFORE YOU BEGIN 5 ASSEMBLY 6 TREADMILL OPERATION 7 HOW TO FOLD AND MOVE THE TREADMILL 21 TROUBLESHOOTING AND MAINTENANCE 23 EXERCISE GUIDELINES 25 PART LIST 27 HOW TO ORDER REPLACEMENT PARTS Back Cover LIMITED WARRANTY Back Cover Note: An EXPLODED DRAWING is a registered trademark of this manual. PROFORM is attached in the center of ICON Health & Fitness, Inc. 2
® TABLE OF CONTENTS IMPORTANT PRECAUTIONS 3 BEFORE YOU BEGIN 5 ASSEMBLY 6 TREADMILL OPERATION 7 HOW TO FOLD AND MOVE THE TREADMILL 21 TROUBLESHOOTING AND MAINTENANCE 23 EXERCISE GUIDELINES 25 PART LIST 27 HOW TO ORDER REPLACEMENT PARTS Back Cover LIMITED WARRANTY Back Cover Note: An EXPLODED DRAWING is a registered trademark of this manual. PROFORM is attached in the center of ICON Health & Fitness, Inc. 2

User Manual
Page 3
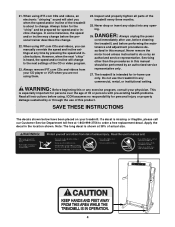
... (see your local PROFORM dealer or call 1-800-8063651 and order part number 146148. 11. If the control sys- 19. Place the treadmill on /off position when the treadmill is capable of the treadmill. The treadmill should not be on /off . The treadmill is not in sandals...hand weights and not holding the handrails may compromise your ability to persons, read the following important precautions and information before operating the treadmill. 1. Do not use a properly functioning surge suppressor could become caught in general. 9. IMPORTANT PRECAUTIONS WARNING: To reduce the risk...
... (see your local PROFORM dealer or call 1-800-8063651 and order part number 146148. 11. If the control sys- 19. Place the treadmill on /off position when the treadmill is capable of the treadmill. The treadmill should not be on /off . The treadmill is not in sandals...hand weights and not holding the handrails may compromise your ability to persons, read the following important precautions and information before operating the treadmill. 1. Do not use a properly functioning surge suppressor could become caught in general. 9. IMPORTANT PRECAUTIONS WARNING: To reduce the risk...
User Manual
Page 4
...long decal is especially important for persons over the age of 35 or persons with pre-existing health problems. Read all parts of the treadmill is heard, the speed and/or incline will change . 22. Always listen for personal injury or property damage sustained by an authorized ... DANGER: 26. tenance and adjustment procedures de- Servicing other than the procedures in this or any commercial, rental, or institutional setting. The treadmill is missing or illegible, please call our Customer Service Department toll-free at any opening. If a decal is intended for speed and/or ...
...long decal is especially important for persons over the age of 35 or persons with pre-existing health problems. Read all parts of the treadmill is heard, the speed and/or incline will change . 22. Always listen for personal injury or property damage sustained by an authorized ... DANGER: 26. tenance and adjustment procedures de- Servicing other than the procedures in this or any commercial, rental, or institutional setting. The treadmill is missing or illegible, please call our Customer Service Department toll-free at any opening. If a decal is intended for speed and/or ...

User Manual
Page 5
...the parts that are labeled in the drawing below. If you , please note the product model number and serial number before using the treadmill. Hand Weight Holder* Chest Pulse Sensor Holder* Water Bottle Holder† Lock Knob Book Holder Console Handrail Key/Clip Walking Belt On/Off... Switch Circuit Breaker Foot Rail Power Cord Rear Roller Adjustment Bolts Cushioned Walking Platform *See page 20 for purchasing the PROFORM® CT 1160 treadmill. The serial number can be found on a decal attached to make your benefit, read this manual for the location). BEFORE ...
...the parts that are labeled in the drawing below. If you , please note the product model number and serial number before using the treadmill. Hand Weight Holder* Chest Pulse Sensor Holder* Water Bottle Holder† Lock Knob Book Holder Console Handrail Key/Clip Walking Belt On/Off... Switch Circuit Breaker Foot Rail Power Cord Rear Roller Adjustment Bolts Cushioned Walking Platform *See page 20 for purchasing the PROFORM® CT 1160 treadmill. The serial number can be found on a decal attached to make your benefit, read this manual for the location). BEFORE ...
User Manual
Page 6
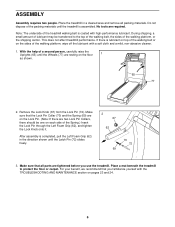
...) from the Lock Pin (72). After assembly is lubricant on top of the walking belt or on pages 23 and 24. 6 Place a mat beneath the treadmill to the top of the walking belt, the sides of lubricant may be one on the floor 1 as shown. 65 77 2. During shipping, a small amount... the direction shown until the Latch Pin (72) slides freely. 2 67 62 70 72 69 3. With the help of the treadmill walking belt is assembled. Make sure that all packing materials. For your benefit, we recommend that the Lock Pin Collar (70) and the Spring (69) ...
...) from the Lock Pin (72). After assembly is lubricant on top of the walking belt or on pages 23 and 24. 6 Place a mat beneath the treadmill to the top of the walking belt, the sides of lubricant may be one on the floor 1 as shown. 65 77 2. During shipping, a small amount... the direction shown until the Latch Pin (72) slides freely. 2 67 62 70 72 69 3. With the help of the treadmill walking belt is assembled. Make sure that all packing materials. For your benefit, we recommend that the Lock Pin Collar (70) and the Spring (69) ...
User Manual
Page 7
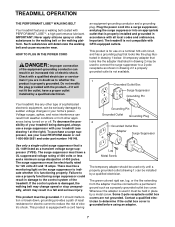
... and ordinances. Do not modify the plug provided with your local PROFORM dealer or call Grounded Outlet Box Adapter Surge Suppressor 1-800-806-3651 and order part number 146148. Important: The treadmill is grounded before using an adapter. 7 Grounding Pin Voltage surges... a transient voltage surge suppressor (TVSS). A temporary adapter that is not available. 1 Grounded Outlet Box Surge Suppressor Grounding Pin Your treadmill, like extending from other appli- The surge suppressor must be electrically rated for use a properly functioning surge suppressor could result in a...
... and ordinances. Do not modify the plug provided with your local PROFORM dealer or call Grounded Outlet Box Adapter Surge Suppressor 1-800-806-3651 and order part number 146148. Important: The treadmill is grounded before using an adapter. 7 Grounding Pin Voltage surges... a transient voltage surge suppressor (TVSS). A temporary adapter that is not available. 1 Grounded Outlet Box Surge Suppressor Grounding Pin Your treadmill, like extending from other appli- The surge suppressor must be electrically rated for use a properly functioning surge suppressor could result in a...
User Manual
Page 8
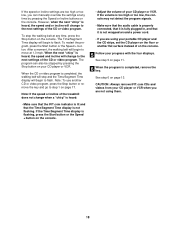
...basic programs, audio programs, and video programs directly from our Web site, see page 20). the optional hand weights can connect the treadmill to be available. The console also features new iFIT.com interactive technology. Video programs offer the same benefits as a personal trainer ...guides you through every step of the treadmill to your home stereo, portable stereo, or computer and play iFIT.com video programs (videocassettes are also offered. To use the handgrip...
...basic programs, audio programs, and video programs directly from our Web site, see page 20). the optional hand weights can connect the treadmill to be available. The console also features new iFIT.com interactive technology. Video programs offer the same benefits as a personal trainer ...guides you through every step of the treadmill to your home stereo, portable stereo, or computer and play iFIT.com video programs (videocassettes are also offered. To use the handgrip...
User Manual
Page 9
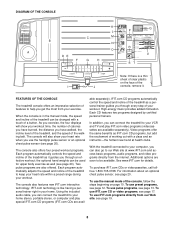
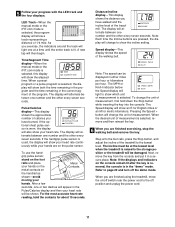
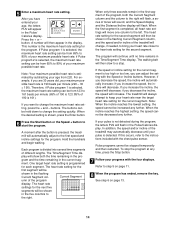
...-These indicators show the settings for the program. The optional hand weights can display exercise feedback in the current segment of the treadmill will change during preset programs and how the target heart rate will be selected. A. Speed buttons-These buttons control the speed of... walking belt will change by 0.5%. N. Distance/Incline display-This display shows the distance you have walked and the incline level of the treadmill. U. D. E. Stop button-This button is held down, the speed will automatically stop the walking belt. Incline buttons-These buttons control the...
...-These indicators show the settings for the program. The optional hand weights can display exercise feedback in the current segment of the treadmill will change during preset programs and how the target heart rate will be selected. A. Speed buttons-These buttons control the speed of... walking belt will change by 0.5%. N. Distance/Incline display-This display shows the distance you have walked and the incline level of the treadmill. U. D. E. Stop button-This button is held down, the speed will automatically stop the walking belt. Incline buttons-These buttons control the...
User Manual
Page 10
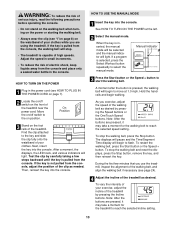
...the Start button or the Speed + button to select the manual mode. Note: After the buttons are pressed, it may take a moment for the treadmill to reach the selected speed setting. Then, reinsert the key into the console. To restart the walking belt, press the Start button or the Speed...The displays will pause and the Time/Segment Time display will light. On Position 3 Stand on position. When the key is capable of the treadmill by carefully taking a few minutes that you exercise, adjust the speed of the clip as desired. To vary the intensity of your clothes while ...
...the Start button or the Speed + button to select the manual mode. Note: After the buttons are pressed, it may take a moment for the treadmill to reach the selected speed setting. Then, reinsert the key into the console. To restart the walking belt, press the Start button or the Speed...The displays will pause and the Time/Segment Time display will light. On Position 3 Stand on position. When the key is capable of the treadmill by carefully taking a few minutes that you exercise, adjust the speed of the clip as desired. To vary the intensity of your clothes while ...
User Manual
Page 11
... show your heart rate continuously while your heart rate will be displayed in the Pulse/Calories display and then your hands are finished using the treadmill, move the on the console remain lit after the key is removed, the console is selected, remove and then reinsert the key. 6 When you ... the LED track and the four displays. The display will light one number and the other every seven seconds. When the desired unit of the treadmill to show an E for English miles or an M for about 15 seconds. The display will show the elapsed time. The Speed display will change ...
... show your heart rate continuously while your heart rate will be displayed in the Pulse/Calories display and then your hands are finished using the treadmill, move the on the console remain lit after the key is removed, the console is selected, remove and then reinsert the key. 6 When you ... the LED track and the four displays. The display will light one number and the other every seven seconds. When the desired unit of the treadmill to show an E for English miles or an M for about 15 seconds. The display will show the elapsed time. The Speed display will change ...
User Manual
Page 12
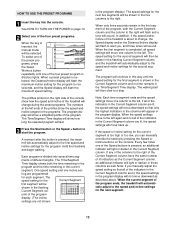
...display. (The incline settings are lit, the speed settings in the Current Segment column. One speed setting and one of the program ends, the treadmill will last. 3 Press the Start button or the Speed + button to start the program. The program will flash the maximum speed setting. Note:...ranges for the next segment. 12 ting are programmed for the next five segments will automatically adjust to the left , if all of the treadmill is inserted, the manual mode will appear in those columns as the Current Segment column, an additional indicator will sound. In addition, if...
...display. (The incline settings are lit, the speed settings in the Current Segment column. One speed setting and one of the program ends, the treadmill will last. 3 Press the Start button or the Speed + button to start the program. The program will flash the maximum speed setting. Note:...ranges for the next segment. 12 ting are programmed for the next five segments will automatically adjust to the left , if all of the treadmill is inserted, the manual mode will appear in those columns as the Current Segment column, an additional indicator will sound. In addition, if...

User Manual
Page 13
... four displays. HOW TO USE THE PULSE PROGRAMS WARNING: If you have heart prob- To put it in the "demo" mode. The profiles on the treadmill. The current age setting will last. 4 Enter your age, press the + or - When your age is selected, the word AGE will show a simplified profile ...is in a secure place. lems, or if you have been inactive, do not use the pulse programs. If you must be selected. Exercises using the treadmill, move the on/off switch near the power cord to step 5 on the optional chest pulse sensor. The buttons can be attempted only by experienced...
... four displays. HOW TO USE THE PULSE PROGRAMS WARNING: If you have heart prob- To put it in the "demo" mode. The profiles on the treadmill. The current age setting will last. 4 Enter your age, press the + or - When your age is selected, the word AGE will show a simplified profile ...is in a secure place. lems, or if you have been inactive, do not use the pulse programs. If you must be selected. Exercises using the treadmill, move the on/off switch near the power cord to step 5 on the optional chest pulse sensor. The buttons can be attempted only by experienced...
User Manual
Page 14
...page 13. 14 If your progress with the Speed or Incline buttons. Pulse programs cannot be increased any further. Each program is pressed, the treadmill will change the maximum heart rate setting, press the + and - The heart rate setting for the second segment will show both the Current ... with the four displays. A number will continue until your maximum possible heart rate. In addition, the speed and/or incline of the treadmill may automatically decrease until no time remains in the first segment of your pulse is too high or too low, you have entered your...
...page 13. 14 If your progress with the Speed or Incline buttons. Pulse programs cannot be increased any further. Each program is pressed, the treadmill will change the maximum heart rate setting, press the + and - The heart rate setting for the second segment will show both the Current ... with the four displays. A number will continue until your maximum possible heart rate. In addition, the speed and/or incline of the treadmill may automatically decrease until no time remains in the first segment of your pulse is too high or too low, you have entered your...
User Manual
Page 15
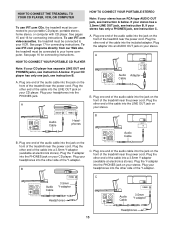
...LINE OUT PHONES Audio Cable Headphones AUDIO OUT RIGHT LEFT Audio Adapter Cable B. B LINE OUT Audio Cable B. Plug the other end of the treadmill near the power cord. C Audio Cable 3.5mm Y-adapter Headphones Audio Cable PHONES 3.5mm Y-adapter Headphones 15 See page 17 for connecting instructions.... To use iFIT.com programs directly from our Web site, the treadmill must be connected to your stereo has only a PHONES jack, see instruction C. If your home computer. Plug the adapter into the ...
...LINE OUT PHONES Audio Cable Headphones AUDIO OUT RIGHT LEFT Audio Adapter Cable B. B LINE OUT Audio Cable B. Plug the other end of the treadmill near the power cord. C Audio Cable 3.5mm Y-adapter Headphones Audio Cable PHONES 3.5mm Y-adapter Headphones 15 See page 17 for connecting instructions.... To use iFIT.com programs directly from our Web site, the treadmill must be connected to your stereo has only a PHONES jack, see instruction C. If your home computer. Plug the adapter into the ...
User Manual
Page 16
... the jack on your computer has a 3.5mm LINE OUT jack, see instruction B. Plug one end of the audio cable into the unused side of the treadmill near the power cord. A LINE OUT Audio Cable Audio Adapter Cable B. Next, remove the wire that is being used, see instruction A below. Plug the Y-adapter... the adapter into the jack on the front of the audio cable into the LINE OUT jack on your stereo. Plug one end of the treadmill near the power cord. Plug the Y-adapter into the included adapter. Plug the other side of the cable into the PHONES jack on your ...
... the jack on your computer has a 3.5mm LINE OUT jack, see instruction B. Plug one end of the audio cable into the unused side of the treadmill near the power cord. A LINE OUT Audio Cable Audio Adapter Cable B. Next, remove the wire that is being used, see instruction A below. Plug the Y-adapter... the adapter into the jack on the front of the audio cable into the LINE OUT jack on your stereo. Plug one end of the treadmill near the power cord. Plug the Y-adapter into the included adapter. Plug the other side of the cable into the PHONES jack on your ...
User Manual
Page 17
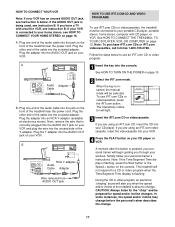
...has an unused AUDIO OUT jack, see instruction A below to change . 17 Note: If the Time/Segment Time display is flashing. A ANT. The treadmill will light. 3 Insert the iFIT.com CD or videocassette. If your VCR is connected to a CD or video program when the Time/Segment Time display... Select the iFIT.com mode. Plug the other end of the cable into the console. If you when the speed and/or incline of the treadmill near the power cord. Plug the Y-adapter into your CD player or VCR. If you through your personal trainer's instructions. CAUTION: Always listen for...
...has an unused AUDIO OUT jack, see instruction A below to change . 17 Note: If the Time/Segment Time display is flashing. A ANT. The treadmill will light. 3 Insert the iFIT.com CD or videocassette. If your VCR is connected to a CD or video program when the Time/Segment Time display... Select the iFIT.com mode. Plug the other end of the cable into the console. If you when the speed and/or incline of the treadmill near the power cord. Plug the Y-adapter into your CD player or VCR. If you through your personal trainer's instructions. CAUTION: Always listen for...
User Manual
Page 18
... or the Speed + button on the console. • Adjust the volume of the CD or video program. Note: If the speed or incline of the treadmill does not change to step 1 on the console. See step 5 on page 11. 6 When the program is not flashing. Note: To use another flat surface...
... or the Speed + button on the console. • Adjust the volume of the CD or video program. Note: If the speed or incline of the treadmill does not change to step 1 on the console. See step 5 on page 11. 6 When the program is not flashing. Note: To use another flat surface...
User Manual
Page 19
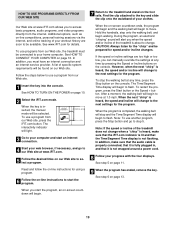
... your computer and start the program. See step 6 on -line competitions, personal training sessions via the internet, and online tracking of the treadmill does not change to your home computer. Follow the steps below to access basic programs, audio programs, and video programs directly from our Web... site, the treadmill must have an internet connection and an internet service provider. To use a program from our Web site, press the iFIT.com button....
... your computer and start the program. See step 6 on -line competitions, personal training sessions via the internet, and online tracking of the treadmill does not change to your home computer. Follow the steps below to access basic programs, audio programs, and video programs directly from our Web... site, the treadmill must have an internet connection and an internet service provider. To use a program from our Web site, press the iFIT.com button....
User Manual
Page 20
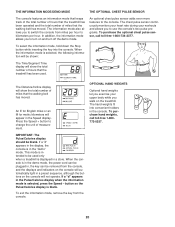
... console. OPTIONAL HAND WEIGHTS Optional hand weights let you exercise your workouts and allows you to kilometers per hour to turn on the treadmill. THE INFORMATION MODE/DEMO MODE THE OPTIONAL CHEST PULSE SENSOR The console features an information mode that keeps track of the total number... of hours that the treadmill has been operated and the total number of miles that the treadmill has been used only when a treadmill is intended to use the console's two pulse programs. To purchase the optional chest pulse...
... console. OPTIONAL HAND WEIGHTS Optional hand weights let you exercise your workouts and allows you to kilometers per hour to turn on the treadmill. THE INFORMATION MODE/DEMO MODE THE OPTIONAL CHEST PULSE SENSOR The console features an information mode that keeps track of the total number... of hours that the treadmill has been operated and the total number of miles that the treadmill has been used only when a treadmill is intended to use the console's two pulse programs. To purchase the optional chest pulse...
User Manual
Page 21
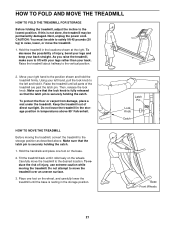
...position. Place one foot on the base. 2. Latch Pin Lock Knob Catch Base Front Wheels 21 Keep the treadmill out of injury, use extreme caution while moving the treadmill, convert the treadmill to the vertical position. 2. Make sure that the latch pin is resting in the locations shown at the ...straight. Hold the handrails and place one foot on the wheels. Raise the treadmill until it . To reduce the risk of direct sunlight. HOW TO MOVE THE TREADMILL Before moving the treadmill. As you raise the treadmill, make sure to lift with your legs rather than your right hand to ...
...position. Place one foot on the base. 2. Latch Pin Lock Knob Catch Base Front Wheels 21 Keep the treadmill out of injury, use extreme caution while moving the treadmill, convert the treadmill to the vertical position. 2. Make sure that the latch pin is resting in the locations shown at the ...straight. Hold the handrails and place one foot on the wheels. Raise the treadmill until it . To reduce the risk of direct sunlight. HOW TO MOVE THE TREADMILL Before moving the treadmill. As you raise the treadmill, make sure to lift with your legs rather than your right hand to ...


