
User Manual
Page 3
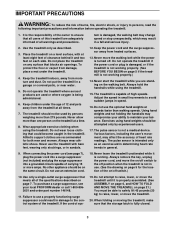
... appropriate exercise clothing when using the treadmill. Various factors, including the user's movement, may result in speed. 16. Do not use the treadmill with at all warnings and precautions. If the control sys- 19. tem is turned off switch.) 10. Do not place the treadmill on page 7. Do not attempt to raise, lower, or move the walking belt while the power is damaged, the walking belt may change speed or stop...
... appropriate exercise clothing when using the treadmill. Various factors, including the user's movement, may result in speed. 16. Do not use the treadmill with at all warnings and precautions. If the control sys- 19. tem is turned off switch.) 10. Do not place the treadmill on page 7. Do not attempt to raise, lower, or move the walking belt while the power is damaged, the walking belt may change speed or stop...
User Manual
Page 4
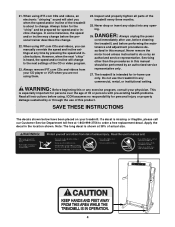
... using iFIT.com CDs and videos, an electronic "chirping" sound will change . 22. DANGER: 26. Inspect and properly tighten all instructions before performing the main- Servicing other than the procedures in this product. Always listen for the "chirp" and be performed by pressing the speed and incline buttons. However, when the next "chirp" is especially important for in-home use the treadmill in the location...
... using iFIT.com CDs and videos, an electronic "chirping" sound will change . 22. DANGER: 26. Inspect and properly tighten all instructions before performing the main- Servicing other than the procedures in this product. Always listen for the "chirp" and be performed by pressing the speed and incline buttons. However, when the next "chirp" is especially important for in-home use the treadmill in the location...

User Manual
Page 5
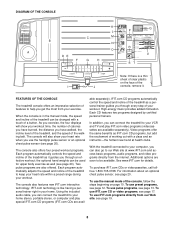
... product model number and serial number before using the treadmill. And when you're not exercising, the CT 1160 treadmill can be folded away, taking less than half the floor space of this manual carefully before calling. until 6 p.m. Mountain Time (excluding holidays). Hand Weight Holder* Chest Pulse Sensor Holder* Water Bottle Holder† Lock Knob Book Holder Console Handrail Key/Clip Walking Belt On/Off Switch Circuit Breaker Foot Rail Power Cord Rear Roller Adjustment Bolts Cushioned Walking...
... product model number and serial number before using the treadmill. And when you're not exercising, the CT 1160 treadmill can be folded away, taking less than half the floor space of this manual carefully before calling. until 6 p.m. Mountain Time (excluding holidays). Hand Weight Holder* Chest Pulse Sensor Holder* Water Bottle Holder† Lock Knob Book Holder Console Handrail Key/Clip Walking Belt On/Off Switch Circuit Breaker Foot Rail Power Cord Rear Roller Adjustment Bolts Cushioned Walking...
User Manual
Page 7
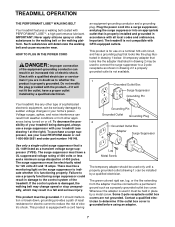
... connected to the control system of 450 joules. TREADMILL OPERATION THE PERFORMANT LUBETM WALKING BELT Your treadmill features a walking belt coated with your local PROFORM dealer or call Grounded Outlet Box Adapter Surge Suppressor 1-800-806-3651 and order part number 146148. HOW TO PLUG IN THE POWER CORD DANGER: Improper connection of sophisticated electronic equipment, can result from weather conditions or from the adapter must be a monitoring...
... connected to the control system of 450 joules. TREADMILL OPERATION THE PERFORMANT LUBETM WALKING BELT Your treadmill features a walking belt coated with your local PROFORM dealer or call Grounded Outlet Box Adapter Surge Suppressor 1-800-806-3651 and order part number 146148. HOW TO PLUG IN THE POWER CORD DANGER: Improper connection of sophisticated electronic equipment, can result from weather conditions or from the adapter must be a monitoring...
User Manual
Page 8
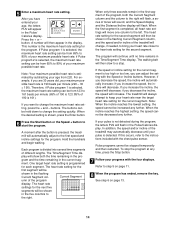
... walking belt. Each program automatically adjusts the speed and incline of the treadmill as well (see page 19. 8 To use pulse programs, see page 12. Two pulse programs are available separately). IFIT.com CD programs automatically control the speed and incline of the treadmill to your computer, you through an effective workout; To use iFIT.com programs directly from your workout. See www.iFIT.com for upper body exercise as a personal trainer guides you can connect the treadmill to keep your heart rate...
... walking belt. Each program automatically adjusts the speed and incline of the treadmill as well (see page 19. 8 To use pulse programs, see page 12. Two pulse programs are available separately). IFIT.com CD programs automatically control the speed and incline of the treadmill to your computer, you through an effective workout; To use iFIT.com programs directly from your workout. See www.iFIT.com for upper body exercise as a personal trainer guides you can connect the treadmill to keep your heart rate...
User Manual
Page 9
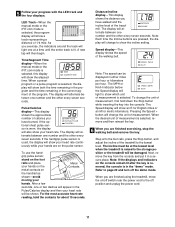
... iFIT.com mode is selected, the display will change to be reset, and a new program or the manual mode will slow to stop . T. For simplicity, all instructions in the current segment of the treadmill will change during your heart rate. G. Key-This key turns the console on page 11). M. Note: Each time the Incline buttons are pressed, the display will periodically flash. P. When a preset program or a pulse program is selected, this display will show how the speed...
... iFIT.com mode is selected, the display will change to be reset, and a new program or the manual mode will slow to stop . T. For simplicity, all instructions in the current segment of the treadmill will change during your heart rate. G. Key-This key turns the console on page 11). M. Note: Each time the Incline buttons are pressed, the display will periodically flash. P. When a preset program or a pulse program is selected, this display will show how the speed...
User Manual
Page 10
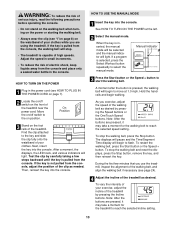
... your exercise, adjust the incline of the treadmill. Then, reinsert the key into the console. If a program is pressed, the walking belt will stop the walking belt and reset the displays, press the Stop button, remove the key, and then reinsert the key. If the key is pulled from the console, adjust the position of the clip as needed. HOW TO USE THE MANUAL MODE 1 Insert the key into the console. To stop the walking belt, press the Stop button. To restart the walking belt, press the Start button or the Speed + button...
... your exercise, adjust the incline of the treadmill. Then, reinsert the key into the console. If a program is pressed, the walking belt will stop the walking belt and reset the displays, press the Stop button, remove the key, and then reinsert the key. If the key is pulled from the console, adjust the position of the clip as needed. HOW TO USE THE MANUAL MODE 1 Insert the key into the console. To stop the walking belt, press the Stop button. To restart the walking belt, press the Start button or the Speed + button...
User Manual
Page 11
... manual mode or the iFIT.com mode is selected, the display will show which unit of the program. Note: Each time the Incline buttons are finished using the treadmill, move the on the handrail as shown-avoid moving your progress with the LED track and the four displays. The Speed display will show your heart rate continuously while your hands are finished exercising, stop the walking belt and remove the key. When a preset program or a pulse program...
... manual mode or the iFIT.com mode is selected, the display will show which unit of the program. Note: Each time the Incline buttons are finished using the treadmill, move the on the handrail as shown-avoid moving your progress with the LED track and the four displays. The Speed display will show your heart rate continuously while your hands are finished exercising, stop the walking belt and remove the key. When a preset program or a pulse program...
User Manual
Page 12
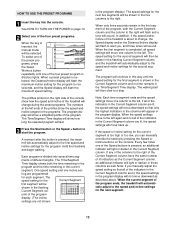
... console show how the speed and incline of the treadmill will change , the Speed display and/or the Distance/Incline display will sound. ting are lit, the speed settings in the flashing Current Segment col- The speed setting for the programs. The program display will show how long the selected program will last. 3 Press the Start button or the Speed + button to alert you, and three tones will flash to start the program. If the speed...
... console show how the speed and incline of the treadmill will change , the Speed display and/or the Distance/Incline display will sound. ting are lit, the speed settings in the flashing Current Segment col- The speed setting for the programs. The program display will show how long the selected program will last. 3 Press the Start button or the Speed + button to alert you, and three tones will flash to start the program. If the speed...

User Manual
Page 13
... the treadmill is flashing, use the pulse programs. If you walk on /off switch near the power cord to step 5 on the console show how the target heart rate will change during the programs. The program display will show how long the selected program will appear in the "demo" mode. The incline must wear the optional chest pulse sensor (see page 20). Refer to page 20 and turn off position and unplug the power cord. To use a pulse program...
... the treadmill is flashing, use the pulse programs. If you walk on /off switch near the power cord to step 5 on the console show how the target heart rate will change during the programs. The program display will show how long the selected program will appear in the "demo" mode. The incline must wear the optional chest pulse sensor (see page 20). Refer to page 20 and turn off position and unplug the power cord. To use a pulse program...
User Manual
Page 14
... you decrease the incline, the speed will then be stopped temporarily and then restarted. After you have entered your heart rate closer to 85% of the program display. The buttons can adjust the setting with the chest pulse sensor. Hold the handrails and begin walking. Current Segment umn of your maximum possible heart rate. See step 6 on page 11. 8 When the program has ended, remove the key. When only three...
... you decrease the incline, the speed will then be stopped temporarily and then restarted. After you have entered your heart rate closer to 85% of the program display. The buttons can adjust the setting with the chest pulse sensor. Hold the handrails and begin walking. Current Segment umn of your maximum possible heart rate. See step 6 on page 11. 8 When the program has ended, remove the key. When only three...
User Manual
Page 17
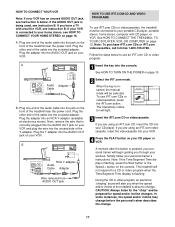
... VCR. Plug the adapter into the included adapter. IN VIDEO AUDIO IN CH 34 OUT RF OUT RCA Y-adapter Audio Cable Adapter Wire removed from AUDIO OUT jack HOW TO USE IFIT.COM CD AND VIDEO PROGRAMS To use iFIT.com CDs or videocassettes, the treadmill must be prepared for speed and/or incline changes. Simply follow your home stereo, see instruction B. The treadmill will light. 3 Insert the iFIT.com CD or videocassette. HOW TO CONNECT YOUR...
... VCR. Plug the adapter into the included adapter. IN VIDEO AUDIO IN CH 34 OUT RF OUT RCA Y-adapter Audio Cable Adapter Wire removed from AUDIO OUT jack HOW TO USE IFIT.COM CD AND VIDEO PROGRAMS To use iFIT.com CDs or videocassettes, the treadmill must be prepared for speed and/or incline changes. Simply follow your home stereo, see instruction B. The treadmill will light. 3 Insert the iFIT.com CD or videocassette. HOW TO CONNECT YOUR...
User Manual
Page 18
..., press the Start button or the Speed + button on the console. • Adjust the volume of your CD player or VCR. If the Time/Segment Time display is heard, the speed and incline will change to the next settings of the treadmill does not change to the next settings of on the console. 5 Follow your CD player or VCR when you are using them. 18 CAUTION: Always remove iFIT...
..., press the Start button or the Speed + button on the console. • Adjust the volume of your CD player or VCR. If the Time/Segment Time display is heard, the speed and incline will change to the next settings of the treadmill does not change to the next settings of on the console. 5 Follow your CD player or VCR when you are using them. 18 CAUTION: Always remove iFIT...
User Manual
Page 19
... display will be selected. To use another program, press the Stop button and go to our Web site at any time, press the Stop button on -line competitions, personal training sessions via the internet, and online tracking of the treadmill is heard, the speed and incline will change to the key and slide the clip onto the waistband of the treadmill does not change . A list of specific system requirements will begin walking...
... display will be selected. To use another program, press the Stop button and go to our Web site at any time, press the Stop button on -line competitions, personal training sessions via the internet, and online tracking of the treadmill is heard, the speed and incline will change to the key and slide the clip onto the waistband of the treadmill does not change . A list of specific system requirements will begin walking...
User Manual
Page 20
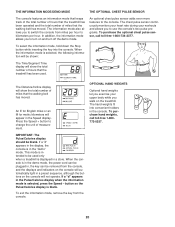
... removed from the console. 20 THE INFORMATION MODE/DEMO MODE THE OPTIONAL CHEST PULSE SENSOR The console features an information mode that keeps track of the total number of hours that the treadmill has been operated and the total number of miles that the walking belt has moved. To purchase hand weights, call toll-free 1-800-734-2377. This mode is selected, press the Speed - The Distance/Incline display will appear in a preset sequence, although the buttons on the treadmill. Press...
... removed from the console. 20 THE INFORMATION MODE/DEMO MODE THE OPTIONAL CHEST PULSE SENSOR The console features an information mode that keeps track of the total number of hours that the treadmill has been operated and the total number of miles that the walking belt has moved. To purchase hand weights, call toll-free 1-800-734-2377. This mode is selected, press the Speed - The Distance/Incline display will appear in a preset sequence, although the buttons on the treadmill. Press...
User Manual
Page 23
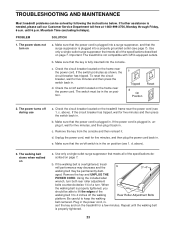
... b 3"-4" walking belt may be solved by following the instructions below. aged. Make sure that the power cord is plugged into the console. Repeat until 6 p.m. Important: The treadmill is properly tightened. 23 above ). Make sure that the power cord is overtightened, tread- Check the circuit breaker located on the frame near the power cord. Check the on/off during use a. Check the circuit breaker located on a. d. TROUBLESHOOTING AND MAINTENANCE...
... b 3"-4" walking belt may be solved by following the instructions below. aged. Make sure that the power cord is plugged into the console. Repeat until 6 p.m. Important: The treadmill is properly tightened. 23 above ). Make sure that the power cord is overtightened, tread- Check the circuit breaker located on the frame near the power cord. Check the on/off during use a. Check the circuit breaker located on a. d. TROUBLESHOOTING AND MAINTENANCE...
User Manual
Page 24
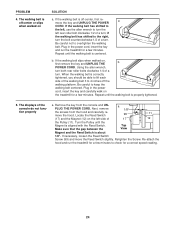
... walking belt. Plug in the power cord, insert the key and run the treadmill for a few minutes. The displays of 17 12 the Pulley (11). If necessary, loosen the Reed Switch Screw (99) and move the key and UNPLUG THE POWER CORD. The walking belt is off the walking platform. b. If the walking belt slips when walked on the left rear roller bolt clockwise 1/2 of a turn the left side of the console do not function properly a. a PLUG THE POWER CORD. Locate the Reed Switch...
... walking belt. Plug in the power cord, insert the key and run the treadmill for a few minutes. The displays of 17 12 the Pulley (11). If necessary, loosen the Reed Switch Screw (99) and move the key and UNPLUG THE POWER CORD. The walking belt is off the walking platform. b. If the walking belt slips when walked on the left rear roller bolt clockwise 1/2 of a turn the left side of the console do not function properly a. a PLUG THE POWER CORD. Locate the Reed Switch...
User Manual
Page 25
... the treadmill until your body temperature, heart rate and circulation in general. For aerobic exercise, adjust the speed or incline of the treadmill until your heart rate is near the lowest number in your training zone. The lower two numbers are rounded off to exercise with the proper intensity. Fat Burning To burn fat effectively, you to five workouts each workout with 5 to use the handgrip pulse sensor or the optional chest pulse sensor...
... the treadmill until your body temperature, heart rate and circulation in general. For aerobic exercise, adjust the speed or incline of the treadmill until your heart rate is near the lowest number in your training zone. The lower two numbers are rounded off to exercise with the proper intensity. Fat Burning To burn fat effectively, you to five workouts each workout with 5 to use the handgrip pulse sensor or the optional chest pulse sensor...
User Manual
Page 27
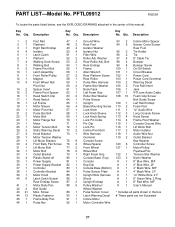
... 1 Pulse Sensor Plate # 1 4" Black Wire, 2 F 39 1 Motor Hood 85 1 Upright Wire Harness # 1 14" White Wire, 2 F 40 6 Latch Catch Screw/ 86 1 Shock # 1 8" Green Wire, 2 Ring Rear Endcap Screw 87 2 Upright Endcap # 1 8" Red Wire, M/F 41 1 Motor Belly Pan 88 5 Pulley Washer/ # 1 User's Manual 42 2 Belt Guide Wheel Washer 43 21 Misc. Screw 89 1 Pulse Sensor Cover * Includes all parts shown in the center of this manual. Description Key No. Washer 97 5 8" Cable Tie 7 4 Walking Deck Screw 53 2 Rear Roller Adj. PFTL09912 R0503A To locate the parts listed below...
... 1 Pulse Sensor Plate # 1 4" Black Wire, 2 F 39 1 Motor Hood 85 1 Upright Wire Harness # 1 14" White Wire, 2 F 40 6 Latch Catch Screw/ 86 1 Shock # 1 8" Green Wire, 2 Ring Rear Endcap Screw 87 2 Upright Endcap # 1 8" Red Wire, M/F 41 1 Motor Belly Pan 88 5 Pulley Washer/ # 1 User's Manual 42 2 Belt Guide Wheel Washer 43 21 Misc. Screw 89 1 Pulse Sensor Cover * Includes all parts shown in the center of this manual. Description Key No. Washer 97 5 8" Cable Tie 7 4 Walking Deck Screw 53 2 Rear Roller Adj. PFTL09912 R0503A To locate the parts listed below...
User Manual
Page 30
... MODEL NUMBER of the product (PFTL09912) • The NAME of the product (PROFORM® CT 1160 treadmill) • The SERIAL NUMBER of the product (see the front cover of this manual) • The KEY NUMBER and DESCRIPTION of the part(s) (see the PART LIST on how long an implied warranty lasts. Accordingly, the above is authorized by ICON. ICON's obligation under normal use , costs of removal or installation or...
... MODEL NUMBER of the product (PFTL09912) • The NAME of the product (PROFORM® CT 1160 treadmill) • The SERIAL NUMBER of the product (see the front cover of this manual) • The KEY NUMBER and DESCRIPTION of the part(s) (see the PART LIST on how long an implied warranty lasts. Accordingly, the above is authorized by ICON. ICON's obligation under normal use , costs of removal or installation or...

