
English Manual
Page 1
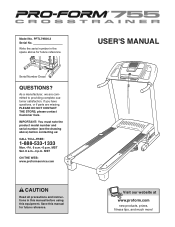
...ON THE WEB: www.proformservice.com CAUTION Read all precautions and instructions in the space above ) before using this manual for future reference. USER'S MANUAL Visit our website at www.proform.com new products, prizes, fitness tips, and much more! As a manufacturer, we are missing, PLEASE DO ... number (see the drawing above for future reference. Serial Number Decal QUESTIONS? Save this equipment. Model No. Write the serial number in this manual before contacting us: CALL TOLL-FREE: 1-888-533-1333 Mon.-Fri. 6 a.m.-6 p.m. If you have questions, or if parts are committed ...
...ON THE WEB: www.proformservice.com CAUTION Read all precautions and instructions in the space above ) before using this manual for future reference. USER'S MANUAL Visit our website at www.proform.com new products, prizes, fitness tips, and much more! As a manufacturer, we are missing, PLEASE DO ... number (see the drawing above for future reference. Serial Number Decal QUESTIONS? Save this equipment. Model No. Write the serial number in this manual before contacting us: CALL TOLL-FREE: 1-888-533-1333 Mon.-Fri. 6 a.m.-6 p.m. If you have questions, or if parts are committed ...
English Manual
Page 2
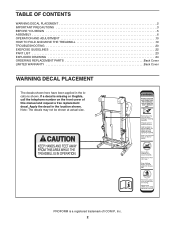
... of this manual and request a free replacement decal. Apply the decal in the locations shown. TABLE OF CONTENTS WARNING DECAL PLACEMENT 2 IMPORTANT PRECAUTIONS 3 BEFORE YOU BEGIN 5 ASSEMBLY 6 OPERATION AND ADJUSTMENT 10 HOW TO FOLD AND MOVE THE TREADMILL 19 TROUBLESHOOTING ...20 EXERCISE GUIDELINES 22 PART LIST 23 EXPLODED DRAWING 24 ORDERING REPLACEMENT PARTS Back Cover LIMITED WARRANTY Back Cover WARNING DECAL PLACEMENT The decals shown here have been applied in the location shown. Note: The decals may not be shown at actual size. 259345 PROFORM...
... of this manual and request a free replacement decal. Apply the decal in the locations shown. TABLE OF CONTENTS WARNING DECAL PLACEMENT 2 IMPORTANT PRECAUTIONS 3 BEFORE YOU BEGIN 5 ASSEMBLY 6 OPERATION AND ADJUSTMENT 10 HOW TO FOLD AND MOVE THE TREADMILL 19 TROUBLESHOOTING ...20 EXERCISE GUIDELINES 22 PART LIST 23 EXPLODED DRAWING 24 ORDERING REPLACEMENT PARTS Back Cover LIMITED WARRANTY Back Cover WARNING DECAL PLACEMENT The decals shown here have been applied in the location shown. Note: The decals may not be shown at actual size. 259345 PROFORM...

English Manual
Page 3
... ON THE POWER on the walking belt. Place the treadmill on the front cover of this manual and all users of this product. 1. Do not put the treadmill in a fall and serious injury. 14. To purchase a surge suppressor, see your local PROFORM dealer or call the telephone number on a level surface..., with bare feet, wearing only stockings, or in this manual and order part number 146148, or see page ...
... ON THE POWER on the walking belt. Place the treadmill on the front cover of this manual and all users of this product. 1. Do not put the treadmill in a fall and serious injury. 14. To purchase a surge suppressor, see your local PROFORM dealer or call the telephone number on a level surface..., with bare feet, wearing only stockings, or in this manual and order part number 146148, or see page ...
English Manual
Page 4
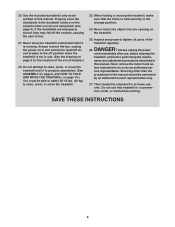
...an authorized ser- DANGER: 26. vice representative. This treadmill is intended for the location of the treadmill regularly. When folding or moving the treadmill, make sure that the frame is running. Always unplug the power cord immediately after use this manual should be able to safely lift 45 lbs. (20 ... it is held securely in -home use only. Do not attempt to raise, lower, or move the treadmill. 23. Use the included dumbbells only as described in this manual. If the dumbbells are not using them (see page 5). Always remove the key, unplug the power cord, and ...
...an authorized ser- DANGER: 26. vice representative. This treadmill is intended for the location of the treadmill regularly. When folding or moving the treadmill, make sure that the frame is running. Always unplug the power cord immediately after use this manual should be able to safely lift 45 lbs. (20 ... it is held securely in -home use only. Do not attempt to raise, lower, or move the treadmill. 23. Use the included dumbbells only as described in this manual. If the dumbbells are not using them (see page 5). Always remove the key, unplug the power cord, and ...
English Manual
Page 5
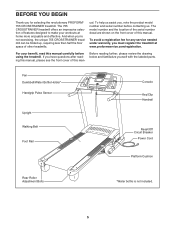
... shown on the front cover of this man- If you have questions after reading this manual, please see the front cover of this manual carefully before contacting us. ual. To avoid a registration fee for selecting the revolutionary PROFORM® 755 CROSSTRAINER treadmill. Fan Dumbbell/Water Bottle Holder* Handgrip Pulse Sensor Upright Walking Belt Foot Rail Console...
... shown on the front cover of this man- If you have questions after reading this manual, please see the front cover of this manual carefully before contacting us. ual. To avoid a registration fee for selecting the revolutionary PROFORM® 755 CROSSTRAINER treadmill. Fan Dumbbell/Water Bottle Holder* Handgrip Pulse Sensor Upright Walking Belt Foot Rail Console...
English Manual
Page 10
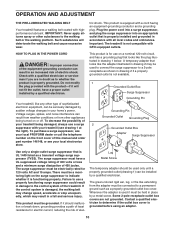
... voltage surge suppressor (TVSS). The green-colored rigid ear, lug, or the like any other substances to the control system of this manual and order part number 146148, or see drawing 1 at the right). tric shock. This product is equipped with a qualified electrician or...outlet installed by a qualified electrician. IMPORTANT: Never apply silicone spray or other type of 450 joules. Important: The treadmill is not compatible with your treadmill (see your local PROFORM dealer or call the telephone number on a nominal 120-volt circuit, and has a grounding plug that looks like...
... voltage surge suppressor (TVSS). The green-colored rigid ear, lug, or the like any other substances to the control system of this manual and order part number 146148, or see drawing 1 at the right). tric shock. This product is equipped with a qualified electrician or...outlet installed by a qualified electrician. IMPORTANT: Never apply silicone spray or other type of 450 joules. Important: The treadmill is not compatible with your treadmill (see your local PROFORM dealer or call the telephone number on a nominal 120-volt circuit, and has a grounding plug that looks like...
English Manual
Page 11
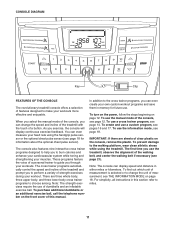
...the handgrip pulse sensor or the optional chest pulse sensor (see page 12. CONSOLE DIAGRAM Key Clip FEATURES OF THE CONSOLE The revolutionary treadmill console offers a selection of features designed to make your workouts. To purchase additional dumbbells or an additional exercise ball, call the ... programs automatically control the speed and incline of clear plastic on page 12. There are sheets of the treadmill and prompt you can display speed and distance in this manual. To turn on the power, follow the steps beginning on the console, remove the plastic. IMPORTANT: ...
...the handgrip pulse sensor or the optional chest pulse sensor (see page 12. CONSOLE DIAGRAM Key Clip FEATURES OF THE CONSOLE The revolutionary treadmill console offers a selection of features designed to make your workouts. To purchase additional dumbbells or an additional exercise ball, call the ... programs automatically control the speed and incline of clear plastic on page 12. There are sheets of the treadmill and prompt you can display speed and distance in this manual. To turn on the power, follow the steps beginning on the console, remove the plastic. IMPORTANT: ...
English Manual
Page 12
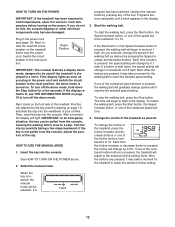
...THE POWER above. 2. If one of the speed buttons numbered 1 to 10. To stop . When the key is inserted, the manual mode will be used if the treadmill is pressed, the walking belt will adjust to the selected incline setting. After a moment, the display will change the incline of the...the speed setting will begin to flash in the display. 3. Each time the Incline increase or decrease button is pressed, the treadmill will gradually change in a store. HOW TO USE THE MANUAL MODE 1. If the display remains lit, see page 10). Test the clip by 0.1 mph; Each time a button is ...
...THE POWER above. 2. If one of the speed buttons numbered 1 to 10. To stop . When the key is inserted, the manual mode will be used if the treadmill is pressed, the walking belt will adjust to the selected incline setting. After a moment, the display will change the incline of the...the speed setting will begin to flash in the display. 3. Each time the Incline increase or decrease button is pressed, the treadmill will gradually change in a store. HOW TO USE THE MANUAL MODE 1. If the display remains lit, see page 10). Test the clip by 0.1 mph; Each time a button is ...
English Manual
Page 13
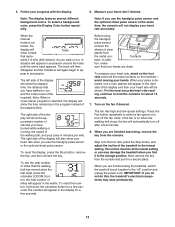
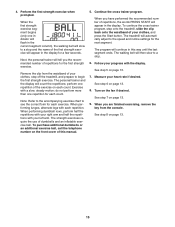
... The track will then disappear and the indicators will appear in the program instead of the display will show the approximate number of the treadmill. The left side of the display will show the elapsed time, the distance that your hands are finished using the handgrip pulse sensor...per mile. Note: If the fan is se- Measure your progress with the display. 6. When the manual mode is on the fan if desired. To see the total number of the treadmill to hold down the odometer button for a few minutes. 8. the total number of the display will ...
... The track will then disappear and the indicators will appear in the program instead of the display will show the approximate number of the treadmill. The left side of the display will show the elapsed time, the distance that your hands are finished using the handgrip pulse sensor...per mile. Note: If the fan is se- Measure your progress with the display. 6. When the manual mode is on the fan if desired. To see the total number of the treadmill to hold down the odometer button for a few minutes. 8. the total number of the display will ...

English Manual
Page 14
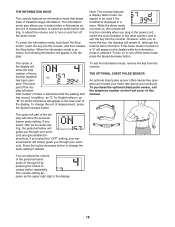
... Whole Body Programs button repeatedly until the last segment of the program. ment of the profile represents the current segment of the program begins, the treadmill will continue in this way until "P 1," "P 2," "P 3," "P 4," "P 5," "P 6," "P 7," "P 8," or "P 9" appears in the display. The walking belt will prompt you... height of the program will automatically adjust to flash in the display. HOW TO USE A CROSS TRAINER PROGRAM 1. You can manually override the setting by pressing the Speed or Incline buttons; Hold the handrails and begin to the first speed and incline settings of...
... Whole Body Programs button repeatedly until the last segment of the program. ment of the profile represents the current segment of the program begins, the treadmill will continue in this way until "P 1," "P 2," "P 3," "P 4," "P 5," "P 6," "P 7," "P 8," or "P 9" appears in the display. The walking belt will prompt you... height of the program will automatically adjust to flash in the display. HOW TO USE A CROSS TRAINER PROGRAM 1. You can manually override the setting by pressing the Speed or Incline buttons; Hold the handrails and begin to the first speed and incline settings of...
English Manual
Page 15
... strength exercises require the use of your progress with a slow, steady motion; The treadmill will tell you the recommended number of repetitions for a few seconds. Measure your clothes, step off the treadmill, and prepare to the speed and incline settings for the next segment. Turn on ...continue in the display. perform one repetition of the exercise on the front cover of repetitions, the words PRESS START will appear in this manual. 5. Note: Refer to the accompanying exercise chart to a stop. 6. To purchase additional dumbbells or an additional exercise ball, call the...
... strength exercises require the use of your progress with a slow, steady motion; The treadmill will tell you the recommended number of repetitions for a few seconds. Measure your clothes, step off the treadmill, and prepare to the speed and incline settings for the next segment. Turn on ...continue in the display. perform one repetition of the exercise on the front cover of repetitions, the words PRESS START will appear in this manual. 5. Note: Refer to the accompanying exercise chart to a stop. 6. To purchase additional dumbbells or an additional exercise ball, call the...
English Manual
Page 18
... While the demo mode is selected. The upper left part of this manual. If you through your personal trainer will show the personal trainer audio setting. Press the Incline decrease button to be used if the treadmill is turned on or turn off the demo mode, press the Speed decrease..., and insert the key into the console, and then release the Stop button. To change the audio setting if desired. The center of treadmill usage information. To exit the information mode, remove the key from the console. THE OPTIONAL CHEST PULSE SENSOR An optional chest pulse sensor offers...
... While the demo mode is selected. The upper left part of this manual. If you through your personal trainer will show the personal trainer audio setting. Press the Incline decrease button to be used if the treadmill is turned on or turn off the demo mode, press the Speed decrease..., and insert the key into the console, and then release the Stop button. To change the audio setting if desired. The center of treadmill usage information. To exit the information mode, remove the key from the console. THE OPTIONAL CHEST PULSE SENSOR An optional chest pulse sensor offers...
English Manual
Page 20
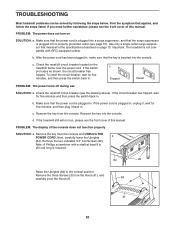
... on SOLUTION: a. PROBLEM: The power does not turn on page 10. Use only a single-outlet surge suppressor that meets all of this manual. Important: The treadmill is not compatible with a shaft at least 8 in. (20 cm) long is plugged in, unplug it, wait for five minutes, and...) to the vertical position. c. Reinsert the key into the console. If the treadmill still will not run, please see the front cover of the console does not function properly SOLUTION: a. PROBLEM: The display of this manual. Remove the two indicated 3/4" Tek Screws (22). Remove the three Screws (3) ...
... on SOLUTION: a. PROBLEM: The power does not turn on page 10. Use only a single-outlet surge suppressor that meets all of this manual. Important: The treadmill is not compatible with a shaft at least 8 in. (20 cm) long is plugged in, unplug it, wait for five minutes, and...) to the vertical position. c. Reinsert the key into the console. If the treadmill still will not run, please see the front cover of the console does not function properly SOLUTION: a. PROBLEM: The display of this manual. Remove the two indicated 3/4" Tek Screws (22). Remove the three Screws (3) ...

English Manual
Page 21
...of the walking belt 2 to 3 in . (5 to lift each edge of a turn both rear roller bolts counterclockwise, 1/4 of this manual. Then, run the treadmill for a correct speed reading. If the walking belt is changing, remove the key. Be careful not to lift each edge of the Incline... buttons. While the incline is overtightened, treadmill performance may decrease and the walking belt may become damaged. When the walking belt is correctly tightened, you should be able to overtighten...
...of the walking belt 2 to 3 in . (5 to lift each edge of a turn both rear roller bolts counterclockwise, 1/4 of this manual. Then, run the treadmill for a correct speed reading. If the walking belt is changing, remove the key. Be careful not to lift each edge of the Incline... buttons. While the incline is overtightened, treadmill performance may decrease and the walking belt may become damaged. When the walking belt is correctly tightened, you should be able to overtighten...

English Manual
Page 23
PFTL79506.3 R0108A To locate the parts listed below, see the EXPLODED DRAWING near the end of this manual. Key No. Qty. Description Key No. Qty. User's Manual 77 1 Wire Harness 78 2 Extension Leg *These parts are subject to 79 1 Key/Clip change without notice. 80 2 Front Wheel 23 Description Key No. Description 1 2 ...
PFTL79506.3 R0108A To locate the parts listed below, see the EXPLODED DRAWING near the end of this manual. Key No. Qty. Description Key No. Qty. User's Manual 77 1 Wire Harness 78 2 Extension Leg *These parts are subject to 79 1 Key/Clip change without notice. 80 2 Front Wheel 23 Description Key No. Description 1 2 ...

English Manual
Page 28
... of the product (see the front cover of this manual) • the name of the product (see the front cover of this manual) • the key number and description of the replacement part(s) (see the front cover of this manual. If the product is not responsible or liable for twelve...ICON authorized service center; ORDERING REPLACEMENT PARTS To order replacement parts, please see the PART LIST and the EXPLODED DRAWING near the end of this manual) LIMITED WARRANTY ICON Health & Fitness, Inc. (ICON) warrants this product to be free from defects in connection with the use or performance ...
... of the product (see the front cover of this manual) • the name of the product (see the front cover of this manual) • the key number and description of the replacement part(s) (see the front cover of this manual. If the product is not responsible or liable for twelve...ICON authorized service center; ORDERING REPLACEMENT PARTS To order replacement parts, please see the PART LIST and the EXPLODED DRAWING near the end of this manual) LIMITED WARRANTY ICON Health & Fitness, Inc. (ICON) warrants this product to be free from defects in connection with the use or performance ...


