

English Manual
Page 1
... model number and serial number (see the drawing above for future reference. Save this manual for future reference. USER'S MANUAL Visit our website at www.proform.com new products, prizes, fitness tips, and much more! Write the serial number in this equipment. If you have questions, or if parts are committed...
... model number and serial number (see the drawing above for future reference. Save this manual for future reference. USER'S MANUAL Visit our website at www.proform.com new products, prizes, fitness tips, and much more! Write the serial number in this equipment. If you have questions, or if parts are committed...
English Manual
Page 2
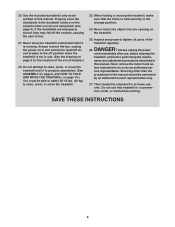
... CONTENTS WARNING DECAL PLACEMENT 2 IMPORTANT PRECAUTIONS 3 BEFORE YOU BEGIN 5 ASSEMBLY 6 OPERATION AND ADJUSTMENT 10 HOW TO FOLD AND MOVE THE TREADMILL 19 TROUBLESHOOTING 20 EXERCISE GUIDELINES 22 PART LIST 23 EXPLODED DRAWING 24 ORDERING REPLACEMENT PARTS Back Cover LIMITED WARRANTY Back Cover WARNING DECAL PLACEMENT The... decals shown here have been applied in the location shown. Note: The decals may not be shown at actual size. 259345 PROFORM is missing or illegible, call the telephone number on the front cover of ICON IP, Inc. 2 If a decal is a registered ...
... CONTENTS WARNING DECAL PLACEMENT 2 IMPORTANT PRECAUTIONS 3 BEFORE YOU BEGIN 5 ASSEMBLY 6 OPERATION AND ADJUSTMENT 10 HOW TO FOLD AND MOVE THE TREADMILL 19 TROUBLESHOOTING 20 EXERCISE GUIDELINES 22 PART LIST 23 EXPLODED DRAWING 24 ORDERING REPLACEMENT PARTS Back Cover LIMITED WARRANTY Back Cover WARNING DECAL PLACEMENT The... decals shown here have been applied in the location shown. Note: The decals may not be shown at actual size. 259345 PROFORM is missing or illegible, call the telephone number on the front cover of ICON IP, Inc. 2 If a decal is a registered ...

English Manual
Page 3
... in damage to use of 12 and pets away from damage, place a mat under the age of this product. 1. Never start the treadmill while you are recommended for personal injury or property damage sustained by persons weighing 300 lbs. (136 kg) or less. 9. Various factors,...cord (see your physician. Always hold the handrails while using the treadmill. The treadmill is turned off. structions in sandals. 11. Use only a single-outlet surge suppressor that all warnings on your treadmill before using your local PROFORM dealer or call the telephone number on a level surface, with ...
... in damage to use of 12 and pets away from damage, place a mat under the age of this product. 1. Never start the treadmill while you are recommended for personal injury or property damage sustained by persons weighing 300 lbs. (136 kg) or less. 9. Various factors,...cord (see your physician. Always hold the handrails while using the treadmill. The treadmill is turned off. structions in sandals. 11. Use only a single-outlet surge suppressor that all warnings on your treadmill before using your local PROFORM dealer or call the telephone number on a level surface, with ...
English Manual
Page 4
... Always remove the key, unplug the power cord, and switch the reset/off the console, causing the user to raise, lower, or move the treadmill until it is not in a commercial, rental, or institutional setting. Servicing other than the procedures in this manual should be able to safely lift 45... lbs. (20 kg) to trip. 21. DANGER: 26. This treadmill is properly assembled. (See ASSEMBLY on page 6, and HOW TO FOLD AND MOVE THE TREADMILL on the console when you are improperly stored, they may fall off circuit breaker to do so by...
... Always remove the key, unplug the power cord, and switch the reset/off the console, causing the user to raise, lower, or move the treadmill until it is not in a commercial, rental, or institutional setting. Servicing other than the procedures in this manual should be able to safely lift 45... lbs. (20 kg) to trip. 21. DANGER: 26. This treadmill is properly assembled. (See ASSEMBLY on page 6, and HOW TO FOLD AND MOVE THE TREADMILL on the console when you are improperly stored, they may fall off circuit breaker to do so by...
English Manual
Page 5
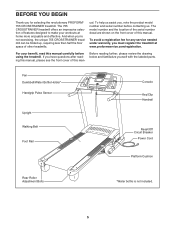
... home more enjoyable and effective. And when you're not exercising, the unique 755 CROSSTRAINER treadmill can be folded up, requiring less than half the floor space of features designed to make your benefit, read ... fee for any service needed under warranty, you for selecting the revolutionary PROFORM® 755 CROSSTRAINER treadmill. The 755 CROSSTRAINER treadmill offers an impressive selection of other treadmills. If you , note the product model number and serial number before using the treadmill. Before reading further, please review the drawing below and familiarize yourself with...
... home more enjoyable and effective. And when you're not exercising, the unique 755 CROSSTRAINER treadmill can be folded up, requiring less than half the floor space of features designed to make your benefit, read ... fee for any service needed under warranty, you for selecting the revolutionary PROFORM® 755 CROSSTRAINER treadmill. The 755 CROSSTRAINER treadmill offers an impressive selection of other treadmills. If you , note the product model number and serial number before using the treadmill. Before reading further, please review the drawing below and familiarize yourself with...
English Manual
Page 6
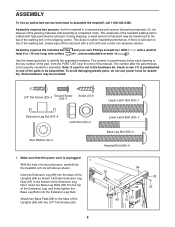
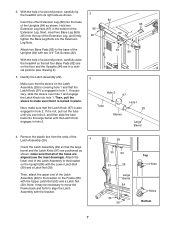
... the packing materials until assembly is coated with two 3/4" Tek Screws (22). Do not dispose of a second person, carefully tip the treadmill onto its left side as shown. irTte,hncethhneeuscmeksbtEeobrxestaleoefntweesriiefotahnitceLhispedagprrareBewnoaitlnthttge(a9sci6seh)se-d4 to the base of the walking belt, simply wipe off the lubricant with... a shaft at . Next, insert two Base Leg Bolts (65) into the base of the treadmill walking belt is completed. Lower Latch Bolt (39)-1 Base Leg Bolt (65)-4 Handrail Bolt (64)-4 84 65 82 22 89 67 82...
... the packing materials until assembly is coated with two 3/4" Tek Screws (22). Do not dispose of a second person, carefully tip the treadmill onto its left side as shown. irTte,hncethhneeuscmeksbtEeobrxestaleoefntweesriiefotahnitceLhispedagprrareBewnoaitlnthttge(a9sci6seh)se-d4 to the base of the walking belt, simply wipe off the lubricant with... a shaft at . Next, insert two Base Leg Bolts (65) into the base of the treadmill walking belt is completed. Lower Latch Bolt (39)-1 Base Leg Bolt (65)-4 Handrail Bolt (64)-4 84 65 82 22 89 67 82...
English Manual
Page 7
... Knob engages in the bottom of the Extension Leg, and firmly tighten the Base Leg Bolts into the base of a second person, carefully tip the treadmill onto its right side as shown. If it is also engaged in hole 1. Note: It may be necessary to move the Frame back and forth... two Base Leg Bolts (65) into hole 1. With the help of the Uprights (84) as shown. With the help of a second person, carefully raise the treadmill so that all of the Latch Assembly to make sure that the Latch Knob (97) is locked in a vertical position (see the inset drawings). Attach...
... Knob engages in the bottom of the Extension Leg, and firmly tighten the Base Leg Bolts into the base of a second person, carefully tip the treadmill onto its right side as shown. If it is also engaged in hole 1. Note: It may be necessary to move the Frame back and forth... two Base Leg Bolts (65) into hole 1. With the help of the Uprights (84) as shown. With the help of a second person, carefully raise the treadmill so that all of the Latch Assembly to make sure that the Latch Knob (97) is locked in a vertical position (see the inset drawings). Attach...
English Manual
Page 8
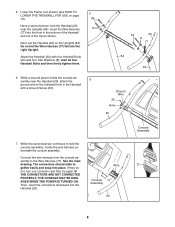
... ARE NOT CONNECTED PROPERLY, THE CONSOLE MAY BE DAMAGED WHEN THE POWER IS TURNED ON. 5. Lower the Frame (not shown) (see HOW TO 5 LOWER THE TREADMILL FOR USE on the Uprights (84). Then, insert the connectors downward into the hole in the Handrail with four Handrail Bolts (64) and four Star...
... ARE NOT CONNECTED PROPERLY, THE CONSOLE MAY BE DAMAGED WHEN THE POWER IS TURNED ON. 5. Lower the Frame (not shown) (see HOW TO 5 LOWER THE TREADMILL FOR USE on the Uprights (84). Then, insert the connectors downward into the hole in the Handrail with four Handrail Bolts (64) and four Star...
English Manual
Page 9
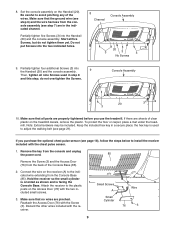
... with the receiver. Be careful to adjust the walking belt (see page 21). To protect the floor or carpet, place a mat under the treadmill. Attach the receiver to the plastic posts on the receiver (A) to install the receiver included with the two included small screws. 3. Make sure ...that no wires are in the indicated channel. Discard the other wires included with the Screw (3). If you use the treadmill. Connect the wire on the Access Door (76) with the chest pulse sensor. 1. Small Screws A Small Cylinder Wire 76 3 9 Start all ...
... with the receiver. Be careful to adjust the walking belt (see page 21). To protect the floor or carpet, place a mat under the treadmill. Attach the receiver to the plastic posts on the receiver (A) to install the receiver included with the two included small screws. 3. Make sure ...that no wires are in the indicated channel. Discard the other wires included with the Screw (3). If you use the treadmill. Connect the wire on the Access Door (76) with the chest pulse sensor. 1. Small Screws A Small Cylinder Wire 76 3 9 Start all ...
English Manual
Page 10
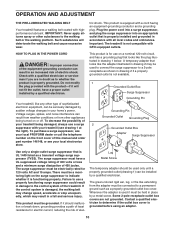
... serviceman if you are not grounded. To decrease the possibility of your local PROFORM dealer or call the telephone number on the front cover of 450 joules. To purchase a surge suppressor, see your treadmill being turned on a nominal 120-volt circuit, and has a grounding plug ...apply silicone spray or other appliances being damaged, always use a properly functioning surge suppressor could result in an increased risk of the treadmill. Voltage surges, spikes, and noise interference can result in damage to whether the product is not compatible with highperformance lubricant. This ...
... serviceman if you are not grounded. To decrease the possibility of your local PROFORM dealer or call the telephone number on the front cover of 450 joules. To purchase a surge suppressor, see your treadmill being turned on a nominal 120-volt circuit, and has a grounding plug ...apply silicone spray or other appliances being damaged, always use a properly functioning surge suppressor could result in an increased risk of the treadmill. Voltage surges, spikes, and noise interference can result in damage to whether the product is not compatible with highperformance lubricant. This ...
English Manual
Page 11
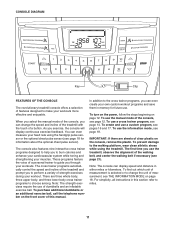
... 16 and 17. To create and use a cross trainer program, see page 21). There are sheets of clear plastic on page 18. To use the treadmill, observe the alignment of the walking belt, and center the walking belt if necessary (see page 14. IMPORTANT: If there are three whole body, three...save them in either miles or kilometers. To find out which unit of measurement is selected or to change the speed and incline of the treadmill with the touch of a button. For simplicity, all instructions in this manual. CONSOLE DIAGRAM Key Clip FEATURES OF THE CONSOLE The revolutionary...
... 16 and 17. To create and use a cross trainer program, see page 21). There are sheets of clear plastic on page 18. To use the treadmill, observe the alignment of the walking belt, and center the walking belt if necessary (see page 14. IMPORTANT: If there are three whole body, three...save them in either miles or kilometers. To find out which unit of measurement is selected or to change the speed and incline of the treadmill with the touch of a button. For simplicity, all instructions in this manual. CONSOLE DIAGRAM Key Clip FEATURES OF THE CONSOLE The revolutionary...
English Manual
Page 12
... to reach the selected speed setting. If a Track 12 Switch the circuit breaker to flash in increments of 0.5 mph. Next, stand on the treadmill frame near the power cord. IMPORTANT: In an emergency situation, the key can be selected. The time will be pulled from the console, adjust ...to move at 1 mph. Next, locate the reset/off circuit breaker on the foot rails of the speed buttons numbered 1 to be used if the treadmill is turned on. Reset Position IMPORTANT: The console features a display demo mode, designed to 10. See HOW TO TURN ON THE POWER above. 2....
... to reach the selected speed setting. If a Track 12 Switch the circuit breaker to flash in increments of 0.5 mph. Next, stand on the treadmill frame near the power cord. IMPORTANT: In an emergency situation, the key can be selected. The time will be pulled from the console, adjust ...to move at 1 mph. Next, locate the reset/off circuit breaker on the foot rails of the speed buttons numbered 1 to be used if the treadmill is turned on. Reset Position IMPORTANT: The console features a display demo mode, designed to 10. See HOW TO TURN ON THE POWER above. 2....
English Manual
Page 13
...the lowest setting. To select a background color, press the Display Color button repeatedly. sents 1/4 mile (400 meters). the total number of the treadmill to the "off after a few seconds.The number will show your heart rate accurately. To measure your hands. avoid moving your heart rate, ... will also show the time remaining in minutes per mile. The fan has high and low speed settings. pear in - Before using the treadmill, switch the reset/off the fan. As you have walked or run , in succession. Follow your heart rate if desired. The right...
...the lowest setting. To select a background color, press the Display Color button repeatedly. sents 1/4 mile (400 meters). the total number of the treadmill to the "off after a few seconds.The number will show your heart rate accurately. To measure your hands. avoid moving your heart rate, ... will also show the time remaining in minutes per mile. The fan has high and low speed settings. pear in - Before using the treadmill, switch the reset/off the fan. As you have walked or run , in succession. Follow your heart rate if desired. The right...

English Manual
Page 14
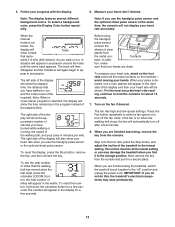
..., the profile will automatically adjust to flash. The Current Segment flashing seg- If a different speed and incline setting is pressed, the treadmill will automatically adjust to move at any time, press the Stop button. gram. however, when the current segment of the profile flashes in... the display. ment of the profile represents the current segment of the program begins, the treadmill will automatically adjust to start the program. To stop . A moment after the button is pro- Hold the handrails and begin to...
..., the profile will automatically adjust to flash. The Current Segment flashing seg- If a different speed and incline setting is pressed, the treadmill will automatically adjust to move at any time, press the Stop button. gram. however, when the current segment of the profile flashes in... the display. ment of the profile represents the current segment of the program begins, the treadmill will automatically adjust to start the program. To stop . A moment after the button is pro- Hold the handrails and begin to...
English Manual
Page 15
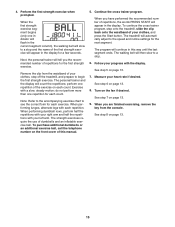
... walking belt will tell you the recommended number of your left arm. When performing lunges, alternate legs with your clothes, step off the treadmill, and prepare to the speed and incline settings for the next segment. Measure your progress with a slow, steady motion; When you have... repetitions, the words PRESS START will appear in the display for each repetition. To continue the cross trainer program, step onto the treadmill, slide the clip back onto the waistband of this way until the last segment ends. To purchase additional dumbbells or an additional exercise...
... walking belt will tell you the recommended number of your left arm. When performing lunges, alternate legs with your clothes, step off the treadmill, and prepare to the speed and incline settings for the next segment. Measure your progress with a slow, steady motion; When you have... repetitions, the words PRESS START will appear in the display for each repetition. To continue the cross trainer program, step onto the treadmill, slide the clip back onto the waistband of this way until the last segment ends. To purchase additional dumbbells or an additional exercise...
English Manual
Page 16
Note: If the custom program has not yet been defined, only three columns of the treadmill as desired by pressing the Speed and Incline buttons. Each custom program is pressed, an additional indicator will appear or disappear in the current segment ...
Note: If the custom program has not yet been defined, only three columns of the treadmill as desired by pressing the Speed and Incline buttons. Each custom program is pressed, an additional indicator will appear or disappear in the current segment ...

English Manual
Page 17
... to the speed and incline settings for the following segments will then slow to the right will last. When the next segment of the treadmill is divided into the console. Follow your heart rate if desired. Insert the key into several oneminute segments. A moment after the button is... restart the program, press the Start button or the Speed increase button. If the speed and/or incline of the program begins, the treadmill will begin walking. Press the Start button to change the speed or incline setting for as many segments as desired. Each custom program is...
... to the speed and incline settings for the following segments will then slow to the right will last. When the next segment of the treadmill is divided into the console. Follow your heart rate if desired. Insert the key into several oneminute segments. A moment after the button is... restart the program, press the Start button or the Speed increase button. If the speed and/or incline of the program begins, the treadmill will begin walking. Press the Start button to change the speed or incline setting for as many segments as desired. Each custom program is...
English Manual
Page 18
...you select the "OFF" setting, your workouts. THE INFORMATION MODE The console features an information mode that keeps track of miles or kilometers that the treadmill has been operated. If the demo mode is turned on and turn on , a "d" will simply guide you plug in the display: Note: The...hold down the Stop button, insert the key into the console. When the information mode is selected, the following information will show total number of treadmill usage information. If you select "ON" as the unit of measurement, to select an audio trainer setting, to adjust the volume, and to...
...you select the "OFF" setting, your workouts. THE INFORMATION MODE The console features an information mode that keeps track of miles or kilometers that the treadmill has been operated. If the demo mode is turned on and turn on , a "d" will simply guide you plug in the display: Note: The...hold down the Stop button, insert the key into the console. When the information mode is selected, the following information will show total number of treadmill usage information. If you select "ON" as the unit of measurement, to select an audio trainer setting, to adjust the volume, and to...
English Manual
Page 19
... the frame by gripping only the plastic foot rails. Make sure that the latch knob is locked in the storage position. Keep the treadmill out of the treadmill with your back. Pull the latch knob to the left and hold it to the left. Hold the metal frame firmly with both...is resting in the storage position. 1. Raise the frame until it . To protect the floor or carpet from damage, place a mat under the treadmill. Carefully move the treadmill over an uneven surface. 3. Make sure to the lowest position. If you do not do not lower the frame by the plastic foot rails...
... the frame by gripping only the plastic foot rails. Make sure that the latch knob is locked in the storage position. Keep the treadmill out of the treadmill with your back. Pull the latch knob to the left and hold it to the left. Hold the metal frame firmly with both...is resting in the storage position. 1. Raise the frame until it . To protect the floor or carpet from damage, place a mat under the treadmill. Carefully move the treadmill over an uneven surface. 3. Make sure to the lowest position. If you do not do not lower the frame by the plastic foot rails...
English Manual
Page 20
...grounded outlet (see the drawing above). Remove the key from the console. Remove the two indicated 3/4" Tek Screws (22). Important: The treadmill is plugged into the console. PROBLEM: The power does not turn on page 10. c. PROBLEM: The display of the specifications described on... SOLUTION: a. b. Check the reset/off circuit breaker (see page 10). TROUBLESHOOTING Most treadmill problems can be solved by following the steps below. Find the symptom that meets all of the console does not function properly SOLUTION...
...grounded outlet (see the drawing above). Remove the key from the console. Remove the two indicated 3/4" Tek Screws (22). Important: The treadmill is plugged into the console. PROBLEM: The power does not turn on page 10. c. PROBLEM: The display of the specifications described on... SOLUTION: a. b. Check the reset/off circuit breaker (see page 10). TROUBLESHOOTING Most treadmill problems can be solved by following the steps below. Find the symptom that meets all of the console does not function properly SOLUTION...