
English Manual
Page 1
... instructions in the space above ) before using this manual for future reference. Serial Number Decal QUESTIONS? MST Sat. 8 a.m.-4 p.m. USER'S MANUAL Visit our website at www.proform.com new products, prizes, fitness tips, and much more! Write the serial number in this manual before contacting us: CALL TOLL-FREE: 1-888-533-1333...
... instructions in the space above ) before using this manual for future reference. Serial Number Decal QUESTIONS? MST Sat. 8 a.m.-4 p.m. USER'S MANUAL Visit our website at www.proform.com new products, prizes, fitness tips, and much more! Write the serial number in this manual before contacting us: CALL TOLL-FREE: 1-888-533-1333...
English Manual
Page 2
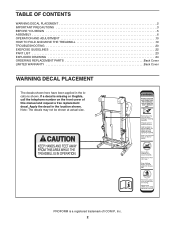
... a free replacement decal. Apply the decal in the locations shown. Note: The decals may not be shown at actual size. 259345 PROFORM is missing or illegible, call the telephone number on the front cover of ICON IP, Inc. 2 TABLE OF CONTENTS WARNING DECAL PLACEMENT... 2 IMPORTANT PRECAUTIONS 3 BEFORE YOU BEGIN 5 ASSEMBLY 6 OPERATION AND ADJUSTMENT 10 HOW TO FOLD AND MOVE THE TREADMILL 19 TROUBLESHOOTING 20 EXERCISE GUIDELINES 22 PART LIST 23 EXPLODED DRAWING 24 ORDERING REPLACEMENT PARTS Back Cover LIMITED WARRANTY Back Cover WARNING DECAL PLACEMENT...
... a free replacement decal. Apply the decal in the locations shown. Note: The decals may not be shown at actual size. 259345 PROFORM is missing or illegible, call the telephone number on the front cover of ICON IP, Inc. 2 TABLE OF CONTENTS WARNING DECAL PLACEMENT... 2 IMPORTANT PRECAUTIONS 3 BEFORE YOU BEGIN 5 ASSEMBLY 6 OPERATION AND ADJUSTMENT 10 HOW TO FOLD AND MOVE THE TREADMILL 19 TROUBLESHOOTING 20 EXERCISE GUIDELINES 22 PART LIST 23 EXPLODED DRAWING 24 ORDERING REPLACEMENT PARTS Back Cover LIMITED WARRANTY Back Cover WARNING DECAL PLACEMENT...

English Manual
Page 3
... administered. 7. Keep the treadmill indoors, away from heated surfaces. 6. Use only a single-outlet surge suppressor that all important precautions and in small increments to ensure that meets all times. 15. To purchase a surge suppressor, see your local PROFORM dealer or call the telephone... number on the same circuit. Never allow more amps. Wear appropriate exercise clothes when using the treadmill. 18. Athletic support clothes are standing on page 10. Never ...
... administered. 7. Keep the treadmill indoors, away from heated surfaces. 6. Use only a single-outlet surge suppressor that all important precautions and in small increments to ensure that meets all times. 15. To purchase a surge suppressor, see your local PROFORM dealer or call the telephone... number on the same circuit. Never allow more amps. Wear appropriate exercise clothes when using the treadmill. 18. Athletic support clothes are standing on page 10. Never ...
English Manual
Page 4
..., and switch the reset/off circuit breaker to the off the console, causing the user to raise, lower, or move the treadmill. 23. vice representative. DANGER: 26. Servicing other than the procedures in use only. nance and adjustment procedures described in this...store the dumbbells in the storage position. 24. If the dumbbells are not using them (see page 5). 20. Do not use , before cleaning the treadmill, and before performing the mainte- Use the included dumbbells only as described in a commercial, rental, or institutional setting. less instructed to raise, lower,...
..., and switch the reset/off circuit breaker to the off the console, causing the user to raise, lower, or move the treadmill. 23. vice representative. DANGER: 26. Servicing other than the procedures in use only. nance and adjustment procedures described in this...store the dumbbells in the storage position. 24. If the dumbbells are not using them (see page 5). 20. Do not use , before cleaning the treadmill, and before performing the mainte- Use the included dumbbells only as described in a commercial, rental, or institutional setting. less instructed to raise, lower,...
English Manual
Page 5
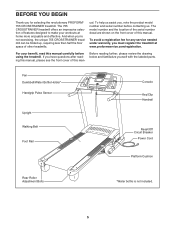
... Thank you for any service needed under warranty, you must register the treadmill at home more enjoyable and effective. To avoid a registration fee for selecting the revolutionary PROFORM® 755 CROSSTRAINER treadmill. For your workouts at www.proformservice.com/registration. To help us .... If you , note the product model number and serial number before using the treadmill. Fan Dumbbell/Water Bottle Holder* Handgrip...
... Thank you for any service needed under warranty, you must register the treadmill at home more enjoyable and effective. To avoid a registration fee for selecting the revolutionary PROFORM® 755 CROSSTRAINER treadmill. For your workouts at www.proformservice.com/registration. To help us .... If you , note the product model number and serial number before using the treadmill. Fan Dumbbell/Water Bottle Holder* Handgrip...
English Manual
Page 6
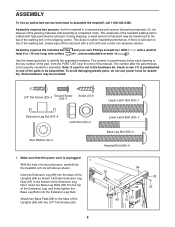
... an Extension Leg (89) into the base of a second person, carefully tip the treadmill onto its left side as shown. Sta(r8W4)a-Utishs2shetehekertehqyeundaurnamtwitbyiennrgeEosexfbdtteehenledoswpfioantrrota,LisdfersegoenmmBtiofbtyhlltyet(h.9PNe6Ao)a-Rtse4sT:eILmfISablTpy anhreataridrswWthnaheoreetee.innlTdNhtohuefetnt(hhu1ima3sr... cleared area and rWemheoevleNaullt p(3a2c)k-in2g materials. irTte,hncethhneeuscmeksbtEeobrxestaleoefntweesriiefotahnitceLhispedagprrareBewnoaitlnthttge(a9sci6seh)se-d4 to assemble the treadmill, call 1-800-445-2480. Next, insert two Base Leg Bolts (65) into the ...
... an Extension Leg (89) into the base of a second person, carefully tip the treadmill onto its left side as shown. Sta(r8W4)a-Utishs2shetehekertehqyeundaurnamtwitbyiennrgeEosexfbdtteehenledoswpfioantrrota,LisdfersegoenmmBtiofbtyhlltyet(h.9PNe6Ao)a-Rtse4sT:eILmfISablTpy anhreataridrswWthnaheoreetee.innlTdNhtohuefetnt(hhu1ima3sr... cleared area and rWemheoevleNaullt p(3a2c)k-in2g materials. irTte,hncethhneeuscmeksbtEeobrxestaleoefntweesriiefotahnitceLhispedagprrareBewnoaitlnthttge(a9sci6seh)se-d4 to assemble the treadmill, call 1-800-445-2480. Next, insert two Base Leg Bolts (65) into the ...
English Manual
Page 7
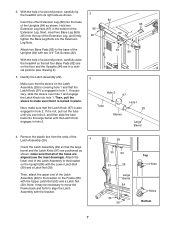
... is not, pull out the tube until you see hole 2, and then slide the tube back into the top of a second person, carefully raise the treadmill so that all of the Latch Assembly to make sure that the sleeve on the floor and the Uprights (84) are in place. Remove the... the bracket. 58 30 50 97 29 Large Barrel 84 30 39 Top Holes Holes Bottom 7 With the help of a second person, carefully tip the treadmill onto its right side as shown.
... is not, pull out the tube until you see hole 2, and then slide the tube back into the top of a second person, carefully raise the treadmill so that all of the Latch Assembly to make sure that the sleeve on the floor and the Uprights (84) are in place. Remove the... the bracket. 58 30 50 97 29 Large Barrel 84 30 39 Top Holes Holes Bottom 7 With the help of a second person, carefully tip the treadmill onto its right side as shown.
English Manual
Page 8
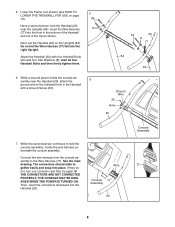
5. Lower the Frame (not shown) (see HOW TO 5 LOWER THE TREADMILL FOR USE on the Uprights (84). Do not let the Wire Harness (77) fall into place. While the second person continues to hold the Handrail (...
5. Lower the Frame (not shown) (see HOW TO 5 LOWER THE TREADMILL FOR USE on the Uprights (84). Do not let the Wire Harness (77) fall into place. While the second person continues to hold the Handrail (...
English Manual
Page 9
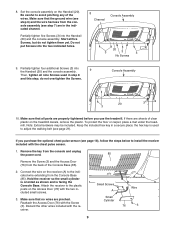
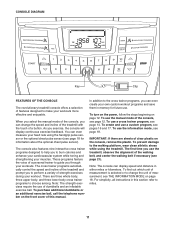
...console assembly (see page 21). Small Screws A Small Cylinder Wire 76 3 9 Set the console assembly on the treadmill decals, remove the plastic. To protect the floor or carpet, place a mat under the treadmill. Remove the key from the console and unplug the power cord. 85 Remove the Screw (3) and the Access... the indicated wire extending from the back of the wires. do not tighten them yet. If there are pinched. If you use the treadmill. Attach the receiver to avoid pinching any of the Console Base (85). 2. Discard the other wires included with the Screw (3).
...console assembly (see page 21). Small Screws A Small Cylinder Wire 76 3 9 Set the console assembly on the treadmill decals, remove the plastic. To protect the floor or carpet, place a mat under the treadmill. Remove the key from the console and unplug the power cord. 85 Remove the Screw (3) and the Access... the indicated wire extending from the back of the wires. do not tighten them yet. If there are pinched. If you use the treadmill. Attach the receiver to avoid pinching any of the Console Base (85). 2. Discard the other wires included with the Screw (3).
English Manual
Page 10
... green-colored rigid ear, lug, or the like the adapter illustrated in drawing 2 may result in an increased risk of the treadmill. Important: The treadmill is properly installed and grounded in place by sudden voltage changes in doubt as a transient voltage surge suppressor (TVSS). Do not ...the right). To decrease the possibility of this manual and order part number 146148, or see your treadmill (see your local PROFORM dealer or call the telephone number on the front cover of your treadmill being turned on the surge suppressor to a 2-pole receptacle as shown in drawing 2 if a...
... green-colored rigid ear, lug, or the like the adapter illustrated in drawing 2 may result in an increased risk of the treadmill. Important: The treadmill is properly installed and grounded in place by sudden voltage changes in doubt as a transient voltage surge suppressor (TVSS). Do not ...the right). To decrease the possibility of this manual and order part number 146148, or see your treadmill (see your local PROFORM dealer or call the telephone number on the front cover of your treadmill being turned on the surge suppressor to a 2-pole receptacle as shown in drawing 2 if a...
English Manual
Page 11
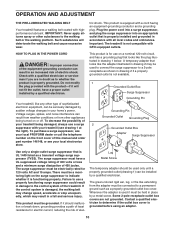
...platform, wear clean athletic shoes while using the handgrip pulse sensor or the optional chest pulse sensor (see page 18 for future use the treadmill, observe the alignment of the console, see page 14. To prevent damage to the cross trainer programs, you use . The first ... (see page 18. For simplicity, all instructions in this manual. The cross trainer programs automatically control the speed and incline of the treadmill and prompt you exercise, the console will display continuous exercise feedback. To purchase additional dumbbells or an additional exercise ball, call the telephone...
...platform, wear clean athletic shoes while using the handgrip pulse sensor or the optional chest pulse sensor (see page 18 for future use the treadmill, observe the alignment of the console, see page 14. To prevent damage to the cross trainer programs, you use . The first ... (see page 18. For simplicity, all instructions in this manual. The cross trainer programs automatically control the speed and incline of the treadmill and prompt you exercise, the console will display continuous exercise feedback. To purchase additional dumbbells or an additional exercise ball, call the telephone...
English Manual
Page 12
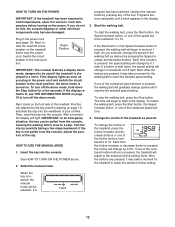
..., the speed setting will adjust to the key (see page 10). The time will light. HOW TO TURN ON THE POWER IMPORTANT: If the treadmill has been exposed to cold temperatures, allow it may take a moment for a few steps backward; Test the clip by 0.5%. if the key is ...selected incline setting. As you do not do this, the console displays or other electrical components may become damaged. if a button is pressed, the treadmill will change by pressing the Speed increase and decrease buttons. Change the incline of 0.5 mph. If a Track 12 Next, stand on page 11)...
..., the speed setting will adjust to the key (see page 10). The time will light. HOW TO TURN ON THE POWER IMPORTANT: If the treadmill has been exposed to cold temperatures, allow it may take a moment for a few steps backward; Test the clip by 0.5%. if the key is ...selected incline setting. As you do not do this, the console displays or other electrical components may become damaged. if a button is pressed, the treadmill will change by pressing the Speed increase and decrease buttons. Change the incline of 0.5 mph. If a Track 12 Next, stand on page 11)...
English Manual
Page 13
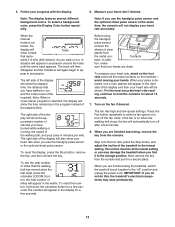
..., the speed of clear plastic from the console and put it to the lowest setting. Follow your hands. The right side of the treadmill. When your heart rate, stand on when the walking belt stops, the fan will also show the approximate number of miles that you ...fan if desired. Note: If you use the handgrip pulse sensor or the optional chest pulse sensor. To reset this , the treadmill's electrical components may damage the treadmill when you walk or run , and the incline level of the display will automatically turn off " position and unplug the power ...
..., the speed of clear plastic from the console and put it to the lowest setting. Follow your hands. The right side of the treadmill. When your heart rate, stand on when the walking belt stops, the fan will also show the approximate number of miles that you ...fan if desired. Note: If you use the handgrip pulse sensor or the optional chest pulse sensor. To reset this , the treadmill's electrical components may damage the treadmill when you walk or run , and the incline level of the display will automatically turn off " position and unplug the power ...

English Manual
Page 14
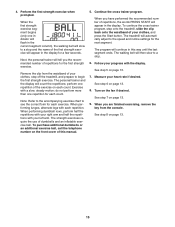
... to the speed and incline settings for the next segment. HOW TO USE A CROSS TRAINER PROGRAM 1. When the next segment of the program ends, the treadmill will continue in this way until "P 1," "P 2," "P 3," "P 4," "P 5," "P 6," "P 7," "P 8," or "P 9" appears in the display and the last ...segment ends. however, when the current segment of the program begins, the treadmill will begin to start the program. Press the Start button to move at any time, press the Stop button. One speed setting and one of...
... to the speed and incline settings for the next segment. HOW TO USE A CROSS TRAINER PROGRAM 1. When the next segment of the program ends, the treadmill will continue in this way until "P 1," "P 2," "P 3," "P 4," "P 5," "P 6," "P 7," "P 8," or "P 9" appears in the display and the last ...segment ends. however, when the current segment of the program begins, the treadmill will begin to start the program. Press the Start button to move at any time, press the Stop button. One speed setting and one of...
English Manual
Page 15
...performing dumbbell rows, perform half the repetitions with your right arm and half the repetitions with each exercise. Continue the cross trainer program. The treadmill will count the repetitions; See step 8 on page 13. 9. The personal trainer and the display will automatically adjust to the speed and... this way until the last segment ends. To continue the cross trainer program, step onto the treadmill, slide the clip back onto the waistband of your clothes, step off the treadmill, and prepare to see the correct form for each count. Next, the personal trainer will appear...
...performing dumbbell rows, perform half the repetitions with your right arm and half the repetitions with each exercise. Continue the cross trainer program. The treadmill will count the repetitions; See step 8 on page 13. 9. The personal trainer and the display will automatically adjust to the speed and... this way until the last segment ends. To continue the cross trainer program, step onto the treadmill, slide the clip back onto the waistband of your clothes, step off the treadmill, and prepare to see the correct form for each count. Next, the personal trainer will appear...
English Manual
Page 16
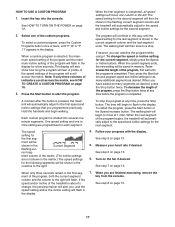
... times a Speed button is pressed, the walking belt will begin walking. The speed and incline settings that you have programmed and the number of the treadmill as desired by pressing the Speed and Incline buttons. A moment after the button is pressed, an additional indicator will scroll across the matrix. Continue programming...
... times a Speed button is pressed, the walking belt will begin walking. The speed and incline settings that you have programmed and the number of the treadmill as desired by pressing the Speed and Incline buttons. A moment after the button is pressed, an additional indicator will scroll across the matrix. Continue programming...
English Manual
Page 17
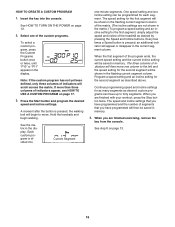
...redefine the program while using it. Note: If only three columns of the program will be shown in the flashing current segment column and the treadmill will continue in the current segment column and the last segment ends. The walking belt will begin to flash in the columns to a stop ... be saved in the display for the current segment, simply press the Speed or Incline buttons. To decrease the length of the program begins, the treadmill will scroll across the matrix, see HOW TO CREATE A CUSTOM PROGRAM on page 16. 3. A moment after the button is completed. When the next segment ...
...redefine the program while using it. Note: If only three columns of the program will be shown in the flashing current segment column and the treadmill will continue in the current segment column and the last segment ends. The walking belt will begin to flash in the columns to a stop ... be saved in the display for the current segment, simply press the Speed or Incline buttons. To decrease the length of the program begins, the treadmill will scroll across the matrix, see HOW TO CREATE A CUSTOM PROGRAM on page 16. 3. A moment after the button is completed. When the next segment ...
English Manual
Page 18
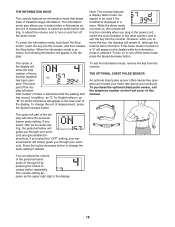
... pulse sensor, call the telephone number on and turn off the demo mode. The upper left part of treadmill usage information. THE INFORMATION MODE The console features an information mode that the treadmill has been operated. To select the information mode, hold down the Stop button, insert the key into the...information mode also allows you select "ON" as the upper right digit in the power cord, switch the circuit breaker to be used if the treadmill is displayed in the lower part of the display. The lower part of this manual. To change the audio setting if desired. You can ...
... pulse sensor, call the telephone number on and turn off the demo mode. The upper left part of treadmill usage information. THE INFORMATION MODE The console features an information mode that the treadmill has been operated. To select the information mode, hold down the Stop button, insert the key into the...information mode also allows you select "ON" as the upper right digit in the power cord, switch the circuit breaker to be used if the treadmill is displayed in the lower part of the display. The lower part of this manual. To change the audio setting if desired. You can ...
English Manual
Page 19
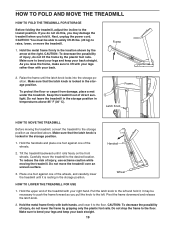
... one of direct sunlight. Place one foot against one of injury, do not lift the frame by the plastic foot rails. it may damage the treadmill when you fold it. Pivot the frame downward and release the latch knob. 2. Hold the metal frame firmly with both hands, and lower it rolls... drop the frame to lift with your legs rather than with your back. CAUTION: To decrease the possibility of the wheels, and carefully lower the treadmill until it ; As you pull the knob to bend your legs and keep your back straight. 19 Frame 2. Make sure that the latch knob is...
... one of direct sunlight. Place one foot against one of injury, do not lift the frame by the plastic foot rails. it may damage the treadmill when you fold it. Pivot the frame downward and release the latch knob. 2. Hold the metal frame firmly with both hands, and lower it rolls... drop the frame to lift with your legs rather than with your back. CAUTION: To decrease the possibility of the wheels, and carefully lower the treadmill until it ; As you pull the knob to bend your legs and keep your back straight. 19 Frame 2. Make sure that the latch knob is...
English Manual
Page 20
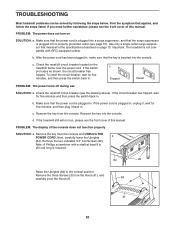
... that the power cord is plugged into the console. Remove the key from the console and UNPLUG THE POWER CORD. TROUBLESHOOTING Most treadmill problems can be solved by following the steps below. Make sure that the power cord is required. 84 22 Raise the Uprights ...carefully lower the Uprights a (84). Note: A Phillips screwdriver with GFCI-equipped outlets. If you need further assistance, please see the drawing above). Important: The treadmill is inserted into a surge suppressor, and that the key is not compatible with a shaft at least 8 in. (20 cm) long is plugged in ....
... that the power cord is plugged into the console. Remove the key from the console and UNPLUG THE POWER CORD. TROUBLESHOOTING Most treadmill problems can be solved by following the steps below. Make sure that the power cord is required. 84 22 Raise the Uprights ...carefully lower the Uprights a (84). Note: A Phillips screwdriver with GFCI-equipped outlets. If you need further assistance, please see the drawing above). Important: The treadmill is inserted into a surge suppressor, and that the key is not compatible with a shaft at least 8 in. (20 cm) long is plugged in ....