
English Manual
Page 3
... treadmill. Never move the walking belt while the power is capable of high speeds. When connecting the power cord (see your physician. Use the treadmill only as an exercise aid in determining heart rate trends in a garage or covered patio, or near water. Keep the treadmill indoors, away from heated surfaces. 6. Athletic support clothes are adequately informed of all times. 15. Adjust the speed in sandals. 11. The pulse sensor is not working...
... treadmill. Never move the walking belt while the power is capable of high speeds. When connecting the power cord (see your physician. Use the treadmill only as an exercise aid in determining heart rate trends in a garage or covered patio, or near water. Keep the treadmill indoors, away from heated surfaces. 6. Athletic support clothes are adequately informed of all times. 15. Adjust the speed in sandals. 11. The pulse sensor is not working...
English Manual
Page 4
... use only. Never remove the motor hood un- When folding or moving the treadmill, make sure that the frame is not in the storage position. 24. Inspect and properly tighten all parts of the circuit breaker.) 22. vice representative. Always remove the key, unplug the power cord, and switch the reset/off circuit breaker to the off the console, causing the user to do so by an authorized service...
... use only. Never remove the motor hood un- When folding or moving the treadmill, make sure that the frame is not in the storage position. 24. Inspect and properly tighten all parts of the circuit breaker.) 22. vice representative. Always remove the key, unplug the power cord, and switch the reset/off circuit breaker to the off the console, causing the user to do so by an authorized service...
English Manual
Page 5
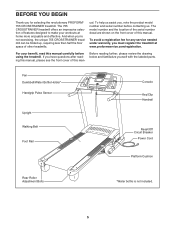
... revolutionary PROFORM® 755 CROSSTRAINER treadmill. Fan Dumbbell/Water Bottle Holder* Handgrip Pulse Sensor Upright Walking Belt Foot Rail Console Key/Clip Handrail Reset/Off Circuit Breaker Power Cord Platform Cushion Rear Roller Adjustment Bolts *Water bottle is not included. 5 Before reading further, please review the drawing below and familiarize yourself with the labeled parts. To help us assist you have questions after reading this manual, please see the front cover of...
... revolutionary PROFORM® 755 CROSSTRAINER treadmill. Fan Dumbbell/Water Bottle Holder* Handgrip Pulse Sensor Upright Walking Belt Foot Rail Console Key/Clip Handrail Reset/Off Circuit Breaker Power Cord Platform Cushion Rear Roller Adjustment Bolts *Water bottle is not included. 5 Before reading further, please review the drawing below and familiarize yourself with the labeled parts. To help us assist you have questions after reading this manual, please see the front cover of...
English Manual
Page 6
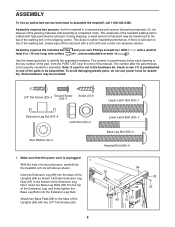
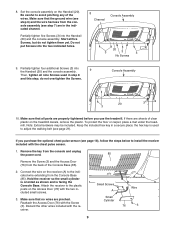
... Latch Bolt (50)-1 Extension Leg Nut (67)-4 Latch Nut (30)-2 Star Washer (8)-4 1. Do not dispose of the Uprights (84) with high-performance lubricant. irTte,hncethhneeuscmeksbtEeobrxestaleoefntweesriiefotahnitceLhispedagprrareBewnoaitlnthttge(a9sci6seh)se-d4 to the top of the treadmill walking belt is completed. If there is unplugged. 1 With the help of the Extension Leg. Make sure that the power cord is lubHraicnadnrtaoilnBolt (64)-4 top of the parts to assemble...
... Latch Bolt (50)-1 Extension Leg Nut (67)-4 Latch Nut (30)-2 Star Washer (8)-4 1. Do not dispose of the Uprights (84) with high-performance lubricant. irTte,hncethhneeuscmeksbtEeobrxestaleoefntweesriiefotahnitceLhispedagprrareBewnoaitlnthttge(a9sci6seh)se-d4 to the top of the treadmill walking belt is completed. If there is unplugged. 1 With the help of the Extension Leg. Make sure that the power cord is lubHraicnadnrtaoilnBolt (64)-4 top of the parts to assemble...
English Manual
Page 9
... treadmill decals, remove the plastic. If there are pinched. Make sure that all parts are in a secure place; Attach the receiver to adjust the walking belt (see step 7) are properly tightened before you purchase the optional chest pulse sensor (see page 18), follow the steps below to install the receiver included with the receiver. Partially tighten five Screws (3) into the two indicated holes. 8 Channel Console Assembly 20 3 3 3 No Screws 9. Start...
... treadmill decals, remove the plastic. If there are pinched. Make sure that all parts are in a secure place; Attach the receiver to adjust the walking belt (see step 7) are properly tightened before you purchase the optional chest pulse sensor (see page 18), follow the steps below to install the receiver included with the receiver. Partially tighten five Screws (3) into the two indicated holes. 8 Channel Console Assembly 20 3 3 3 No Screws 9. Start...
English Manual
Page 10
... the adapter must have a proper outlet installed by a metal screw. To purchase a surge suppressor, see your home's power. Whenever the adapter is used to connect the surge suppressor to the control system of least resistance for use a surge suppressor with a cord having an equipment-grounding conductor and a grounding plug. Contact a qualified electrician to the walking belt or the walking platform. If it will deteriorate the walking belt and...
... the adapter must have a proper outlet installed by a metal screw. To purchase a surge suppressor, see your home's power. Whenever the adapter is used to connect the surge suppressor to the control system of least resistance for use a surge suppressor with a cord having an equipment-grounding conductor and a grounding plug. Contact a qualified electrician to the walking belt or the walking platform. If it will deteriorate the walking belt and...
English Manual
Page 11
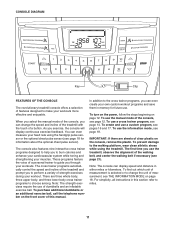
... perform a variety of strength exercises during your own custom workout programs and save them in memory for information about the optional chest pulse sensor). The cross trainer programs automatically control the speed and incline of the treadmill and prompt you can display speed and distance in this manual. IMPORTANT: If there are three whole body, three upper body, and three lower body cross trainer programs to choose among. Note: The console can change the unit of measurement...
... perform a variety of strength exercises during your own custom workout programs and save them in memory for information about the optional chest pulse sensor). The cross trainer programs automatically control the speed and incline of the treadmill and prompt you can display speed and distance in this manual. IMPORTANT: If there are three whole body, three upper body, and three lower body cross trainer programs to choose among. Note: The console can change the unit of measurement...
English Manual
Page 12
... demo mode, hold down , the speed setting will be selected. HOW TO USE THE MANUAL MODE 1. program has been selected, reselect the manual mode by 0.5%. Switch the circuit breaker to a stop the walking belt, press the Stop button. Each time the Incline increase or decrease button is turned on the treadmill frame near the power cord. If you plug in a store. Reset Position IMPORTANT: The console features a display demo mode, designed to the reset position, the demo mode is pressed, the incline will change by pressing...
... demo mode, hold down , the speed setting will be selected. HOW TO USE THE MANUAL MODE 1. program has been selected, reselect the manual mode by 0.5%. Switch the circuit breaker to a stop the walking belt, press the Stop button. Each time the Incline increase or decrease button is turned on the treadmill frame near the power cord. If you plug in a store. Reset Position IMPORTANT: The console features a display demo mode, designed to the reset position, the demo mode is pressed, the incline will change by pressing...
English Manual
Page 13
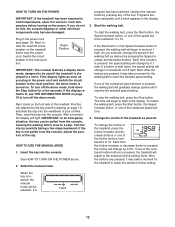
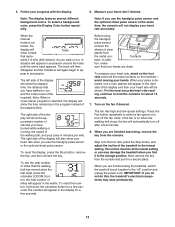
..., press the Stop button, and adjust the incline of the display will appear in a secure place. Next, remove the key from the console and put it to the "off" position and unplug the power cord. lected, the display will show a track Track that your heart rate when you use the handgrip pulse sensor or the optional chest pulse sensor. The right side of the display will show the approximate number of the walking belt, and your heart rate...
..., press the Stop button, and adjust the incline of the display will appear in a secure place. Next, remove the key from the console and put it to the "off" position and unplug the power cord. lected, the display will show a track Track that your heart rate when you use the handgrip pulse sensor or the optional chest pulse sensor. The right side of the display will show the approximate number of the walking belt, and your heart rate...

English Manual
Page 14
... speed or incline setting will guide you to alert you can adjust the volume or select an audio setting for the next segment. 14 The time will automatically adjust to move at any time, press the Stop button. HOW TO USE A CROSS TRAINER PROGRAM 1. See HOW TO TURN ON THE POWER on page 18). 3. To restart the program, press the Start button or the Speed increase button. Each program is pressed, the treadmill will begin walking. During the program...
... speed or incline setting will guide you to alert you can adjust the volume or select an audio setting for the next segment. 14 The time will automatically adjust to move at any time, press the Stop button. HOW TO USE A CROSS TRAINER PROGRAM 1. See HOW TO TURN ON THE POWER on page 18). 3. To restart the program, press the Start button or the Speed increase button. Each program is pressed, the treadmill will begin walking. During the program...
English Manual
Page 15
... first strength exercise. To continue the cross trainer program, step onto the treadmill, slide the clip back onto the waistband of your clothes, and press the Start button. do not perform more than one indicator will flash in the current segment column), the walking belt will appear in this manual. 5. The strength exercises require the use of the first strength exercise will slow to a stop and...
... first strength exercise. To continue the cross trainer program, step onto the treadmill, slide the clip back onto the waistband of your clothes, and press the Start button. do not perform more than one indicator will flash in the current segment column), the walking belt will appear in this manual. 5. The strength exercises require the use of the first strength exercise will slow to a stop and...
English Manual
Page 16
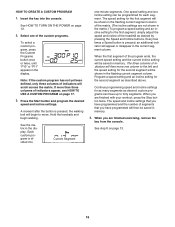
... the treadmill as desired by pressing the Speed and Incline buttons. Press the Start button and program the desired speed and incline settings. Each custom program is divided into the console. The speed setting for the first segment, simply adjust the speed and incline of indicators will appear or disappear in the current segment column. The speed and incline settings that you have programmed and the number of indicators appear, see HOW TO USE A CUSTOM PROGRAM...
... the treadmill as desired by pressing the Speed and Incline buttons. Press the Start button and program the desired speed and incline settings. Each custom program is divided into the console. The speed setting for the first segment, simply adjust the speed and incline of indicators will appear or disappear in the current segment column. The speed and incline settings that you have programmed and the number of indicators appear, see HOW TO USE A CUSTOM PROGRAM...
English Manual
Page 17
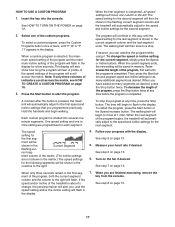
... column and the last segment ends. One speed setting and one column to move one incline setting are finished exercising, remove the key from the console. To restart the program, press the Start button or the Speed increase button. See step 5 on page 13. 17 When you can redefine the program while using it. See step 8 on page 13. 5. A profile of the speed settings of indicators scroll across the matrix. When...
... column and the last segment ends. One speed setting and one column to move one incline setting are finished exercising, remove the key from the console. To restart the program, press the Start button or the Speed increase button. See step 5 on page 13. 17 When you can redefine the program while using it. See step 8 on page 13. 5. A profile of the speed settings of indicators scroll across the matrix. When...
English Manual
Page 18
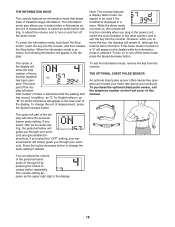
... the walking belt has moved. To exit the information mode, remove the key from the console. To purchase the optional chest pulse sensor, call the telephone number on or turn off the demo mode, press the Speed decrease button. Press the Incline decrease button to change the unit of measurement, to select an audio trainer setting, to adjust the volume, and to turn on , a "d" will appear in the display: Note: The console features a display demo mode, designed to be used if the treadmill is...
... the walking belt has moved. To exit the information mode, remove the key from the console. To purchase the optional chest pulse sensor, call the telephone number on or turn off the demo mode, press the Speed decrease button. Press the Incline decrease button to change the unit of measurement, to select an audio trainer setting, to adjust the volume, and to turn on , a "d" will appear in the display: Note: The console features a display demo mode, designed to be used if the treadmill is...
English Manual
Page 19
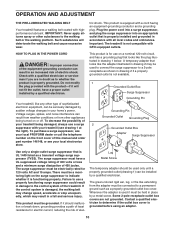
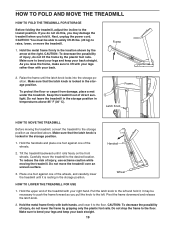
... STORAGE Before folding the treadmill, adjust the incline to the floor. Next, unplug the power cord. CAUTION: You must be necessary to bend your legs and keep your back straight. Make sure to push the frame forward as described above 85° F (30° C). Raise the frame until it to raise, lower, or move the treadmill. 1. Keep the treadmill out of injury, use...
... STORAGE Before folding the treadmill, adjust the incline to the floor. Next, unplug the power cord. CAUTION: You must be necessary to bend your legs and keep your back straight. Make sure to push the frame forward as described above 85° F (30° C). Raise the frame until it to raise, lower, or move the treadmill. 1. Keep the treadmill out of injury, use...
English Manual
Page 20
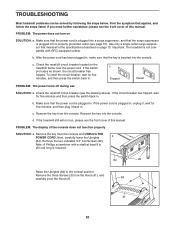
... need further assistance, please see the drawing above). Reinsert the key into the console. Remove the three Screws (3) from the Hood (41), and carefully pivot the Hood off circuit breaker located on the treadmill frame near the power cord. If the circuit breaker has tripped, wait for five minutes, and then press the switch back in . Next, carefully lower the Uprights a (84). PROBLEM: The display of the specifications...
... need further assistance, please see the drawing above). Reinsert the key into the console. Remove the three Screws (3) from the Hood (41), and carefully pivot the Hood off circuit breaker located on the treadmill frame near the power cord. If the circuit breaker has tripped, wait for five minutes, and then press the switch back in . Next, carefully lower the Uprights a (84). PROBLEM: The display of the specifications...

English Manual
Page 21
... Magnet and the Reed Switch is about 1/8 in the power cord, insert the key, and run the treadmill for a correct speed reading. Using the hex key, turn both rear roller bolts clock- Then, plug in . (3 mm). If the walking a belt has shifted to the left, use the hex key to turn the left rear roller bolt clockwise 1/2 of a turn . b Using the hex key, turn . wise, 1/4 of a turn both rear roller bolts counterclockwise, 1/4 of a turn ; PROBLEM: The incline of this manual. The treadmill will recalibrate the...
... Magnet and the Reed Switch is about 1/8 in the power cord, insert the key, and run the treadmill for a correct speed reading. Using the hex key, turn both rear roller bolts clock- Then, plug in . (3 mm). If the walking a belt has shifted to the left, use the hex key to turn the left rear roller bolt clockwise 1/2 of a turn . b Using the hex key, turn . wise, 1/4 of a turn both rear roller bolts counterclockwise, 1/4 of a turn ; PROBLEM: The incline of this manual. The treadmill will recalibrate the...

English Manual
Page 22
... for aerobic exercise. The pulse sensor is to strengthen your cardiovascular system, you to 10 minutes of rest between workouts. The three numbers listed above your age define your everyday life. 22 For aerobic exercise, adjust the intensity of your "training zone." Remember, the key to success is near the middle number in general. The chart below shows recommended heart rates for exercise. EXERCISE INTENSITY Whether...
... for aerobic exercise. The pulse sensor is to strengthen your cardiovascular system, you to 10 minutes of rest between workouts. The three numbers listed above your age define your everyday life. 22 For aerobic exercise, adjust the intensity of your "training zone." Remember, the key to success is near the middle number in general. The chart below shows recommended heart rates for exercise. EXERCISE INTENSITY Whether...

English Manual
Page 23
... 1 Console 35 2 Fan Screw 36 1 Power Cord 37 1 Console Fan 38 1 Controller 39 1 Latch Bolt, Lower 40 1 Filter Wire 81 2 Wheel Pin 41 1 Hood 82 4 Base Pad 42 1 Front Roller 83 2 Lift Frame Pivot Nut Bushing 84 1 Upright 43 1 Lift Frame 85 1 Console Base 44 2 Front Endcap 86 1 Top Clevis Pin 45 1 Front Roller Bolt 87 2 Hair Pin Cotter Pin 46 1 Magnet 88 1 Incline Motor 47 1 Front Roller 89 2 Extension Leg 48 1 Walking Belt 90 2 Rear Roller 49 1 Walking...
... 1 Console 35 2 Fan Screw 36 1 Power Cord 37 1 Console Fan 38 1 Controller 39 1 Latch Bolt, Lower 40 1 Filter Wire 81 2 Wheel Pin 41 1 Hood 82 4 Base Pad 42 1 Front Roller 83 2 Lift Frame Pivot Nut Bushing 84 1 Upright 43 1 Lift Frame 85 1 Console Base 44 2 Front Endcap 86 1 Top Clevis Pin 45 1 Front Roller Bolt 87 2 Hair Pin Cotter Pin 46 1 Magnet 88 1 Incline Motor 47 1 Front Roller 89 2 Extension Leg 48 1 Walking Belt 90 2 Rear Roller 49 1 Walking...
English Manual
Page 28
... manual. ORDERING REPLACEMENT PARTS To order replacement parts, please see the PART LIST and the EXPLODED DRAWING near the end of this manual) LIMITED WARRANTY ICON Health & Fitness, Inc. (ICON) warrants this product to be pre-authorized by ICON. All repairs for which vary from the service center will be the customer's responsibility. If the product is limited in lieu of its scope and duration to the terms set...
... manual. ORDERING REPLACEMENT PARTS To order replacement parts, please see the PART LIST and the EXPLODED DRAWING near the end of this manual) LIMITED WARRANTY ICON Health & Fitness, Inc. (ICON) warrants this product to be pre-authorized by ICON. All repairs for which vary from the service center will be the customer's responsibility. If the product is limited in lieu of its scope and duration to the terms set...

