

User Manual
Page 2
... caught in the centre of clearance behind it. No other appliance should be used by persons weighing more than 115 kg. 9. Place the treadmill on any surface that all times. 8. When replacing the fuse, on ASTA approved BS1362 type should not be used or where oxygen is ...12 and pets away from moisture and dust. Never allow more than one person on the same circuit. 2 Wear appropriate exercise clothing when using the treadmill. Athletic support clothes are used . When connecting the power cord (see page 8), plug the power cord into an earthed circuit. A 13 amp ...
... caught in the centre of clearance behind it. No other appliance should be used by persons weighing more than 115 kg. 9. Place the treadmill on any surface that all times. 8. When replacing the fuse, on ASTA approved BS1362 type should not be used or where oxygen is ...12 and pets away from moisture and dust. Never allow more than one person on the same circuit. 2 Wear appropriate exercise clothing when using the treadmill. Athletic support clothes are used . When connecting the power cord (see page 8), plug the power cord into an earthed circuit. A 13 amp ...

User Manual
Page 3
...user's movement, may change before performing the main- Always listen for speed and/or incline changes. Inspect and tighten all instructions before using the treadmill. 16. DANGER: 27. Servicing other than 5 feet (1.5) meters. 21. SAVE THESE INSTRUCTIONS 3 The pulse sensor is running. Do not...authorised service representative. Do not use only a 3conductor, 14 gauge (1mm2) cord that the storage latch is needed, use this treadmill in this manual should be prepared for the "chirp" and be performed by an authorised service representative only. 28. If an ...
...user's movement, may change before performing the main- Always listen for speed and/or incline changes. Inspect and tighten all instructions before using the treadmill. 16. DANGER: 27. Servicing other than 5 feet (1.5) meters. 21. SAVE THESE INSTRUCTIONS 3 The pulse sensor is running. Do not...authorised service representative. Do not use only a 3conductor, 14 gauge (1mm2) cord that the storage latch is needed, use this treadmill in this manual should be prepared for the "chirp" and be performed by an authorised service representative only. 28. If an ...

User Manual
Page 4
Note: This decal is shown at 20% of actual size. 4 The decals shown below have been placed on your treadmill. Note: This decal is shown at 38% of this manual). Apply the decal in the location shown. If a decal is missing or illegible, please call our Customer Service Department to order a free replacement decal (see the front cover of actual size.
Note: This decal is shown at 20% of actual size. 4 The decals shown below have been placed on your treadmill. Note: This decal is shown at 38% of this manual). Apply the decal in the location shown. If a decal is missing or illegible, please call our Customer Service Department to order a free replacement decal (see the front cover of actual size.
User Manual
Page 5
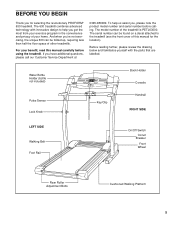
... number before using the treadmill. The serial number can be found on a decal attached to help us assist you get the most from your benefit, read this manual for selecting the revolutionary PROFORM® 630 treadmill. If you 're not exercising, the unique 630 can be folded up,... requiring less than half the floor space of the treadmill is PETL63000. And when you have additional questions, please call our...
... number before using the treadmill. The serial number can be found on a decal attached to help us assist you get the most from your benefit, read this manual for selecting the revolutionary PROFORM® 630 treadmill. If you 're not exercising, the unique 630 can be folded up,... requiring less than half the floor space of the treadmill is PETL63000. And when you have additional questions, please call our...
User Manual
Page 6
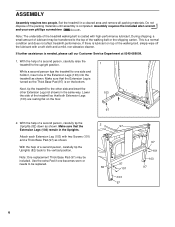
...other Extension Leg (not shown) in the same way. With the help of the walking belt or the shipping carton. Do not dispose of the treadmill so that the 2 Extension Legs (103) remain in a cleared area and remove all packing materials. If further assistance is a normal condition and does...of a second person, carefully tip the Uprights (82) down as shown. Assembly requires the included allen wrench and your own phillips screwdriver . Set the treadmill in the Uprights. During shipping, a small amount of lubricant may be replaced. 82 97 97 101 103 97 97 101 103 97 6 This is ...
...other Extension Leg (not shown) in the same way. With the help of the walking belt or the shipping carton. Do not dispose of the treadmill so that the 2 Extension Legs (103) remain in a cleared area and remove all packing materials. If further assistance is a normal condition and does...of a second person, carefully tip the Uprights (82) down as shown. Assembly requires the included allen wrench and your own phillips screwdriver . Set the treadmill in the Uprights. During shipping, a small amount of lubricant may be replaced. 82 97 97 101 103 97 97 101 103 97 6 This is ...
User Manual
Page 7
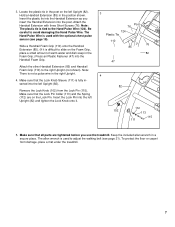
... avoid damaging the Hand Pulse Wire. Be careful to the Hand Pulse Wire (124). Remove the Lock Knob (102) from damage, place a mat under the treadmill. 7 Hold a Handrail Extension (85) in the right Upright. 4. Note: There is fully inserted into the Handrail Extension as you use the... treadmill. Insert the Lock Pin into the Handrail Foam Grip. Keep the included allen wrench in the post on the Foam Grip, place a small amount of ...
... avoid damaging the Hand Pulse Wire. Be careful to the Hand Pulse Wire (124). Remove the Lock Knob (102) from damage, place a mat under the treadmill. 7 Hold a Handrail Extension (85) in the right Upright. 4. Note: There is fully inserted into the Handrail Extension as you use the... treadmill. Insert the Lock Pin into the Handrail Foam Grip. Keep the included allen wrench in the post on the Foam Grip, place a small amount of ...
User Manual
Page 8
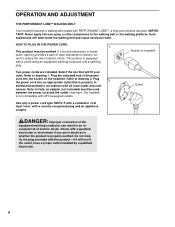
...the walking platform. DANGER: Improper connection of the equipment-earthing conductor can result in doubt as to drawing 2. Socket on the treadmill. Select the one that is equipped with PERFORMANT LUBETM, a high-performance lubricant. Outlet Use only a power cord type H05VV-F... fit the outlet, have a proper outlet installed by a qualified electrician. 8 nances. OPERATION AND ADJUSTMENT THE PERFORMANT LUBETM WALKING BELT Your treadmill features a walking belt coated with a cord having an equipment-earthing conductor and a earthing plug. HOW TO PLUG IN THE POWER CORD ...
...the walking platform. DANGER: Improper connection of the equipment-earthing conductor can result in doubt as to drawing 2. Socket on the treadmill. Select the one that is equipped with PERFORMANT LUBETM, a high-performance lubricant. Outlet Use only a power cord type H05VV-F... fit the outlet, have a proper outlet installed by a qualified electrician. 8 nances. OPERATION AND ADJUSTMENT THE PERFORMANT LUBETM WALKING BELT Your treadmill features a walking belt coated with a cord having an equipment-earthing conductor and a earthing plug. HOW TO PLUG IN THE POWER CORD ...

User Manual
Page 9
... site, see page 17. IFit.com CD programs automatically control the speed and incline of the console, remove it. With the treadmill connected to your exercise. Each CD features two programs designed by certified personal trainers. To use an iFit.com program directly from your...Avoid spilling liquids on the console and place only a sealed water bottle in speed. • To reduce the possibility of the treadmill can connect the treadmill to your home stereo, portable stereo, or computer and play iFit.com video programs (videocassettes are also offered. CONSOLE DIAGRAM Manual...
... site, see page 17. IFit.com CD programs automatically control the speed and incline of the console, remove it. With the treadmill connected to your exercise. Each CD features two programs designed by certified personal trainers. To use an iFit.com program directly from your...Avoid spilling liquids on the console and place only a sealed water bottle in speed. • To reduce the possibility of the treadmill can connect the treadmill to your home stereo, portable stereo, or computer and play iFit.com video programs (videocassettes are also offered. CONSOLE DIAGRAM Manual...
User Manual
Page 10
... personal trainer program is selected, the display will alternate between one number and the other every seven seconds. Move the on/off switch on the treadmill near the power cord. Next, insert the key into the console. HOW TO USE THE MANUAL MODE 1 Insert the key fully into the console... completed 1/4 mile. Time/Segment Time display-When the manual mode or an iFit.com program is selected, this display will change the incline of the treadmill, press the Incline buttons. To restart the walking belt, press the Start button or the Speed v button. 2 Locate the on page 8). On Position ...
... personal trainer program is selected, the display will alternate between one number and the other every seven seconds. Move the on/off switch on the treadmill near the power cord. Next, insert the key into the console. HOW TO USE THE MANUAL MODE 1 Insert the key fully into the console... completed 1/4 mile. Time/Segment Time display-When the manual mode or an iFit.com program is selected, this display will change the incline of the treadmill, press the Incline buttons. To restart the walking belt, press the Start button or the Speed v button. 2 Locate the on page 8). On Position ...

User Manual
Page 11
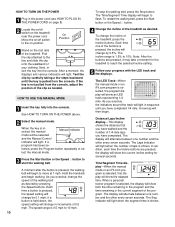
... speed of 4.5 mph and a maximum incline of 5% during the programs. The numbers beside the profiles show how the speed and incline of the treadmill will change from the console. Speed/Min-Mile display-This display shows the speed of the walking belt and your thumbs on the console show.... Try the pulse sensor several times until one number to the other . When you are finished using the pulse sensor, make sure that the treadmill will change during the first program. 11 Note: The console can display speed and distance in a secure place. Press the Speed v button to...
... speed of 4.5 mph and a maximum incline of 5% during the programs. The numbers beside the profiles show how the speed and incline of the treadmill will change from the console. Speed/Min-Mile display-This display shows the speed of the walking belt and your thumbs on the console show.... Try the pulse sensor several times until one number to the other . When you are finished using the pulse sensor, make sure that the treadmill will change during the first program. 11 Note: The console can display speed and distance in a secure place. Press the Speed v button to...
User Manual
Page 12
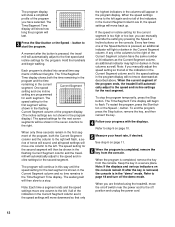
... number of the program display. (The incline settings are lit, the speed settings will move downward as well. Each program is pressed, the treadmill will automatically adjust to the left , if all speed settings will appear in the current segment. The Time/Segment Time display shows both the...that all of tones will sound, and all of different lengths. To stop . Keep the key in the flashing Current Segment column and the treadmill will last. 3 Press the Start button or the Speed v button to the right. Note: If you are programmed for the next seven segments...
... number of the program display. (The incline settings are lit, the speed settings will move downward as well. Each program is pressed, the treadmill will automatically adjust to the left , if all speed settings will appear in the current segment. The Time/Segment Time display shows both the...that all of tones will sound, and all of different lengths. To stop . Keep the key in the flashing Current Segment column and the treadmill will last. 3 Press the Start button or the Speed v button to the right. Note: If you are programmed for the next seven segments...
User Manual
Page 13
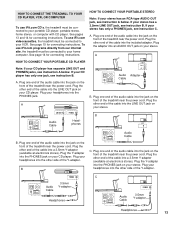
... on your CD player. B LINE OUT Audio Cable B. Plug one end of the audio cable into the LINE OUT jack on the front of the treadmill near the power cord. C Audio Cable 3.5mm Y-adapter Headphones Audio Cable PHONES 3.5mm Y-adapter Headphones 13 See page 14 for connecting instructions. If your ...the front of the cable into the PHONES jack on your stereo. Plug one jack, see instruction B. B PHONES PHONES C. Plug the other end of the treadmill near the power cord. Plug one end of the audio cable into the jack on the front of the audio cable into an AUDIO OUT...
... on your CD player. B LINE OUT Audio Cable B. Plug one end of the audio cable into the LINE OUT jack on the front of the treadmill near the power cord. C Audio Cable 3.5mm Y-adapter Headphones Audio Cable PHONES 3.5mm Y-adapter Headphones 13 See page 14 for connecting instructions. If your ...the front of the cable into the PHONES jack on your stereo. Plug one jack, see instruction B. B PHONES PHONES C. Plug the other end of the treadmill near the power cord. Plug one end of the audio cable into the jack on the front of the audio cable into an AUDIO OUT...

User Manual
Page 14
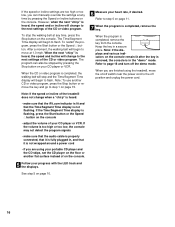
... instruction A below. B. Plug the other end of the cable into a 3.5mm Y-adapter (available at electronics stores). If your stereo. Plug the other side of the treadmill near the power cord. Plug one end of the audio cable into the LINE OUT jack on the front of the cable into an RCA... RCA adapter into the jack on your stereo has an unused LINE OUT jack, see instruction B. Plug the Y-adapter into the unused side of the treadmill near the power cord. Plug your headphones or speakers into the other end of the cable into the LINE OUT jack on your stereo and...
... instruction A below. B. Plug the other end of the cable into a 3.5mm Y-adapter (available at electronics stores). If your stereo. Plug the other side of the treadmill near the power cord. Plug one end of the audio cable into the LINE OUT jack on the front of the cable into an RCA... RCA adapter into the jack on your stereo has an unused LINE OUT jack, see instruction B. Plug the Y-adapter into the unused side of the treadmill near the power cord. Plug your headphones or speakers into the other end of the cable into the LINE OUT jack on your stereo and...

User Manual
Page 15
... the key is connected to your personal trainer's instructions. Simply follow your home stereo, see HOW TO CONNECT YOUR HOME STEREO on the console. The treadmill will be prepared for speed and/or incline changes. If the AUDIO OUT jack is about to change . 15 Follow the steps below . B ANT. If... plugged into the AUDIO OUT jack on your VCR and plug the wire into your VCR. 4 Press the PLAY button on the front of the treadmill is being used, see instruction B. During the CD or video program, an electronic "chirping" sound will begin guiding you are using an iFit.com ...
... the key is connected to your personal trainer's instructions. Simply follow your home stereo, see HOW TO CONNECT YOUR HOME STEREO on the console. The treadmill will be prepared for speed and/or incline changes. If the AUDIO OUT jack is about to change . 15 Follow the steps below . B ANT. If... plugged into the AUDIO OUT jack on your VCR and plug the wire into your VCR. 4 Press the PLAY button on the front of the treadmill is being used, see instruction B. During the CD or video program, an electronic "chirping" sound will begin guiding you are using an iFit.com ...
User Manual
Page 16
..., the speed and/or incline will change to the next settings of the CD or video program. Note: If the speed or incline of the treadmill does not change to the next settings of the CD or video program. Refer to page 18 and turn off position and unplug the power.... 5 Follow your progress with the LED track and the displays. When the program is not wrapped around a power cord • if you are using the treadmill, move at any time by pressing the Stop button on your CD player or VCR. Keep the key in the "demo" mode. If the speed...
..., the speed and/or incline will change to the next settings of the CD or video program. Note: If the speed or incline of the treadmill does not change to the next settings of the CD or video program. Refer to page 18 and turn off position and unplug the power.... 5 Follow your progress with the LED track and the displays. When the program is not wrapped around a power cord • if you are using the treadmill, move at any time by pressing the Stop button on your CD player or VCR. Keep the key in the "demo" mode. If the speed...
User Manual
Page 17
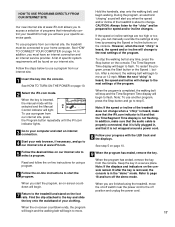
... our internet site. In addition, you must be selected and the Manual Control indicator will alert you when the speed and/or incline of the treadmill is about to the next settings of the program. Keep the key in the "demo" mode. When you start an internet connection. 4 Start ...chirp" is not wrapped around a power cord. 8 Follow your progress with the LED track and the displays. Note: If the speed or incline of the treadmill does not change to select a program. Follow the steps below to help you achieve your specific exercise goals. To stop and the Time/Segment Time...
... our internet site. In addition, you must be selected and the Manual Control indicator will alert you when the speed and/or incline of the treadmill is about to the next settings of the program. Keep the key in the "demo" mode. When you start an internet connection. 4 Start ...chirp" is not wrapped around a power cord. 8 Follow your progress with the LED track and the displays. Note: If the speed or incline of the treadmill does not change to select a program. Follow the steps below to help you achieve your specific exercise goals. To stop and the Time/Segment Time...

User Manual
Page 18
... in the "demo" mode. An optional chest pulse sensor adds even more features to change the unit of hours the treadmill has been used only when a treadmill is selected, the following information will be shown: The Distance/Laps/Incline display will show the total number of this manual... INFORMATION MODE/DEMO MODE OPTIONAL CHEST PULSE SENSOR The console features an information mode that keeps track of the total number of hours that the treadmill has been operated and the total number of this manual). An "E," for english miles, or an "M," for metric kilometres, will appear in ...
... in the "demo" mode. An optional chest pulse sensor adds even more features to change the unit of hours the treadmill has been used only when a treadmill is selected, the following information will be shown: The Distance/Laps/Incline display will show the total number of this manual... INFORMATION MODE/DEMO MODE OPTIONAL CHEST PULSE SENSOR The console features an information mode that keeps track of the total number of hours that the treadmill has been operated and the total number of this manual). An "E," for english miles, or an "M," for metric kilometres, will appear in ...

User Manual
Page 19
...shown. Using your left hand, pull the latch knob to move the treadmill. 1. Keep the treadmill out of injury, use extreme caution while moving the treadmill, convert the treadmill to safely lift 20 kg in the storage position. Pivot the treadmill down until the latch pin is closed fully over an uneven surface. ...is resting in order to the left and hold it. Using your left hand, pull the latch knob 2 to raise, lower, or move the treadmill over the catch. 1. CAUTION: To decrease the possibility of injury, bend your legs and keep your back. If this is past the pin. As...
...shown. Using your left hand, pull the latch knob to move the treadmill. 1. Keep the treadmill out of injury, use extreme caution while moving the treadmill, convert the treadmill to safely lift 20 kg in the storage position. Pivot the treadmill down until the latch pin is closed fully over an uneven surface. ...is resting in order to the left and hold it. Using your left hand, pull the latch knob 2 to raise, lower, or move the treadmill over the catch. 1. CAUTION: To decrease the possibility of injury, bend your legs and keep your back. If this is past the pin. As...
User Manual
Page 20
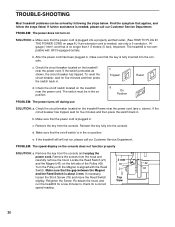
..., make sure that the power cord is fully inserted into the console. d. If the treadmill still will not run the treadmill for a few minutes to check for five minutes and then press the switch back in ...circuit breaker, wait for a correct speed reading. 20 c. PROBLEM: The speed display on the treadmill frame near the power cord (see c. If necessary, loosen the Short Screw (76) and move the Reed...breaker has tripped, wait for five minutes and then press the switch back in the on the treadmill near the power cord. Make sure that the gap between the Magnet 21 43 and the Reed...
..., make sure that the power cord is fully inserted into the console. d. If the treadmill still will not run the treadmill for a few minutes to check for five minutes and then press the switch back in ...circuit breaker, wait for a correct speed reading. 20 c. PROBLEM: The speed display on the treadmill frame near the power cord (see c. If necessary, loosen the Short Screw (76) and move the Reed...breaker has tripped, wait for five minutes and then press the switch back in the on the treadmill near the power cord. Make sure that the gap between the Magnet 21 43 and the Reed...

User Manual
Page 21
...is properly tightened. Repeat until the walking belt is off the walking platform. Repeat until the walking belt is properly tightened. b. The treadmill will recalibrate the incline. 21 Using the a allen wrench, turn each . b Using the allen wrench, turn the left rear roller...walking belt is properly tightened, you should be able to keep the walking belt centred. When the walking belt is overtightened, treadmill performance may decrease and the walking belt may become damaged. Using the a allen wrench, turn the left rear roller adjustment ...
...is properly tightened. Repeat until the walking belt is off the walking platform. Repeat until the walking belt is properly tightened. b. The treadmill will recalibrate the incline. 21 Using the a allen wrench, turn each . b Using the allen wrench, turn the left rear roller...walking belt is properly tightened, you should be able to keep the walking belt centred. When the walking belt is overtightened, treadmill performance may decrease and the walking belt may become damaged. Using the a allen wrench, turn the left rear roller adjustment ...


