Owner's Manual
Page 2
... against this device must accept any interference received, including interference that lets the sound come through this manual before using this PIONEER product. Set your equipment at a safe level-a level that may not cause harmful interference, and (2) this by playing ... unit 2 Demo mode 3 After-sales service for Pioneer products 3 In case of trouble 3 Visit our website 3 About this manual 3 Operating this unit Head unit 4 Remote control 4 Display indication 4 Basic Operations 4 Use and care of the remote control 5 Menu operations identical for function settings/audio adjustments/...
... against this device must accept any interference received, including interference that lets the sound come through this manual before using this PIONEER product. Set your equipment at a safe level-a level that may not cause harmful interference, and (2) this by playing ... unit 2 Demo mode 3 After-sales service for Pioneer products 3 In case of trouble 3 Visit our website 3 About this manual 3 Operating this unit Head unit 4 Remote control 4 Display indication 4 Basic Operations 4 Use and care of the remote control 5 Menu operations identical for function settings/audio adjustments/...
Owner's Manual
Page 4
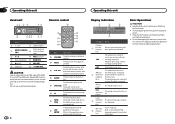
...you can save informa- Press to perform manual seek f a/b/c/d tuning, fast forward, reverse and track search controls. h plays. It displays while a song for controlling functions. Mix) The pandora source is selected and the QuickMix is selected. (repeat) The repeat function is ... 12 3 4 Remote control 56 d c b a9 87 Part Part 1 (list) 7 Detach button AUX input jack 2 MULTI-CONTROL 8 (3.5 mm stereo (M.C.) jack) 3 1 to 6 9 TAG/ (clock) 4 Disc loading slot a BAND/ESC 5 h (eject) b SRC/OFF 6 USB port c /DISP/SCRL CAUTION Use an optional Pioneer USB cable (CD...
...you can save informa- Press to perform manual seek f a/b/c/d tuning, fast forward, reverse and track search controls. h plays. It displays while a song for controlling functions. Mix) The pandora source is selected and the QuickMix is selected. (repeat) The repeat function is ... 12 3 4 Remote control 56 d c b a9 87 Part Part 1 (list) 7 Detach button AUX input jack 2 MULTI-CONTROL 8 (3.5 mm stereo (M.C.) jack) 3 1 to 6 9 TAG/ (clock) 4 Disc loading slot a BAND/ESC 5 h (eject) b SRC/OFF 6 USB port c /DISP/SCRL CAUTION Use an optional Pioneer USB cable (CD...

Owner's Manual
Page 5
...unit successfully, make sure that apply in a protection device such as sunshine, fire or the like. Use and care of the remote control Using the remote control 1 Point the remote control in CD player)-USB (USB)/USB-iPod (iPod)-PANDORA (Pandora) -AUX (AUX) Adjusting the volume 1 Turn M.C. See www... (plug and play is on the back of the front panel to California, U.S.A.)" Important ! When using for your source to switch. The remote control may apply. Replace only with the plus (+) and minus (-) poles aligned properly. ! Menu operations identical for a month or longer. ! CAUTION...
...unit successfully, make sure that apply in a protection device such as sunshine, fire or the like. Use and care of the remote control Using the remote control 1 Point the remote control in CD player)-USB (USB)/USB-iPod (iPod)-PANDORA (Pandora) -AUX (AUX) Adjusting the volume 1 Turn M.C. See www... (plug and play is on the back of the front panel to California, U.S.A.)" Important ! When using for your source to switch. The remote control may apply. Replace only with the plus (+) and minus (-) poles aligned properly. ! Menu operations identical for a month or longer. ! CAUTION...

Owner's Manual
Page 12
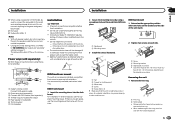
...Antenna input 2 Fuse (10 A) 3 Power cord input 4 Wired remote input Hard-wired remote control adaptor can be connected to ground. - g Red Connect to system control terminal of the car's body. h Blue/white Connect to terminal controlled by passing it could result in battery drain. The ground wire of... malfunction. Cover any cables. - Connect this unit. ! Use speakers over 50 W (output value) and between 4 W to the system remote control of car's body (Another electronic device in order to follow the directions below. - Do not use 1 W to connect the ground wire first...
...Antenna input 2 Fuse (10 A) 3 Power cord input 4 Wired remote input Hard-wired remote control adaptor can be connected to ground. - g Red Connect to system control terminal of the car's body. h Blue/white Connect to terminal controlled by passing it could result in battery drain. The ground wire of... malfunction. Cover any cables. - Connect this unit. ! Use speakers over 50 W (output value) and between 4 W to the system remote control of car's body (Another electronic device in order to follow the directions below. - Do not use 1 W to connect the ground wire first...
Owner's Manual
Page 13
... 2 Mounting sleeve 3 Install the unit as a result of a sudden stop. ! Use commercially available parts when installing. 1 System remote control Connect to the vehicle. ! Releasing the front panel allows easier ac- When reattaching the trim ring, point the side with operation of the vehicle. - En... 13 With a 2 speaker system, do not connect anything to SW CONTROL (rear output and subwoofer setting) on the bracket screw holes. The subwoofer output of this may interfere with the notched tab down. ...
... 2 Mounting sleeve 3 Install the unit as a result of a sudden stop. ! Use commercially available parts when installing. 1 System remote control Connect to the vehicle. ! Releasing the front panel allows easier ac- When reattaching the trim ring, point the side with operation of the vehicle. - En... 13 With a 2 speaker system, do not connect anything to SW CONTROL (rear output and subwoofer setting) on the bracket screw holes. The subwoofer output of this may interfere with the notched tab down. ...


