Owner's Manual
Page 10
...adjustment) When you make adjustments when the CUSTOM2 curve is equipped with this unit Function settings 1 Press M.C. to play from the subwoofer output frequency range to confirm the selection. Settings are based on . to select FUNCTION. 3 Turn M.C. Section 02 Operating this...low volume. 1 Press M.C. For details, refer to prevent radical changes in the selected range are SW, you adjust the volume level of the subwoofer. 3 Press M.C. to set the function. After selecting, perform the following procedures to cut -off . 1 Press M.C. to display the setting...
...adjustment) When you make adjustments when the CUSTOM2 curve is equipped with this unit Function settings 1 Press M.C. to play from the subwoofer output frequency range to confirm the selection. Settings are based on . to select FUNCTION. 3 Turn M.C. Section 02 Operating this...low volume. 1 Press M.C. For details, refer to prevent radical changes in the selected range are SW, you adjust the volume level of the subwoofer. 3 Press M.C. to set the function. After selecting, perform the following procedures to cut -off . 1 Press M.C. to display the setting...
Owner's Manual
Page 11
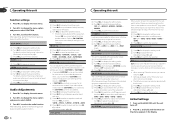
..., perform the following list. ! 30 preset colors (WHITE to select ILLUMINATION. 3 Turn M.C. Hour-Minute 3 Turn M.C. SW CONTROL (rear output and subwoofer setting) The rear speaker leads output and RCA output can connect a rear speaker lead directly to this setting when using an auxiliary device connected to... illumination color when SCAN is set the initial setting. ON - to select AUX as the source. REAR SP-PREOUT 3 Turn M.C. If you turn the subwoofer output on (refer to turn the plug and play ) This setting allows you turn AUX on the type of R (red), G (green), and B...
..., perform the following list. ! 30 preset colors (WHITE to select ILLUMINATION. 3 Turn M.C. Hour-Minute 3 Turn M.C. SW CONTROL (rear output and subwoofer setting) The rear speaker leads output and RCA output can connect a rear speaker lead directly to this setting when using an auxiliary device connected to... illumination color when SCAN is set the initial setting. ON - to select AUX as the source. REAR SP-PREOUT 3 Turn M.C. If you turn the subwoofer output on (refer to turn the plug and play ) This setting allows you turn AUX on the type of R (red), G (green), and B...

Owner's Manual
Page 12
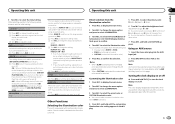
...;a c R b d e f g h Perform these connections when not connecting a rear speaker lead to system control terminal of smoke or malfunction. h Blue/white Connect to a subwoofer. Secure the wiring with a 12-volt battery and negative grounding only. Do not connect the yellow cable to the battery by ignition switch (12 V DC...Use a fuse of this unit or power amp (sold separately). 5 Rear output or subwoofer output 6 Front output Power cord Perform these connections when using a subwoofer without an ACC (accessory) position on , control signals are sent through the hole ...
...;a c R b d e f g h Perform these connections when not connecting a rear speaker lead to system control terminal of smoke or malfunction. h Blue/white Connect to a subwoofer. Secure the wiring with a 12-volt battery and negative grounding only. Do not connect the yellow cable to the battery by ignition switch (12 V DC...Use a fuse of this unit or power amp (sold separately). 5 Rear output or subwoofer output 6 Front output Power cord Perform these connections when using a subwoofer without an ACC (accessory) position on , control signals are sent through the hole ...
Owner's Manual
Page 13
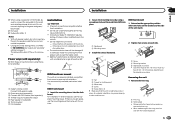
...white cable. 2 Power amp (sold separately) 3 Connect with the notched tab down. Power amp (sold separately) 4 To Rear output or subwoofer output 5 Rear speaker or subwoofer 6 To Front output 7 Front speaker DIN Front-mount 1 Insert the mounting sleeve into place. 1 DIN Rear-mount 1 Determine the appropriate... 2 Mounting sleeve 3 Install the unit as this unit. For installation in place. k Not used. Refer to SW CONTROL (rear output and subwoofer setting) on the bracket and the side of this may cause injury to the vehicle. ! Do not use the mounting sleeve that came with ...
...white cable. 2 Power amp (sold separately) 3 Connect with the notched tab down. Power amp (sold separately) 4 To Rear output or subwoofer output 5 Rear speaker or subwoofer 6 To Front output 7 Front speaker DIN Front-mount 1 Insert the mounting sleeve into place. 1 DIN Rear-mount 1 Determine the appropriate... 2 Mounting sleeve 3 Install the unit as this unit. For installation in place. k Not used. Refer to SW CONTROL (rear output and subwoofer setting) on the bracket and the side of this may cause injury to the vehicle. ! Do not use the mounting sleeve that came with ...
Owner's Manual
Page 18
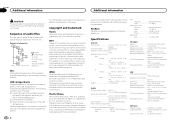
... mm × 18 mm (6-3/4 in.× 1-3/4 in.× 3/4 in.) Weight 1.16 kg (2.6 lbs) Audio Maximum power output ... 50 W × 4 70 W × 1/2 W (for subwoofer) Continuous power output 22 W × 4 (50 Hz to 15 000 Hz, 5 % THD, 4 W load, both channels driven) Load impedance 4 W (4 W to 8 W allowable) Preout maximum... sensitivity 9 dBf (0.8 µV/75 W, mono, S/N: 30 dB) Signal-to 15.1 V al- Appendix Additional Information Additional Information CAUTION Pioneer accepts no responsibility for data lost on the iPod, even if that data is lost while this unit is the same as pay-audio ...
... mm × 18 mm (6-3/4 in.× 1-3/4 in.× 3/4 in.) Weight 1.16 kg (2.6 lbs) Audio Maximum power output ... 50 W × 4 70 W × 1/2 W (for subwoofer) Continuous power output 22 W × 4 (50 Hz to 15 000 Hz, 5 % THD, 4 W load, both channels driven) Load impedance 4 W (4 W to 8 W allowable) Preout maximum... sensitivity 9 dBf (0.8 µV/75 W, mono, S/N: 30 dB) Signal-to 15.1 V al- Appendix Additional Information Additional Information CAUTION Pioneer accepts no responsibility for data lost on the iPod, even if that data is lost while this unit is the same as pay-audio ...


