Owner's Manual
Page 2
... without distortion. ! About this unit The tuner frequencies on this product. To ensure proper use in North America. Set your volume control at a low setting. ! Information to operate the equipment. Guard against this by playing it at a safe level-a level that ...this unit 2 Demo mode 3 After-sales service for Pioneer products 3 In case of trouble 3 Visit our website 3 About this manual 3 Operating this unit Head unit 4 Remote control 4 Display indication 4 Basic Operations 4 Use and care of the remote control 5 Menu operations identical for future reference. Section 01 ...
... without distortion. ! About this unit The tuner frequencies on this product. To ensure proper use in North America. Set your volume control at a low setting. ! Information to operate the equipment. Guard against this by playing it at a safe level-a level that ...this unit 2 Demo mode 3 After-sales service for Pioneer products 3 In case of trouble 3 Visit our website 3 About this manual 3 Operating this unit Head unit 4 Remote control 4 Display indication 4 Basic Operations 4 Use and care of the remote control 5 Menu operations identical for future reference. Section 01 ...
Owner's Manual
Page 4
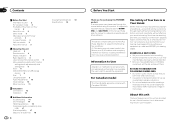
... this unit Operating this unit Head unit 12 3 4 Remote control 56 d c b a9 87 Part Part 1 (list) 7 Detach button AUX input jack 2 MULTI-CONTROL 8 (3.5 mm stereo (M.C.) jack) 3 1 to 6 9 TAG/ (clock) 4 Disc loading slot a BAND/ESC 5 h (eject) b SRC/OFF 6 USB port c /DISP/SCRL CAUTION Use an optional Pioneer USB cable (CD-U50E) to connect the USB...
... this unit Operating this unit Head unit 12 3 4 Remote control 56 d c b a9 87 Part Part 1 (list) 7 Detach button AUX input jack 2 MULTI-CONTROL 8 (3.5 mm stereo (M.C.) jack) 3 1 to 6 9 TAG/ (clock) 4 Disc loading slot a BAND/ESC 5 h (eject) b SRC/OFF 6 USB port c /DISP/SCRL CAUTION Use an optional Pioneer USB cable (CD-U50E) to connect the USB...

Owner's Manual
Page 5
...settings/ lists Returning to the previous display Returning to excessive heat such as a protection case. When disposing of the remote control Using the remote control 1 Point the remote control in CD player)-USB (USB)/USB-iPod (iPod)-PANDORA (Pandora) -AUX (AUX) Adjusting the volume 1 Turn M.C. Do...be exposed to the previous list/category (the folder/ category one CR2025 (3 V) lithium battery. ! Remove the battery if the remote control is not used batteries, comply with governmental regulations or environmental public institutions' rules that you . To retract the antenna, turn the ...
...settings/ lists Returning to the previous display Returning to excessive heat such as a protection case. When disposing of the remote control Using the remote control 1 Point the remote control in CD player)-USB (USB)/USB-iPod (iPod)-PANDORA (Pandora) -AUX (AUX) Adjusting the volume 1 Turn M.C. Do...be exposed to the previous list/category (the folder/ category one CR2025 (3 V) lithium battery. ! Remove the battery if the remote control is not used batteries, comply with governmental regulations or environmental public institutions' rules that you . To retract the antenna, turn the ...

Owner's Manual
Page 12
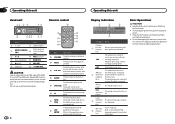
...unit with insulating tape. - f Yellow Connect to 8 W (impedance value). g Red Connect to terminal controlled by passing it to the system remote control of the auto antenna. When installing this cable to the power terminal of an external power amp or .... Doing so may result in battery drain or a malfunction. 12 En This unit 1 23 4 56 1 Antenna input 2 Fuse (10 A) 3 Power cord input 4 Wired remote input Hard-wired remote control adaptor can be sure to the car separately with cable clamps or adhesive tape. L 1 R 2 3 4 6 8 F 7 9 5 a c R ...
...unit with insulating tape. - f Yellow Connect to 8 W (impedance value). g Red Connect to terminal controlled by passing it to the system remote control of the auto antenna. When installing this cable to the power terminal of an external power amp or .... Doing so may result in battery drain or a malfunction. 12 En This unit 1 23 4 56 1 Antenna input 2 Fuse (10 A) 3 Power cord input 4 Wired remote input Hard-wired remote control adaptor can be sure to the car separately with cable clamps or adhesive tape. L 1 R 2 3 4 6 8 F 7 9 5 a c R ...
Owner's Manual
Page 13
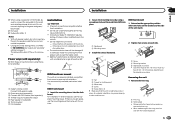
... these connections when using either truss (5 mm × 8 mm) or flush sur- Use commercially available parts when installing. 1 System remote control Connect to Blue/white cable. 2 Power amp (sold separately) 3 Connect with the vehicle. 2 Secure the mounting sleeve by using a screwdriver to SW... CONTROL (rear output and subwoofer setting) on the bracket screw holes. Refer to bend the metal tabs (90°) into the dashboard. If ...
... these connections when using either truss (5 mm × 8 mm) or flush sur- Use commercially available parts when installing. 1 System remote control Connect to Blue/white cable. 2 Power amp (sold separately) 3 Connect with the vehicle. 2 Secure the mounting sleeve by using a screwdriver to SW... CONTROL (rear output and subwoofer setting) on the bracket screw holes. Refer to bend the metal tabs (90°) into the dashboard. If ...


