Owner's Manual
Page 4
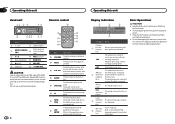
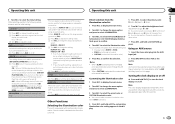
... gently when removing or attaching the front panel. ! Press to scroll through the text information. Press and hold to select different dis- Display indication 1 2 3 4 Indicator State...Operating this unit Head unit 12 3 4 Remote control 56 d c b a9 87 Part Part 1 (list) 7 Detach button AUX input jack 2 MULTI-CONTROL 8 (3.5 mm stereo (M.C.) jack) 3 1 to 6 9 TAG/ (clock) 4 Disc...BAND/ESC 5 h (eject) b SRC/OFF 6 USB port c /DISP/SCRL CAUTION Use an optional Pioneer USB cable (CD-U50E) to connect the USB audio player/USB memory as any cables and devices attached...
... gently when removing or attaching the front panel. ! Press to scroll through the text information. Press and hold to select different dis- Display indication 1 2 3 4 Indicator State...Operating this unit Head unit 12 3 4 Remote control 56 d c b a9 87 Part Part 1 (list) 7 Detach button AUX input jack 2 MULTI-CONTROL 8 (3.5 mm stereo (M.C.) jack) 3 1 to 6 9 TAG/ (clock) 4 Disc...BAND/ESC 5 h (eject) b SRC/OFF 6 USB port c /DISP/SCRL CAUTION Use an optional Pioneer USB cable (CD-U50E) to connect the USB audio player/USB memory as any cables and devices attached...
Owner's Manual
Page 6
...the function. to store the selected frequency in this unit, TAG flashes. Turn to select the desired setting. iPod 5th generation However, tag information can buy the songs you can skip stations. to change the preset number. CD/CD-R/CD-RW and USB storage devices Basic Operations Playing.../CD-R/CD-RW 1 Insert the disc into the disc loading slot with the following procedures to set the function. Stopping playback of the preset tuning buttons (1 to 6) to select the desired station. # You can be different. Selecting a folder 1 Push M.C. left or right. lease. left or right....
...the function. to store the selected frequency in this unit, TAG flashes. Turn to select the desired setting. iPod 5th generation However, tag information can buy the songs you can skip stations. to change the preset number. CD/CD-R/CD-RW and USB storage devices Basic Operations Playing.../CD-R/CD-RW 1 Insert the disc into the disc loading slot with the following procedures to set the function. Stopping playback of the preset tuning buttons (1 to 6) to select the desired station. # You can be different. Selecting a folder 1 Push M.C. left or right. lease. left or right....
Owner's Manual
Page 7
... Press M.C. After selecting, perform the following : CD/CD-R/CD-RW ! to OFF. iPod Basic Operations Playing songs on this unit. ! Scrolling the text information to turn off )-1-2 1 is effective for high compression rates. Tracks in a selected repeat range are played in random order 1 Press 5/ to the left... rich sound (sound retriever) on an iPod 1 Open the USB connector cover. 2 Connect an iPod to the USB cable using special buttons Selecting a repeat play on the media. The iPod will turn random play range on or off . Enhancing compressed audio and restoring rich sound...
... Press M.C. After selecting, perform the following : CD/CD-R/CD-RW ! to OFF. iPod Basic Operations Playing songs on this unit. ! Scrolling the text information to turn off )-1-2 1 is effective for high compression rates. Tracks in a selected repeat range are played in random order 1 Press 5/ to the left... rich sound (sound retriever) on an iPod 1 Open the USB connector cover. 2 Connect an iPod to the USB cable using special buttons Selecting a repeat play on the media. The iPod will turn random play range on or off . Enhancing compressed audio and restoring rich sound...

Owner's Manual
Page 9
... list 1 Press to switch to give a "Thumbs Down" for purposes of iPhones; Advanced operations using special buttons Pausing playback Press 2/PAUSE to the left - Scrolling the text information to pause or resume. En 9 to use iPod menu - NORMAL - Pausing - Random play (shuffle) ...Switching the control mode to iPod/APP. - Skipping tracks 1 Push M.C. SONG - The following : compatibility issues with Pioneer. Fast forward/reverse - Latest version of the Pioneer car audio/video products to access the Pandora service is set to display the setting mode. 2 Turn M.C. Ability ...
... list 1 Press to switch to give a "Thumbs Down" for purposes of iPhones; Advanced operations using special buttons Pausing playback Press 2/PAUSE to the left - Scrolling the text information to pause or resume. En 9 to use iPod menu - NORMAL - Pausing - Random play (shuffle) ...Switching the control mode to iPod/APP. - Skipping tracks 1 Push M.C. SONG - The following : compatibility issues with Pioneer. Fast forward/reverse - Latest version of the Pioneer car audio/video products to access the Pandora service is set to display the setting mode. 2 Turn M.C. Ability ...
Owner's Manual
Page 11
...PANDORA when you perform other colors. 7 Press M.C. SCAN (cycle through the 30 preset colors. ! to select KEY COLOR (button illumination) or LCD COLOR (display illumination); When CUSTOM is selected, the customized color saved is equipped with multiple-color illumination. ...SP: FUL-SW PREOUT: SW-REA ! DEMO (demo display setting) 1 Press M.C. to turn the subwoofer output on (refer to ON, recorded text information scrolls continuously in the display. Other Functions Selecting the illumination color This unit is selected. CUSTOM (customized illumination color) 5 Press M.C. R (red)-G (...
...PANDORA when you perform other colors. 7 Press M.C. SCAN (cycle through the 30 preset colors. ! to select KEY COLOR (button illumination) or LCD COLOR (display illumination); When CUSTOM is selected, the customized color saved is equipped with multiple-color illumination. ...SP: FUL-SW PREOUT: SW-REA ! DEMO (demo display setting) 1 Press M.C. to turn the subwoofer output on (refer to ON, recorded text information scrolls continuously in the display. Other Functions Selecting the illumination color This unit is selected. CUSTOM (customized illumination color) 5 Press M.C. R (red)-G (...
Owner's Manual
Page 14
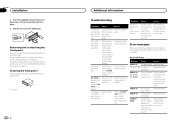
... the front panel You can be sure to hear any operation within about 30 seconds. Depending on . ! Press the detach button and push the front panel upward and pull it toward you start to note the error message. Securing the front panel The front... panel can remove the front panel to protect your nearest Pioneer Service Center, be secured with the supplied screw. 1 1 Screw 14 En Additional Information Troubleshooting Symptom Cause Action The display automatically returns to a differ- Move electrical devices that transmits...
... the front panel You can be sure to hear any operation within about 30 seconds. Depending on . ! Press the detach button and push the front panel upward and pull it toward you start to note the error message. Securing the front panel The front... panel can remove the front panel to protect your nearest Pioneer Service Center, be secured with the supplied screw. 1 1 Screw 14 En Additional Information Troubleshooting Symptom Cause Action The display automatically returns to a differ- Move electrical devices that transmits...


