
Owner's Manual
Page 2
...User 2 For Canadian model 2 The Safety of Your Ears is in Your Hands 2 About this unit 2 Demo mode 3 After-sales service for Pioneer products 3 In case of trouble 3 Visit our website 3 About this manual 3 Operating this unit Head unit 4 Remote control 4 Display indication ...-R/CD-RW and USB storage devices 6 iPod 7 Using Pandoraâ 9 Audio Adjustments 10 Initial Settings 10 Other Functions 11 Installation Connections 12 Installation 13 Additional Information Troubleshooting 14 Error messages 14 Handling guidelines 16 Compressed audio compatibility (disc, USB) 17 iPod compatibility 17 Sequence...
...User 2 For Canadian model 2 The Safety of Your Ears is in Your Hands 2 About this unit 2 Demo mode 3 After-sales service for Pioneer products 3 In case of trouble 3 Visit our website 3 About this manual 3 Operating this unit Head unit 4 Remote control 4 Display indication ...-R/CD-RW and USB storage devices 6 iPod 7 Using Pandoraâ 9 Audio Adjustments 10 Initial Settings 10 Other Functions 11 Installation Connections 12 Installation 13 Additional Information Troubleshooting 14 Error messages 14 Handling guidelines 16 Compressed audio compatibility (disc, USB) 17 iPod compatibility 17 Sequence...

Owner's Manual
Page 5
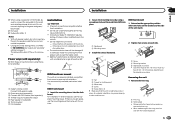
... display Returning to cycle between: TUNER (tuner)-CD (built-in your vehicle when removing the front panel. Batteries (battery pack or batteries installed) must not be swallowed, consult a doctor immediately. ! Operating this unit Operating this unit Section 02 English Removing the front panel to ...battery out of the reach of explosion if the battery is firmly seated. If the battery leaks, wipe the remote control completely clean and install a new battery. Turning the unit on and either an iPhone or iPod touch is connected, it is incorrectly replaced. Selecting a source...
... display Returning to cycle between: TUNER (tuner)-CD (built-in your vehicle when removing the front panel. Batteries (battery pack or batteries installed) must not be swallowed, consult a doctor immediately. ! Operating this unit Operating this unit Section 02 English Removing the front panel to ...battery out of the reach of explosion if the battery is firmly seated. If the battery leaks, wipe the remote control completely clean and install a new battery. Turning the unit on and either an iPhone or iPod touch is connected, it is incorrectly replaced. Selecting a source...

Owner's Manual
Page 9
...! Operate the iPod to iPod pauses song playback. Press M.C. Apple iPhone (first generation), iPhone 3G, iPhone 3GS or iPhone 4 with Pioneer. to the QuickMix/station list mode. 2 Use M.C. DATE - You can play the Pandora by Pandora; to select your iPhone to use... 9 to select the desired setting. ! S.RTRV (sound retriever) 1 Press M.C. Pausing - Random play (ONE/ALL/OFF) - up the Pandora application installed on the previous page. 3 Press M.C. Ability of the following functions are not available. - Basic Operations Playing songs 1 Open the USB connector cover. ...
...! Operate the iPod to iPod pauses song playback. Press M.C. Apple iPhone (first generation), iPhone 3G, iPhone 3GS or iPhone 4 with Pioneer. to the QuickMix/station list mode. 2 Use M.C. DATE - You can play the Pandora by Pandora; to select your iPhone to use... 9 to select the desired setting. ! S.RTRV (sound retriever) 1 Press M.C. Pausing - Random play (ONE/ALL/OFF) - up the Pandora application installed on the previous page. 3 Press M.C. Ability of the following functions are not available. - Basic Operations Playing songs 1 Open the USB connector cover. ...

Owner's Manual
Page 12
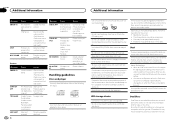
...to system control terminal of the cable is properly connected to the antenna booster power supply terminal. ! When installing this unit or any cables. - h Blue/white Connect to 3 W speakers for the ground wire ...;a c R b d e f g h Perform these connections when not connecting a rear speaker lead to the battery by ignition switch (12 V DC). Section 03 Installation Installation T Connections WARNING ! Use speakers over 50 W (output value) and between 4 W to the constant 12 V supply terminal. The black cable is equipped ...
...to system control terminal of the cable is properly connected to the antenna booster power supply terminal. ! When installing this unit or any cables. - h Blue/white Connect to 3 W speakers for the ground wire ...;a c R b d e f g h Perform these connections when not connecting a rear speaker lead to the battery by ignition switch (12 V DC). Section 03 Installation Installation T Connections WARNING ! Use speakers over 50 W (output value) and between 4 W to the constant 12 V supply terminal. The black cable is equipped ...
Owner's Manual
Page 13
...5 1 Nut 2 Firewall or metal support 3 Metal strap 4 Screw 5 Screw (M4 × 8) # Make sure that came with the notched tab down. Installation Installation Section 03 English j When using a subwoofer of 70 W (2 Ω), be sure to connect the subwoofer to a passenger as a result of a sudden stop.... ! Check all connections and systems before final installation. ! En 13 it overheats. Power amp (sold separately) 4 To Rear output or subwoofer output 5 Rear speaker or subwoofer 6 To Front ...
...5 1 Nut 2 Firewall or metal support 3 Metal strap 4 Screw 5 Screw (M4 × 8) # Make sure that came with the notched tab down. Installation Installation Section 03 English j When using a subwoofer of 70 W (2 Ω), be sure to connect the subwoofer to a passenger as a result of a sudden stop.... ! Check all connections and systems before final installation. ! En 13 it overheats. Power amp (sold separately) 4 To Rear output or subwoofer output 5 Rear speaker or subwoofer 6 To Front ...
Owner's Manual
Page 14
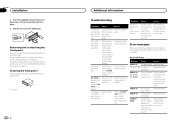
Appendix Installation 2 Insert the supplied extraction keys into place. 3 Pull the unit out of playback hear sound. For details, refer to Removing the front panel to note ... and chanical error. ERROR-15 ERROR-23 FORMAT READ The inserted disc is Replace the disc. and when you contact your dealer or your nearest Pioneer Service Center, be played when FOLDER (folder repeat) is not played back. Securing the front panel The front panel can remove the front panel to...
Appendix Installation 2 Insert the supplied extraction keys into place. 3 Pull the unit out of playback hear sound. For details, refer to Removing the front panel to note ... and chanical error. ERROR-15 ERROR-23 FORMAT READ The inserted disc is Replace the disc. and when you contact your dealer or your nearest Pioneer Service Center, be played when FOLDER (folder repeat) is not played back. Securing the front panel The front panel can remove the front panel to...
Owner's Manual
Page 16
... check your iPod/iPhone. Handling guidelines Discs and player Use only discs that contains songs. Do not touch the recorded surface of the Pandora application installed. The storage device may become jammed under the brake or accelerator pedal. USB storage device Connections via USB hub are no songs in order to...
... check your iPod/iPhone. Handling guidelines Discs and player Use only discs that contains songs. Do not touch the recorded surface of the Pandora application installed. The storage device may become jammed under the brake or accelerator pedal. USB storage device Connections via USB hub are no songs in order to...


