Owner's Manual
Page 7
... remaining provisions of liability shall not be applicable to you do not allow the exclusion or limitation of the United States government or any time by Pioneer. IF PIONEER'S WARRANTY DISCLAIMER OR LIMITATION OF LIABILITY SET FORTH IN THIS AGREEMENT SHALL OR FOR ANY REASON WHATSOEVER BE HELD... EXPORT LAW ASSURANCES You agree and certify that they are prohibited by any other technical data received from Pioneer, nor the direct product thereof, except as permitted by the United States government, the Data is being acquired by or on behalf of incidental or consequential damages, so ...
... remaining provisions of liability shall not be applicable to you do not allow the exclusion or limitation of the United States government or any time by Pioneer. IF PIONEER'S WARRANTY DISCLAIMER OR LIMITATION OF LIABILITY SET FORTH IN THIS AGREEMENT SHALL OR FOR ANY REASON WHATSOEVER BE HELD... EXPORT LAW ASSURANCES You agree and certify that they are prohibited by any other technical data received from Pioneer, nor the direct product thereof, except as permitted by the United States government, the Data is being acquired by or on behalf of incidental or consequential damages, so ...
Owner's Manual
Page 17
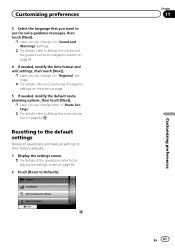
..." settings. = For details, refer to Setting the volume and the guidance voice for navigation system on page 54. 8 If needed, modify the time format and unit settings, then touch [Next]. Follow the steps below. 1 Start the engine to boot up the system. 2 Wait approximately 10 seconds, and then press the MODE...
..." settings. = For details, refer to Setting the volume and the guidance voice for navigation system on page 54. 8 If needed, modify the time format and unit settings, then touch [Next]. Follow the steps below. 1 Start the engine to boot up the system. 2 Wait approximately 10 seconds, and then press the MODE...
Owner's Manual
Page 44
The unit for the following option: ! Fuel Consumption on Highways: Enter the average consumption of your vehicle when used in "Regional" settings. ! Use Extended Settings: Check this ... an existing vehicle profile, touch [Back]. Name: Touch this profile is a trailer attached to enable more hazard types if the vehicle carries dangerous material. The unit for travel with the vehicle. ! Width: Set the width of the vehicle. ! Actual Weight: Set the actual weight of the vehicle. ! Chapter 08 Checking and...
The unit for the following option: ! Fuel Consumption on Highways: Enter the average consumption of your vehicle when used in "Regional" settings. ! Use Extended Settings: Check this ... an existing vehicle profile, touch [Back]. Name: Touch this profile is a trailer attached to enable more hazard types if the vehicle carries dangerous material. The unit for travel with the vehicle. ! Width: Set the width of the vehicle. ! Actual Weight: Set the actual weight of the vehicle. ! Chapter 08 Checking and...
Owner's Manual
Page 60
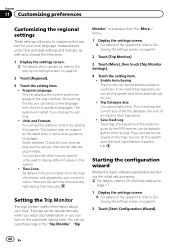
... the Trip Monitor Trip logs contain useful information about your trips. menu. 1 Display the settings screen. = For details of all the listed units in some voice guidance languages. Enable Auto-Saving: Trip monitor can select a new language from the map information and adjusted by your current location... time display and the various international date display formats. Trip logs can turn on the map. You can also set other country specific units used by the GPS receiver, can set time zone and daylight saving time manually. You can let this system. ! Program Language: ...
... the Trip Monitor Trip logs contain useful information about your trips. menu. 1 Display the settings screen. = For details of all the listed units in some voice guidance languages. Enable Auto-Saving: Trip monitor can select a new language from the map information and adjusted by your current location... time display and the various international date display formats. Trip logs can turn on the map. You can also set other country specific units used by the GPS receiver, can set time zone and daylight saving time manually. You can let this system. ! Program Language: ...
Owner's Manual
Page 61
... Displaying the settings screen on page 54. 2 Touch [Reset to Setting the route calculation on the previous page. 5 If needed , modify the time format and unit settings, then touch [Next].
... Displaying the settings screen on page 54. 2 Touch [Reset to Setting the route calculation on the previous page. 5 If needed , modify the time format and unit settings, then touch [Next].
Owner's Manual
Page 62
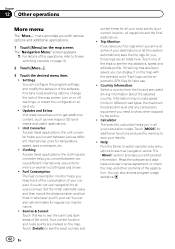
... helps you convert between various different international size units for additional functions and use . ! Touch one of the trips to save your journeys. Track logs can be exported to get additional content, such ... applications. 1 Touch [Menu] on different road types, the maximum blood alcohol level and any compulsory equipment you convert between various different international units for regular car maintenance. ! Unit Converter: Access travel applications: the clothing size converter helps you need to see the sunlit and dark areas of the application. Your current...
... helps you convert between various different international size units for additional functions and use . ! Touch one of the trips to save your journeys. Track logs can be exported to get additional content, such ... applications. 1 Touch [Menu] on different road types, the maximum blood alcohol level and any compulsory equipment you convert between various different international units for regular car maintenance. ! Unit Converter: Access travel applications: the clothing size converter helps you need to see the sunlit and dark areas of the application. Your current...
Owner's Manual
Page 64
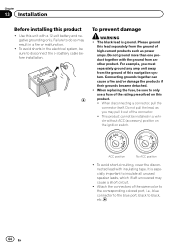
Please ground this lead separately from the ground of high-current products such as you must separately ground any amp unit away from another product. Connecting grounds together can cause a fire and/or damage the products if their grounds became detached. ! It is...N STAR T T ACC position No ACC position ! Do not ground more than one product together with insulating tape. Chapter 13 Installation Before installing this unit with a 12-volt battery and negative grounding only. Use this product ! For example, you may pull it out of the rating prescribed on the ...
Please ground this lead separately from the ground of high-current products such as you must separately ground any amp unit away from another product. Connecting grounds together can cause a fire and/or damage the products if their grounds became detached. ! It is...N STAR T T ACC position No ACC position ! Do not ground more than one product together with insulating tape. Chapter 13 Installation Before installing this unit with a 12-volt battery and negative grounding only. Use this product ! For example, you may pull it out of the rating prescribed on the ...

Owner's Manual
Page 66
... ) screw (supplied). Chapter 13 Installation Connecting the system Insert one end of the RGB cable into the "DATA BUS" slot on the back of your Pioneer AV receiver. Connect the other end of the cable to the AV receiver using an 11 mm (.4 in ) screw Where applicable, secure the cable to... cable with an 11 mm (.4 in .) Attach the GPS antenna to the "GPS ANTENNA" jack on the double-sided tape. Fuse (3 A, 250 V) FUSE The navigation unit Power cord (supplied) Black (GND) To vehicle (metal) body.
... ) screw (supplied). Chapter 13 Installation Connecting the system Insert one end of the RGB cable into the "DATA BUS" slot on the back of your Pioneer AV receiver. Connect the other end of the cable to the AV receiver using an 11 mm (.4 in ) screw Where applicable, secure the cable to... cable with an 11 mm (.4 in .) Attach the GPS antenna to the "GPS ANTENNA" jack on the double-sided tape. Fuse (3 A, 250 V) FUSE The navigation unit Power cord (supplied) Black (GND) To vehicle (metal) body.
Owner's Manual
Page 67
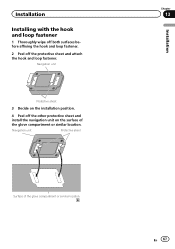
Navigation unit Protective sheet Surface of the glove compartment or similar location. Navigation unit Protective sheet 3 Decide on the installation position. 4 Peel off the protective sheet and attach the hook and loop fastener. Installation Installing with the hook and loop fastener 1 Thoroughly wipe off both surfaces before affixing the hook and loop fastener. 2 Peel off the other protective sheet and install the navigation unit on the surface of the glove compartment or similar location Chapter 13 En 67 Installation
Navigation unit Protective sheet Surface of the glove compartment or similar location. Navigation unit Protective sheet 3 Decide on the installation position. 4 Peel off the protective sheet and attach the hook and loop fastener. Installation Installing with the hook and loop fastener 1 Thoroughly wipe off both surfaces before affixing the hook and loop fastener. 2 Peel off the other protective sheet and install the navigation unit on the surface of the glove compartment or similar location Chapter 13 En 67 Installation
Owner's Manual
Page 72
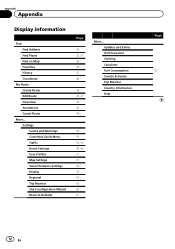
... Find Find Address Find Places Find on Map Favorites History Coordinate My Route Create Route Edit Route Overview Avoidances Cancel Route More... Updates and Extras Unit Converter Clothing Calculator Fuel Consumption Sunrise & Sunset Trip Monitor Country Information Help Page 62 72 En
... Find Find Address Find Places Find on Map Favorites History Coordinate My Route Create Route Edit Route Overview Avoidances Cancel Route More... Updates and Extras Unit Converter Clothing Calculator Fuel Consumption Sunrise & Sunset Trip Monitor Country Information Help Page 62 72 En


