Owner's Manual
Page 1
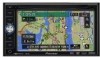
For more information, please contact your vehicle, additional installation may be properly connected to all users: This software requires that the navigation system be required. If not properly connected and depending on your Authorized Pioneer Electronics retailer or call us at (800) 421-1404. Operation Manual DVD MULTIMEDIA AV NAVIGATION SERVER AVIC-D3 Notice to your vehicle's parking brake.
For more information, please contact your vehicle, additional installation may be properly connected to all users: This software requires that the navigation system be required. If not properly connected and depending on your Authorized Pioneer Electronics retailer or call us at (800) 421-1404. Operation Manual DVD MULTIMEDIA AV NAVIGATION SERVER AVIC-D3 Notice to your vehicle's parking brake.
Owner's Manual
Page 8
... traffic congestion on route ahead 58 When checking traffic congestion information manually 59 Traffic flow information 59 Selecting traffic information to display 60...of leads and installation positions 68 Chapter 5 Customizing Your Navigation System Modifying the Default Settings 71 Items Users can Change 71 Volume 71 System Options 72 ... Operation using the Function menu 82 Other DVD-Video/DivX function 83 Radio 86 Listening ...player 90 Advanced multi-CD player operation 90 Repeating play 90 Playing tracks in strong signals 88 Chapter 7 Using the AV Source (Pioneer AV Equipment) Multi-CD Player...
... traffic congestion on route ahead 58 When checking traffic congestion information manually 59 Traffic flow information 59 Selecting traffic information to display 60...of leads and installation positions 68 Chapter 5 Customizing Your Navigation System Modifying the Default Settings 71 Items Users can Change 71 Volume 71 System Options 72 ... Operation using the Function menu 82 Other DVD-Video/DivX function 83 Radio 86 Listening ...player 90 Advanced multi-CD player operation 90 Repeating play 90 Playing tracks in strong signals 88 Chapter 7 Using the AV Source (Pioneer AV Equipment) Multi-CD Player...
Owner's Manual
Page 13
...could expose you are ever in any of your seat belt at all existing traffic regulations. Installation or servicing of your vehicle. Important Safety Information Before using your navigation system, be sure to read and understood the operating instructions. ❒ Never use headphones while ... this navigation system. ❒ The navigation features of your vehicle. Upgrade DVDs are disabled unless the vehicle is stopped and/or the parking brake is applied. ❒ The data encoded in the disc for purchase through your local Pioneer dealer. ❒ Never use this manual and...
...could expose you are ever in any of your seat belt at all existing traffic regulations. Installation or servicing of your vehicle. Important Safety Information Before using your navigation system, be sure to read and understood the operating instructions. ❒ Never use headphones while ... this navigation system. ❒ The navigation features of your vehicle. Upgrade DVDs are disabled unless the vehicle is stopped and/or the parking brake is applied. ❒ The data encoded in the disc for purchase through your local Pioneer dealer. ❒ Never use this manual and...
Owner's Manual
Page 16
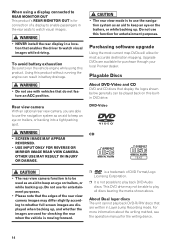
... for purchase through your local Pioneer dealer. For more information about the writing method, see the operation manual for most accurate destination mapping. Do not use the navigation system as an aid to keep an eye on this function for entertainment purposes. • NEVER install the rear display in a ... REAR MONITOR OUT This product's REAR MONITOR OUT is for connection of DVD Format/Logo Licensing Corporation. ❒ It is not possible to play back DVD-Audio discs. Do not use this builtin DVD drive. Upgrade DVDs are used as an aid to keep an eye on trailers, or ...
... for purchase through your local Pioneer dealer. For more information about the writing method, see the operation manual for most accurate destination mapping. Do not use the navigation system as an aid to keep an eye on this function for entertainment purposes. • NEVER install the rear display in a ... REAR MONITOR OUT This product's REAR MONITOR OUT is for connection of DVD Format/Logo Licensing Corporation. ❒ It is not possible to play back DVD-Audio discs. Do not use this builtin DVD drive. Upgrade DVDs are used as an aid to keep an eye on trailers, or ...
Owner's Manual
Page 22
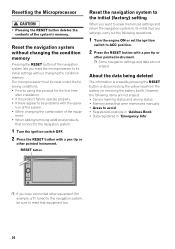
...manually • Areas to avoid • Registered Locations in "Address Book" • Data registered in "Emergency Info" ❒ If you reset the microprocessor to its initial (factory) settings, carry out the following conditions: • Prior to using this product for example, a TV tuner) to this navigation system... memorized settings and return the navigation system to its initial settings without changing the condition memory Pressing the RESET button of the navigation system lets you have connected other equipment (for the first time after installation. • If the product...
...manually • Areas to avoid • Registered Locations in "Address Book" • Data registered in "Emergency Info" ❒ If you reset the microprocessor to its initial (factory) settings, carry out the following conditions: • Prior to using this product for example, a TV tuner) to this navigation system... memorized settings and return the navigation system to its initial settings without changing the condition memory Pressing the RESET button of the navigation system lets you have connected other equipment (for the first time after installation. • If the product...
Owner's Manual
Page 77
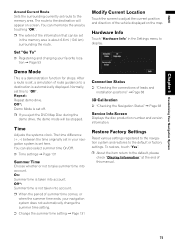
..., set this manual. 75 The time difference (+, -) between the time originally set off. ❒ If you eject the DVD Map Disc during the demo drive, the demo mode will appear on the map. Off*: Summer time is not taken into account. Restore Factory Settings Reset various settings registered to the navigation system and restores...
..., set this manual. 75 The time difference (+, -) between the time originally set off. ❒ If you eject the DVD Map Disc during the demo drive, the demo mode will appear on the map. Off*: Summer time is not taken into account. Restore Factory Settings Reset various settings registered to the navigation system and restores...
Owner's Manual
Page 144
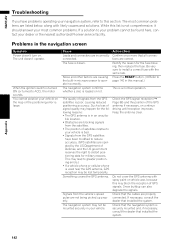
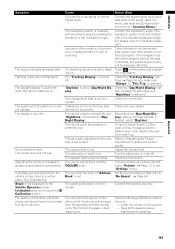
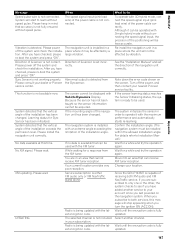
You cannot position your dealer or the nearest authorized Pioneer service facility. The navigation system confirms whether a disc is large. Action (See... that installed the system. Something covers the GPS antenna. Snow buildup can also degrade the signals. Problems in microprocessor to your most common problems are correct. Be very sure to this manual.) This...the vehicle's speed pulse are blocking signals from the GPS satellites have problems operating your navigation system, refer to install a correct fuse with spray paint or vehicle wax, because this list is not ...
You cannot position your dealer or the nearest authorized Pioneer service facility. The navigation system confirms whether a disc is large. Action (See... that installed the system. Something covers the GPS antenna. Snow buildup can also degrade the signals. Problems in microprocessor to your most common problems are correct. Be very sure to this manual.) This...the vehicle's speed pulse are blocking signals from the GPS satellites have problems operating your navigation system, refer to install a correct fuse with spray paint or vehicle wax, because this list is not ...
Owner's Manual
Page 145
...Installation Manual".) Check whether or not the reverse gear signal input lead (purple) is selected. Tracking marks are heard. The volume level will not switch on the screen and change the map display. Inclination does not move on . The person on "Day/ Night Display". The navigation system...speakers and then picked up by the microphone again, creating an echo. Confirm the installation angle. (The navigation system must be adversely affected.) Touch on or will be installed within the allowed installation angle. Wait for the entry of your dealer. The display is low. A ...
...Installation Manual".) Check whether or not the reverse gear signal input lead (purple) is selected. Tracking marks are heard. The volume level will not switch on the screen and change the map display. Inclination does not move on . The person on "Day/ Night Display". The navigation system...speakers and then picked up by the microphone again, creating an echo. Confirm the installation angle. (The navigation system must be adversely affected.) Touch on or will be installed within the allowed installation angle. Wait for the entry of your dealer. The display is low. A ...
Owner's Manual
Page 149
...of the positioning will not be operated with the latest encryption code. Confirm the installation angle. (The navigation system must be acquired. Change your subscription. re-boot the system and press "OK". Please power off the power, and then contact your ...Pioneer service facility. If the sensor learning status reaches the Sensor Initializing status, the system is fully updated. Move into an area that cannot receive XM tuner reception. Wait until the encryption code is ready to Installation Manual.) Wait for Gyro Sensor has been initialized. Direction of the navigation...
...of the positioning will not be operated with the latest encryption code. Confirm the installation angle. (The navigation system must be acquired. Change your subscription. re-boot the system and press "OK". Please power off the power, and then contact your ...Pioneer service facility. If the sensor learning status reaches the Sensor Initializing status, the system is fully updated. Move into an area that cannot receive XM tuner reception. Wait until the encryption code is ready to Installation Manual.) Wait for Gyro Sensor has been initialized. Direction of the navigation...
Other Manual
Page 2
.... Please call 911. • Do not operate this navigation system (or the rear view camera option if purchased) if doing so in the installation and operation of your navigation system. • This manual explains how to install this product. IMPORTANT INFORMATION ABOUT YOUR NEW NAVIGATION SYSTEM AND THIS MANUAL • The navigation features of this product (and rear view camera option...
.... Please call 911. • Do not operate this navigation system (or the rear view camera option if purchased) if doing so in the installation and operation of your navigation system. • This manual explains how to install this product. IMPORTANT INFORMATION ABOUT YOUR NEW NAVIGATION SYSTEM AND THIS MANUAL • The navigation features of this product (and rear view camera option...
Other Manual
Page 3
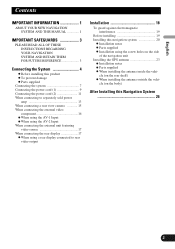
... the rear display 17 - cle (on the rear shelf) - English Español Contents IMPORTANT INFORMATION 1 ABOUT YOUR NEW NAVIGATION SYSTEM AND THIS MANUAL 1 IMPORTANT SAFEGUARDS 3 PLEASE READ ALL OF THESE INSTRUCTIONS REGARDING YOUR NAVIGATION SYSTEM AND RETAIN THEM FOR FUTURE REFERENCE 3 Connecting the System 4 - Parts supplied - Before installing this Navigation System 26 Deutsch Français Italiano Nederlands 2
... the rear display 17 - cle (on the rear shelf) - English Español Contents IMPORTANT INFORMATION 1 ABOUT YOUR NEW NAVIGATION SYSTEM AND THIS MANUAL 1 IMPORTANT SAFEGUARDS 3 PLEASE READ ALL OF THESE INSTRUCTIONS REGARDING YOUR NAVIGATION SYSTEM AND RETAIN THEM FOR FUTURE REFERENCE 3 Connecting the System 4 - Parts supplied - Before installing this Navigation System 26 Deutsch Français Italiano Nederlands 2
Other Manual
Page 4
fully. 4. If you experience difficulty in certain circumstances display erroneous informa- Installation or servicing of the navigation system by yourself. Keep this manual fully and carefully before installing your navigation system. 2. tion regarding the position of your own judgment in the light of objects shown on the screen, and compass directions. Please exercise your vehicle, the ...
fully. 4. If you experience difficulty in certain circumstances display erroneous informa- Installation or servicing of the navigation system by yourself. Keep this manual fully and carefully before installing your navigation system. 2. tion regarding the position of your own judgment in the light of objects shown on the screen, and compass directions. Please exercise your vehicle, the ...

Other Manual
Page 5
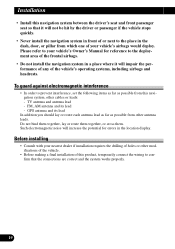
.... • Never feed power to other hazards, and can cause damage to the navigation system that only authorized Pioneer service personnel, who have special training and experience in the mobile electronics installations, please carefully follow all of the steps in the Installation Manual. • Secure all wiring with cable clamps or electrical tape. Do not ground...
.... • Never feed power to other hazards, and can cause damage to the navigation system that only authorized Pioneer service personnel, who have special training and experience in the mobile electronics installations, please carefully follow all of the steps in the Installation Manual. • Secure all wiring with cable clamps or electrical tape. Do not ground...
Other Manual
Page 6
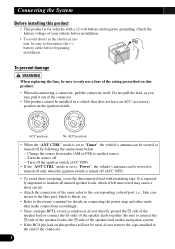
... side of the speaker lead on this navigation system. • If the RCA pin jack on this product will not be sure to insulate all unused speaker leads, which if left uncovered may pull it out of your vehicle before beginning installation. Turn the source off only when the...disconnected lead with a 12-volt battery and negative grounding. Check the battery voltage of the connector. • This product cannot be sure to the owner's manual for vehicles with insulating tape. Do not pull the lead, as you may cause a short circuit. • Attach the connectors of the connector. 5 F...
... side of the speaker lead on this navigation system. • If the RCA pin jack on this product will not be sure to insulate all unused speaker leads, which if left uncovered may pull it out of your vehicle before beginning installation. Turn the source off only when the...disconnected lead with a 12-volt battery and negative grounding. Check the battery voltage of the connector. • This product cannot be sure to the owner's manual for vehicles with insulating tape. Do not pull the lead, as you may cause a short circuit. • Attach the connectors of the connector. 5 F...

Other Manual
Page 18
This navigation system's rear video output is necessary to set "AV-1 Input" in "System" to "EXT" when connecting the external video component. (For details, refer to the Operation Manual.) When connecting the rear display The navigation unit 10 15 cm (5-7/8 in.) Yellow (REAR MONITOR OUTPUT) RCA connector RCA cables ... using a rear display connected to rear video output NEVER install the rear display in the rear seats to watch the video source. 17 Connecting the System When connecting the external unit featuring video source The navigation unit Blue IP-BUS cable (sold separately) 10 To ...
This navigation system's rear video output is necessary to set "AV-1 Input" in "System" to "EXT" when connecting the external video component. (For details, refer to the Operation Manual.) When connecting the rear display The navigation unit 10 15 cm (5-7/8 in.) Yellow (REAR MONITOR OUTPUT) RCA connector RCA cables ... using a rear display connected to rear video output NEVER install the rear display in the rear seats to watch the video source. 17 Connecting the System When connecting the external unit featuring video source The navigation unit Blue IP-BUS cable (sold separately) 10 To ...
Other Manual
Page 20
..., or pillar from which one of your vehicle's Owner's Manual for errors in a place where it will impair the performance of any of the vehicle's operating systems, including airbags and headrests. Installation • Install this navigation system between the driver's seat and front passenger seat so that the...will not be hit by the driver or passenger if the vehicle stops quickly. • Never install the navigation system in front of the frontal airbags. • Do not install the navigation system in the location display. Do not bind them together, lay or route them together, or ...
..., or pillar from which one of your vehicle's Owner's Manual for errors in a place where it will impair the performance of any of the vehicle's operating systems, including airbags and headrests. Installation • Install this navigation system between the driver's seat and front passenger seat so that the...will not be hit by the driver or passenger if the vehicle stops quickly. • Never install the navigation system in front of the frontal airbags. • Do not install the navigation system in the location display. Do not bind them together, lay or route them together, or ...
Other Manual
Page 21
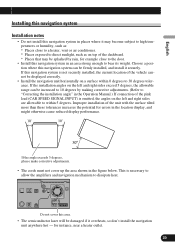
... enough to within 0 degrees to 30 degrees tolerance. English Español Deutsch Installing this navigation system Installation notes • Do not install this navigation system in places where it may be splashed by making corrective adjustments. (Refer to "Correcting the installation angle" in the Operation Manual.) If connection of the pink lead (CAR SPEED SIGNAL INPUT) is necessary...
... enough to within 0 degrees to 30 degrees tolerance. English Español Deutsch Installing this navigation system Installation notes • Do not install this navigation system in places where it may be splashed by making corrective adjustments. (Refer to "Correcting the installation angle" in the Operation Manual.) If connection of the pink lead (CAR SPEED SIGNAL INPUT) is necessary...
Other Manual
Page 27
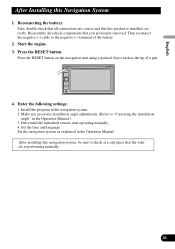
...: 1. English Español Deutsch After Installing this navigation system, be sure to "Correcting the installation angle" in the navigation system. 2. Reassemble all connections are correct and that this product is performing normally. 26 Français Italiano Nederlands After installing this Navigation System 1. Install the program in the Operation Manual.) 3. Make any necessary installation angle adjustments. (Refer to check at a safe...
...: 1. English Español Deutsch After Installing this navigation system, be sure to "Correcting the installation angle" in the navigation system. 2. Reassemble all connections are correct and that this product is performing normally. 26 Français Italiano Nederlands After installing this Navigation System 1. Install the program in the Operation Manual.) 3. Make any necessary installation angle adjustments. (Refer to check at a safe...


