Owner's Manual
Page 9
... 120 Adjusting source levels 120 Setting Up the DVD/DivX Player 120 DVD/DivX setup adjustments 120 Setting the language 120 Setting assist subtitles on BT Audio (Bluetooth... Editing the PIN code 123 Switching the sound muting/attenuation 123 Adjusting a blurry or low contrast screen 124 Other Functions 124 7 Switching between the detailed information display and the preset list display 92... ID 98 Advanced SIRIUS tuner operation 98 Hands-free Phoning 100 Hands-free phoning with one touch 111 Playing video 111 Pausing video playback 111 Advanced iPod operation 111 Repeating play 111 Shuffle...
... 120 Adjusting source levels 120 Setting Up the DVD/DivX Player 120 DVD/DivX setup adjustments 120 Setting the language 120 Setting assist subtitles on BT Audio (Bluetooth... Editing the PIN code 123 Switching the sound muting/attenuation 123 Adjusting a blurry or low contrast screen 124 Other Functions 124 7 Switching between the detailed information display and the preset list display 92... ID 98 Advanced SIRIUS tuner operation 98 Hands-free Phoning 100 Hands-free phoning with one touch 111 Playing video 111 Pausing video playback 111 Advanced iPod operation 111 Repeating play 111 Shuffle...
Owner's Manual
Page 10
... for DVD 128 Appendix Anti-theft function 129 Setting the password 129 Enter the password 129 Delete the password 129 If the password is forgotten 129 Installing the Program 130 Adjusting the Response Positions of the Touch Panels (Touch Panel Calibration) 132 Memory Navi Mode 133 Navigation in ...DVD Map Discs 152 DVD drive and care 152 DVD-Video 152 DVD-R/-RW and CD-R/-RW 152 MP3, WMA and AAC files 153 DivX video files 154 DivX subtitle files 155 Ambient conditions for playing a disc 155 Using the Navigation System Correctly 155 Handling the LCD screen 155 Liquid crystal display (LCD) screen...
... for DVD 128 Appendix Anti-theft function 129 Setting the password 129 Enter the password 129 Delete the password 129 If the password is forgotten 129 Installing the Program 130 Adjusting the Response Positions of the Touch Panels (Touch Panel Calibration) 132 Memory Navi Mode 133 Navigation in ...DVD Map Discs 152 DVD drive and care 152 DVD-Video 152 DVD-R/-RW and CD-R/-RW 152 MP3, WMA and AAC files 153 DivX video files 154 DivX subtitle files 155 Ambient conditions for playing a disc 155 Using the Navigation System Correctly 155 Handling the LCD screen 155 Liquid crystal display (LCD) screen...
Owner's Manual
Page 12
... learn more about the conventions used in this system with this manual for use in conjunction with a RCA cable, such as a general-purpose AV equipment. 10 Terminology Before moving image from DVD-Video in the built-in DVD drive or from the slot, keep it in...the moving on, take a few minutes to read the following information about your navigation system are described in ALL CAPITAL, BOLD lettering: e.g.) MENU button, MAP button. • Items in the different menus or touch keys available on the screen are described in quotations (" ") and bold: e.g.) "Destination", "Settings". •...
... learn more about the conventions used in this system with this manual for use in conjunction with a RCA cable, such as a general-purpose AV equipment. 10 Terminology Before moving image from DVD-Video in the built-in DVD drive or from the slot, keep it in...the moving on, take a few minutes to read the following information about your navigation system are described in ALL CAPITAL, BOLD lettering: e.g.) MENU button, MAP button. • Items in the different menus or touch keys available on the screen are described in quotations (" ") and bold: e.g.) "Destination", "Settings". •...
Owner's Manual
Page 15
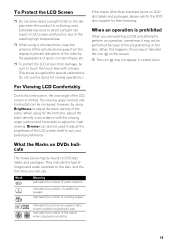
...day and night • To avoid the risk of damage and injury and the potential violation of DVD-Video and certain touch key operations) offered by persons other functions offered by the navigation system, park your vehicle in a safe place, and keep the brake pedal pushed down before releasing ... brake interlock Certain functions (such as GPS signal detection, speed pulse wire connectivity, and driving habits or conditions of "Video image" on the screen. To prevent such functions from those shown. ➲ "Day/Night Display" ➞ Page 74 13 Please keep the brake pedal pushed down...
...day and night • To avoid the risk of damage and injury and the potential violation of DVD-Video and certain touch key operations) offered by persons other functions offered by the navigation system, park your vehicle in a safe place, and keep the brake pedal pushed down before releasing ... brake interlock Certain functions (such as GPS signal detection, speed pulse wire connectivity, and driving habits or conditions of "Video image" on the screen. To prevent such functions from those shown. ➲ "Day/Night Display" ➞ Page 74 13 Please keep the brake pedal pushed down...
Owner's Manual
Page 17
...operate the navigation function and the audio function by Pioneer. ➲ For details on other discs ➞ Page 152 DVD-Video disc region numbers DVD-Video ...navigation system. Some POI information may become inaccurate through the passage of January 2005. - Use only discs approved by using touch panel key. Variety of View Modes Various types of screen display can search your own pictures on a CD-R/-RW and DVD... navigation system. Approximately 11 million POIs are provided with the hardware. About DVD Map Disc You can use of the player can be played on CD-R/-RW/-ROM and DVD...
...operate the navigation function and the audio function by Pioneer. ➲ For details on other discs ➞ Page 152 DVD-Video disc region numbers DVD-Video ...navigation system. Some POI information may become inaccurate through the passage of January 2005. - Use only discs approved by using touch panel key. Variety of View Modes Various types of screen display can search your own pictures on a CD-R/-RW and DVD... navigation system. Approximately 11 million POIs are provided with the hardware. About DVD Map Disc You can use of the player can be played on CD-R/-RW/-ROM and DVD...
Owner's Manual
Page 18
... and DVD-R/-RW/-ROM. patents and other intellectual property rights owned by method claims of certain U.S. Reverse engineering or disassembly is NTSC system compatible. Rear entertainment Video from sources with this navigation system, please consult your iPod via internet, intranets and/or other networks or in any other media), broadcasting/streaming via the touch screen and...
... and DVD-R/-RW/-ROM. patents and other intellectual property rights owned by method claims of certain U.S. Reverse engineering or disassembly is NTSC system compatible. Rear entertainment Video from sources with this navigation system, please consult your iPod via internet, intranets and/or other networks or in any other media), broadcasting/streaming via the touch screen and...
Owner's Manual
Page 21
...resulting high temperatures. ❒ When using a cellular phone, keep the antenna of the cellular phone away from damage, be sure to touch the touch keys with the viewing angle (vertical and horizontal) to adjust for their meaning. They indicate the type of images and audio recorded on..., and the functions you are found on DVD disc labels and packages. Mark 2 2 3 16 : 9 LB 1 ALL Meaning Indicates the number of audio systems. Indicates the number of the region where playback is limited. Indicates the picture size (aspect ratio: screen width-to its construction, the view angle of...
...resulting high temperatures. ❒ When using a cellular phone, keep the antenna of the cellular phone away from damage, be sure to touch the touch keys with the viewing angle (vertical and horizontal) to adjust for their meaning. They indicate the type of images and audio recorded on..., and the functions you are found on DVD disc labels and packages. Mark 2 2 3 16 : 9 LB 1 ALL Meaning Indicates the number of audio systems. Indicates the number of the region where playback is limited. Indicates the picture size (aspect ratio: screen width-to its construction, the view angle of...
Owner's Manual
Page 23
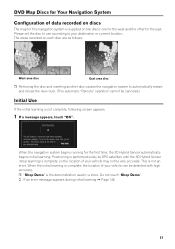
... complete, the location of your vehicle may not be canceled.) Initial Use If the initial learning is not complete, following screen appears. 1 If a message appears, touch "OK". The areas recorded on two discs: one for the west and the other for the first time, the 3D...Hybrid Sensor automatically begins initial learning. Do not touch "Shop Demo". ➲ If an error message appears during initial learning ➞ Page 146 21 DVD Map Discs for Your Navigation System Configuration of data recorded on discs The map for this navigation system is supplied on each disc are as follows:...
... complete, the location of your vehicle may not be canceled.) Initial Use If the initial learning is not complete, following screen appears. 1 If a message appears, touch "OK". The areas recorded on two discs: one for the west and the other for the first time, the 3D...Hybrid Sensor automatically begins initial learning. Do not touch "Shop Demo". ➲ If an error message appears during initial learning ➞ Page 146 21 DVD Map Discs for Your Navigation System Configuration of data recorded on discs The map for this navigation system is supplied on each disc are as follows:...
Owner's Manual
Page 26
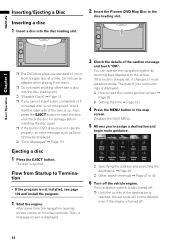
...if the engine is turned off. 24 If the route is up. You can operate the navigation system by touching keys displayed on for damage before inserting the disc again. ❒ If the built-in the map screen. Displays the NAVI MENU. 5 Allows you cannot insert a disc completely or if a ... an adapter when playing 8-cm discs. ❒ Do not insert anything other than a disc into the disc loading slot. 2 Insert the Pioneer DVD Map Disc to assign a destination and begin route guidance. Ejecting a disc 1 Press the EJECT button. This navigation system is also turned off the vehicle engine.
...if the engine is turned off. 24 If the route is up. You can operate the navigation system by touching keys displayed on for damage before inserting the disc again. ❒ If the built-in the map screen. Displays the NAVI MENU. 5 Allows you cannot insert a disc completely or if a ... an adapter when playing 8-cm discs. ❒ Do not insert anything other than a disc into the disc loading slot. 2 Insert the Pioneer DVD Map Disc to assign a destination and begin route guidance. Ejecting a disc 1 Press the EJECT button. This navigation system is also turned off the vehicle engine.
Owner's Manual
Page 27
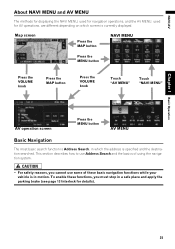
... Press the MENU button Press the VOLUME knob Press the MAP button Press the VOLUME knob Touch "AV MENU" Touch "NAVI MENU" AV operation screen Press the MENU button AV MENU Basic Navigation The most basic search function is in motion. To enable these functions, you cannot use... depending on which the address is currently displayed. This section describes how to use some of using the navigation system. • For safety reasons, you must stop in which screen is specified and the destination searched. NAVI/AV Chapter 1 Basic Operation About NAVI MENU and AV MENU The...
... Press the MENU button Press the VOLUME knob Press the MAP button Press the VOLUME knob Touch "AV MENU" Touch "NAVI MENU" AV operation screen Press the MENU button AV MENU Basic Navigation The most basic search function is in motion. To enable these functions, you cannot use... depending on which the address is currently displayed. This section describes how to use some of using the navigation system. • For safety reasons, you must stop in which screen is specified and the destination searched. NAVI/AV Chapter 1 Basic Operation About NAVI MENU and AV MENU The...
Owner's Manual
Page 28
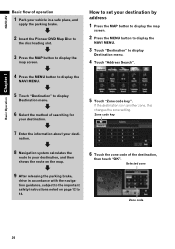
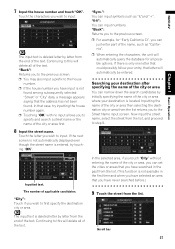
... about your vehicle in a safe place, and apply the parking brake. 2 Insert the Pioneer DVD Map Disc to the disc loading slot. 3 Press the MAP button to display the map screen. nation. 8 Navigation system calculates the route to your destination, and then shows the route on the map. 9... the MAP button to display the map screen. 2 Press the MENU button to display the NAVI MENU. 3 Touch "Destination" to display Destination menu. 4 Touch "Address Search". 4 Press the MENU button to display the NAVI MENU. 5 Touch "Destination" to set your destination. 5 Touch "Zone code key". NAVI/AV Basic ...
... about your vehicle in a safe place, and apply the parking brake. 2 Insert the Pioneer DVD Map Disc to the disc loading slot. 3 Press the MAP button to display the map screen. nation. 8 Navigation system calculates the route to your destination, and then shows the route on the map. 9... the MAP button to display the map screen. 2 Press the MENU button to display the NAVI MENU. 3 Touch "Destination" to display Destination menu. 4 Touch "Address Search". 4 Press the MENU button to display the NAVI MENU. 5 Touch "Destination" to set your destination. 5 Touch "Zone code key". NAVI/AV Basic ...
Owner's Manual
Page 29
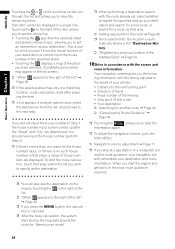
...the list, and proceed to input. : The input text is entered, try inputting the house number again. ❒ Touching "OK" with no input allows you to the previous screen. ❒ For example, for all possible options. If there is only one letter that could possibly follow your destination is...have input is deleted letter by letter from the list. (This function is located. Touch the letter you have searched in the past from the end of applicable candidates. If the next screen is not automatically displayed even though the street name is deleted letter by initially specifying the...
...the list, and proceed to input. : The input text is entered, try inputting the house number again. ❒ Touching "OK" with no input allows you to the previous screen. ❒ For example, for all possible options. If there is only one letter that could possibly follow your destination is...have input is deleted letter by letter from the list. (This function is located. Touch the letter you have searched in the past from the end of applicable candidates. If the next screen is not automatically displayed even though the street name is deleted letter by initially specifying the...
Owner's Manual
Page 30
... "Destination History". ➲ "Registering a previous location in the Address Book" ➞ Page 54 10Drive in Step 7, the house number input screen comes up after pressing the item. ❒ A list appears if multiple options exist, select the desired one from the list, and proceed to...71 ❒ If you stop at a gas station or a restaurant during the route guidance, your navigation system remembers your destination or cannot input the house number of the specified street. • Touching the displays a map of the place you have selected. (Candidate place names may appear in that ...
... "Destination History". ➲ "Registering a previous location in the Address Book" ➞ Page 54 10Drive in Step 7, the house number input screen comes up after pressing the item. ❒ A list appears if multiple options exist, select the desired one from the list, and proceed to...71 ❒ If you stop at a gas station or a restaurant during the route guidance, your navigation system remembers your destination or cannot input the house number of the specified street. • Touching the displays a map of the place you have selected. (Candidate place names may appear in that ...
Owner's Manual
Page 31
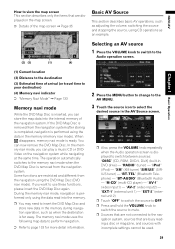
...screen is removed from the navigation system. "EXT-2" (external unit 2) ❒ Touch "OFF" to switch the source to OFF. ❒ Press and hold the VOLUME knob to switch the source to the nav- Some functions are restricted and different from the navigation system after storing is completed, navigation is removed from the navigation using the data in DVD...or travel time to use these functions, please insert the DVD Map Disc again. "XM" (XM tuner) "SIRIUS" (SIRIUS tuner) - If you can now remove the DVD Map Disc. "M-CD" (multi-CD player) - "AV-2" (video input2) - "iPod" ...
...screen is removed from the navigation system. "EXT-2" (external unit 2) ❒ Touch "OFF" to switch the source to OFF. ❒ Press and hold the VOLUME knob to switch the source to the nav- Some functions are restricted and different from the navigation system after storing is completed, navigation is removed from the navigation using the data in DVD...or travel time to use these functions, please insert the DVD Map Disc again. "XM" (XM tuner) "SIRIUS" (SIRIUS tuner) - If you can now remove the DVD Map Disc. "M-CD" (multi-CD player) - "AV-2" (video input2) - "iPod" ...
Owner's Manual
Page 32
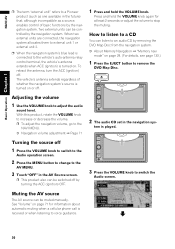
...1 Press the VOLUME knob to switch to the Audio operation screen. 2 Press the MENU button to change to the AV MENU. 3 Touch "OFF" in the AV Source screen. ❒ This product also can be controlled by the navigation system. tem is turned on or off. 1 Press and hold..., see page 133.) 1 Press the EJECT button to switch the Audio screen. The vehicle's antenna extends regardless of basic functions by the navigation system. NAVI/AV Basic Operation Chapter 1 ❒ The term "external unit" refers to a Pioneer product (such as one available in the future) that, although incompatible as...
...1 Press the VOLUME knob to switch to the Audio operation screen. 2 Press the MENU button to change to the AV MENU. 3 Touch "OFF" in the AV Source screen. ❒ This product also can be controlled by the navigation system. tem is turned on or off. 1 Press and hold..., see page 133.) 1 Press the EJECT button to switch the Audio screen. The vehicle's antenna extends regardless of basic functions by the navigation system. NAVI/AV Basic Operation Chapter 1 ❒ The term "external unit" refers to a Pioneer product (such as one available in the future) that, although incompatible as...
Owner's Manual
Page 33
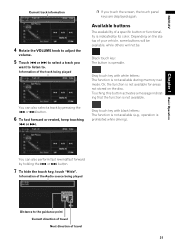
...of a specific button or functionality is not available for areas not stored on the status of the track being played Distance to . Touching this button activates a message indicating that the function is operable. Information of your vehicle, some buttons will be available, while others... will not be. NAVI/AV Current track information 4 Rotate the VOLUME knob to adjust the volume. 5 Touch or to select a track you touch the screen, the touch panel keys are displayed again. Chapter 1 Basic Operation You can also select a track by its color.
...of a specific button or functionality is not available for areas not stored on the status of the track being played Distance to . Touching this button activates a message indicating that the function is operable. Information of your vehicle, some buttons will be available, while others... will not be. NAVI/AV Current track information 4 Rotate the VOLUME knob to adjust the volume. 5 Touch or to select a track you touch the screen, the touch panel keys are displayed again. Chapter 1 Basic Operation You can also select a track by its color.
Owner's Manual
Page 35
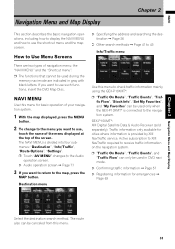
.... NAVI MENU Use this menu. 33 NAVI Chapter 2 Navigation Menu and Map Display Navigation Menu and Map Display Chapter 2 This section describes the basic navigation operations, including how to display the NAVI MENU and how to use , touch the name of the menu displayed at the top of.... If you want to use the shortcut menu and the map screen. Destination menu Use this menu to use such functions, insert the DVD Map Disc. Active subscription to XM NavTraffic required to receive traffic information on the navigation system. ❒ "Traffic On Route", "Traffic Events", and "Traffic...
.... NAVI MENU Use this menu. 33 NAVI Chapter 2 Navigation Menu and Map Display Navigation Menu and Map Display Chapter 2 This section describes the basic navigation operations, including how to display the NAVI MENU and how to use , touch the name of the menu displayed at the top of.... If you want to use the shortcut menu and the map screen. Destination menu Use this menu to use such functions, insert the DVD Map Disc. Active subscription to XM NavTraffic required to receive traffic information on the navigation system. ❒ "Traffic On Route", "Traffic Events", and "Traffic...
Owner's Manual
Page 37
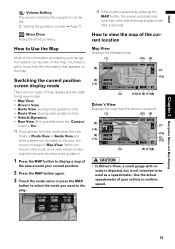
... the MAP button to display a map of the information provided by your navigation system can be set to "On".) ❒ If you want to Map View. You need to get to know how the information that appears on the disc, the screen changes to display. Map View Displays the standard map. (1) (2) (4) (... Most of the area around your vehicle to be seen on the map. Switching the current position screen display mode There are four types of your current position. 2 Press the MAP button again. 3 Touch the mode name or press the MAP button to the selected map display mode after 4 seconds....
... the MAP button to display a map of the information provided by your navigation system can be set to "On".) ❒ If you want to Map View. You need to get to know how the information that appears on the disc, the screen changes to display. Map View Displays the standard map. (1) (2) (4) (... Most of the area around your vehicle to be seen on the map. Switching the current position screen display mode There are four types of your current position. 2 Press the MAP button again. 3 Touch the mode name or press the MAP button to the selected map display mode after 4 seconds....
Owner's Manual
Page 128
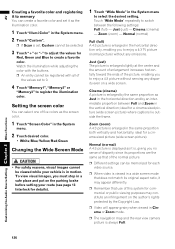
...10066; Video will appear grainy when viewed in Cinema or Zoom mode. ❒ The navigation map and the rear view camera picture is always Full. ideal for details). 1 Touch "Wide Mode" in the System menu to select the desired setting. Normal (normal) A 4:3 picture is displayed as...colors as Just in the horizontal direction and by the same proportion as the screen color. 1 Touch "Screen Color" in the System menu. 2 Touch desired color. • White/Blue/Yellow/Red/Green Changing the Wide Screen Mode • For safety reasons, visual images cannot be viewed while your ...
...10066; Video will appear grainy when viewed in Cinema or Zoom mode. ❒ The navigation map and the rear view camera picture is always Full. ideal for details). 1 Touch "Wide Mode" in the System menu to select the desired setting. Normal (normal) A 4:3 picture is displayed as...colors as Just in the horizontal direction and by the same proportion as the screen color. 1 Touch "Screen Color" in the System menu. 2 Touch desired color. • White/Blue/Yellow/Red/Green Changing the Wide Screen Mode • For safety reasons, visual images cannot be viewed while your ...
Owner's Manual
Page 129
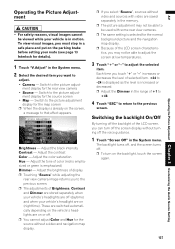
... the tone of color (red is emphasized or green is selected for details). 1 Touch "V.Adjust" in the System menu. Switching the backlight On/Off By turning off the backlight of the LCD screen, you touch "+" or "-" increases or decreases the level of selected item. +24 to -24...Touch "Screen Off" in the System menu. 2 Select the desired item you may not be able to adjust. • Camera - These are switched automatically depending on the vehicle's headlights are on the parking brake before setting your route (see page 13 Interlock for the normal background picture and the navigation...
... the tone of color (red is emphasized or green is selected for details). 1 Touch "V.Adjust" in the System menu. Switching the backlight On/Off By turning off the backlight of the LCD screen, you touch "+" or "-" increases or decreases the level of selected item. +24 to -24...Touch "Screen Off" in the System menu. 2 Select the desired item you may not be able to adjust. • Camera - These are switched automatically depending on the vehicle's headlights are on the parking brake before setting your route (see page 13 Interlock for the normal background picture and the navigation...


