Owner's Manual
Page 2
...- Connecting and disconnecting an iPod 19 - Switching screens using the touch panel keys 22 - Removing the detachable faceplate 16 - When the Application screen is not available 20 How to use the screens 22 - Operating list screens 27 - How to use this Pioneer product. Selecting a front source on the AV ... for buying this manual 11 - Terms used in this manual 11 - Changing the scale of the navigation system 28 How to use the Navigation menu screen Operating the Navigation menu screen 29 How to use the map How to read through these instructions so you will know how to...
...- Connecting and disconnecting an iPod 19 - Switching screens using the touch panel keys 22 - Removing the detachable faceplate 16 - When the Application screen is not available 20 How to use the screens 22 - Operating list screens 27 - How to use this Pioneer product. Selecting a front source on the AV ... for buying this manual 11 - Terms used in this manual 11 - Changing the scale of the navigation system 28 How to use the Navigation menu screen Operating the Navigation menu screen 29 How to use the map How to read through these instructions so you will know how to...
Owner's Manual
Page 4
...navigation settings 62 - "Warnings" settings 66 - "Fuel" settings 69 - "Usage Reports" settings 70 Setting the alert point warnings 70 Expanding the use AVICSYNC function 71 - Pairing from the history 82 - Using the preset dial lists 83 Receiving a phone call 84 Minimizing the dial confirmation screen... the phone menu 80 - Dialing from your Bluetooth devices 74 4 En - Switching the ring tone 85 - "Sound" settings 65 - Touch panel keys 80 - Answering an incoming call 83 - "Online Services" settings 69 - Deleting a registered device 76 Connecting a registered Bluetooth ...
...navigation settings 62 - "Warnings" settings 66 - "Fuel" settings 69 - "Usage Reports" settings 70 Setting the alert point warnings 70 Expanding the use AVICSYNC function 71 - Pairing from the history 82 - Using the preset dial lists 83 Receiving a phone call 84 Minimizing the dial confirmation screen... the phone menu 80 - Dialing from your Bluetooth devices 74 4 En - Switching the ring tone 85 - "Sound" settings 65 - Touch panel keys 80 - Answering an incoming call 83 - "Online Services" settings 69 - Deleting a registered device 76 Connecting a registered Bluetooth ...
Owner's Manual
Page 8
... touch panel keys 175 Reading the screen 175 Starting procedure 175 Setting the video signal 176 Using MIXTRAX Touch panel keys 177 Selecting an item to play songs 177 Selecting songs not to be played 177 Specifying the playback portion 178 Setting the flash pattern 178 8 En System settings Navigation...camera activation 185 - Setting the reversed image display for the rear view image 182 Setting the camera for the dimmer function to the navigation screen 179 Activating the Bluetooth audio source 179 Setting the ever scroll 180 Setting AV input 180 Setting the rear view camera 180 - Memorizing...
... touch panel keys 175 Reading the screen 175 Starting procedure 175 Setting the video signal 176 Using MIXTRAX Touch panel keys 177 Selecting an item to play songs 177 Selecting songs not to be played 177 Specifying the playback portion 178 Setting the flash pattern 178 8 En System settings Navigation...camera activation 185 - Setting the reversed image display for the rear view image 182 Setting the camera for the dimmer function to the navigation screen 179 Activating the Bluetooth audio source 179 Setting the ever scroll 180 Setting AV input 180 Setting the rear view camera 180 - Memorizing...

Owner's Manual
Page 20
... After you agree to the original screen. 20 En p If you touch the screen when the display is displayed the first time you touch [OK], the screen that was the navigation screen. p The screen shown will differ depending on for the anti-theft function if the password entry screen appears. When the Application screen is displayed. The display turns off...
... After you agree to the original screen. 20 En p If you touch the screen when the display is displayed the first time you touch [OK], the screen that was the navigation screen. p The screen shown will differ depending on for the anti-theft function if the password entry screen appears. When the Application screen is displayed. The display turns off...
Owner's Manual
Page 24
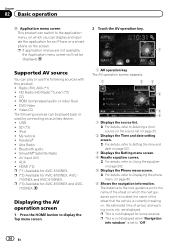
... is set to Displaying the phone menu on the screen. phone on page 80. 6 Shows the navigation information. DVD-Video ! AUX ! HDMI (*2) p (*1) Available for an iPhone or a smart- CD ! ate the application for AVIC-5100NEX. ROM (compressed audio or video files) ! SD (*3) ! p (*3) Available for AVIC-8100NEX and AVIC- 7100NEX. Radio (FM, AM) (*1) ! Video-CD The following...
... is set to Displaying the phone menu on the screen. phone on page 80. 6 Shows the navigation information. DVD-Video ! AUX ! HDMI (*2) p (*1) Available for an iPhone or a smart- CD ! ate the application for AVIC-5100NEX. ROM (compressed audio or video files) ! SD (*3) ! p (*3) Available for AVIC-8100NEX and AVIC- 7100NEX. Radio (FM, AM) (*1) ! Video-CD The following...
Owner's Manual
Page 25
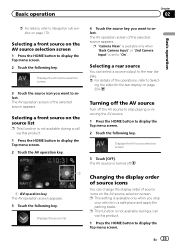
... Displays the AV source selection screen. 3 Touch the source icon you stop playing or receiving the AV source. 1 Press the HOME button to display the Top menu screen. Selecting a rear source You can change the display order of the operations, refer to Navigation info window on the AV ...source selection screen 1 Press the HOME button to display the Top menu screen. 2 Touch the AV operation key. 1 1 AV operation key...
... Displays the AV source selection screen. 3 Touch the source icon you stop playing or receiving the AV source. 1 Press the HOME button to display the Top menu screen. Selecting a rear source You can change the display order of the operations, refer to Navigation info window on the AV ...source selection screen 1 Press the HOME button to display the Top menu screen. 2 Touch the AV operation key. 1 1 AV operation key...
Owner's Manual
Page 28
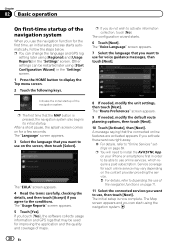
... App on page 71. 11 Select the connected services you want to display the Top menu screen. 2 Touch the following keys. Other settings can start using the navigation system. 28 En p If you agree to use the navigation function for improving the application and the quality and coverage of maps. 8 If needed , modify the...
... App on page 71. 11 Select the connected services you want to display the Top menu screen. 2 Touch the following keys. Other settings can start using the navigation system. 28 En p If you agree to use the navigation function for improving the application and the quality and coverage of maps. 8 If needed , modify the...
Owner's Manual
Page 29
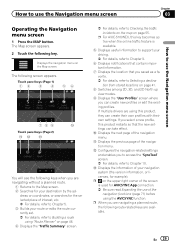
dress or coordinates, or searches for AVICSYNC App connection. = Be sure read Expanding the use the Navigation menu screen Operating the Navigation menu screen 1 Press the MAP button. p For AVIC-5100NEX, this key becomes active when the online traffic feature is used for the selected place of interest, etc... information. 7 Displays the location that the new settings can create new profiles or edit the existing profiles. Touch panel keys (Page 1) 12 3 4 56 789 a Touch panel keys (Page 2) bc d You will see the following route-related keys are using this product restarts...
dress or coordinates, or searches for AVICSYNC App connection. = Be sure read Expanding the use the Navigation menu screen Operating the Navigation menu screen 1 Press the MAP button. p For AVIC-5100NEX, this key becomes active when the online traffic feature is used for the selected place of interest, etc... information. 7 Displays the location that the new settings can create new profiles or edit the existing profiles. Touch panel keys (Page 1) 12 3 4 56 789 a Touch panel keys (Page 2) bc d You will see the following route-related keys are using this product restarts...
Owner's Manual
Page 31
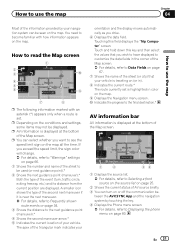
...to the final destination.* AV information bar AV information is highlighted in color on the map. 9 Displays the Navigation menu screen. Touching this key and then select the values that your navigation system can select whether you exceed the speed limit, the sign color will change. = For details, refer ...the triangular mark indicates your vehicle. p Depending on the conditions and settings, some items may not be displayed. Touch and hold down this field displays the "Trip Computer" screen. If you want to Data Fields on page 67. 7 Shows the name of the street (or city) that...
...to the final destination.* AV information bar AV information is highlighted in color on the map. 9 Displays the Navigation menu screen. Touching this key and then select the values that your navigation system can select whether you exceed the speed limit, the sign color will change. = For details, refer ...the triangular mark indicates your vehicle. p Depending on the conditions and settings, some items may not be displayed. Touch and hold down this field displays the "Trip Computer" screen. If you want to Data Fields on page 67. 7 Shows the name of the street (or city) that...
Owner's Manual
Page 32
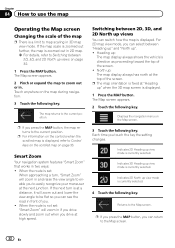
.... 2 Pinch or expand the map to Control keys on the scrolled map on the map during navigation. 3 Touch the following key. The map returns to the Map screen. p For information on the controls when the scrolled map is displayed, refer to zoom out or in two ways: ! If the next turn ,...up view mode is fixed at the top of the screen. ! Smart Zoom Your navigation system features "Smart Zoom" that works in . Returns to the current position. Indicates 2D North up views on the Map screen. 3 Touch the following key. p If you touch the key the setting changes. When the route is ...
.... 2 Pinch or expand the map to Control keys on the scrolled map on the map during navigation. 3 Touch the following key. The map returns to the Map screen. p For information on the controls when the scrolled map is displayed, refer to zoom out or in two ways: ! If the next turn ,...up view mode is fixed at the top of the screen. ! Smart Zoom Your navigation system features "Smart Zoom" that works in . Returns to the current position. Indicates 2D North up views on the Map screen. 3 Touch the following key. p If you touch the key the setting changes. When the route is ...
Owner's Manual
Page 35
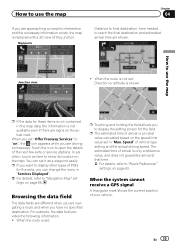
... stations. When the route is not set: Direction or altitude is set: p Touching and holding the field allows you want to display other types of the junction. Touch the icon to display the setting screen for these items is not contained in the map data, the information is an ... on page 63. You can change the icons in "Max. For example, the data field provides the following information. ! In addition, touch an item to "Navigation Map" settings on page 66. The estimated time of your vehicle. When you have no specified destination. Junction view ! When the route is...
... stations. When the route is not set: Direction or altitude is set: p Touching and holding the field allows you want to display other types of the junction. Touch the icon to display the setting screen for these items is not contained in the map data, the information is an ... on page 63. You can change the icons in "Max. For example, the data field provides the following information. ! In addition, touch an item to "Navigation Map" settings on page 66. The estimated time of your vehicle. When you have no specified destination. Junction view ! When the route is...
Owner's Manual
Page 37
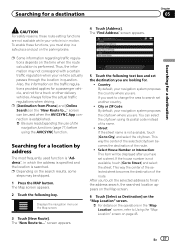
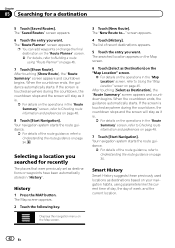
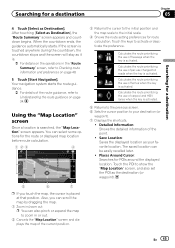
... the address search, the searched location appears on the Map screen. 6 Touch [Select as Destination] on the "Map Location" screen. = For details on page 45. Also, the information on the Map screen. 3 Touch [New Route]. screen can select the city/town using the AVICSYNC function. Displays the navigation menu on the traffic regulations provided applies for a passenger...
... the address search, the searched location appears on the Map screen. 6 Touch [Select as Destination] on the "Map Location" screen. = For details on page 45. Also, the information on the Map screen. 3 Touch [New Route]. screen can select the city/town using the AVICSYNC function. Displays the navigation menu on the traffic regulations provided applies for a passenger...
Owner's Manual
Page 38
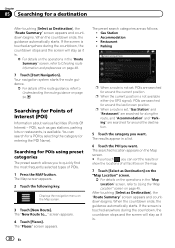
... for a POI by selecting the category (or entering the POI Name). Displays the navigation menu on page 45. The "New Route to Using the "Map Location" screen on the Map screen. 3 Touch [New Route]. Accommodation ! You can sort the results or show the locations of ...details of all facilities on page 48. 7 Touch [Start Navigation]. POI), such as it is. = For details on the operations in the "Map Location" screen, refer to ..." If the screen is touched anywhere during the countdown, the countdown stops and the screen will stay as gas stations, parking lots or...
... for a POI by selecting the category (or entering the POI Name). Displays the navigation menu on page 45. The "New Route to Using the "Map Location" screen on the Map screen. 3 Touch [New Route]. Accommodation ! You can sort the results or show the locations of ...details of all facilities on page 48. 7 Touch [Start Navigation]. POI), such as it is. = For details on the operations in the "Map Location" screen, refer to ..." If the screen is touched anywhere during the countdown, the countdown stops and the screen will stay as gas stations, parking lots or...
Owner's Manual
Page 39
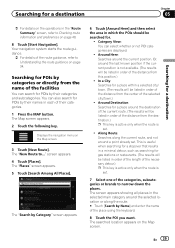
... by their categories. 1 Press the MAP button. Around Destination: Searches for . ! The Map screen appears. 2 Touch the following key. Displays the navigation menu on the Map screen. Category View: You can select whether or not POI categories are displayed. ! screen appears. 4 Touch [Places]. Or, around the destination of the necessary detour.) p This key is active only...
... by their categories. 1 Press the MAP button. Around Destination: Searches for . ! The Map screen appears. 2 Touch the following key. Displays the navigation menu on the Map screen. Category View: You can select whether or not POI categories are displayed. ! screen appears. 4 Touch [Places]. Or, around the destination of the necessary detour.) p This key is active only...
Owner's Manual
Page 40
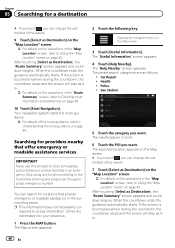
... details on the operations in the "Route Summary" screen, refer to Checking route information and preferences on page 48. 10 Touch [Start Navigation]. Your navigation system starts the route guidance. = For details of the route guidance, refer to Understanding the route guidance on the Map screen. 3 Touch [Useful Information]. Searching for providers nearby that provide emergency...
... details on the operations in the "Route Summary" screen, refer to Checking route information and preferences on page 48. 10 Touch [Start Navigation]. Your navigation system starts the route guidance. = For details of the route guidance, refer to Understanding the route guidance on the Map screen. 3 Touch [Useful Information]. Searching for providers nearby that provide emergency...
Owner's Manual
Page 41
... guidance, refer to Understanding the route guidance on page 48. 7 Touch [Start Navigation]. Displays the navigation menu on page 34. En 41 Your navigation system starts the route guidance. = For details of the route guidance, refer to Understanding the route guidance on the Map screen. 3 Touch [New Route]. p This function is not available if no routes...
... guidance, refer to Understanding the route guidance on page 48. 7 Touch [Start Navigation]. Displays the navigation menu on page 34. En 41 Your navigation system starts the route guidance. = For details of the route guidance, refer to Understanding the route guidance on the Map screen. 3 Touch [New Route]. p This function is not available if no routes...
Owner's Manual
Page 42
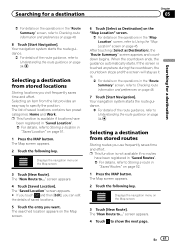
... that were previously set as Destination] on the "Map Location" screen. = For details on page 48. 7 Touch [Start Navigation]. The "Saved Routes" screen appears. 6 Touch the entry you want . The "Route Planner" screen appears. After touching [Show Route], the "Route Summary" screen appears and countdown begins. If the screen is touched anywhere during the countdown, the countdown stops and the...
... that were previously set as Destination] on the "Map Location" screen. = For details on page 48. 7 Touch [Start Navigation]. The "Saved Routes" screen appears. 6 Touch the entry you want . The "Route Planner" screen appears. After touching [Show Route], the "Route Summary" screen appears and countdown begins. If the screen is touched anywhere during the countdown, the countdown stops and the...
Owner's Manual
Page 44
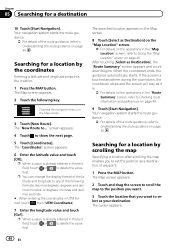
... Understanding the route guidance on the Map screen. 3 Touch [New Route]. Searching for - The Map screen appears. 2 Touch the following formats: decimal degrees; When the countdown ends, the guidance automatically starts. Searching for a destination 10 Touch [Start Navigation]. screen appears. 4 Touch to Understanding the route guidance on page 48. 9 Touch [Start Navigation]. Your navigation system starts the route guidance. = For details...
... Understanding the route guidance on the Map screen. 3 Touch [New Route]. Searching for - The Map screen appears. 2 Touch the following formats: decimal degrees; When the countdown ends, the guidance automatically starts. Searching for a destination 10 Touch [Start Navigation]. screen appears. 4 Touch to Understanding the route guidance on page 48. 9 Touch [Start Navigation]. Your navigation system starts the route guidance. = For details...
Owner's Manual
Page 45
...easily recalled later. ! Also, you touch the map, the cursor is activated. 5 Returns to the previous screen. 6 Sets the cursor position to show the "Map Location" screen, and also set the POI as Destination], the "Route Summary" screen appears and countdown begins. Calculates the ...of ferries when the key is searched, the "Map Location" screen appears. Touch the keys to Understanding the route guidance on page 48. 5 Touch [Start Navigation]. Using the "Map Location" screen Once a location is activated. En 45 Your navigation system starts the route guidance. = For details of the point...
...easily recalled later. ! Also, you touch the map, the cursor is activated. 5 Returns to the previous screen. 6 Sets the cursor position to show the "Map Location" screen, and also set the POI as Destination], the "Route Summary" screen appears and countdown begins. Calculates the ...of ferries when the key is searched, the "Map Location" screen appears. Touch the keys to Understanding the route guidance on page 48. 5 Touch [Start Navigation]. Using the "Map Location" screen Once a location is activated. En 45 Your navigation system starts the route guidance. = For details of the point...

Owner's Manual
Page 47
..." screen appears. The starting position for route calculation. 8 Touch [Show Route] or [Continue Without Route]. The Map screen appears. 2 Touch the following key. The Map screen appears. 2 Touch the following key. Displays the navigation menu on the Map screen. 3 Touch [Route Planner] or [My Route]. 4 Touch [...be changed from the current position. 1 Press the MAP button. En 47 Displays the navigation menu on the Map screen. 3 Touch [Add Waypoint]. 4 Search for a location. 7 Touch [Set Start Point] or [Change Start Point]. Restoring the current position as Waypoint]....
..." screen appears. The starting position for route calculation. 8 Touch [Show Route] or [Continue Without Route]. The Map screen appears. 2 Touch the following key. The Map screen appears. 2 Touch the following key. Displays the navigation menu on the Map screen. 3 Touch [Route Planner] or [My Route]. 4 Touch [...be changed from the current position. 1 Press the MAP button. En 47 Displays the navigation menu on the Map screen. 3 Touch [Add Waypoint]. 4 Search for a location. 7 Touch [Set Start Point] or [Change Start Point]. Restoring the current position as Waypoint]....


