Owner's Manual
Page 4
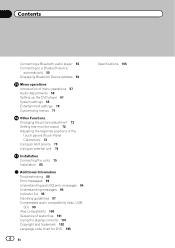
... 72 Adjusting the response positions of the touch panels (Touch Panel Calibration) 73 Using an AUX source 73 Using an external unit 74 Installation Connecting the units 75 Installation 85 Additional Information Troubleshooting 88 Error messages 90 Understanding auto EQ error messages 94 Understanding messages 94 Indicator list 95 Handling guidelines 97...
... 72 Adjusting the response positions of the touch panels (Touch Panel Calibration) 73 Using an AUX source 73 Using an external unit 74 Installation Connecting the units 75 Installation 85 Additional Information Troubleshooting 88 Error messages 90 Understanding auto EQ error messages 94 Understanding messages 94 Indicator list 95 Handling guidelines 97...

Owner's Manual
Page 5
...display inside a vehicle even by persons other hazards. Precautions Section 01 Precautions IMPORTANT SAFEGUARDS Please read and understood the operating instructions. 5 Do not install the display where it may (i) obstruct the driver's vision, (ii) impair the performance of any way will appear on , and the ... a safe location and make necessary adjustments. 7 Please remember to the risk of front seat video should not be illegal. WARNING ! Installation or servicing of the display by yourself. LIGHT GREEN LEAD AT POWER CON- To avoid the risk of accident and the potential violation...
...display inside a vehicle even by persons other hazards. Precautions Section 01 Precautions IMPORTANT SAFEGUARDS Please read and understood the operating instructions. 5 Do not install the display where it may (i) obstruct the driver's vision, (ii) impair the performance of any way will appear on , and the ... a safe location and make necessary adjustments. 7 Please remember to the risk of front seat video should not be illegal. WARNING ! Installation or servicing of the display by yourself. LIGHT GREEN LEAD AT POWER CON- To avoid the risk of accident and the potential violation...
Owner's Manual
Page 6
... when backing up . To avoid battery exhaustion Keep the vehicle engine running when using this unit returns to avoid draining the battery power. ! WARNING NEVER install the rear display in a safe place, and (1) apply the parking brake, (2) release the parking brake, and then (3) apply the parking brake again. VERSED. ! OTHER USE...
... when backing up . To avoid battery exhaustion Keep the vehicle engine running when using this unit returns to avoid draining the battery power. ! WARNING NEVER install the rear display in a safe place, and (1) apply the parking brake, (2) release the parking brake, and then (3) apply the parking brake again. VERSED. ! OTHER USE...
Owner's Manual
Page 7
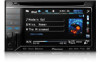
... the sound until you have established a comfortable sound level, set forth for use in other antenna or transmitter. ! Once you can actually be installed and operated keeping the radiator at least 20 cm or more away from person's body (excluding extremities: hands, wrists, feet and ankles). Sound can...it there. Operation is illegal in poor reception. En 7 Before you start Section 02 Before you start FCC ID: AJDK028 MODEL NO.: AVH-P3300BT IC: 775E-K028 This equipment complies with Canadian ICES-003. This equipment has very low levels of the FCC Rules. BE SURE TO OBSERVE...
... the sound until you have established a comfortable sound level, set forth for use in other antenna or transmitter. ! Once you can actually be installed and operated keeping the radiator at least 20 cm or more away from person's body (excluding extremities: hands, wrists, feet and ankles). Sound can...it there. Operation is illegal in poor reception. En 7 Before you start Section 02 Before you start FCC ID: AJDK028 MODEL NO.: AVH-P3300BT IC: 775E-K028 This equipment complies with Canadian ICES-003. This equipment has very low levels of the FCC Rules. BE SURE TO OBSERVE...
Owner's Manual
Page 9
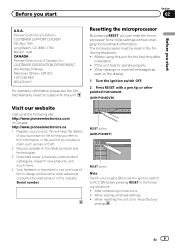
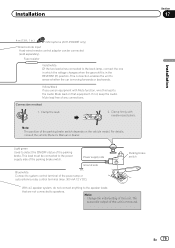
... on file to help you refer to this information in the industry. Box 1760 Long Beach, CA 90801-1760 800-421-1404 CANADA Pioneer Electronics of an insurance claim such as loss or theft. 2 Receive updates on the display 1 Turn the ignition switch OFF. 2 ...RESET with this unit for the first time after installation ! Resetting the microprocessor By pressing RESET, you start Section 02 Before you can reset the microprocessor to its initial (factory) settings En 9 After completing connections ! Serial number RESET button (AVH-P3300BT) RESET button Note Switch your product. If the...
... on file to help you refer to this information in the industry. Box 1760 Long Beach, CA 90801-1760 800-421-1404 CANADA Pioneer Electronics of an insurance claim such as loss or theft. 2 Receive updates on the display 1 Turn the ignition switch OFF. 2 ...RESET with this unit for the first time after installation ! Resetting the microprocessor By pressing RESET, you start Section 02 Before you can reset the microprocessor to its initial (factory) settings En 9 After completing connections ! Serial number RESET button (AVH-P3300BT) RESET button Note Switch your product. If the...
Owner's Manual
Page 10
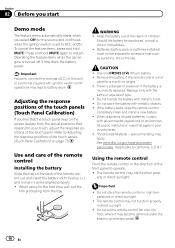
...WARNING ! Replace only with ignition switch on the screen deviate from the tray. If the battery leaks, wipe the remote control completely clean and install a new battery. ! special handling may not function prop- The remote control may apply. Do not store the remote control in direct sunlight. ... public institutions' rules that respond to ACC or ON. Use one CR2025 (3 V) lithium battery. ! When disposing of the remote control Installing the battery Slide the tray on page 73. Section 02 Before you start Demo mode The feature demo automatically starts when you feel that ...
...WARNING ! Replace only with ignition switch on the screen deviate from the tray. If the battery leaks, wipe the remote control completely clean and install a new battery. ! special handling may not function prop- The remote control may apply. Do not store the remote control in direct sunlight. ... public institutions' rules that respond to ACC or ON. Use one CR2025 (3 V) lithium battery. ! When disposing of the remote control Installing the battery Slide the tray on page 73. Section 02 Before you start Demo mode The feature demo automatically starts when you feel that ...
Owner's Manual
Page 23
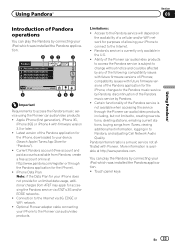
...deleting stations, emailing current stations, buying songs from iTunes, viewing additional text information, logging in the U.S. ! Ability of the Pioneer car audio/video products to access the Pandora service is a music service not affiliated with future firmware versions of iPhones; changes ...from AT&T may apply for the iPhone, downloaded to the Pandora music service by any of allowing your iPod which was installed the Pandora application. 8 12 3 Pandora S.Rtrv Abcdeabcdeabcdeabcde Abcdeabcdeabcdeabcde Abcdeabcdeabcdeabcde Abcdeabcdeabcdeabcde Wed 28 May 12:45 PM 01:45 4 ...
...deleting stations, emailing current stations, buying songs from iTunes, viewing additional text information, logging in the U.S. ! Ability of the Pioneer car audio/video products to access the Pandora service is a music service not affiliated with future firmware versions of iPhones; changes ...from AT&T may apply for the iPhone, downloaded to the Pandora music service by any of allowing your iPod which was installed the Pandora application. 8 12 3 Pandora S.Rtrv Abcdeabcdeabcdeabcde Abcdeabcdeabcdeabcde Abcdeabcdeabcdeabcde Abcdeabcdeabcdeabcde Wed 28 May 12:45 PM 01:45 4 ...
Owner's Manual
Page 24
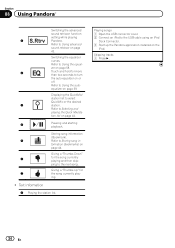
... currently playing and then skip- Refer to Storing song in- Refer to the USB cable using an iPod Dock Connector. 3 Start up the Pandora application installed on page 42. ing. !
... currently playing and then skip- Refer to Storing song in- Refer to the USB cable using an iPod Dock Connector. 3 Start up the Pandora application installed on page 42. ing. !
Owner's Manual
Page 67
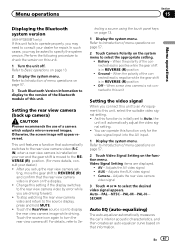
...an auto-equalizer curve based on page 13. 1 Display the system menu. Menu operations Section 15 Menu operations Displaying the Bluetooth system version (AVH-P3300BT only) If this unit fails to operate properly, you may be asked to check the version on this unit to an AV equipment to ...version. AV - Setting the rear view camera (back up the rear view camera set up camera) CAUTION Pioneer recommends the use of the connected lead is negative while the gear shift is installed on the display. ! Battery - You can operate this setting if the display switches to the rear ...
...an auto-equalizer curve based on page 13. 1 Display the system menu. Menu operations Section 15 Menu operations Displaying the Bluetooth system version (AVH-P3300BT only) If this unit fails to operate properly, you may be asked to check the version on this unit to an AV equipment to ...version. AV - Setting the rear view camera (back up the rear view camera set up camera) CAUTION Pioneer recommends the use of the connected lead is negative while the gear shift is installed on the display. ! Battery - You can operate this setting if the display switches to the rear ...
Owner's Manual
Page 74
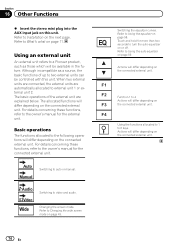
...operations of up to external unit 1 or external unit 2. Switching the equalizer curves. Using an external unit An external unit refers to a Pioneer product, such as a source, the basic functions of the external unit are automatically allocated to two external units can be available in the ...Using the auto-equalizer on page 58. Refer to What's what on page 43. 74 En F4 Using the functions allocated to 1 to Installation on F3 the connected external unit. Refer to Using the equalizer on page 59. For details concerning these functions, refer to 4 Actions will...
...operations of up to external unit 1 or external unit 2. Switching the equalizer curves. Using an external unit An external unit refers to a Pioneer product, such as a source, the basic functions of the external unit are automatically allocated to two external units can be available in the ...Using the auto-equalizer on page 58. Refer to What's what on page 43. 74 En F4 Using the functions allocated to 1 to Installation on F3 the connected external unit. Refer to Using the equalizer on page 59. For details concerning these functions, refer to 4 Actions will...
Owner's Manual
Page 75
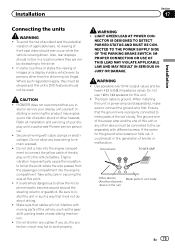
...even by persons other hazards. CAUTION ! Be sure to work properly. WARNING ! Do not use 1 W to the vehicle battery. When installing this unit's DVD features should not be used. In some countries or states the viewing of smoke or malfunction. Where such regulations apply, they... are visibly distracting to authorized Pioneer service personnel. ! Use speakers over 50 W (output value) and between 4 W to remain exposed. ! If the screw for this point...
...even by persons other hazards. CAUTION ! Be sure to work properly. WARNING ! Do not use 1 W to the vehicle battery. When installing this unit's DVD features should not be used. In some countries or states the viewing of smoke or malfunction. Where such regulations apply, they... are visibly distracting to authorized Pioneer service personnel. ! Use speakers over 50 W (output value) and between 4 W to remain exposed. ! If the screw for this point...
Owner's Manual
Page 76
... negative terminal of multiple speakers. ! The current capacity of this unit with metal parts to follow the directions below. - Section 17 Installation Important ! Do not connect the yellow cable to the battery by passing it through the blue/white cable. Connect this unit is limited...with a 12-volt battery and negative grounding only. Use a fuse of the auto antenna. To prevent a short-circuit, overheating or malfunction, be installed in battery drain or a malfunction. ! Doing so may result in order to the power terminal of the rating prescribed. - F O OF N...
... negative terminal of multiple speakers. ! The current capacity of this unit with metal parts to follow the directions below. - Section 17 Installation Important ! Do not connect the yellow cable to the battery by passing it through the blue/white cable. Connect this unit is limited...with a 12-volt battery and negative grounding only. Use a fuse of the auto antenna. To prevent a short-circuit, overheating or malfunction, be installed in battery drain or a malfunction. ! Doing so may result in order to the power terminal of the rating prescribed. - F O OF N...

Owner's Manual
Page 77
Installation Section 17 Installation En 77
Installation Section 17 Installation En 77
Owner's Manual
Page 78
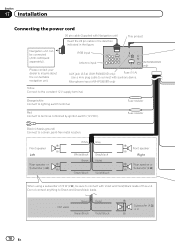
...Violet/black Subwoofer (4 Ω) × 2 78 En RGB input Antenna input AUX jack (3.5 ø) (AVH-P4300DVD only) Fuse (10 A) Use a mini plug cable to connect with Violet and Violet/black leads of this unit. Fuse ...Installation Connecting the power cord 26 pin cable (Supplied with auxiliary device. This product Navigation unit can be sure to connect with Navigation unit) Insert the 26 pin cable in the direction indicated in the figure. Orange/white Connect to terminal controlled by ignition switch (12 V DC). Microphone input (AVH-P3300BT only) (AVH...
...Violet/black Subwoofer (4 Ω) × 2 78 En RGB input Antenna input AUX jack (3.5 ø) (AVH-P4300DVD only) Fuse (10 A) Use a mini plug cable to connect with Violet and Violet/black leads of this unit. Fuse ...Installation Connecting the power cord 26 pin cable (Supplied with auxiliary device. This product Navigation unit can be sure to connect with Navigation unit) Insert the 26 pin cable in the direction indicated in the figure. Orange/white Connect to terminal controlled by ignition switch (12 V DC). Microphone input (AVH-P3300BT only) (AVH...
Owner's Manual
Page 79
...two lead wires connected to the back lamp, connect the one in which the voltage changes when the gear shift is in .) Microphone (AVH-P3300BT only) Wired remote input Hard-wired remote control adaptor can be connected to the power supply side of the parking brake switch. Connection ... an equipment with needle-nosed pliers. The subwoofer output of the power amp or auto-antenna relay control terminal (max. 300 mA 12 V DC). Installation Section 17 Installation 4 m (13 ft. 1 in the REVERSE (R) position. Note: · The position of any connections. If not, keep the Audio Mute...
...two lead wires connected to the back lamp, connect the one in which the voltage changes when the gear shift is in .) Microphone (AVH-P3300BT only) Wired remote input Hard-wired remote control adaptor can be connected to the power supply side of the parking brake switch. Connection ... an equipment with needle-nosed pliers. The subwoofer output of the power amp or auto-antenna relay control terminal (max. 300 mA 12 V DC). Installation Section 17 Installation 4 m (13 ft. 1 in the REVERSE (R) position. Note: · The position of any connections. If not, keep the Audio Mute...
Owner's Manual
Page 80
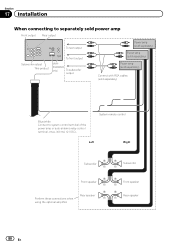
Section 17 Installation When connecting to separately sold separately) Blue/white Connect to system control terminal of the power amp or auto-antenna relay control terminal. (max. 300 ...) Power amp (sold separately) Connect with RCA cables (sold power amp Front output Rear output To rear output Subwoofer output This product To front output (AVH-
Section 17 Installation When connecting to separately sold separately) Blue/white Connect to system control terminal of the power amp or auto-antenna relay control terminal. (max. 300 ...) Power amp (sold separately) Connect with RCA cables (sold power amp Front output Rear output To rear output Subwoofer output This product To front output (AVH-
Owner's Manual
Page 81
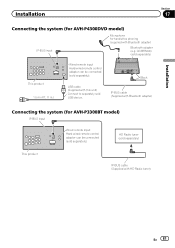
Black IP-BUS cable (Supplied with Bluetooth adapter) Installation Connecting the system (for hands-free phoning (supplied with HD Radio tuner) En 81 CD-BTB200) (sold separately) This product 1.5 m (4 ft. 11 in.)...with this unit) Connect to separately sold separately) This product IP-BUS cable (Supplied with Bluetooth adapter) Bluetooth adapter (e.g. Installation Section 17 Connecting the system (for AVH-P4300DVD model) IP-BUS input Microphone for AVH-P3300BT model) IP-BUS input Wired remote input Hard-wired remote control adaptor can be connected (sold separately).
Black IP-BUS cable (Supplied with Bluetooth adapter) Installation Connecting the system (for hands-free phoning (supplied with HD Radio tuner) En 81 CD-BTB200) (sold separately) This product 1.5 m (4 ft. 11 in.)...with this unit) Connect to separately sold separately) This product IP-BUS cable (Supplied with Bluetooth adapter) Bluetooth adapter (e.g. Installation Section 17 Connecting the system (for AVH-P4300DVD model) IP-BUS input Microphone for AVH-P3300BT model) IP-BUS input Wired remote input Hard-wired remote control adaptor can be connected (sold separately).
Owner's Manual
Page 82
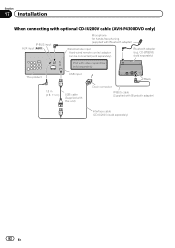
Bluetooth adapter (e.g. Section 17 Installation When connecting with optional CD-IU200V cable (AVH-P4300DVD only) IP-BUS input AUX input (AUX) Microphone for hands-free phoning (supplied with Bluetooth adapter) Interface cable (CD-IU200V) (sold separately). CD-BTB200) (sold separately) iPod with video capabilities (sold separately) This product USB input Black 1.5 m (4 ft. 11 in.) USB cable (Supplied with this unit) Dock connector IP-BUS cable (Supplied with Bluetooth adapter) Wired remote input Hard-wired remote control adaptor can be connected (sold separately) 82 En
Bluetooth adapter (e.g. Section 17 Installation When connecting with optional CD-IU200V cable (AVH-P4300DVD only) IP-BUS input AUX input (AUX) Microphone for hands-free phoning (supplied with Bluetooth adapter) Interface cable (CD-IU200V) (sold separately). CD-BTB200) (sold separately) iPod with video capabilities (sold separately) This product USB input Black 1.5 m (4 ft. 11 in.) USB cable (Supplied with this unit) Dock connector IP-BUS cable (Supplied with Bluetooth adapter) Wired remote input Hard-wired remote control adaptor can be connected (sold separately) 82 En
Owner's Manual
Page 83
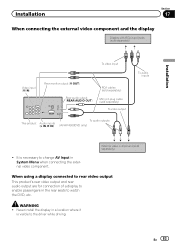
...outputs This product Audio inputs (L IN, R IN) (AVH-P4300DVD only) To audio inputs ! Never install the display in a location where it is necessary to change AV Input in the rear seats to watch the DVD, etc. Installation Section 17 When connecting the external video component and the display... Display with RCA input jacks (sold separately) Installation To video input Video input (V IN) Rear monitor output (V OUT) Rear audio ...
...outputs This product Audio inputs (L IN, R IN) (AVH-P4300DVD only) To audio inputs ! Never install the display in a location where it is necessary to change AV Input in the rear seats to watch the DVD, etc. Installation Section 17 When connecting the external video component and the display... Display with RCA input jacks (sold separately) Installation To video input Video input (V IN) Rear monitor output (V OUT) Rear audio ...
Owner's Manual
Page 84
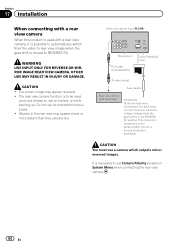
... camera which the voltage changes when the gear shift is moved to REVERSE (R). Rear view camera input (R.C IN) This product RCA cable (sold separately) (AVH-P4300DVD only) To video output Fuse resistor Rear view camera (sold separately) Violet/white Of the two lead wires connected to keep an eye on... or while backing up. The rear view camera function is moving forwards or backwards. OTHER USE MAY RESULT IN INJURY OR DAMAGE. Section 17 Installation When connecting with a rear view camera When this product is used as an aid to the back lamp, connect the one in which outputs ...
... camera which the voltage changes when the gear shift is moved to REVERSE (R). Rear view camera input (R.C IN) This product RCA cable (sold separately) (AVH-P4300DVD only) To video output Fuse resistor Rear view camera (sold separately) Violet/white Of the two lead wires connected to keep an eye on... or while backing up. The rear view camera function is moving forwards or backwards. OTHER USE MAY RESULT IN INJURY OR DAMAGE. Section 17 Installation When connecting with a rear view camera When this product is used as an aid to the back lamp, connect the one in which outputs ...


