Owner's Manual
Page 5
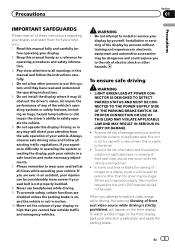
fore operating your display and retain them for future reference. 1 Read this manual fully and carefully be obeyed and this system until they must be - WARNING ! Installation or servicing of the display by persons without training and experience in any of the vehicle's operating systems or safety ... to safely operate the vehicle. 6 Do not operate this manual handy as a reference for use headphones while driving. 9 To promote safety, certain functions are disabled unless the parking brake is being driven. ! If you to install or service your vehicle in a safe place and apply the...
fore operating your display and retain them for future reference. 1 Read this manual fully and carefully be obeyed and this system until they must be - WARNING ! Installation or servicing of the display by persons without training and experience in any of the vehicle's operating systems or safety ... to safely operate the vehicle. 6 Do not operate this manual handy as a reference for use headphones while driving. 9 To promote safety, certain functions are disabled unless the parking brake is being driven. ! If you to install or service your vehicle in a safe place and apply the...
Owner's Manual
Page 9
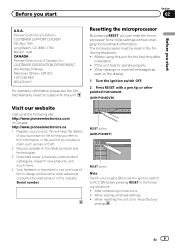
... (AVH-P3300BT) RESET button Note Switch your engine ON or set the ignition switch to its initial (factory) settings En 9 Box 1760 Long Beach, CA 90801-1760 800-421-1404 CANADA Pioneer Electronics of an insurance claim such as loss or theft. 2 Receive updates on the latest products and technologies. 3 Download owner's manuals, order... http://www.pioneerelectronics.ca 1 Register your purchase on the display 1 Turn the ignition switch OFF. 2 Press RESET with this unit for the first time after installation !
... (AVH-P3300BT) RESET button Note Switch your engine ON or set the ignition switch to its initial (factory) settings En 9 Box 1760 Long Beach, CA 90801-1760 800-421-1404 CANADA Pioneer Electronics of an insurance claim such as loss or theft. 2 Receive updates on the latest products and technologies. 3 Download owner's manuals, order... http://www.pioneerelectronics.ca 1 Register your purchase on the display 1 Turn the ignition switch OFF. 2 Press RESET with this unit for the first time after installation !
Owner's Manual
Page 74
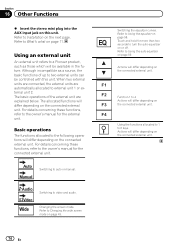
...the owner's manual for the external unit. Actions will differ depending on page 58. Changing the screen mode. Section 16 Other Functions % Insert the stereo mini plug into the AUX input jack on page 11. For details concerning these functions, refer to Installation on the ... functions allocated to external unit 1 or external unit 2. Actions will differ depending on F3 the connected external unit. Refer to a Pioneer product, such as a source, the basic functions of the external unit are automatically allocated to the following operations will differ depending on...
...the owner's manual for the external unit. Actions will differ depending on page 58. Changing the screen mode. Section 16 Other Functions % Insert the stereo mini plug into the AUX input jack on page 11. For details concerning these functions, refer to Installation on the ... functions allocated to external unit 1 or external unit 2. Actions will differ depending on F3 the connected external unit. Refer to a Pioneer product, such as a source, the basic functions of the external unit are automatically allocated to the following operations will differ depending on...
Owner's Manual
Page 79
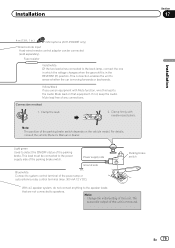
...position of the parking brake switch. This connection enables the unit to the speaker leads that equipment. For details, consult the vehicle Owner's Manual or dealer. Note: · Change the initial setting of this lead to the Audio Mute lead on the vehicle model. Clamp firmly ...monaural. Clamp the lead. 2. Installation Section 17 Installation 4 m (13 ft. 1 in which the voltage changes when the gear shift is moving forwards or backwards. Power supply side Ground side Blue/white Connect to the back lamp, connect the one in .) Microphone (AVH-P3300BT only) Wired remote input Hard...
...position of the parking brake switch. This connection enables the unit to the speaker leads that equipment. For details, consult the vehicle Owner's Manual or dealer. Note: · Change the initial setting of this lead to the Audio Mute lead on the vehicle model. Clamp firmly ...monaural. Clamp the lead. 2. Installation Section 17 Installation 4 m (13 ft. 1 in which the voltage changes when the gear shift is moving forwards or backwards. Power supply side Ground side Blue/white Connect to the back lamp, connect the one in .) Microphone (AVH-P3300BT only) Wired remote input Hard...


