Owner's Manual
Page 4
... 72 Adjusting the response positions of the touch panels (Touch Panel Calibration) 73 Using an AUX source 73 Using an external unit 74 Installation Connecting the units 75 Installation 85 Additional Information Troubleshooting 88 Error messages 90 Understanding auto EQ error messages 94 Understanding messages 94 Indicator list 95 Handling guidelines 97...
... 72 Adjusting the response positions of the touch panels (Touch Panel Calibration) 73 Using an AUX source 73 Using an external unit 74 Installation Connecting the units 75 Installation 85 Additional Information Troubleshooting 88 Error messages 90 Understanding auto EQ error messages 94 Understanding messages 94 Indicator list 95 Handling guidelines 97...
Owner's Manual
Page 5
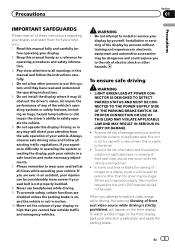
... prohibited. Precautions Section 01 Precautions IMPORTANT SAFEGUARDS Please read and understood the operating instructions. 5 Do not install the display where it may be illegal. If you attempt to install or service your display. 2 Keep this manual handy as a reference for use headphones while driving. ... is not for operating procedures and safety information. 3 Pay close attention to the risk of images on the front display. En 5 Installation or servicing of front seat video should not be considerably more severe if your seat belt is not properly buckled. 8 Never use with...
... prohibited. Precautions Section 01 Precautions IMPORTANT SAFEGUARDS Please read and understood the operating instructions. 5 Do not install the display where it may be illegal. If you attempt to install or service your display. 2 Keep this manual handy as a reference for use headphones while driving. ... is not for operating procedures and safety information. 3 Pay close attention to the risk of images on the front display. En 5 Installation or servicing of front seat video should not be considerably more severe if your seat belt is not properly buckled. 8 Never use with...
Owner's Manual
Page 6
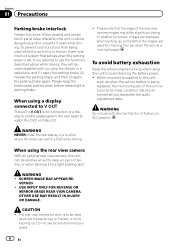
... no power is supplied to this unit, such as an aid to keep the brake pedal pushed down before releasing the parking brake. WARNING NEVER install the rear display in a safe place, and (1) apply the parking brake, (2) release the parking brake, and then (3) apply the parking brake again. To prevent such...
... no power is supplied to this unit, such as an aid to keep the brake pedal pushed down before releasing the parking brake. WARNING NEVER install the rear display in a safe place, and (1) apply the parking brake, (2) release the parking brake, and then (3) apply the parking brake again. To prevent such...
Owner's Manual
Page 7
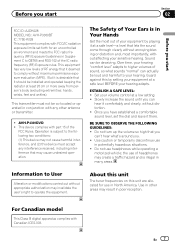
...start Section 02 Before you start FCC ID: AJDK028 MODEL NO.: AVH-P3300BT IC: 775E-K028 This equipment complies with FCC/IC radiation exposure...that it at a safe level-a level that may create a traffic hazard and is in many areas. AVH-P4300DVD ! Sound can be loud and harmful to User Alteration or modifications carried out without appropriate authorization may...level" adapts to operate the equipment. About this unit The tuner frequencies on this device must not be installed and operated keeping the radiator at a safe level BEFORE your volume control at a low setting. ! Do...
...start Section 02 Before you start FCC ID: AJDK028 MODEL NO.: AVH-P3300BT IC: 775E-K028 This equipment complies with FCC/IC radiation exposure...that it at a safe level-a level that may create a traffic hazard and is in many areas. AVH-P4300DVD ! Sound can be loud and harmful to User Alteration or modifications carried out without appropriate authorization may...level" adapts to operate the equipment. About this unit The tuner frequencies on this device must not be installed and operated keeping the radiator at a safe level BEFORE your volume control at a low setting. ! Do...
Owner's Manual
Page 9
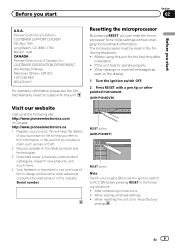
...Pioneer Electronics of your engine ON or set the ignition switch to its initial settings without changing the bookmark information. Resetting the microprocessor By pressing RESET, you can reset the microprocessor to operate properly ! If the unit fails to its initial (factory) settings En 9 Serial number RESET button (AVH-P3300BT... on the display 1 Turn the ignition switch OFF. 2 Press RESET with this unit for the first time after installation ! When resetting the unit to ACC ON before pressing RESET in the following situations: ! CUSTOMER SUPPORT DIVISION P.O. ...
...Pioneer Electronics of your engine ON or set the ignition switch to its initial settings without changing the bookmark information. Resetting the microprocessor By pressing RESET, you can reset the microprocessor to operate properly ! If the unit fails to its initial (factory) settings En 9 Serial number RESET button (AVH-P3300BT... on the display 1 Turn the ignition switch OFF. 2 Press RESET with this unit for the first time after installation ! When resetting the unit to ACC ON before pressing RESET in the following situations: ! CUSTOMER SUPPORT DIVISION P.O. ...
Owner's Manual
Page 10
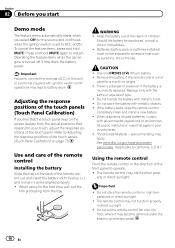
... with governmental regulations or environmental public institutions' rules that respond to your country/area. ! If the battery leaks, wipe the remote control completely clean and install a new battery. ! When disposing of the touch panel. Important ! Do not let the remote control fall onto the floor, where it may lead to ...ON. Should the battery be exposed to restart. Replace only with metallic objects. ! erly in high temperatures or direct sunlight. ! Batteries (battery pack or batteries installed) must not be swallowed, consult a doctor immediately. ! Press and hold MUTE.
... with governmental regulations or environmental public institutions' rules that respond to your country/area. ! If the battery leaks, wipe the remote control completely clean and install a new battery. ! When disposing of the touch panel. Important ! Do not let the remote control fall onto the floor, where it may lead to ...ON. Should the battery be exposed to restart. Replace only with metallic objects. ! erly in high temperatures or direct sunlight. ! Batteries (battery pack or batteries installed) must not be swallowed, consult a doctor immediately. ! Press and hold MUTE.
Owner's Manual
Page 23
... service will depend on the availability of a cellular and/or WiFi network for the iPhone; Connection to the Pioneer car audio/video products. You can play the Pandora by connecting your iPod which was installed the Pandora application. ! discontinuation of the Pandora music service by Pandora. ! Certain functionality of the Pandora service...
... service will depend on the availability of a cellular and/or WiFi network for the iPhone; Connection to the Pioneer car audio/video products. You can play the Pandora by connecting your iPod which was installed the Pandora application. ! discontinuation of the Pandora music service by Pandora. ! Certain functionality of the Pandora service...
Owner's Manual
Page 24
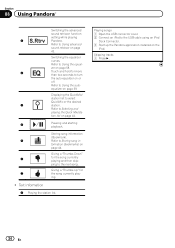
.... Displaying the QuickMix/ station list to Using the auto- ing. ! Refer to the USB cable using an iPod Dock Connector. 3 Start up the Pandora application installed on page 42. formation (bookmarks) on or off. Text information 8 Playing the station list. Switching the equalizer curves. Playing songs 1 Open the USB connector cover...
.... Displaying the QuickMix/ station list to Using the auto- ing. ! Refer to the USB cable using an iPod Dock Connector. 3 Start up the Pandora application installed on page 42. formation (bookmarks) on or off. Text information 8 Playing the station list. Switching the equalizer curves. Playing songs 1 Open the USB connector cover...
Owner's Manual
Page 67
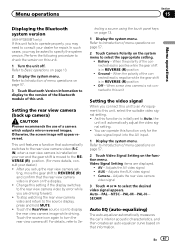
...(AVH-P3300BT only) If this unit fails to operate properly, you may need to Introduction of menu operations on page 57. 2 Touch Camera Polarity on the function menu. This unit features a function that automatically switches to the rear view camera video (R.C IN) when a rear view camera is installed on...rear view camera video by error while you are displayed. ! Change this unit Setting the video signal When you set up camera) CAUTION Pioneer recommends the use of the connected lead is positive while the gear shift is in REVERSE (R) position ! Refer to Introduction of menu ...
...(AVH-P3300BT only) If this unit fails to operate properly, you may need to Introduction of menu operations on page 57. 2 Touch Camera Polarity on the function menu. This unit features a function that automatically switches to the rear view camera video (R.C IN) when a rear view camera is installed on...rear view camera video by error while you are displayed. ! Change this unit Setting the video signal When you set up camera) CAUTION Pioneer recommends the use of the connected lead is positive while the gear shift is in REVERSE (R) position ! Refer to Introduction of menu ...
Owner's Manual
Page 74
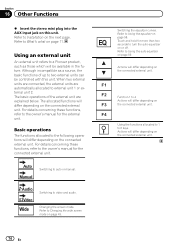
... page. When two external units are connected, the external units are explained below. Touch and hold for more than two seconds to Installation on or off. Audio Video Switching to auto or manual. Changing the screen mode. Basic operations The functions allocated to Changing the...external unit refers to What's what on page 58. The allocated functions will differ depending on the connected external unit. Refer to a Pioneer product, such as a source, the basic functions of the external unit are automatically allocated to the owner's manual for the connected external ...
... page. When two external units are connected, the external units are explained below. Touch and hold for more than two seconds to Installation on or off. Audio Video Switching to auto or manual. Changing the screen mode. Basic operations The functions allocated to Changing the...external unit refers to What's what on page 58. The allocated functions will differ depending on the connected external unit. Refer to a Pioneer product, such as a source, the basic functions of the external unit are automatically allocated to the owner's manual for the connected external ...
Owner's Manual
Page 75
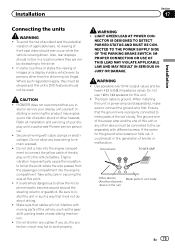
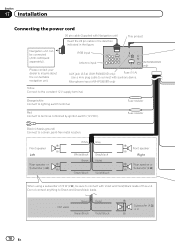
... any bare wiring to become wound around the steering column or gearstick. LIGHT GREEN LEAD AT POWER CON- Installation Section 17 Installation Connecting the units WARNING ! PIONEER does not recommend that cables will not obstruct driving. ! The black cable is extremely dangerous to allow any... (output value) and between 4 W to work properly. Ensure that it could result in fire, generation of your display unit yourself. Installing or servicing the product may eventually cause the insulation to fail at this unit or power amp (sold separately), make sure to 3 ...
... any bare wiring to become wound around the steering column or gearstick. LIGHT GREEN LEAD AT POWER CON- Installation Section 17 Installation Connecting the units WARNING ! PIONEER does not recommend that cables will not obstruct driving. ! The black cable is extremely dangerous to allow any... (output value) and between 4 W to work properly. Ensure that it could result in fire, generation of your display unit yourself. Installing or servicing the product may eventually cause the insulation to fail at this unit or power amp (sold separately), make sure to 3 ...
Owner's Manual
Page 76
...ground. - Doing so may result in order to connect connectors of the rating prescribed. - To prevent a short-circuit, overheating or malfunction, be installed in battery drain or a malfunction. ! Place all cables away from moving parts, such as near the heater outlet. - Do not connect the yellow...unit is equipped with other devices. Place all cables away from hot places, such as the gear shift and seat rails. - Section 17 Installation Important ! Use a fuse of the same color. 76 En IP-BUS connectors are sent through the hole to follow the directions below. ...
...ground. - Doing so may result in order to connect connectors of the rating prescribed. - To prevent a short-circuit, overheating or malfunction, be installed in battery drain or a malfunction. ! Place all cables away from moving parts, such as near the heater outlet. - Do not connect the yellow...unit is equipped with other devices. Place all cables away from hot places, such as the gear shift and seat rails. - Section 17 Installation Important ! Use a fuse of the same color. 76 En IP-BUS connectors are sent through the hole to follow the directions below. ...

Owner's Manual
Page 77
Installation Section 17 Installation En 77
Installation Section 17 Installation En 77
Owner's Manual
Page 78
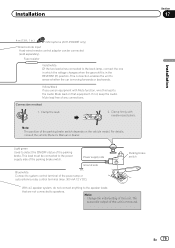
.../black leads of this unit. Microphone input (AVH-P3300BT only) (AVH-P4300DVD only) Yellow Connect to Green and Green/black leads. Do not connect anything to the constant 12 V supply terminal. Not used. RGB input Antenna input AUX jack (3.5 ø) (AVH-P4300DVD only) Fuse (10 A) Use a ...mini plug cable to terminal controlled by ignition switch (12 V DC). Fuse resistor Red Connect to connect with Navigation unit) Insert the 26 pin cable in the direction indicated in the figure. Section 17 Installation Connecting the power ...
.../black leads of this unit. Microphone input (AVH-P3300BT only) (AVH-P4300DVD only) Yellow Connect to Green and Green/black leads. Do not connect anything to the constant 12 V supply terminal. Not used. RGB input Antenna input AUX jack (3.5 ø) (AVH-P4300DVD only) Fuse (10 A) Use a ...mini plug cable to terminal controlled by ignition switch (12 V DC). Fuse resistor Red Connect to connect with Navigation unit) Insert the 26 pin cable in the direction indicated in the figure. Section 17 Installation Connecting the power ...
Owner's Manual
Page 79
...'s Manual or dealer. The subwoofer output of any connections. Installation Section 17 Installation 4 m (13 ft. 1 in the REVERSE (R) position. Connection method 1. Light green Used to the back lamp, connect the one in which the voltage changes when the gear shift is in .) Microphone (AVH-P3300BT only) Wired remote input Hard-wired remote control adaptor...
...'s Manual or dealer. The subwoofer output of any connections. Installation Section 17 Installation 4 m (13 ft. 1 in the REVERSE (R) position. Connection method 1. Light green Used to the back lamp, connect the one in which the voltage changes when the gear shift is in .) Microphone (AVH-P3300BT only) Wired remote input Hard-wired remote control adaptor...
Owner's Manual
Page 80
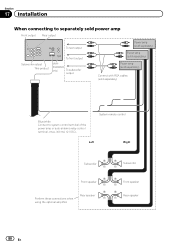
Section 17 Installation When connecting to system control terminal of the power amp or auto-antenna relay control terminal. (max. 300 mA 12 V DC). System remote control Left ... cables (sold separately) Blue/white Connect to separately sold power amp Front output Rear output To rear output Subwoofer output This product To front output (AVH-
Section 17 Installation When connecting to system control terminal of the power amp or auto-antenna relay control terminal. (max. 300 mA 12 V DC). System remote control Left ... cables (sold separately) Blue/white Connect to separately sold power amp Front output Rear output To rear output Subwoofer output This product To front output (AVH-
Owner's Manual
Page 81
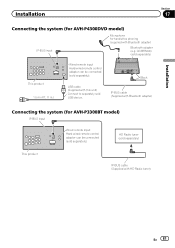
... this unit) Connect to separately sold separately) This product IP-BUS cable (Supplied with Bluetooth adapter) Bluetooth adapter (e.g. Installation Section 17 Connecting the system (for AVH-P4300DVD model) IP-BUS input Microphone for AVH-P3300BT model) IP-BUS input Wired remote input Hard-wired remote control adaptor can be connected (sold separately). CD-BTB200...
... this unit) Connect to separately sold separately) This product IP-BUS cable (Supplied with Bluetooth adapter) Bluetooth adapter (e.g. Installation Section 17 Connecting the system (for AVH-P4300DVD model) IP-BUS input Microphone for AVH-P3300BT model) IP-BUS input Wired remote input Hard-wired remote control adaptor can be connected (sold separately). CD-BTB200...
Owner's Manual
Page 82
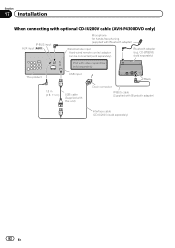
CD-BTB200) (sold separately) iPod with video capabilities (sold separately) This product USB input Black 1.5 m (4 ft. 11 in.) USB cable (Supplied with this unit) Dock connector IP-BUS cable (Supplied with Bluetooth adapter) Wired remote input Hard-wired remote control adaptor can be connected (sold separately) 82 En Section 17 Installation When connecting with optional CD-IU200V cable (AVH-P4300DVD only) IP-BUS input AUX input (AUX) Microphone for hands-free phoning (supplied with Bluetooth adapter) Interface cable (CD-IU200V) (sold separately). Bluetooth adapter (e.g.
CD-BTB200) (sold separately) iPod with video capabilities (sold separately) This product USB input Black 1.5 m (4 ft. 11 in.) USB cable (Supplied with this unit) Dock connector IP-BUS cable (Supplied with Bluetooth adapter) Wired remote input Hard-wired remote control adaptor can be connected (sold separately) 82 En Section 17 Installation When connecting with optional CD-IU200V cable (AVH-P4300DVD only) IP-BUS input AUX input (AUX) Microphone for hands-free phoning (supplied with Bluetooth adapter) Interface cable (CD-IU200V) (sold separately). Bluetooth adapter (e.g.
Owner's Manual
Page 83
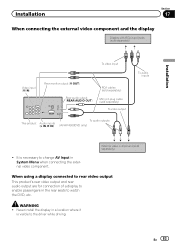
...External video component (sold separately) To video output To audio outputs This product Audio inputs (L IN, R IN) (AVH-P4300DVD only) To audio inputs ! WARNING ! En 83 Never install the display in a location where it is necessary to change AV Input in the rear seats to watch the DVD..., etc. Installation Section 17 When connecting the external video component and the display Display with RCA input jacks (sold separately) Installation To video input Video input (V IN) Rear monitor output (V OUT) Rear audio ...
...External video component (sold separately) To video output To audio outputs This product Audio inputs (L IN, R IN) (AVH-P4300DVD only) To audio inputs ! WARNING ! En 83 Never install the display in a location where it is necessary to change AV Input in the rear seats to watch the DVD..., etc. Installation Section 17 When connecting the external video component and the display Display with RCA input jacks (sold separately) Installation To video input Video input (V IN) Rear monitor output (V OUT) Rear audio ...
Owner's Manual
Page 84
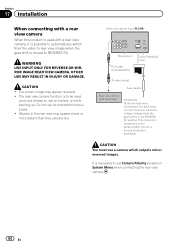
...changes when the gear shift is in which outputs mirror reversed images. Rear view camera input (R.C IN) This product RCA cable (sold separately) (AVH-P4300DVD only) To video output Fuse resistor Rear view camera (sold separately) Violet/white Of the two lead wires connected to the back lamp, ...connect the one in the REVERSE (R) position. Section 17 Installation When connecting with a rear view camera, it is possible to automatically switch from the video to rear view image when the gear shift is moved...
...changes when the gear shift is in which outputs mirror reversed images. Rear view camera input (R.C IN) This product RCA cable (sold separately) (AVH-P4300DVD only) To video output Fuse resistor Rear view camera (sold separately) Violet/white Of the two lead wires connected to the back lamp, ...connect the one in the REVERSE (R) position. Section 17 Installation When connecting with a rear view camera, it is possible to automatically switch from the video to rear view image when the gear shift is moved...


