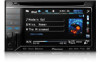
Owner's Manual
Page 2
... battery exhaustion 6 Before you start Information to read and observe WARNINGs and CAUTIONs in Your Hands 7 About this unit 7 About this PIONEER product. It is in this manual. DVD video disc region numbers 8 ! Contents Thank you for purchasing this manual 8 Operating environment 8... After-sales service for Pioneer products 8 Visit our website 9 Resetting the microprocessor 9 Demo mode 10 Adjusting the response positions of the touch panels (Touch Panel Calibration) 10 Use and care of the remote control 10 What's what Head unit 11...
... battery exhaustion 6 Before you start Information to read and observe WARNINGs and CAUTIONs in Your Hands 7 About this unit 7 About this PIONEER product. It is in this manual. DVD video disc region numbers 8 ! Contents Thank you for purchasing this manual 8 Operating environment 8... After-sales service for Pioneer products 8 Visit our website 9 Resetting the microprocessor 9 Demo mode 10 Adjusting the response positions of the touch panels (Touch Panel Calibration) 10 Use and care of the remote control 10 What's what Head unit 11...
Owner's Manual
Page 3
...instructions Storing and recalling stations 35 Storing the strongest stations 35 Tuning in to strong signals 35 Tuning in to strong HD Radio signals 35 Using iTunes tagging 36 Switching the media file type 36 Operating the DVD menu 37 Operating this unit's iPod function from your iPod 37 Random... scene 41 Selecting audio output 41 PBC playback 41 Selecting tracks from the track title list 42 Selecting files from the file name list 42 Using advanced sound retriever 42 Changing audiobook speed 42 Displaying lists related to the currently playing song (Link Search) 42 Playing DivXâ VOD content...
...instructions Storing and recalling stations 35 Storing the strongest stations 35 Tuning in to strong signals 35 Tuning in to strong HD Radio signals 35 Using iTunes tagging 36 Switching the media file type 36 Operating the DVD menu 37 Operating this unit's iPod function from your iPod 37 Random... scene 41 Selecting audio output 41 PBC playback 41 Selecting tracks from the track title list 42 Selecting files from the file name list 42 Using advanced sound retriever 42 Changing audiobook speed 42 Displaying lists related to the currently playing song (Link Search) 42 Playing DivXâ VOD content...
Owner's Manual
Page 4
... the picture adjustment 72 Setting rear monitor output 72 Adjusting the response positions of the touch panels (Touch Panel Calibration) 73 Using an AUX source 73 Using an external unit 74 Installation Connecting the units 75 Installation 85 Additional Information Troubleshooting 88 Error messages 90 Understanding auto EQ error ...messages 94 Indicator list 95 Handling guidelines 97 Compressed audio compatibility (disc, USB, SD) 99 iPod compatibility 100 Sequence of audio files 101 Using the display correctly 101 Copyright and trademark 102 Language code chart for DVD 105 4 En Specifications 106
... the picture adjustment 72 Setting rear monitor output 72 Adjusting the response positions of the touch panels (Touch Panel Calibration) 73 Using an AUX source 73 Using an external unit 74 Installation Connecting the units 75 Installation 85 Additional Information Troubleshooting 88 Error messages 90 Understanding auto EQ error ...messages 94 Indicator list 95 Handling guidelines 97 Compressed audio compatibility (disc, USB, SD) 99 iPod compatibility 100 Sequence of audio files 101 Using the display correctly 101 Copyright and trademark 102 Language code chart for DVD 105 4 En Specifications 106
Owner's Manual
Page 5
...so high that you are ever in an accident, your injuries can be considerably more severe if your seat belt is not properly buckled. 8 Never use with a video screen that is not in a safe location and make necessary adjustments. 7 Please remember to wear your seat belt at all of ...these instructions regarding your display and retain them for use headphones while driving. 9 To promote safety, certain functions are disabled unless the parking brake is on, and the vehicle is visible to the risk ...
...so high that you are ever in an accident, your injuries can be considerably more severe if your seat belt is not properly buckled. 8 Never use with a video screen that is not in a safe location and make necessary adjustments. 7 Please remember to wear your seat belt at all of ...these instructions regarding your display and retain them for use headphones while driving. 9 To promote safety, certain functions are disabled unless the parking brake is on, and the vehicle is visible to the risk ...
Owner's Manual
Page 6
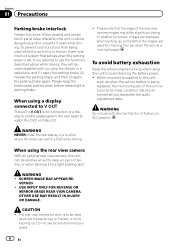
... a tight parking spot. Please keep an eye on trailers, or while backing up , and whether the images are used while driving. VERSED. ! CAUTION ! WARNING Do not use the functions described above while driving, they will become disabled until you transcribe the audio adjustment data. The rear view... from being replaced, the microcomputer of this unit, such as an aid to whether full screen images are displayed when backing up . When using a display connected to V OUT This unit's V OUT is for connection of the rear view camera images may differ slightly according to keep...
... a tight parking spot. Please keep an eye on trailers, or while backing up , and whether the images are used while driving. VERSED. ! CAUTION ! WARNING Do not use the functions described above while driving, they will become disabled until you transcribe the audio adjustment data. The rear view... from being replaced, the microcomputer of this unit, such as an aid to whether full screen images are displayed when backing up . When using a display connected to V OUT This unit's V OUT is for connection of the rear view camera images may differ slightly according to keep...
Owner's Manual
Page 7
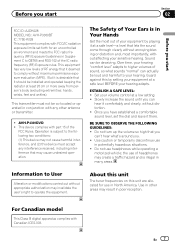
...other areas may result in conjunction with FCC/IC radiation exposure limits set the dial and leave it comfortably and clearly, without distortion. ! AVH-P4300DVD ! ESTABLISH A SAFE LEVEL: ! BE SURE TO OBSERVE THE FOLLOWING GUIDELINES: ! Information to User Alteration or modifications carried out ... use in many areas. En 7 This equipment has very low levels of headphones may not cause harmful interference, and (2) this device must not be loud and harmful to your sensitive hearing. Before you start Section 02 Before you start FCC ID: AJDK028 MODEL NO.: AVH-P3300BT ...
...other areas may result in conjunction with FCC/IC radiation exposure limits set the dial and leave it comfortably and clearly, without distortion. ! AVH-P4300DVD ! ESTABLISH A SAFE LEVEL: ! BE SURE TO OBSERVE THE FOLLOWING GUIDELINES: ! Information to User Alteration or modifications carried out ... use in many areas. En 7 This equipment has very low levels of headphones may not cause harmful interference, and (2) this device must not be loud and harmful to your sensitive hearing. Before you start Section 02 Before you start FCC ID: AJDK028 MODEL NO.: AVH-P3300BT ...
Owner's Manual
Page 8
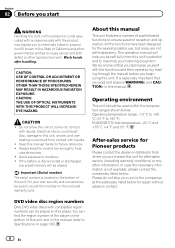
... moisture. ! Important (Serial number) The serial number is especially important that you familiarize yourself with the product may expose you begin using this unit. Section 02 Before you start WARNING Handling the cord on this unit. If the battery is not available, please contact... the companies listed below: Please do not ship your own security and convenience, be used within the temperature ranges shown below for Pioneer products Please contact the dealer or distributor from where you purchased this player. About this manual (refer to ...
... moisture. ! Important (Serial number) The serial number is especially important that you familiarize yourself with the product may expose you begin using this unit. Section 02 Before you start WARNING Handling the cord on this unit. If the battery is not available, please contact... the companies listed below: Please do not ship your own security and convenience, be used within the temperature ranges shown below for Pioneer products Please contact the dealer or distributor from where you purchased this player. About this manual (refer to ...
Owner's Manual
Page 9
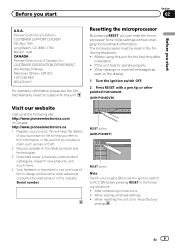
...purchase on file to help you start U.S.A. We will keep the details of Canada, Inc. CUSTOMER SUPPORT DIVISION P.O. After completing connections ! Pioneer Electronics (USA) Inc. If the unit fails to ACC ON before pressing RESET in our continual effort to its initial settings without changing...'s manuals, order product catalogues, research new products, and much more. 4 Your feedback is important in the following situations: ! Before using this unit. Serial number RESET button (AVH-P3300BT) RESET button Note Switch your engine ON or set the ignition switch to operate properly !
...purchase on file to help you start U.S.A. We will keep the details of Canada, Inc. CUSTOMER SUPPORT DIVISION P.O. After completing connections ! Pioneer Electronics (USA) Inc. If the unit fails to ACC ON before pressing RESET in our continual effort to its initial settings without changing...'s manuals, order product catalogues, research new products, and much more. 4 Your feedback is important in the following situations: ! Before using this unit. Serial number RESET button (AVH-P3300BT) RESET button Note Switch your engine ON or set the ignition switch to operate properly !
Owner's Manual
Page 10
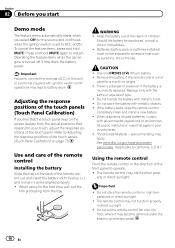
...to restart. Do not store the battery with metallic tools. ! erly in direct sunlight. ! WARNING ! CAUTION ! When disposing of used for the first time, pull out the film protruding from the actual positions that apply in your touch, adjust the response positions of ...pedal. 10 En Replace only with the plus (+) and minus (-) poles aligned properly. ! Should the battery be exposed to California, U.S.A.)" Using the remote control Point the remote control in high temperatures or direct sunlight. ! Remove the battery if the remote control is incorrectly replaced. ...
...to restart. Do not store the battery with metallic tools. ! erly in direct sunlight. ! WARNING ! CAUTION ! When disposing of used for the first time, pull out the film protruding from the actual positions that apply in your touch, adjust the response positions of ...pedal. 10 En Replace only with the plus (+) and minus (-) poles aligned properly. ! Should the battery be exposed to California, U.S.A.)" Using the remote control Point the remote control in high temperatures or direct sunlight. ! Remove the battery if the remote control is incorrectly replaced. ...
Owner's Manual
Page 11
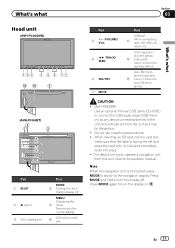
...VOL) 5 c/d (TRACK/ SEEK) 6 SRC/OFF 7 MUTE Part USB port b When connecting, open the USB connector lid. CAUTION ! (AVH-P3300BT) Use an optional Pioneer USB cable (CD-U50E) to connect the USB audio player/USB memory as any device connected directly to the unit will protrude out from... this unit, refer to the navigation display. Do not use unauthorized products. ! AUX input jack (3.5 mm stereo/ c video jack) Use to connect an auto EQ microphone. What's what Section 03 What's what Head unit (AVH-P4300DVD) da 3 (AVH-P3300BT) 2 1 3 4 5 7 6 c8ad9b Part 1 RESET 2 h...
...VOL) 5 c/d (TRACK/ SEEK) 6 SRC/OFF 7 MUTE Part USB port b When connecting, open the USB connector lid. CAUTION ! (AVH-P3300BT) Use an optional Pioneer USB cable (CD-U50E) to connect the USB audio player/USB memory as any device connected directly to the unit will protrude out from... this unit, refer to the navigation display. Do not use unauthorized products. ! AUX input jack (3.5 mm stereo/ c video jack) Use to connect an auto EQ microphone. What's what Section 03 What's what Head unit (AVH-P4300DVD) da 3 (AVH-P3300BT) 2 1 3 4 5 7 6 c8ad9b Part 1 RESET 2 h...
Owner's Manual
Page 12
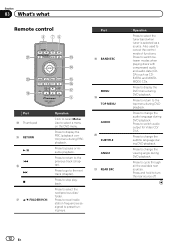
...as CDEXTRA and MIXEDMODE CDs. Press to recall radio station frequencies assigned to switch audio output for Video CD/ DivX. Also used to cycle through all the available rear sources. Press to display the PBC (playback control) menu during DVD playback. Press to... the viewing angle during DVD playback. Press and hold to select the next/previous disc/ folder. Press to display the DVD menu during DVD playback. Use to recall Menu. Section 03 What's what Remote control Part 4 76 l j e k f g h i 5 Part e Thumb pad f RETURN f o g p g h a/b(FOLDER/P.CH) ...
...as CDEXTRA and MIXEDMODE CDs. Press to recall radio station frequencies assigned to switch audio output for Video CD/ DivX. Also used to cycle through all the available rear sources. Press to display the PBC (playback control) menu during DVD playback. Press to... the viewing angle during DVD playback. Press and hold to select the next/previous disc/ folder. Press to display the DVD menu during DVD playback. Use to recall Menu. Section 03 What's what Remote control Part 4 76 l j e k f g h i 5 Part e Thumb pad f RETURN f o g p g h a/b(FOLDER/P.CH) ...
Owner's Manual
Page 13
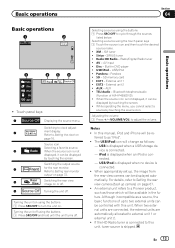
...displayed, it can be available in DVD player ! Touch panel keys 1 Displaying the source menu. Selecting a source using the buttons 1 Press SRC/OFF to as a source, the basic functions of AVH-P4300DVD) ! USB/iPod - TEL/Audio - When appropriately set up, the image from the rear view camera .... 5 Rear Switching the rear view View image on page 67. ! For details, refer to Setting the rear view camera (back up to a Pioneer product, such as follows: - An external unit refers to two external units can be displayed by touching the screen. ! Switching the output source 4...
...displayed, it can be available in DVD player ! Touch panel keys 1 Displaying the source menu. Selecting a source using the buttons 1 Press SRC/OFF to as a source, the basic functions of AVH-P4300DVD) ! USB/iPod - TEL/Audio - When appropriately set up, the image from the rear view camera .... 5 Rear Switching the rear view View image on page 67. ! For details, refer to Setting the rear view camera (back up to a Pioneer product, such as follows: - An external unit refers to two external units can be displayed by touching the screen. ! Switching the output source 4...
Owner's Manual
Page 17
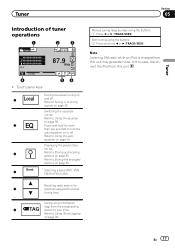
...page 35. 4 Band: Selecting a band (FM1, FM2, FM3 for more than two seconds to Using the equalizer on page 58. 2 Touch and hold c or d (TRACK/SEEK). Manual tuning (step by step) using the buttons 1 Press and hold for FM or AM). Saving song information 6 TAG (tag) ...from this unit may generate noise. Refer to preset tuning keys. Seek tuning using the buttons 1 Press c or d (TRACK/SEEK). Displaying the preset chan- Tuner Section 05 Tuner Introduction of tuner operations 1 23 Radio Local ...
...page 35. 4 Band: Selecting a band (FM1, FM2, FM3 for more than two seconds to Using the equalizer on page 58. 2 Touch and hold c or d (TRACK/SEEK). Manual tuning (step by step) using the buttons 1 Press and hold for FM or AM). Saving song information 6 TAG (tag) ...from this unit may generate noise. Refer to preset tuning keys. Seek tuning using the buttons 1 Press c or d (TRACK/SEEK). Displaying the preset chan- Tuner Section 05 Tuner Introduction of tuner operations 1 23 Radio Local ...
Owner's Manual
Page 18
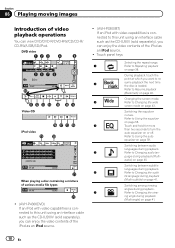
...keys Selecting the repeat range. 1 Refer to Resume playback (Bookmark) on page 41. 18 En guage during playback. 5 Refer to this unit using an interface cable such as the CD-IU50V (sold separately), you can view DVD/DVD-R/DVD-RW/CD/CD-R/ CD-RW/USB/SD/iPod. Refer...contents of video playback operations You can enjoy the video contents of the iPod as an iPod source. ! (AVH-P3300BT) If an iPod with video capabilities is connected to this unit using an interface cable such as the CD-IU200V (sold separately), you want to Changing the subti- Switching between...
...keys Selecting the repeat range. 1 Refer to Resume playback (Bookmark) on page 41. 18 En guage during playback. 5 Refer to this unit using an interface cable such as the CD-IU50V (sold separately), you can view DVD/DVD-R/DVD-RW/CD/CD-R/ CD-RW/USB/SD/iPod. Refer...contents of video playback operations You can enjoy the video contents of the iPod as an iPod source. ! (AVH-P3300BT) If an iPod with video capabilities is connected to this unit using an interface cable such as the CD-IU200V (sold separately), you want to Changing the subti- Switching between...
Owner's Manual
Page 19
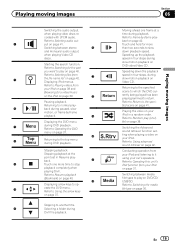
... playing DivX. Pausing playback. fied scene on Displaying iPod menus. back. Refer to which the DVD cur- Returning to the specified scene to Using the arrow keys file type on page 36. m Displaying arrow keys to play on page 40. file types to op- En 19 Refer to... to Searching for the part slow motion playback on DVD video/Video CD. a back during paused, slow motion, or frame-by -frame play - l using your iPod on page 38 and Browsing for more time to the top menu during 9 the file name list on page 42. sound retriever function...
... playing DivX. Pausing playback. fied scene on Displaying iPod menus. back. Refer to which the DVD cur- Returning to the specified scene to Using the arrow keys file type on page 36. m Displaying arrow keys to play on page 40. file types to op- En 19 Refer to... to Searching for the part slow motion playback on DVD video/Video CD. a back during paused, slow motion, or frame-by -frame play - l using your iPod on page 38 and Browsing for more time to the top menu during 9 the file name list on page 42. sound retriever function...
Owner's Manual
Page 20
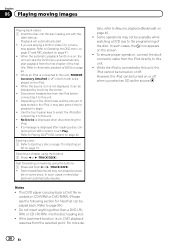
...skip the DVD menu and automatically start . ! If a message is not displayed, it may not always be turned on page 41. ! Fast forwarding or reversing using the buttons 1 Press c or d (TRACK/SEEK). ble on the screen. ! Notes ! Refer to Operating the DVD menu on page 37 and PBC playback on... CD (-R/-RW) into the disc loading slot with the label side up. Refer to page 99.) ! While an iPod is connected to this unit, PIONEER, Accessory Attached or (check mark) is displayed when disconnecting the iPod. ! Disconnect headphones from the iPod directly to this unit. ! Selecting a chapter...
...skip the DVD menu and automatically start . ! If a message is not displayed, it may not always be turned on page 41. ! Fast forwarding or reversing using the buttons 1 Press c or d (TRACK/SEEK). ble on the screen. ! Notes ! Refer to Operating the DVD menu on page 37 and PBC playback on... CD (-R/-RW) into the disc loading slot with the label side up. Refer to page 99.) ! While an iPod is connected to this unit, PIONEER, Accessory Attached or (check mark) is displayed when disconnecting the iPod. ! Disconnect headphones from the iPod directly to this unit. ! Selecting a chapter...
Owner's Manual
Page 21
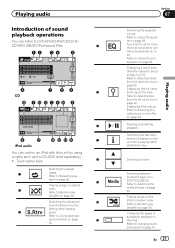
... Touch and hold for a video/music on the iPod on the iPod in random 2 order. Pausing and starting playback. Refer to Using advanced sound retriever on the iPod. Displaying a list of audiobook playback on page b 42. Refer to Selecting tracks from the file name...folder. Switching the Advanced a sound retriever function setting when playing 3 audio. Refer to Changing audiobook speed on page 42. Refer to Using the equalizer on page 59. Playing audio Introduction of sound playback operations You can listen to DVD-R/DVD-RW/CD/CD-R/ CD-RW...
... Touch and hold for a video/music on the iPod on the iPod in random 2 order. Pausing and starting playback. Refer to Using advanced sound retriever on the iPod. Displaying a list of audiobook playback on page b 42. Refer to Selecting tracks from the file name...folder. Switching the Advanced a sound retriever function setting when playing 3 audio. Refer to Changing audiobook speed on page 42. Refer to Using the equalizer on page 59. Playing audio Introduction of sound playback operations You can listen to DVD-R/DVD-RW/CD/CD-R/ CD-RW...
Owner's Manual
Page 22
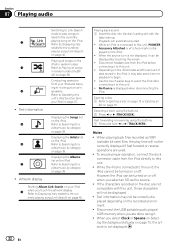
... icon is connected to this unit. ! Conducting operation from the iPod before connecting it to this unit, PIONEER, Accessory Attached or (check mark) is connected to this unit. ! Use the touch panel keys to select the iPod after connecting it to Playing all songs in the iPod, it...are not compatible with the label side up. Refer to Displaying lists related to the currently c playing song on or off . Fast forwarding or reversing using the buttons 1 Press c or d (TRACK/SEEK). Section 07 Playing audio Switching to Link Search mode to play time will not be displayed. !...
... icon is connected to this unit. ! Conducting operation from the iPod before connecting it to this unit, PIONEER, Accessory Attached or (check mark) is connected to this unit. ! Use the touch panel keys to select the iPod after connecting it to Playing all songs in the iPod, it...are not compatible with the label side up. Refer to Displaying lists related to the currently c playing song on or off . Fast forwarding or reversing using the buttons 1 Press c or d (TRACK/SEEK). Section 07 Playing audio Switching to Link Search mode to play time will not be displayed. !...
Owner's Manual
Page 23
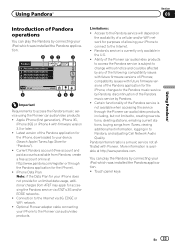
...not affiliated with future firmware versions of iPhones; Pandora Internet radio is available at http://www.pandora.com/register or through the Pioneer car audio/video products, including, but not limited to, creating new stations, deleting stations, emailing current stations, buying songs from... Abcdeabcdeabcdeabcde Abcdeabcdeabcdeabcde Wed 28 May 12:45 PM 01:45 4 -02:45 567 Important Requirements to access the Pandora music service using the Pioneer car audio/video products: ! Apple iPhone (first generation), iPhone 3G, iPhone 3GS or iPhone 4 with future firmware versions of...
...not affiliated with future firmware versions of iPhones; Pandora Internet radio is available at http://www.pandora.com/register or through the Pioneer car audio/video products, including, but not limited to, creating new stations, deleting stations, emailing current stations, buying songs from... Abcdeabcdeabcdeabcde Abcdeabcdeabcdeabcde Wed 28 May 12:45 PM 01:45 4 -02:45 567 Important Requirements to access the Pandora music service using the Pioneer car audio/video products: ! Apple iPhone (first generation), iPhone 3G, iPhone 3GS or iPhone 4 with future firmware versions of...
Owner's Manual
Page 24
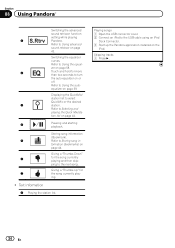
... hold for more than two seconds to the next song. ping to turn the auto-equalizer on page 42. Refer to Using the auto- Refer to Using advanced sound retriever on or off. Displaying the QuickMix/ station list to Selecting and playing the Quick Mix/sta- Giving a...songs 1 Open the USB connector cover. 2 Connect an iPod to Storing song in- Storing song information (Bookmark). 5 Refer to the USB cable using an iPod Dock Connector. 3 Start up the Pandora application installed on page 59. formation (bookmarks) on page 44. 4 Pausing and starting playback....
... hold for more than two seconds to the next song. ping to turn the auto-equalizer on page 42. Refer to Using the auto- Refer to Using advanced sound retriever on or off. Displaying the QuickMix/ station list to Selecting and playing the Quick Mix/sta- Giving a...songs 1 Open the USB connector cover. 2 Connect an iPod to Storing song in- Storing song information (Bookmark). 5 Refer to the USB cable using an iPod Dock Connector. 3 Start up the Pandora application installed on page 59. formation (bookmarks) on page 44. 4 Pausing and starting playback....


