User Guide
Page 4
...to the following : Philips Consumer Electronics Company One Philips Drive Knoxville, TN 37914 Telephone (1888) 873-4672 IMPORTANT Digital Light Processing, DLP, Digital Micromirror Device ... trademarks in this multimedia projector is encouraged to try to radio communications. 1. Projector Features 6 5. Operation 15-21 Preparation 15 Menu structure - UGO X-lite or S-lite (resp. VGA Cable ... XGA or SVGA) projector - Consult the dealer or an experienced radio/TV technician for more of the following items are trademarks of the projector 9 Moving the projector 9 Inserting ...
...to the following : Philips Consumer Electronics Company One Philips Drive Knoxville, TN 37914 Telephone (1888) 873-4672 IMPORTANT Digital Light Processing, DLP, Digital Micromirror Device ... trademarks in this multimedia projector is encouraged to try to radio communications. 1. Projector Features 6 5. Operation 15-21 Preparation 15 Menu structure - UGO X-lite or S-lite (resp. VGA Cable ... XGA or SVGA) projector - Consult the dealer or an experienced radio/TV technician for more of the following items are trademarks of the projector 9 Moving the projector 9 Inserting ...
User Guide
Page 5
... openings must not be placed in a built-in chapter 'Maintenance'. This projector has been engineered and manufactured to clean the projector unit. Unplug the projector from the wall outlet before you follow the manufacturer's instructions. 7. Do not use attachments not recommended by PHILIPS, as this can perform many products, because this may damage your...
... openings must not be placed in a built-in chapter 'Maintenance'. This projector has been engineered and manufactured to clean the projector unit. Unplug the projector from the wall outlet before you follow the manufacturer's instructions. 7. Do not use attachments not recommended by PHILIPS, as this can perform many products, because this may damage your...
User Guide
Page 6
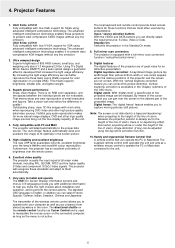
...mouse cursor on the connected computer, as long as your projector from almost anywhere in the 'Display' submenu of great value for XGA using the key-stone correction function. 10. UGO X-lite; UGO S-lite; Ultra compact design Superior brightness of vision. This means ...In addition you can select French, Spanish, German, Italian, Swedish, Chinese and Japanese. Projector Features 1. LC5131 Fully compatible with true XGA; Digital zoom; Excellent video quality The projector accepts the input signal of small characters and figures. Digital features The digital features of ...
...mouse cursor on the connected computer, as long as your projector from almost anywhere in the 'Display' submenu of great value for XGA using the key-stone correction function. 10. UGO X-lite; UGO S-lite; Ultra compact design Superior brightness of vision. This means ...In addition you can select French, Spanish, German, Italian, Swedish, Chinese and Japanese. Projector Features 1. LC5131 Fully compatible with true XGA; Digital zoom; Excellent video quality The projector accepts the input signal of small characters and figures. Digital features The digital features of ...
User Guide
Page 7
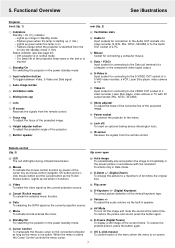
...the built-in speaker. fi AV Mute To turn off the image and mute the sound at the same time. 5. Flashes orange when the projector is active the Cursor Control controls the menu cursor. fl D-Freeze (Digital Freeze) To display a still image of ten times the original size... - Flashes green when the lamp is not active. To restore the picture and sound, press the button again. • Standby/On For switching the projector in the power standby mode. 3 Input selection button To toggle between Video, S-Video and Data signal. 4 Auto image button 5 Ventilation slots 6 Sliding...
...the built-in speaker. fi AV Mute To turn off the image and mute the sound at the same time. 5. Flashes orange when the projector is active the Cursor Control controls the menu cursor. fl D-Freeze (Digital Freeze) To display a still image of ten times the original size... - Flashes green when the lamp is not active. To restore the picture and sound, press the button again. • Standby/On For switching the projector in the power standby mode. 3 Input selection button To toggle between Video, S-Video and Data signal. 4 Auto image button 5 Ventilation slots 6 Sliding...
User Guide
Page 8
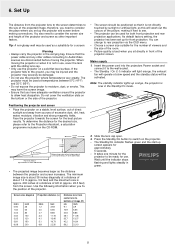
...the exhaust fan will operate at slow speed and the standby status will wash out the colours of the projector screen. Positioning the projector and screen • Place the projector on a solid flat level surface. Use the following information when you sit directly in the Standby/On ....3 feet) from center of lens to lower edge of excessive dust, dirt, heat, water, moisture, vibration and strong magnetic fields. The projector must be used as this will be ready for the best picture results. Wait until the indicator stops flashing and lights steadily in the carrying...
...the exhaust fan will operate at slow speed and the standby status will wash out the colours of the projector screen. Positioning the projector and screen • Place the projector on a solid flat level surface. Use the following information when you sit directly in the Standby/On ....3 feet) from center of lens to lower edge of excessive dust, dirt, heat, water, moisture, vibration and strong magnetic fields. The projector must be used as this will be ready for the best picture results. Wait until the indicator stops flashing and lights steadily in the carrying...
User Guide
Page 9
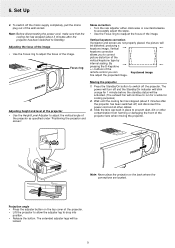
...on the back where the connections are not properly placed, the picture will be distorted, producing a keystone image. Vertical keystone correction If projector and screen are located. The power will turn off ) and disconnect the power cord and all other contamination from harming or damaging the... front of the projector. • Lift the projector to allow the adjuster leg to run for a while for cooling purposes) 2. Press the Standby/On button to readjust the ...
...on the back where the connections are not properly placed, the picture will be distorted, producing a keystone image. Vertical keystone correction If projector and screen are located. The power will turn off ) and disconnect the power cord and all other contamination from harming or damaging the... front of the projector. • Lift the projector to allow the adjuster leg to run for a while for cooling purposes) 2. Press the Standby/On button to readjust the ...
User Guide
Page 10
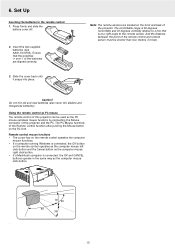
... functions of the Remote Control function after pushing the Mouse button on the front and back of this projector and the PC. 6. Using the remote control as PC mouse The remote control of the projector. Slide the cover back until it snaps into place. Set Up Inserting the batteries in the same... off. 2. Status Standby/On y Input Auto image OPEN 30˚ 50˚ 50˚ 30˚ , 10 And the distance between the point of this projector can be shorter than four meters (13 feet).
... functions of the Remote Control function after pushing the Mouse button on the front and back of this projector and the PC. 6. Using the remote control as PC mouse The remote control of the projector. Slide the cover back until it snaps into place. Set Up Inserting the batteries in the same... off. 2. Status Standby/On y Input Auto image OPEN 30˚ 50˚ 50˚ 30˚ , 10 And the distance between the point of this projector can be shorter than four meters (13 feet).
User Guide
Page 11
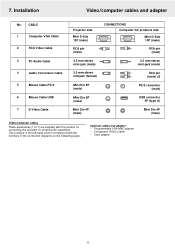
... No. Component (YCbCr) cable - CABLE 1 Computer VGA Cable 2 RCA Video Cable 3 PC Audio Cable 4 Audio Conversion Cable 5 Mouse Cable PS/2 6 Mouse Cable USB 7 S-Video Cable Projector side Mini D-Sub 15P (male) RCA pin (male) CONNECTIONS Computer/AV products side Mini D-Sub 15P (male) RCA pin (male) 3.5 mm stereo mini-jack (male... 4P (male) Video/computer cables These accessories (1 to 7) are supplied with the numbers in the left-hand column correspond with the product for connecting the projector to computer/AV equipment.
... No. Component (YCbCr) cable - CABLE 1 Computer VGA Cable 2 RCA Video Cable 3 PC Audio Cable 4 Audio Conversion Cable 5 Mouse Cable PS/2 6 Mouse Cable USB 7 S-Video Cable Projector side Mini D-Sub 15P (male) RCA pin (male) CONNECTIONS Computer/AV products side Mini D-Sub 15P (male) RCA pin (male) 3.5 mm stereo mini-jack (male... 4P (male) Video/computer cables These accessories (1 to 7) are supplied with the numbers in the left-hand column correspond with the product for connecting the projector to computer/AV equipment.
User Guide
Page 12
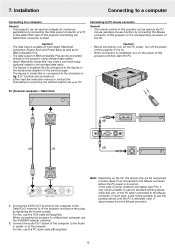
...by tightening the thumb screws. The figures in brackets like # correspond to the characters in circles like (1) correspond to the Data/YCbCr jack of the projector. The figures in fig. 2 of IBM compatible PCs can be used as a display for IBM compatible PCs. - Caution! - The data output ... connector before the PC power is on the previous page. The remote control of this , use the VGA/MAC adapter (optional). 2. For this projector can be possible to set your PC. Caution! - Before connecting, turn on the PC, the mouse may need a conversion plug (optional) added...
...by tightening the thumb screws. The figures in brackets like # correspond to the characters in circles like (1) correspond to the Data/YCbCr jack of the projector. The figures in fig. 2 of IBM compatible PCs can be used as a display for IBM compatible PCs. - Caution! - The data output ... connector before the PC power is on the previous page. The remote control of this , use the VGA/MAC adapter (optional). 2. For this projector can be possible to set your PC. Caution! - Before connecting, turn on the PC, the mouse may need a conversion plug (optional) added...
User Guide
Page 13
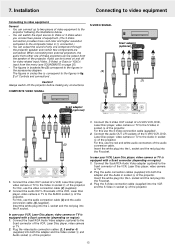
... white plug into the L socket and the red plug into the R socket. You can switch the input source to the Audio in socket ^ of the projector. COMPOSITE VIDEO SIGNAL S-VIDEO SIGNAL (3) Scart adapter (optional) (7) (4) Scart adapter (optional) # Audio in Mouse Data / YCbCr ^ S-Video in Video in... (3) (2) (4) # Audio in Mouse Data / YCbCr & S-Video in Video in socket & of the projector. For this use the audio connection cable (3) and the audio conversion cable (4) (supplied). In case your VCR, Laser Disc player, video camera or TV is...
... white plug into the L socket and the red plug into the R socket. You can switch the input source to the Audio in socket ^ of the projector. COMPOSITE VIDEO SIGNAL S-VIDEO SIGNAL (3) Scart adapter (optional) (7) (4) Scart adapter (optional) # Audio in Mouse Data / YCbCr ^ S-Video in Video in... (3) (2) (4) # Audio in Mouse Data / YCbCr & S-Video in Video in socket & of the projector. For this use the audio connection cable (3) and the audio conversion cable (4) (supplied). In case your VCR, Laser Disc player, video camera or TV is...
User Guide
Page 14
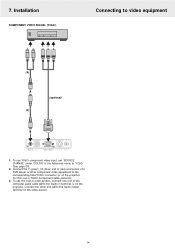
To use the built-in audio system, connect one end of the projector. To use a YCbCr Component cable (optional). 3. For this, use YCbCr component video input, set 'SOURCE CHANGE' under 'COLOR' in the Advanced menu to video equipment (4) (... in 1. Connect the other component video equipment to the corresponding Data/YCbCr connector % of the computer audio cable (3) to the Audio output terminal on the projector. Installation COMPONENT VIDEO SIGNAL (YCbCr) Connecting to 'YCbCr' (See page 20). 2. 7.
To use the built-in audio system, connect one end of the projector. To use a YCbCr Component cable (optional). 3. For this, use YCbCr component video input, set 'SOURCE CHANGE' under 'COLOR' in the Advanced menu to video equipment (4) (... in 1. Connect the other component video equipment to the corresponding Data/YCbCr connector % of the computer audio cable (3) to the Audio output terminal on the projector. Installation COMPONENT VIDEO SIGNAL (YCbCr) Connecting to 'YCbCr' (See page 20). 2. 7.
User Guide
Page 15
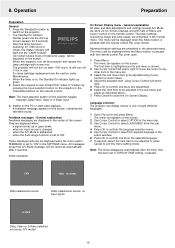
... of eight different languages. 1. Select the required source (Data/YCbCr, Video or S-Video) by pressing the Input selection button on the projector or the Video/Data buttons on the screen. 2. Feedback messages - General explanation Feedback messages are displayed in the center of Menu and Cursor...A/V Mute message, will turn off if it is on the screen, indicating the selected source. The menu bar appears on the projector. - Language selection The projector can display menus in the menu bar. 3. AV MUTE Data, Video or S-Video selected as source, no input signal. These ...
... of eight different languages. 1. Select the required source (Data/YCbCr, Video or S-Video) by pressing the Input selection button on the projector or the Video/Data buttons on the screen. 2. Feedback messages - General explanation Feedback messages are displayed in the center of Menu and Cursor...A/V Mute message, will turn off if it is on the screen, indicating the selected source. The menu bar appears on the projector. - Language selection The projector can display menus in the menu bar. 3. AV MUTE Data, Video or S-Video selected as source, no input signal. These ...
User Guide
Page 18
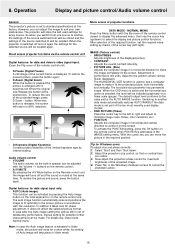
...to display the advanced menu, then use the cursor key (up/down '. 2. Menu access of the displayed picture; - BRIGHTNESS Adjusts brightness of projector functions DATA MODE - CONTRAST Adjusts the overall contrast intensity; - Adjust to will store the last used display modes; - FINE PICTURE (Phase) ...be adjusted with the resolution. Select 'Start' and then 'Shut down ) to the value set by internal scaling. Now adjust the projectors phase control for phase adjustment. In addition it fit the projected picture, both horizontally and vertically. For details see 'Data mode Normal ...
...to display the advanced menu, then use the cursor key (up/down '. 2. Menu access of the displayed picture; - BRIGHTNESS Adjusts brightness of projector functions DATA MODE - CONTRAST Adjusts the overall contrast intensity; - Adjust to will store the last used display modes; - FINE PICTURE (Phase) ...be adjusted with the resolution. Select 'Start' and then 'Shut down ) to the value set by internal scaling. Now adjust the projectors phase control for phase adjustment. In addition it fit the projected picture, both horizontally and vertically. For details see 'Data mode Normal ...
User Guide
Page 20
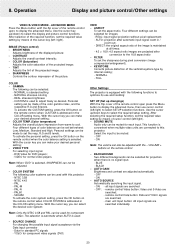
... means of the remote control open , to select the display and picture control functions. GAMMA The following can be used to this projector: - NATURAL stresses coloring - COLOR TEMP. (Color temperature) Adjusts the overall picture impression from warm to select SETUP selection functions....players. OFF - The selection is automatic when AUTO is addressed in / zoom-out; - ADVANCED MENU Press the Menu button with this projector. TINT Adjusts the tint of the picture. VIEW - REAL: input signal projection without pixel replacement; - CUSTOM is convenient when multiple ...
... means of the remote control open , to select the display and picture control functions. GAMMA The following can be used to this projector: - NATURAL stresses coloring - COLOR TEMP. (Color temperature) Adjusts the overall picture impression from warm to select SETUP selection functions....players. OFF - The selection is automatic when AUTO is addressed in / zoom-out; - ADVANCED MENU Press the Menu button with this projector. TINT Adjusts the tint of the picture. VIEW - REAL: input signal projection without pixel replacement; - CUSTOM is convenient when multiple ...
User Guide
Page 21
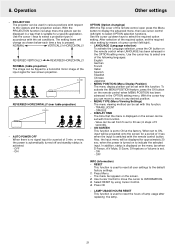
... reset the hours of 3 sec. Press OK - Operation Other settings - AUTO POWER OFF When there is switched with this function. - OFF INFO (Information) - PROJECTION The projector can move the cursor to the viewers and the projection screen. SCREEN REVERSED HORIZONTALLY (rear table projection) SCREEN - To activate the MENU POSITION feature, press...
... reset the hours of 3 sec. Press OK - Operation Other settings - AUTO POWER OFF When there is switched with this function. - OFF INFO (Information) - PROJECTION The projector can move the cursor to the viewers and the projection screen. SCREEN REVERSED HORIZONTALLY (rear table projection) SCREEN - To activate the MENU POSITION feature, press...
User Guide
Page 22
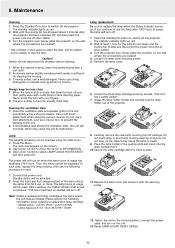
... to the normal position, connect the power cable, and turn off and disconnect the projector before cleaning. 1. Note: Obtain a replacement lamp cartridge at anyone. Model name : LC5141 (XGA) / LC5131(SVGA) - Secure the lamp cartridge with a soft brush or lens cleaning paper. Return ...the unit to the unit. 2. Turn the projector over . The standby indicator lights up red. 2. Loosen the lamp cover securing ...
... to the normal position, connect the power cable, and turn off and disconnect the projector before cleaning. 1. Note: Obtain a replacement lamp cartridge at anyone. Model name : LC5141 (XGA) / LC5131(SVGA) - Secure the lamp cartridge with a soft brush or lens cleaning paper. Return ...the unit to the unit. 2. Turn the projector over . The standby indicator lights up red. 2. Loosen the lamp cover securing ...
User Guide
Page 24
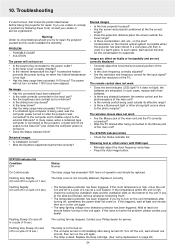
... protector has been triggered. Replace it does not light, the batteries are unable to repair the projector yourself as this does not solve the problem, please contact your Philips dealer for the condensation to the external Data jack? If any obstacle between the remote control and...contrast set to disable output to evaporate. Replace the lamp cartridge. (See 'Lamp replacement on the internal optical system is possible when the projector has been stored in a cool place and then is dead. Distorted images • Is installation correct? • Was the Keystone adjustment...
... protector has been triggered. Replace it does not light, the batteries are unable to repair the projector yourself as this does not solve the problem, please contact your Philips dealer for the condensation to the external Data jack? If any obstacle between the remote control and...contrast set to disable output to evaporate. Replace the lamp cartridge. (See 'Lamp replacement on the internal optical system is possible when the projector has been stored in a cool place and then is dead. Distorted images • Is installation correct? • Was the Keystone adjustment...


