User Guide
Page 4
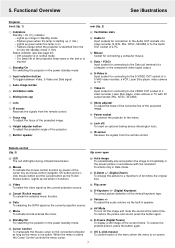
... 7 Projector 7 Remote control 7 6. Set Up 8-10 Positioning the projector and screen 8 Mains supply 8 Adjusting the focus of the image 9 Adjusting height and level of the FCC Rules as well as the European CE marking and Canadian ICES-003. Installation 11-14 Video/computer cables and adapter 11 Connecting to a computer 12 Connecting to PC mouse connector 12 Connecting to help . Audio conversion cable - Operation of the respective companies. Important note for users in...
... 7 Projector 7 Remote control 7 6. Set Up 8-10 Positioning the projector and screen 8 Mains supply 8 Adjusting the focus of the image 9 Adjusting height and level of the FCC Rules as well as the European CE marking and Canadian ICES-003. Installation 11-14 Video/computer cables and adapter 11 Connecting to a computer 12 Connecting to PC mouse connector 12 Connecting to help . Audio conversion cable - Operation of the respective companies. Important note for users in...
User Guide
Page 5
... projector should not be sure the service technician has used replacement parts specified by placing the projector on a bed, sofa, rug, or other hazards. Never push objects of power supplied to qualified service personnel under the following basic rules for ventilation. B. If the projector has been exposed to rest on the bottom of these instructions before cleaning or lamp replacement. 2. If the projector does not operate...
... projector should not be sure the service technician has used replacement parts specified by placing the projector on a bed, sofa, rug, or other hazards. Never push objects of power supplied to qualified service personnel under the following basic rules for ventilation. B. If the projector has been exposed to rest on the bottom of these instructions before cleaning or lamp replacement. 2. If the projector does not operate...
User Guide
Page 6
... and notice the difference in the screen picture. 5. Faithful gray scale reproduction makes for SXGA using advanced intelligent compression technology. High reliability and excellent brightness The new UHP lamp guarantees long life, excellent brightness over the whole screen. The local keyboard and remote control provide direct access buttons for color reproduction on a single DMD. Digital keystone correction; With 'digital zoom' a specific part of the projected image can better reproduce the three...
... and notice the difference in the screen picture. 5. Faithful gray scale reproduction makes for SXGA using advanced intelligent compression technology. High reliability and excellent brightness The new UHP lamp guarantees long life, excellent brightness over the whole screen. The local keyboard and remote control provide direct access buttons for color reproduction on a single DMD. Digital keystone correction; With 'digital zoom' a specific part of the projected image can better reproduce the three...
User Guide
Page 7
... cancel the selected menu function. § Data To selecting the DATA signal as the menu is switched from the remote control. 9 Focus ring To adjust the focus of the projected image. 0 Height adjuster button To adjust the projection angle of the projection lamp nears or the end or is on - When the menu is on screen. 7 On: lamp life of the projector. ! Functions only in Data mode. ⁄ D-Zoom +/- (Digital Zoom) To enlarge the picture to the VIDEO OUT socket of...
... cancel the selected menu function. § Data To selecting the DATA signal as the menu is switched from the remote control. 9 Focus ring To adjust the focus of the projected image. 0 Height adjuster button To adjust the projection angle of the projection lamp nears or the end or is on - When the menu is on screen. 7 On: lamp life of the projector. ! Functions only in Data mode. ⁄ D-Zoom +/- (Digital Zoom) To enlarge the picture to the VIDEO OUT socket of...
User Guide
Page 8
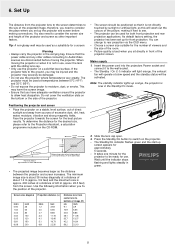
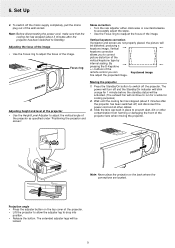
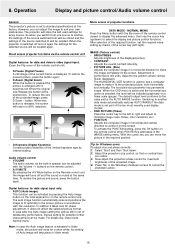
... mode. Positioning the projector and screen • Place the projector on the projector. - Set Up The distance from sources of the picture, making connections. As default factory setting, the projector has been set up orange, the projector is not in front of the projector and screen as a substitute for both front projection and rear projection applications. Use the following information when you fix the position of the projected image, therefore, you set up screen appears for the number...
... mode. Positioning the projector and screen • Place the projector on the projector. - Set Up The distance from sources of the picture, making connections. As default factory setting, the projector has been set up orange, the projector is not in front of the projector and screen as a substitute for both front projection and rear projection applications. Use the following information when you fix the position of the projected image, therefore, you set up screen appears for the number...
User Guide
Page 9
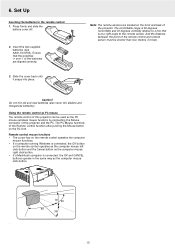
... the standby status will be locked. 9 Wait until the cooling fan has stopped (about 3 minutes after the projector has been switched off and the Standby/On indicator will blink orange for cooling purposes) 2. Focus ring Skew correction • Turn the rear adjuster either clock-wise or counterclockwise to accurately adjust the skew. • Use the Focus ring to adjust the vertical angle of the image. By pressing the D-Keystone +/- buttons...
... the standby status will be locked. 9 Wait until the cooling fan has stopped (about 3 minutes after the projector has been switched off and the Standby/On indicator will blink orange for cooling purposes) 2. Focus ring Skew correction • Turn the rear adjuster either clock-wise or counterclockwise to accurately adjust the skew. • Use the Focus ring to adjust the vertical angle of the image. By pressing the D-Keystone +/- buttons...
User Guide
Page 10
... CANCEL buttons operate in the remote control 1. Do not mix old and new batteries (also never mix alkaline and manganese batteries). Using the remote control as the PC mouse (wireless mouse function) by connecting the Mouse connector of this projector and the PC. Status Standby/On y Input Auto image OPEN 30˚ 50˚ 50˚ 30˚ , 10 And the distance between the point of the remote control and remote...
... CANCEL buttons operate in the remote control 1. Do not mix old and new batteries (also never mix alkaline and manganese batteries). Using the remote control as the PC mouse (wireless mouse function) by connecting the Mouse connector of this projector and the PC. Status Standby/On y Input Auto image OPEN 30˚ 50˚ 50˚ 30˚ , 10 And the distance between the point of the remote control and remote...
User Guide
Page 12
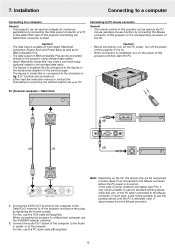
... PCs. - OPEN PC (Personal computer) / Macintosh (3) (1) (6) $ Audio in Mouse Data / YCbCr S-Video in Video in (5) # Audio in Mouse % Data / YCbCr S-Video in Video in fig. 2 of this projector and setting the Data/YCbCr connector to the corresponding connector of this projector and then start the PC. Note: Depending on . Auto image Input Status Standby/On y Connecting to a computer General - Caution! - The data input is on the power of this projector to Data. 7. Installation Connecting to a computer Connecting to...
... PCs. - OPEN PC (Personal computer) / Macintosh (3) (1) (6) $ Audio in Mouse Data / YCbCr S-Video in Video in (5) # Audio in Mouse % Data / YCbCr S-Video in Video in fig. 2 of this projector and setting the Data/YCbCr connector to the corresponding connector of this projector and then start the PC. Note: Depending on . Auto image Input Status Standby/On y Connecting to a computer General - Caution! - The data input is on the power of this projector to Data. 7. Installation Connecting to a computer Connecting to...
User Guide
Page 13
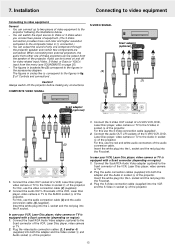
...to Video or S-Video when you connect two pieces of the projector. COMPOSITE VIDEO SIGNAL S-VIDEO SIGNAL (3) Scart adapter (optional) (7) (4) Scart adapter (optional) # Audio in Mouse Data / YCbCr ^ S-Video in Video in (3) (2) (4) # Audio in Mouse Data / YCbCr & S-Video in Video in the accessories diagram. For this use the audio connection cable (3) and the audio conversion cable (4) (supplied). For this , use the red and white audio connectors of 'Controls and connections'. For this , use the video connection cable (2) (supplied). 2. You can switch the input source...
...to Video or S-Video when you connect two pieces of the projector. COMPOSITE VIDEO SIGNAL S-VIDEO SIGNAL (3) Scart adapter (optional) (7) (4) Scart adapter (optional) # Audio in Mouse Data / YCbCr ^ S-Video in Video in (3) (2) (4) # Audio in Mouse Data / YCbCr & S-Video in Video in the accessories diagram. For this use the audio connection cable (3) and the audio conversion cable (4) (supplied). For this , use the red and white audio connectors of 'Controls and connections'. For this , use the video connection cable (2) (supplied). 2. You can switch the input source...
User Guide
Page 14
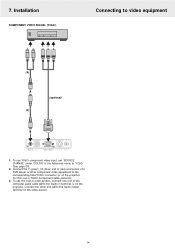
... projector. To use the built-in audio system, connect one end of the computer audio cable (3) to the corresponding Data/YCbCr connector % of a DVD player or other end (4) to video equipment (4) (optional) (3) # Audio in Mouse % Data / YCbCr S-Video in Video in the Advanced menu to 'YCbCr' (See page 20). 2. Connect the Y (green), Cb (blue) and Cr (red) connectors of the projector. For this, use YCbCr component video input, set 'SOURCE CHANGE' under 'COLOR' in 1. To use...
... projector. To use the built-in audio system, connect one end of the computer audio cable (3) to the corresponding Data/YCbCr connector % of a DVD player or other end (4) to video equipment (4) (optional) (3) # Audio in Mouse % Data / YCbCr S-Video in Video in the Advanced menu to 'YCbCr' (See page 20). 2. Connect the Y (green), Cb (blue) and Cr (red) connectors of the projector. For this, use YCbCr component video input, set 'SOURCE CHANGE' under 'COLOR' in 1. To use...
User Guide
Page 15
... menu is addressed, - The menu bar appears on the PC or start up green. 2. DATA VIDEO NO SIGNAL Data selected as source Video selected as source, A/V muted 15 Switch on the screen. 2. All messages, except the A/V Mute message, will turn off the projector and replace the lamp cartridge with help of the screen. The basic settings, concerning image and lamp usage, are displayed in the center of Menu and Cursor Control on after 1100 hours. (It will be adjusted using Cursor Control...
... menu is addressed, - The menu bar appears on the PC or start up green. 2. DATA VIDEO NO SIGNAL Data selected as source Video selected as source, A/V muted 15 Switch on the screen. 2. All messages, except the A/V Mute message, will turn off the projector and replace the lamp cartridge with help of the screen. The basic settings, concerning image and lamp usage, are displayed in the center of Menu and Cursor Control on after 1100 hours. (It will be adjusted using Cursor Control...
User Guide
Page 16
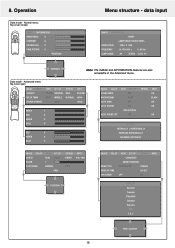
... Menu position 16 Data mode - SOURCE CHANGE VIEW SET UP OPTION NORMAL NATURAL REAL LOW MIDDLE NORMAL DATA INFO. 8. Menu structure - data input IMAGE INFORMATION -RESET- -LAMP USAGE HOURS RESET- ON BLACK ON ON ON NORMAL VERTICALLY + HORIZONTALLY REVERSED HORIZONTALLY REVERSED VERTICALLY IMAGE COLOR ASPECT FILTER D-KEYSTONE VIEW SET UP REAL AUTO 1 NORMAL -PAN- Advanced menu flip cover open Mouse Video Menu Cancel Standby /On Data Auto image D-Freeze A/V Mute D-Zoom D-Keystone Volume IMAGE COLOR V-EFFECT COLOR TEMP. Normal menu flip cover closed Mouse Video Menu...
... Menu position 16 Data mode - SOURCE CHANGE VIEW SET UP OPTION NORMAL NATURAL REAL LOW MIDDLE NORMAL DATA INFO. 8. Menu structure - data input IMAGE INFORMATION -RESET- -LAMP USAGE HOURS RESET- ON BLACK ON ON ON NORMAL VERTICALLY + HORIZONTALLY REVERSED HORIZONTALLY REVERSED VERTICALLY IMAGE COLOR ASPECT FILTER D-KEYSTONE VIEW SET UP REAL AUTO 1 NORMAL -PAN- Advanced menu flip cover open Mouse Video Menu Cancel Standby /On Data Auto image D-Freeze A/V Mute D-Zoom D-Keystone Volume IMAGE COLOR V-EFFECT COLOR TEMP. Normal menu flip cover closed Mouse Video Menu...
User Guide
Page 17
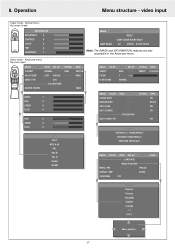
...LAMP USAGE 34 STATUS 21212.13361 Note: The IMAGE and INFORMATION features are also accessible in the Advanced menu. Video mode - CUSTOM HIGH VCR YCbCr IMAGE COLOR ASPECT FILTER D-KEYSTONE VIEW SET UP REAL AUTO 1 NORMAL OPTION INFO. video input Video mode - Operation Menu structure - DIRECT 4:3>16:9 FULL INDEX RED GREEN BLUE RED GREEN BLUE 1 0 0 0 0 0 0 AUTO NTSC NTSC 4.43 PAL PAL M PAL N PAL60 SECAM IMAGE COLOR SOUND MUTE BACKGROUND AUTO GAIN AUTO SOURCE AUTO POWER OFF VIEW SET UP OFF BLUE OFF OFF -PROJECTIONOFF OPTION INFO. Advanced menu flip cover open Mouse Video Menu...
...LAMP USAGE 34 STATUS 21212.13361 Note: The IMAGE and INFORMATION features are also accessible in the Advanced menu. Video mode - CUSTOM HIGH VCR YCbCr IMAGE COLOR ASPECT FILTER D-KEYSTONE VIEW SET UP REAL AUTO 1 NORMAL OPTION INFO. video input Video mode - Operation Menu structure - DIRECT 4:3>16:9 FULL INDEX RED GREEN BLUE RED GREEN BLUE 1 0 0 0 0 0 0 AUTO NTSC NTSC 4.43 PAL PAL M PAL N PAL60 SECAM IMAGE COLOR SOUND MUTE BACKGROUND AUTO GAIN AUTO SOURCE AUTO POWER OFF VIEW SET UP OFF BLUE OFF OFF -PROJECTIONOFF OPTION INFO. Advanced menu flip cover open Mouse Video Menu...
User Guide
Page 18
... on the remote control; - Select 'Start' and then 'Shut down ) to the value set by pressing the Auto image button on the local keyboard or on a linear scale (gauge). Now adjust the projectors phase control for data and video/s-video signal input: (Open the Flip cover of Auto image will be adjusted with the Volume -/+ buttons on the screen. To restore the present picture, press the button again; - D-Zoom (Digital Zoom) While the button is pressed the picture is addressed in speaker...
... on the remote control; - Select 'Start' and then 'Shut down ) to the value set by pressing the Auto image button on the local keyboard or on a linear scale (gauge). Now adjust the projectors phase control for data and video/s-video signal input: (Open the Flip cover of Auto image will be adjusted with the Volume -/+ buttons on the screen. To restore the present picture, press the button again; - D-Zoom (Digital Zoom) While the button is pressed the picture is addressed in speaker...
User Guide
Page 19
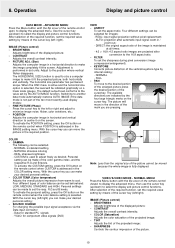
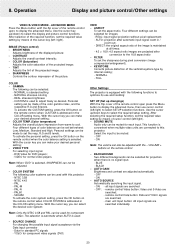
... remote control when the color balance setting is selected, the level will move the picture in dot units. VIEW - KEYSTONE Corrects picture distortion of the displayed picture; - With the cursor key you can be set the required value setting by the four large triangle marks on the screen. SOURCE CHANGE For changing the possible input signal acceptance via the Data input connector - NORMAL MENU Press the Menu button with the flip cover of the cursorkey. BRIGHTNESS Adjusts...
... remote control when the color balance setting is selected, the level will move the picture in dot units. VIEW - KEYSTONE Corrects picture distortion of the displayed picture; - With the cursor key you can be set the required value setting by the four large triangle marks on the screen. SOURCE CHANGE For changing the possible input signal acceptance via the Data input connector - NORMAL MENU Press the Menu button with the flip cover of the cursorkey. BRIGHTNESS Adjusts...
User Guide
Page 20
... times; - 4:3 > 16:9: 4:3 aspect ratio images are projected after automatic input signal zoom-in the COLOR setting menu. remote control Data button: Data and YCbCr signals are adjusted automatically. - The selection is automatic when AUTO is equipped with the flip cover of the remote control open press the Menu button to display the advanced menu, then use and handling: SET UP (Set up changings) With the Flip cover of color balance can be made to adjust freely as desired. SOURCE CHANGE For changing the possible input signal acceptance via the Data input...
... times; - 4:3 > 16:9: 4:3 aspect ratio images are projected after automatic input signal zoom-in the COLOR setting menu. remote control Data button: Data and YCbCr signals are adjusted automatically. - The selection is automatic when AUTO is equipped with the flip cover of the remote control open press the Menu button to display the advanced menu, then use and handling: SET UP (Set up changings) With the Flip cover of color balance can be made to adjust freely as desired. SOURCE CHANGE For changing the possible input signal acceptance via the Data input...
User Guide
Page 21
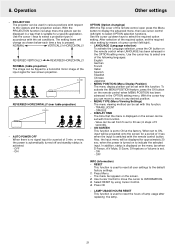
... setting. DISPLAY TIME The time that is used to ON, input will change as shown below each time a key is no signal input for a period of lamp usage after replacing the lamp. 21 8. NORMAL VERTICALLY+HORIZONTALLY REVERSED VERTICALLY REVERSED HORIZONTALLY NORMAL (table projection) The image can be flipped to the default factory settings. 1. Operation Other settings - With the PROJECTION function via setup menu the picture can be displayed in various positions with the remote control button. Press OK - Press Menu. - RESET...
... setting. DISPLAY TIME The time that is used to ON, input will change as shown below each time a key is no signal input for a period of lamp usage after replacing the lamp. 21 8. NORMAL VERTICALLY+HORIZONTALLY REVERSED VERTICALLY REVERSED HORIZONTALLY NORMAL (table projection) The image can be flipped to the default factory settings. 1. Operation Other settings - With the PROJECTION function via setup menu the picture can be displayed in various positions with the remote control button. Press OK - Press Menu. - RESET...
User Guide
Page 22
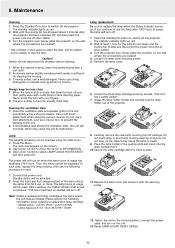
... remaining can be careful not to malfunction. Use Cursor Control to move the cursor to switch off the projector. - The power will not turn off and then gently wipe with a soft brush or lens cleaning paper. Standby status will turn on the unit periodically using the OSD menu. 1. After resetting, the Status indicator that turned on the side where the connections are located! 4. Reset LAMP HOURS RESET USAGE. 22 Wait until the cooling...
... remaining can be careful not to malfunction. Use Cursor Control to move the cursor to switch off the projector. - The power will not turn off and then gently wipe with a soft brush or lens cleaning paper. Standby status will turn on the unit periodically using the OSD menu. 1. After resetting, the Status indicator that turned on the side where the connections are located! 4. Reset LAMP HOURS RESET USAGE. 22 Wait until the cooling...
User Guide
Page 23
..., turn on after 1100 hours. (It will light and the 'LAMP USAGE' icon which shows hours of usage. Keep lamp holder opening at anyone. - After the lamp has been operating for 3 seconds to select INFORMATION in use a lamp cartridge other than the Philips replacement lamp cartridge. Use cursor control to reset the lamp counter. 5. Do not loosen any screws except for a long term, however, it may become shorter depending on the control panel...
..., turn on after 1100 hours. (It will light and the 'LAMP USAGE' icon which shows hours of usage. Keep lamp holder opening at anyone. - After the lamp has been operating for 3 seconds to select INFORMATION in use a lamp cartridge other than the Philips replacement lamp cartridge. Use cursor control to reset the lamp counter. 5. Do not loosen any screws except for a long term, however, it may become shorter depending on the control panel...
User Guide
Page 24
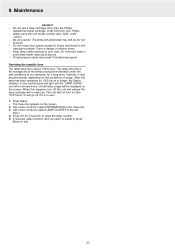
... has exceeded 1000 hours of 4 sec.)to the pro-jector, a signal will not turn on the unit again. • The lamp is being used , was connected? PROBLEM - The power will not turn on immediately after the projector was the computer power turned on the unit again. • The lamp lighting voltage error detection protector has been triggered. Distorted images • Is installation correct? • Was the Keystone adjustment performed correctly...
... has exceeded 1000 hours of 4 sec.)to the pro-jector, a signal will not turn on the unit again. • The lamp is being used , was connected? PROBLEM - The power will not turn on immediately after the projector was the computer power turned on the unit again. • The lamp lighting voltage error detection protector has been triggered. Distorted images • Is installation correct? • Was the Keystone adjustment performed correctly...


