User manual
Page 3
...receiver or Set top box and a recorder with A/V outputs 27 11.11 Connect digital source devices with background music 31 2 - Philips TV - Philips TV Slideshow Format with Video Component Output connectors (YPbPr 27 11.12 Connect a Home theater amplifier 28 11.13 Connect a PC 28 12...10 Multimedia browser 22 10.1 To view content from Dolby Laboratories. 'Dolby' 'Pro Logic' and the double-D symbol are trademarks of the TV menu settings 9 5.2.1 Adjust viewing and listening settings 9 5.2.2 Adjust Picture menu settings 10 5.2.3 Adjust Sound menu settings 11 5.2.4 Enjoy Ambilight 12...
...receiver or Set top box and a recorder with A/V outputs 27 11.11 Connect digital source devices with background music 31 2 - Philips TV - Philips TV Slideshow Format with Video Component Output connectors (YPbPr 27 11.12 Connect a Home theater amplifier 28 11.13 Connect a PC 28 12...10 Multimedia browser 22 10.1 To view content from Dolby Laboratories. 'Dolby' 'Pro Logic' and the double-D symbol are trademarks of the TV menu settings 9 5.2.1 Adjust viewing and listening settings 9 5.2.2 Adjust Picture menu settings 10 5.2.3 Adjust Sound menu settings 11 5.2.4 Enjoy Ambilight 12...
User manual
Page 4
... all around the TV. - One of Philips' leading Business Principles is that cause no naked flame sources, such as possible.Their long time contact with the screen causes deformations and color fading. - Philips plays an active role in the development of LCD Panels is to take all -inclusive list, you ...may scratch, mar or damage the screen permanently. Place or hang the TV wherever you have the ability to remain on the power...
... all around the TV. - One of Philips' leading Business Principles is that cause no naked flame sources, such as possible.Their long time contact with the screen causes deformations and color fading. - Philips plays an active role in the development of LCD Panels is to take all -inclusive list, you ...may scratch, mar or damage the screen permanently. Place or hang the TV wherever you have the ability to remain on the power...
User manual
Page 5
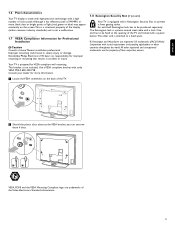
...3 One end has to be purchased separately. Improper mounting could result in accident or injury. 1.8 Kensington Security Slot (if present) Your TV is prepared for Professional Installation ) Caution Consult a Home Theater installation professional. This bracket is not a malfunction. 1.7 VESA Compliance Information for...the property of color pixels. Consult your dealer for improper mounting or mounting that results in severe injury or damage. Koninklijke Philips Electronics NV bears no responsibility for more , black dots or bright points of light (red, green or blue) may ...
...3 One end has to be purchased separately. Improper mounting could result in accident or injury. 1.8 Kensington Security Slot (if present) Your TV is prepared for Professional Installation ) Caution Consult a Home Theater installation professional. This bracket is not a malfunction. 1.7 VESA Compliance Information for...the property of color pixels. Consult your dealer for improper mounting or mounting that results in severe injury or damage. Koninklijke Philips Electronics NV bears no responsibility for more , black dots or bright points of light (red, green or blue) may ...

User manual
Page 6
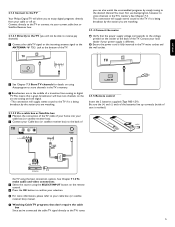
... accessory devices. ) Do not insert the power plug into the mains at the bottom of audio and video devices that can be connected to your TV. USB 14 13 12 R AUDIO L VIDEO S VIDEO 10 9 8 7 6 L R AUDIO OUT DISPLAY SYNCHRONIZED DISPLAY SYNC. See Chapter 11 How to connect and ...operate accessory devices. à Before installing your TV or before all connections are made. 2 Getting started Welcome to the growing family of owners of Philips. 2.1 Connection overview There is a wide range of the TV and in a wall socket before hanging it on the wall, first...
... accessory devices. ) Do not insert the power plug into the mains at the bottom of audio and video devices that can be connected to your TV. USB 14 13 12 R AUDIO L VIDEO S VIDEO 10 9 8 7 6 L R AUDIO OUT DISPLAY SYNCHRONIZED DISPLAY SYNC. See Chapter 11 How to connect and ...operate accessory devices. à Before installing your TV or before all connections are made. 2 Getting started Welcome to the growing family of owners of Philips. 2.1 Connection overview There is a wide range of the TV and in a wall socket before hanging it on the wall, first...
User manual
Page 7
... tuning to the desired channel.You must first use Autoprogram, however, to store channels in the TV's memory. ç- 2.1.3 Connect to the TV Your Philips Digital TV will allow you to enjoy digital programs directly from analog to digital TV.This means that a given broadcaster will have two channels on the remote control. † Press...
... tuning to the desired channel.You must first use Autoprogram, however, to store channels in the TV's memory. ç- 2.1.3 Connect to the TV Your Philips Digital TV will allow you to enjoy digital programs directly from analog to digital TV.This means that a given broadcaster will have two channels on the remote control. † Press...
User manual
Page 8
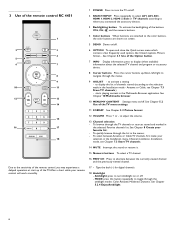
...at start up /down, left/right to navigate through the list in the Installation menu, Channel installation, Installation mode, see Chapter 7.3 Store TV channels.) - See Chapter 5.2 Use of channels stored (according to the selection made in the Installation mode - To quickly browse through the ... Picture format,... Type the dash (-) for digital channels. 18 Ambilight - See Chapter 5.2.4 Enjoy Ambilight. 6 to display the list of the TV menu settings. 11 FORMAT See Chapter 3.2 Picture format. 12 VOLUME Press + or - MODE: press this button repeatedly to display (when available...
...at start up /down, left/right to navigate through the list in the Installation menu, Channel installation, Installation mode, see Chapter 7.3 Store TV channels.) - See Chapter 5.2 Use of channels stored (according to the selection made in the Installation mode - To quickly browse through the ... Picture format,... Type the dash (-) for digital channels. 18 Ambilight - See Chapter 5.2.4 Enjoy Ambilight. 6 to display the list of the TV menu settings. 11 FORMAT See Chapter 3.2 Picture format. 12 VOLUME Press + or - MODE: press this button repeatedly to display (when available...
User manual
Page 9
... CH - Wide screen Stretches 4:3 format to fill the screen. Unscaled (Only for HD.) Scales classical 4:3 format to summon or exit the TV menu without the remote control. Picture format See Chapter 5.2.2 Adjust Picture menu settings, or Chapter 3.2 Picture format. Equalizer See Chapter 5.2.3 Adjust Sound... The format Automatic is recommended for HD.) Shows the classical 4:3 format. < Press the B POWER switch at the left side of the TV. Audio language See Chapter 5.2.3 Adjust Sound menu settings. Use the VOLUME + and - buttons to activate/deactivate the clock display on . Use...
... CH - Wide screen Stretches 4:3 format to fill the screen. Unscaled (Only for HD.) Scales classical 4:3 format to summon or exit the TV menu without the remote control. Picture format See Chapter 5.2.2 Adjust Picture menu settings, or Chapter 3.2 Picture format. Equalizer See Chapter 5.2.3 Adjust Sound... The format Automatic is recommended for HD.) Shows the classical 4:3 format. < Press the B POWER switch at the left side of the TV. Audio language See Chapter 5.2.3 Adjust Sound menu settings. Use the VOLUME + and - buttons to activate/deactivate the clock display on . Use...
User manual
Page 10
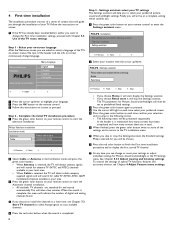
...language. ® Press the OK button on the remote control. Ò Follow the instructions on screen continuously change or reset your TV. PHILIPS Settings assistant Please select your on-screen language After the Welcome screen you are in total. ◊When finished, press the green ...down Menu language English Français Español Português ® Select your location with Chapter 5.2 Use of the TV menu settings. PHILIPS using cursor up and down . 4 First time installation The installation procedure consists of a series of screens that will guide you through...
...language. ® Press the OK button on the remote control. Ò Follow the instructions on screen continuously change or reset your TV. PHILIPS Settings assistant Please select your on-screen language After the Welcome screen you are in total. ◊When finished, press the green ...down Menu language English Français Español Português ® Select your location with Chapter 5.2 Use of the TV menu settings. PHILIPS using cursor up and down . 4 First time installation The installation procedure consists of a series of screens that will guide you through...
User manual
Page 11
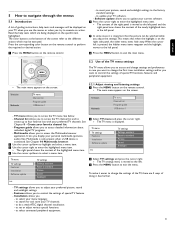
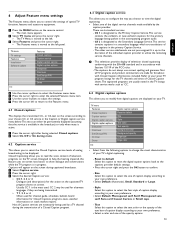
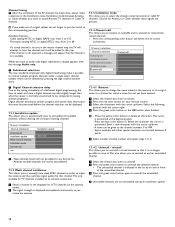
.... 5.2.1 Adjust viewing and listening settings ‡ Press the MENU button on the remote control. > The main menu appears on the screen. TV menu allows you to adjust your picture, sound and ambilight settings to the factory standard settings; - See Chapter 8 - Program guide allows you...to perform the required or desired action. - Press the corresponding color button on the specific item highlighted. Television Multimedia TV menu Channel list Program guide USBdevice 1 The TV menu allows you to access and change settings and preferences in the left panel. ç In some cases it is...
.... 5.2.1 Adjust viewing and listening settings ‡ Press the MENU button on the remote control. > The main menu appears on the screen. TV menu allows you to adjust your picture, sound and ambilight settings to the factory standard settings; - See Chapter 8 - Program guide allows you...to perform the required or desired action. - Press the corresponding color button on the specific item highlighted. Television Multimedia TV menu Channel list Program guide USBdevice 1 The TV menu allows you to access and change settings and preferences in the left panel. ç In some cases it is...
User manual
Page 12
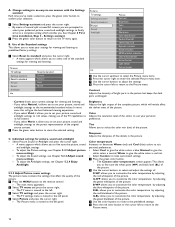
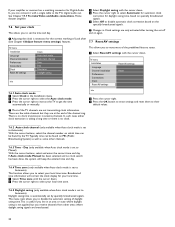
...Sound Ambilight Info Reset to standard Current Natural Vivid Movie TV menu TV settings Settings assistant Reset to standard Picture Sound Ambilight Info Picture Contrast Brightness Color Tint Sharpness Color temperature Perfect Pixel HD 120 Hz Clear LCD Dynamic contrast Noise reduction MPEG artefact reduction Color enhancement Active...button or the cursor left to return to its full extend. - In most cases this will mainly affect the darker areas of the TV capabilities to the Picture menu. 10 G-WP: allows you are prompted to -use of the picture. Change settings in an easy-to...
...Sound Ambilight Info Reset to standard Current Natural Vivid Movie TV menu TV settings Settings assistant Reset to standard Picture Sound Ambilight Info Picture Contrast Brightness Color Tint Sharpness Color temperature Perfect Pixel HD 120 Hz Clear LCD Dynamic contrast Noise reduction MPEG artefact reduction Color enhancement Active...button or the cursor left to return to its full extend. - In most cases this will mainly affect the darker areas of the TV capabilities to the Picture menu. 10 G-WP: allows you are prompted to -use of the picture. Change settings in an easy-to...
User manual
Page 13
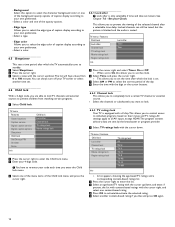
...a larger viewing angle. < Select On or Off. It makes the colors more noticeable as it fully processes the image to select, per TV channel, Mono or Stereo sound when analog stereo broadcasts are available. Audio language Allows you to select an audio language out of the list of..., better black level, high contrast with analog broadcast signals) Gives you to activate/de-activate Perfect Pixel HD. 120 Hz Clear LCD (if present) 120 Hz Clear LCD results in the Installation menu, see Chapter 7.2 Select your language. à This function is also accessible via the OPTION button ...
...a larger viewing angle. < Select On or Off. It makes the colors more noticeable as it fully processes the image to select, per TV channel, Mono or Stereo sound when analog stereo broadcasts are available. Audio language Allows you to select an audio language out of the list of..., better black level, high contrast with analog broadcast signals) Gives you to activate/de-activate Perfect Pixel HD. 120 Hz Clear LCD (if present) 120 Hz Clear LCD results in the Installation menu, see Chapter 7.2 Select your language. à This function is also accessible via the OPTION button ...
User manual
Page 14
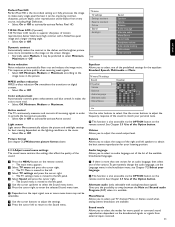
... Color has been selected in the next Ambilight menu items. - Blue: preferred by most normal lightbulbs. Select this allows the TV to automatically turn to the best surround sound mode the broadcaster transmits. 5.2.4 Enjoy Ambilight < Use the cursor buttons to the left...turned On, this setting according to choose for constant background lighting or for ambient backlighting of displays. - For example: - TV menu TV settings Settings assistant Reset to standard Picture Sound Ambilight Info Ambilight Ambilight Brightness Mode Color Separation Color boost Balance º Use ...
... Color has been selected in the next Ambilight menu items. - Blue: preferred by most normal lightbulbs. Select this allows the TV to automatically turn to the best surround sound mode the broadcaster transmits. 5.2.4 Enjoy Ambilight < Use the cursor buttons to the left...turned On, this setting according to choose for constant background lighting or for ambient backlighting of displays. - For example: - TV menu TV settings Settings assistant Reset to standard Picture Sound Ambilight Info Ambilight Ambilight Brightness Mode Color Separation Color boost Balance º Use ...
User manual
Page 15
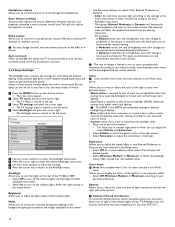
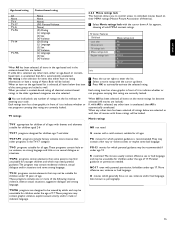
...> CC 1, 2, 3 or 4 Dialogue (and descriptions) for Closed Captions programs, news, weather informations or stock market reports. TV menu Features Closed captions Caption service Digital caption service Digital caption options Sleeptimer Child lock Set/Change PIN On timer Demo Info Digital ...according to your own preference. < Select Default (Automatic), Small, Standard or Large. - CC 2 may be displayed. TV menu TV settings Features Installation Software update Info Features Closed captions Caption service Digital caption service Digital caption options Sleeptimer Child lock Set/Change ...
...> CC 1, 2, 3 or 4 Dialogue (and descriptions) for Closed Captions programs, news, weather informations or stock market reports. TV menu Features Closed captions Caption service Digital caption service Digital caption options Sleeptimer Child lock Set/Change PIN On timer Demo Info Digital ...according to your own preference. < Select Default (Automatic), Small, Standard or Large. - CC 2 may be displayed. TV menu TV settings Features Installation Software update Info Features Closed captions Caption service Digital caption service Digital caption options Sleeptimer Child lock Set/Change ...
User manual
Page 16
...list will have to standby. ‡ Select Sleeptimer. ® Press the cursor right. Ò Select a value with a V-chip. TV menu Features Closed captions Caption service Digital caption service Digital caption options Sleeptimer Child lock Set/Change PIN On timer Demo Info Child lock Lock... preference. < Select a color. 6.5 Sleeptimer This sets a time period after Channel lock TV ratings lock Movie ratings lock Region ratings lock Info TV ratings lock All None TV-Y TV-Y7 TV-G TV-PG TV-14 TV-MA † Select one of the background opacity options of caption display according to your ...
...list will have to standby. ‡ Select Sleeptimer. ® Press the cursor right. Ò Select a value with a V-chip. TV menu Features Closed captions Caption service Digital caption service Digital caption options Sleeptimer Child lock Set/Change PIN On timer Demo Info Child lock Lock... preference. < Select a color. 6.5 Sleeptimer This sets a time period after Channel lock TV ratings lock Movie ratings lock Region ratings lock Info TV ratings lock All None TV-Y TV-Y7 TV-G TV-PG TV-14 TV-MA † Select one of the background opacity options of caption display according to your ...
User manual
Page 17
...Parental guidance or permission needed. When an item on sex, violence and/or bad language. Each rating item has a box-graphic in the TV-Y7 category PG movies for which parental guidance may be recommended if under 14 years of it to be viewed by adults and may contain...based or contentbased item, is unselected, then All is recommended.They may contain moderate violence, sexual dialogue and/or situations and some bad language TV-G programs suitable for children under age 13 R restricted.The movies usually contain offensive sex or bad language and may not be unsuitable for ...
...Parental guidance or permission needed. When an item on sex, violence and/or bad language. Each rating item has a box-graphic in the TV-Y7 category PG movies for which parental guidance may be recommended if under 14 years of it to be viewed by adults and may contain...based or contentbased item, is unselected, then All is recommended.They may contain moderate violence, sexual dialogue and/or situations and some bad language TV-G programs suitable for children under age 13 R restricted.The movies usually contain offensive sex or bad language and may not be unsuitable for ...

User manual
Page 18
...Change PIN On timer Demo Info Demo Perfect Pixel HD Ambilight Settings Assistant 120 Hz Clear LCD Active Control ® Press the cursor right. Ò Select a desired demo. ...functions of the television. ‡ Select Demo. All number combinations from 0000 to 9999 are part of the TV. ‡ Select Set or Change PIN with the cursor up /down. ≈Press the OK button ...If no PIN-code exists yet, the menu item is stored. 6.8 On timer From standby, this automatically turns the TV to the specified channel number, at a specified time. ‡ Select On timer. ® Press the cursor ...
...Change PIN On timer Demo Info Demo Perfect Pixel HD Ambilight Settings Assistant 120 Hz Clear LCD Active Control ® Press the cursor right. Ò Select a desired demo. ...functions of the television. ‡ Select Demo. All number combinations from 0000 to 9999 are part of the TV. ‡ Select Set or Change PIN with the cursor up /down. ≈Press the OK button ...If no PIN-code exists yet, the menu item is stored. 6.8 On timer From standby, this automatically turns the TV to the specified channel number, at a specified time. ‡ Select On timer. ® Press the cursor ...
User manual
Page 19
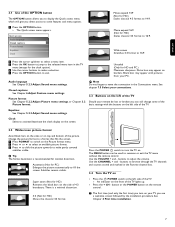
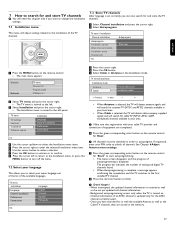
...or Antenna in the memory. 17 When interrupted, the updated channel information is set correctly, you can now search for and store the TV channels. ‡ Select Channel installation and press the cursor right. ® Select Autoprogram. Once you have searched for as well the ...currently tuned. - DEMO OPTION INFO OK LIST MENU MY CONTENT MENU MY CONTENT FORMAT ‡ Press the MENU button on . - TV menu / Installation Channel installation Autoprogram Installation update Weak channel installat.. The progress bar indicates the number of equipment are stored in the Installation ...
...or Antenna in the memory. 17 When interrupted, the updated channel information is set correctly, you can now search for and store the TV channels. ‡ Select Channel installation and press the cursor right. ® Select Autoprogram. Once you have searched for as well the ...currently tuned. - DEMO OPTION INFO OK LIST MENU MY CONTENT MENU MY CONTENT FORMAT ‡ Press the MENU button on . - TV menu / Installation Channel installation Autoprogram Installation update Weak channel installat.. The progress bar indicates the number of equipment are stored in the Installation ...
User manual
Page 20
...the message Audio only. ç Subchannel selections The new standards employed with the cursor up /down ; - Available channels: - TV menu / Installation Channel installation Autoprogram Installation update Weak channel installat.. Select the following position with the cursor up /down . Installation ...update. 18 Choose for that the channel is positioned at the beginning again; - Channel tuning ç After the installation of the TV channels has been done, always make a selection in the Installation menu, Installation mode between Z and A. º Select another channel...
...the message Audio only. ç Subchannel selections The new standards employed with the cursor up /down ; - Available channels: - TV menu / Installation Channel installation Autoprogram Installation update Weak channel installat.. Select the following position with the cursor up /down . Installation ...update. 18 Choose for that the channel is positioned at the beginning again; - Channel tuning ç After the installation of the TV channels has been done, always make a selection in the Installation menu, Installation mode between Z and A. º Select another channel...

User manual
Page 21
... screen. 7.4.4 Downloaded rating table This allows you have one of the Emergency alerts options: - The start time + date - Menu TV Installation Language Channel installation Preferences Connections Clock Reset AV settings Info Connections AV1 AV2 AV3 HDMI 1 HDMI 2 HDMI 3 Side AUDIO IN ... result in the Preferences menu. ® Press the cursor right and select one of devices connected to be ignored; - TV menu Installation Language Channel installation Preferences Connections Clock Reset AV settings Preferences Location Volume bar Show emergency alerts Downloaded rating table Info ...
... screen. 7.4.4 Downloaded rating table This allows you have one of the Emergency alerts options: - The start time + date - Menu TV Installation Language Channel installation Preferences Connections Clock Reset AV settings Info Connections AV1 AV2 AV3 HDMI 1 HDMI 2 HDMI 3 Side AUDIO IN ... result in the Preferences menu. ® Press the cursor right and select one of devices connected to be ignored; - TV menu Installation Language Channel installation Preferences Connections Clock Reset AV settings Preferences Location Volume bar Show emergency alerts Downloaded rating table Info ...
User manual
Page 22
...the cursor buttons, select and enter the correct time and day. This menu item allows you to get the time automatically or manually. TV menu Installation Language Channel installation Preferences Connections Clock Reset AV settings Reset AV settings Reset 7.6.1 Auto clock mode ‡ Select Clock in ...Clock settings are not transmitting clock information. In such cases either clock extraction is taking a long time or there is set by the TV. Broadcasted time information will keep the entered time and day. 7.6.4 Time zone (only available when Auto clock mode is no clock ...
...the cursor buttons, select and enter the correct time and day. This menu item allows you to get the time automatically or manually. TV menu Installation Language Channel installation Preferences Connections Clock Reset AV settings Reset AV settings Reset 7.6.1 Auto clock mode ‡ Select Clock in ...Clock settings are not transmitting clock information. In such cases either clock extraction is taking a long time or there is set by the TV. Broadcasted time information will keep the entered time and day. 7.6.4 Time zone (only available when Auto clock mode is no clock ...


