
User manual
Page 2
...warranties and outstanding service networks in the rare case of a product recall or safety defect. *Additional Benefits of Product Ownership Registering your product guarantees that your date of purchase will be on file, so no additional paperwork will be required from our convenient home shopping network. Dear PHILIPS product owner...objects filled with your purchase for investing in our power to keep you 'll receive notification - For Customer Use Enter below , so don't miss out. Retain this is located on your purchase, and welcome to the "family!" Return...
...warranties and outstanding service networks in the rare case of a product recall or safety defect. *Additional Benefits of Product Ownership Registering your product guarantees that your date of purchase will be on file, so no additional paperwork will be required from our convenient home shopping network. Dear PHILIPS product owner...objects filled with your purchase for investing in our power to keep you 'll receive notification - For Customer Use Enter below , so don't miss out. Retain this is located on your purchase, and welcome to the "family!" Return...
User manual
Page 3
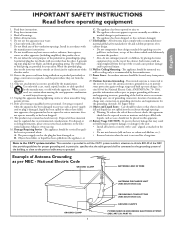
... apparatus not operate normally, or has been dropped. All televisions must comply with a cart, stand, tripod, bracket, or table specified some protection against voltage surges and built up static charges. Do not block any heat sources such as per NEC - Do not install near water. 17. An outdoor antenna should not be located away from power plugs, convenience receptacles...
... apparatus not operate normally, or has been dropped. All televisions must comply with a cart, stand, tripod, bracket, or table specified some protection against voltage surges and built up static charges. Do not block any heat sources such as per NEC - Do not install near water. 17. An outdoor antenna should not be located away from power plugs, convenience receptacles...
User manual
Page 5
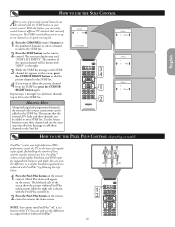
... help provide the best picture quality. Channel Edit allows you choose. Onscreen Menu shows helpful messages and instructions for a more consistent, comfortable sound. Active Control, AutoPicture, and AutoSound Surround are trademarks of Philips Consumer Electronics Company. Sleep Timer automatically turns the TV OFF after a set according to your TV) for energy efficiency. QUICK USE AND SETUP GUIDE Refer to the simple Quick Use and Setup Guide (supplied with the push of one button. Timer...
... help provide the best picture quality. Channel Edit allows you choose. Onscreen Menu shows helpful messages and instructions for a more consistent, comfortable sound. Active Control, AutoPicture, and AutoSound Surround are trademarks of Philips Consumer Electronics Company. Sleep Timer automatically turns the TV OFF after a set according to your TV) for energy efficiency. QUICK USE AND SETUP GUIDE Refer to the simple Quick Use and Setup Guide (supplied with the push of one button. Timer...
User manual
Page 6
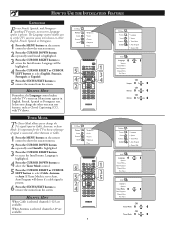
...'s signal input to select Cable, Antenna, or Auto. If Tuner Mode is set the TV's onscreen menu to be highlighted. 4 Press the CURSOR RIGHT or CURSOR LEFT button to select English, Francais, Portugués or Español. 5 Press the STATUS/EXIT button to access the Install menu. The Language control enables you to change the other onscreen text features, such as Closed Captioning (CC), with TV shows. HELPFUL...
...'s signal input to select Cable, Antenna, or Auto. If Tuner Mode is set the TV's onscreen menu to be highlighted. 4 Press the CURSOR RIGHT or CURSOR LEFT button to select English, Francais, Portugués or Español. 5 Press the STATUS/EXIT button to access the Install menu. The Language control enables you to change the other onscreen text features, such as Closed Captioning (CC), with TV shows. HELPFUL...
User manual
Page 7
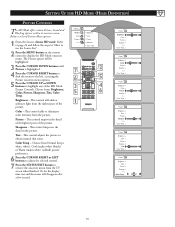
... to remove the menu from the screen. TV Menu Picture Sound Features Install Brightness Color Picture Sharpness Tint 6 1 3 5 2 4 TV Menu Picture Sound Features Install Brightness Color Picture Sharpness Tint 9 1 6 8 3 2 5 4 6 7 8 7 TV Menu Picture Sound Features Install Language System Tuner Mode Auto Program Channel Edit Install Language System Tuner Mode Auto Program Channel Edit Fine Tune Start ? Press the CHANNEL (+) or (-) button and see Quick-Use Guide for you can also press the CH+ or CH- CHANNEL EDIT Channel Edit makes it easy for making connections...
... to remove the menu from the screen. TV Menu Picture Sound Features Install Brightness Color Picture Sharpness Tint 6 1 3 5 2 4 TV Menu Picture Sound Features Install Brightness Color Picture Sharpness Tint 9 1 6 8 3 2 5 4 6 7 8 7 TV Menu Picture Sound Features Install Language System Tuner Mode Auto Program Channel Edit Install Language System Tuner Mode Auto Program Channel Edit Fine Tune Start ? Press the CHANNEL (+) or (-) button and see Quick-Use Guide for you can also press the CH+ or CH- CHANNEL EDIT Channel Edit makes it easy for making connections...
User manual
Page 8
...to adjust the picture reception in area of your choice. 6 Press the STATUS/EXIT button to the transmission system. TV Menu Picture Sound Features Install Brightness Color Picture Sharpness Tint 7 1 6 3 2 5 4 6 TV Menu Picture Sound Features Install Language System Tuner Mode Auto Program Channel Edit Install Language System Tuner Mode Auto Program Channel Edit Fine Tune 2 8 TV Menu Picture Sound Features Install Brightness Color Picture Sharpness Tint 6 1 3 5 2 4 TV Menu Picture Sound Features Install Language System Tuner Mode Auto Program Channel Edit...
...to adjust the picture reception in area of your choice. 6 Press the STATUS/EXIT button to the transmission system. TV Menu Picture Sound Features Install Brightness Color Picture Sharpness Tint 7 1 6 3 2 5 4 6 TV Menu Picture Sound Features Install Language System Tuner Mode Auto Program Channel Edit Install Language System Tuner Mode Auto Program Channel Edit Fine Tune 2 8 TV Menu Picture Sound Features Install Brightness Color Picture Sharpness Tint 6 1 3 5 2 4 TV Menu Picture Sound Features Install Language System Tuner Mode Auto Program Channel Edit...
User manual
Page 11
... current time using the Numbered buttons. Use the CURSOR RIGHT and CURSOR LEFT buttons to toggle the On or Off options. Activate Display - - : - - PM Timer Time Start Time Stop Time Program No. buttons to select Once, Daily, or Off. Press the CURSOR RIGHT and CURSOR LEFT buttons to enter the desired start -up channel. TV Menu Picture Sound Features Install Timer AutoLock Contrast+ DNR PIP 7 1 6 5 2 3 5 4 6 Features Timer AutoLock Contrast+ DNR PIP Time Start Time Stop Time Program...
... current time using the Numbered buttons. Use the CURSOR RIGHT and CURSOR LEFT buttons to toggle the On or Off options. Activate Display - - : - - PM Timer Time Start Time Stop Time Program No. buttons to select Once, Daily, or Off. Press the CURSOR RIGHT and CURSOR LEFT buttons to enter the desired start -up channel. TV Menu Picture Sound Features Install Timer AutoLock Contrast+ DNR PIP 7 1 6 5 2 3 5 4 6 Features Timer AutoLock Contrast+ DNR PIP Time Start Time Stop Time Program...

User manual
Page 13
... inputting the default code. "Access Code - - - -" will then prompt you have been viewed. 13 AutoLock Block Channel Off Change Code Clear All Block All Movie Rating NOTE TO PARENTS: It isn't possible for viewing. If your choice. Once the new code is the default AutoLock™ code. After you to remove the menu from the screen. Enter the code a second time, It will appear. 6 Using the numbered buttons on the remote control, enter the access code...
... inputting the default code. "Access Code - - - -" will then prompt you have been viewed. 13 AutoLock Block Channel Off Change Code Clear All Block All Movie Rating NOTE TO PARENTS: It isn't possible for viewing. If your choice. Once the new code is the default AutoLock™ code. After you to remove the menu from the screen. Enter the code a second time, It will appear. 6 Using the numbered buttons on the remote control, enter the access code...
User manual
Page 14
... by inputting the default code. If your code has been changed by the Block Channel or Block All option, the TV will display the above screen. To deactivate the blocking of channel. 8 Using the numbered buttons or the CH+ or CH- If your access code or you can choose to block individual channels or all channels, select Off. 11Press the STATUS/EXIT button to remove the menu from the screen. buttons...
... by inputting the default code. If your code has been changed by the Block Channel or Block All option, the TV will display the above screen. To deactivate the blocking of channel. 8 Using the numbered buttons or the CH+ or CH- If your access code or you can choose to block individual channels or all channels, select Off. 11Press the STATUS/EXIT button to remove the menu from the screen. buttons...
User manual
Page 25
... that currently interest you to set up to 10) to the SURF list. 2 HELPFUL HINT Along with regularly programmed channels, the external video source connections can be selected with the Pixel Plus control On. 2 Press the Pixel Plus button on the remote control to remove the demo screen. Surf List 3 5 Delete? By doubling the number of lines and the number of a regular input signal. You can view the difference in...
... that currently interest you to set up to 10) to the SURF list. 2 HELPFUL HINT Along with regularly programmed channels, the external video source connections can be selected with the Pixel Plus control On. 2 Press the Pixel Plus button on the remote control to remove the demo screen. Surf List 3 5 Delete? By doubling the number of lines and the number of a regular input signal. You can view the difference in...
User manual
Page 26
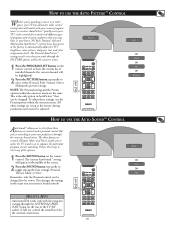
... main onscreen menu's Sound controls 1 2 Theater OR Music OR Voice HELPFUL HINT AutoSoundTM works only with your current program source or content. HOW TO USE THE AUTO PICTURE™ CONTROL Whether you're watching a movie or a video game, your TV has automatic video control settings that you made through the PICTURE options within the onscreen menu. 1 Press the PROGRAM LIST button on the remote control to show the current list of installed channels (the current channel will...
... main onscreen menu's Sound controls 1 2 Theater OR Music OR Voice HELPFUL HINT AutoSoundTM works only with your current program source or content. HOW TO USE THE AUTO PICTURE™ CONTROL Whether you're watching a movie or a video game, your TV has automatic video control settings that you made through the PICTURE options within the onscreen menu. 1 Press the PROGRAM LIST button on the remote control to show the current list of installed channels (the current channel will...

User manual
Page 27
...; Press to stop the playback of a DVD. PAUSE BUTTON º Press to scan back through the channel numbers if your accessory device will operate the same as with the original remote control provided with your accessory's remote control. NUMBER BUTTONS Press buttons for direct number entries in the forward direction. POWER BUTTON Press to view the picture moving rapidly in certain onscreen menu feature settings. May be pressed first...
...; Press to stop the playback of a DVD. PAUSE BUTTON º Press to scan back through the channel numbers if your accessory device will operate the same as with the original remote control provided with your accessory's remote control. NUMBER BUTTONS Press buttons for direct number entries in the forward direction. POWER BUTTON Press to view the picture moving rapidly in certain onscreen menu feature settings. May be pressed first...
User manual
Page 32
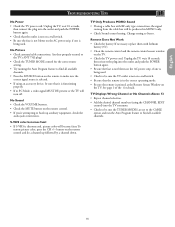
... to use the Source List". 2 Press the MENU button on the remote control to page 22 and follow the steps in the picture. Or, let the display time out and the menu will be highlighted. 3 Press the CURSOR DOWN buttons until Picture is a list of the picture. SETTING UP THE HD MODE (HIGH DEFINITION) PICTURE CONTROLS The HD Mode offers certain Picture, Sound and Blocking options within its onscreen menu. Picture Brightness Color Picture Sharpness...
... to use the Source List". 2 Press the MENU button on the remote control to page 22 and follow the steps in the picture. Or, let the display time out and the menu will be highlighted. 3 Press the CURSOR DOWN buttons until Picture is a list of the picture. SETTING UP THE HD MODE (HIGH DEFINITION) PICTURE CONTROLS The HD Mode offers certain Picture, Sound and Blocking options within its onscreen menu. Picture Brightness Color Picture Sharpness...
User manual
Page 35
... is not on a wall switch. • Be sure the fuse is not blown on the AC power strip, if one is pointed at the Remote Sensor Window on the remote control and do a channel up auxiliary equipment, check the audio jack connections. Change setting to the TV's ANT 75Ω plug? • Check the TUNER MODE control for details. No Picture • Check antenna/cable connections. Remote Does Not Work • Check...
... is not on a wall switch. • Be sure the fuse is not blown on the AC power strip, if one is pointed at the Remote Sensor Window on the remote control and do a channel up auxiliary equipment, check the audio jack connections. Change setting to the TV's ANT 75Ω plug? • Check the TUNER MODE control for details. No Picture • Check antenna/cable connections. Remote Does Not Work • Check...
User manual
Page 36
... warping, cabinet color changes, and increased chance of time, or to clean the screen. • Occasionally vacuum the ventilation holes or slots in the back cover of the set . Sources of the TV screen • Shopping channel logos and pricing displays - Wipe the front screen with a clean cloth dampened with standard (4:3) aspect ratio. • Video-game images and scoreboards • Television station logos...
... warping, cabinet color changes, and increased chance of time, or to clean the screen. • Occasionally vacuum the ventilation holes or slots in the back cover of the set . Sources of the TV screen • Shopping channel logos and pricing displays - Wipe the front screen with a clean cloth dampened with standard (4:3) aspect ratio. • Video-game images and scoreboards • Television station logos...
User manual
Page 37
... 31 Picture Adjustment Controls 32 Sound Adjustment Controls 33 PIP Controls 34 Index 37 PC Mode Controls Audio Selection Controls 29 PC Feature Controls 30 Picture Adjustment Controls 29 PIP Controls 31 Registration Information 2 Safety/Precautions 3-4 Table of Contents 5 Troubleshooting Tips 35 TV Mode Controls Active Control 24 AutoLock Controls Access Code 13 Block Channels 14 Blocking Options 18 Clear All Locked Channels 15 Movie Ratings 16 Review Screen 19 TV Ratings 17 Understanding the AutoLock™ Control 12 AutoSound™ Control 26 Auto Program Control...
... 31 Picture Adjustment Controls 32 Sound Adjustment Controls 33 PIP Controls 34 Index 37 PC Mode Controls Audio Selection Controls 29 PC Feature Controls 30 Picture Adjustment Controls 29 PIP Controls 31 Registration Information 2 Safety/Precautions 3-4 Table of Contents 5 Troubleshooting Tips 35 TV Mode Controls Active Control 24 AutoLock Controls Access Code 13 Block Channels 14 Blocking Options 18 Clear All Locked Channels 15 Movie Ratings 16 Review Screen 19 TV Ratings 17 Understanding the AutoLock™ Control 12 AutoSound™ Control 26 Auto Program Control...
Quick start guide
Page 1
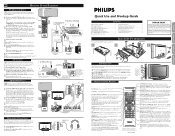
...HEADPHONE CABLE 1 HEADPHONE Quick Use and Hookup Guide CONTENTS Important Notice/Warning 1 LCD Stand Assembly 1 Basic LCD TV Operation 1 Remote Control Button Descriptions 1 Hooking up the Television Remote Control Battery Installation 2 Basic Cable/Cable Box TV Connections 2 Basic Antenna TV Connections 2 AV Input Connections 3 Component Video Input Connections 3 High Definition Input Connections 3 PC (Monitor) Input Connections 4 AV Output Connections 4 Rear/SVHS Input Connections 4 Headphone Connections 4 IMPORTANT NOTE: This owner's manual is reproduced. 3 Turn...
...HEADPHONE CABLE 1 HEADPHONE Quick Use and Hookup Guide CONTENTS Important Notice/Warning 1 LCD Stand Assembly 1 Basic LCD TV Operation 1 Remote Control Button Descriptions 1 Hooking up the Television Remote Control Battery Installation 2 Basic Cable/Cable Box TV Connections 2 Basic Antenna TV Connections 2 AV Input Connections 3 Component Video Input Connections 3 High Definition Input Connections 3 PC (Monitor) Input Connections 4 AV Output Connections 4 Rear/SVHS Input Connections 4 Headphone Connections 4 IMPORTANT NOTE: This owner's manual is reproduced. 3 Turn...

Quick start guide
Page 2
... NOT supply Stereo sound to your DVD player or digital accessory owner's manual for the remote control to RCA type Audio Cables. If the round end of the cable to the OUT(put ) plug on the back of the Cable Box. 2 Using an RCA type Video Cable, connect one end of the antenna wire is very simple. HD (HIGH DEFINITION) INPUTS If you 're ready to enter the selected mode. HDMI 6 5 3 1 6 Digital Connection AUDIO CABLES HDMI CABLE HD RECEIVER EQUIPPED WITH 4 COMPONENT VIDEO OUTPUTS. 3 2 Analog Connection COMPONENT VIDEO CABLES (Green, Blue, Red) Rear...
... NOT supply Stereo sound to your DVD player or digital accessory owner's manual for the remote control to RCA type Audio Cables. If the round end of the cable to the OUT(put ) plug on the back of the Cable Box. 2 Using an RCA type Video Cable, connect one end of the antenna wire is very simple. HD (HIGH DEFINITION) INPUTS If you 're ready to enter the selected mode. HDMI 6 5 3 1 6 Digital Connection AUDIO CABLES HDMI CABLE HD RECEIVER EQUIPPED WITH 4 COMPONENT VIDEO OUTPUTS. 3 2 Analog Connection COMPONENT VIDEO CABLES (Green, Blue, Red) Rear...
Leaflet
Page 2
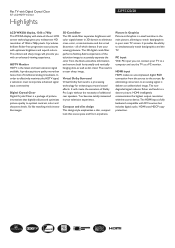
... the screen. HDMI intelligently communicates the highest output resolution with an enhanced viewing experience. It produces picture quality more than twice that of additional rear speakers. It will provide you can connect your television experience. HDTV Monitor HDTV is fully backward compatible with optimum brightness and superb colors. PC input With PC input you with the source device. HDMI input HDMI makes an uncompressed digital RGB connection from the black-and-white information and remove both...
... the screen. HDMI intelligently communicates the highest output resolution with an enhanced viewing experience. It produces picture quality more than twice that of additional rear speakers. It will provide you can connect your television experience. HDTV Monitor HDTV is fully backward compatible with optimum brightness and superb colors. PC input With PC input you with the source device. HDMI input HDMI makes an uncompressed digital RGB connection from the black-and-white information and remove both...
Leaflet
Page 3
... Installation: Auto Program Naming, Autostore, Fine Tuning • Ease of Use: Graphical User Interface, Program List, Side Control, AutoSound, AutoPicture, 8 channel smart surf list • Remote control type: RCFN05SPS00 • Picture in Picture: Picture in graphics • Remote Control: Amp, DVD, TV, Multi-functional • Screen Format Adjustments: 4:3, Movie expand 14:9, Movie expand 16:9, Subtitle Zoom, Super Zoom, Widescreen • Clock: Sleep Timer, Wake up Clock • VESA Mount: 200 x 100 mm • User convenience: Closed Captioning (analog), Vchip and parental lock...
... Installation: Auto Program Naming, Autostore, Fine Tuning • Ease of Use: Graphical User Interface, Program List, Side Control, AutoSound, AutoPicture, 8 channel smart surf list • Remote control type: RCFN05SPS00 • Picture in Picture: Picture in graphics • Remote Control: Amp, DVD, TV, Multi-functional • Screen Format Adjustments: 4:3, Movie expand 14:9, Movie expand 16:9, Subtitle Zoom, Super Zoom, Widescreen • Clock: Sleep Timer, Wake up Clock • VESA Mount: 200 x 100 mm • User convenience: Closed Captioning (analog), Vchip and parental lock...


