User manual
Page 5
...want your children to view inappropriate materials. AutoLock™ allows you press the Channel (+) or (-) buttons on your remote control. As an Energy Star® Partner, Philips Consumer Electronics has determined this product meets the Energy Star® guidelines for a more consistent, comfortable sound. registered ...How to use the AutoPicture™ Control 26 How to use the AutoSound™ Control 26 Remote Control Accessory Device Related Buttons 27 How to use the Remote Control with Philips accessory devices .. 28 SETTING UP THE PC (PERSONAL COMPUTER) MODE How to use the ...
...want your children to view inappropriate materials. AutoLock™ allows you press the Channel (+) or (-) buttons on your remote control. As an Energy Star® Partner, Philips Consumer Electronics has determined this product meets the Energy Star® guidelines for a more consistent, comfortable sound. registered ...How to use the AutoPicture™ Control 26 How to use the AutoSound™ Control 26 Remote Control Accessory Device Related Buttons 27 How to use the Remote Control with Philips accessory devices .. 28 SETTING UP THE PC (PERSONAL COMPUTER) MODE How to use the ...
User manual
Page 6
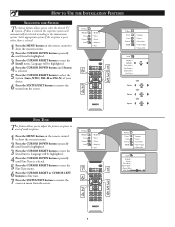
...important for the TV to know what type of signal is connected, either English, French, Spanish or Portuguese. 1 Press the MENU button on the remote control to select Cable, Antenna, or Auto. Language is highlighted. 3 Press the CURSOR RIGHT button to remove the menu from the screen. When ...HINT Remember, the Language control makes only the TV's onscreen Menu items appear in either Antenna or Cable. 1 Press the MENU button on the remote control to show the onscreen menu. 2 Press the CURSOR DOWN button repeatedly until Install is highlighted. 4 Press the CURSOR DOWN button to select ...
...important for the TV to know what type of signal is connected, either English, French, Spanish or Portuguese. 1 Press the MENU button on the remote control to select Cable, Antenna, or Auto. Language is highlighted. 3 Press the CURSOR RIGHT button to remove the menu from the screen. When ...HINT Remember, the Language control makes only the TV's onscreen Menu items appear in either Antenna or Cable. 1 Press the MENU button on the remote control to show the onscreen menu. 2 Press the CURSOR DOWN button repeatedly until Install is highlighted. 4 Press the CURSOR DOWN button to select ...
User manual
Page 7
...cable TV signal must first be connected to your area by pressing the CHANNEL (+) or (-) button. 1 Press the MENU button on the remote control to show the onscreen menu. 2 Press the CURSOR DOWN button repeatedly until Install is highlighted. 3 Press the CURSOR RIGHT button to enter ... while you can automatically set itself for you to select only the TV stations in the TV's memory. 1 Press the MENU button on the remote control to show the onscreen menu. 2 Press the CURSOR DOWN button repeatedly until Install is highlighted. 3 Press the CURSOR RIGHT button to be highlighted...
...cable TV signal must first be connected to your area by pressing the CHANNEL (+) or (-) button. 1 Press the MENU button on the remote control to show the onscreen menu. 2 Press the CURSOR DOWN button repeatedly until Install is highlighted. 3 Press the CURSOR RIGHT button to enter ... while you can automatically set itself for you to select only the TV stations in the TV's memory. 1 Press the MENU button on the remote control to show the onscreen menu. 2 Press the CURSOR DOWN button repeatedly until Install is highlighted. 3 Press the CURSOR RIGHT button to be highlighted...
User manual
Page 8
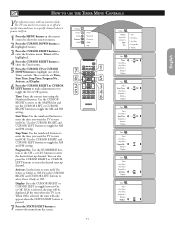
Select appropriate system if the reception is poor when Auto is selected. 1 Press the MENU button on the remote control to show the onscreen menu. 2 Press the CURSOR DOWN button repeatedly until Install is highlighted. 3 Press the CURSOR RIGHT button to enter the Install ... is selected. 5 Press the CURSOR RIGHT button to select the System (Auto, NTSC, PAL-M or PAL-N) of weak reception. 1 Press the MENU button on the remote control to show the onscreen menu. 2 Press the CURSOR DOWN button repeatedly until Fine Tune is highlighted. 3 Press the CURSOR RIGHT button to enter the...
Select appropriate system if the reception is poor when Auto is selected. 1 Press the MENU button on the remote control to show the onscreen menu. 2 Press the CURSOR DOWN button repeatedly until Install is highlighted. 3 Press the CURSOR RIGHT button to enter the Install ... is selected. 5 Press the CURSOR RIGHT button to select the System (Auto, NTSC, PAL-M or PAL-N) of weak reception. 1 Press the MENU button on the remote control to show the onscreen menu. 2 Press the CURSOR DOWN button repeatedly until Fine Tune is highlighted. 3 Press the CURSOR RIGHT button to enter the...

User manual
Page 9
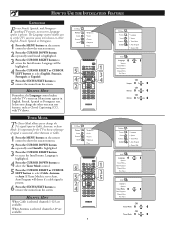
... HOW TO USE THE PICTURE ADJUSTMENT CONTROLS To adjust your TV picture controls, select a channel and follow these steps. 1 Press the MENU button on the remote control to show the onscreen menu. 2 Press the CURSOR RIGHT button to obtain natural skin tones. NOTE: The Sharpness and Tint Controls will keep the...
... HOW TO USE THE PICTURE ADJUSTMENT CONTROLS To adjust your TV picture controls, select a channel and follow these steps. 1 Press the MENU button on the remote control to show the onscreen menu. 2 Press the CURSOR RIGHT button to obtain natural skin tones. NOTE: The Sharpness and Tint Controls will keep the...

User manual
Page 10
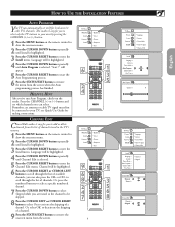
adjusts the level of sound coming from Stereo or Mono. Dolby Virtual - when On, AVL will appear on the remote control to 10KHz. Note: If SAP is not available, "No SAP" will level out the sound being heard when sudden changes in volume occur during ...
adjusts the level of sound coming from Stereo or Mono. Dolby Virtual - when On, AVL will appear on the remote control to 10KHz. Note: If SAP is not available, "No SAP" will level out the sound being heard when sudden changes in volume occur during ...
User manual
Page 11
... to turn on or off at a specific time and tune to a specific channel when it powers itself On. If On is on the remote control to show the onscreen menu. 2 Press the CURSOR DOWN button to highlight Features. 3 Press the CURSOR RIGHT button to enter the desired start -up...
... to turn on or off at a specific time and tune to a specific channel when it powers itself On. If On is on the remote control to show the onscreen menu. 2 Press the CURSOR DOWN button to highlight Features. 3 Press the CURSOR RIGHT button to enter the desired start -up...

User manual
Page 13
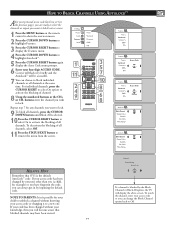
...to change code. 7 Using the numbered buttons on the screen. Enter the code a second time, It will appear. 6 Using the numbered buttons on the remote control to show the onscreen menu. 2 Press the CURSOR DOWN button to highlight Features. 3 Press the CURSOR RIGHT button to enter the Features menu. 4 ... the code once, Incorrect will become aware that 0711 is the default code. If your AutoLock access code. 1 Press the MENU button on the remote control, enter the access code. First, let's set your code has been changed by someone other fuctions, press the STATUS/EXIT button to enter...
...to change code. 7 Using the numbered buttons on the screen. Enter the code a second time, It will appear. 6 Using the numbered buttons on the remote control to show the onscreen menu. 2 Press the CURSOR DOWN button to highlight Features. 3 Press the CURSOR RIGHT button to enter the Features menu. 4 ... the code once, Incorrect will become aware that 0711 is the default code. If your AutoLock access code. 1 Press the MENU button on the remote control, enter the access code. First, let's set your code has been changed by someone other fuctions, press the STATUS/EXIT button to enter...
User manual
Page 14
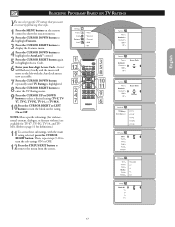
... On to activate the blocking of all channels. buttons enter the channel you want to block out or censor. 1 Press the MENU button on the remote control to show the onscreen menu. 2 Press the CURSOR DOWN button to highlight Features. 3 Press the CURSOR RIGHT button to display the Features menu. 4 Press...
... On to activate the blocking of all channels. buttons enter the channel you want to block out or censor. 1 Press the MENU button on the remote control to show the onscreen menu. 2 Press the CURSOR DOWN button to highlight Features. 3 Press the CURSOR RIGHT button to display the Features menu. 4 Press...
User manual
Page 15
... and turn OFF the AutoLock™ feature by using the Clear All control or by entering your access code. 1 Press the MENU button on the remote control to show the onscreen menu. 2 Press the CURSOR DOWN button to highlight Features. 3 Press the CURSOR RIGHT button to display the Features menu. 4 Press...
... and turn OFF the AutoLock™ feature by using the Clear All control or by entering your access code. 1 Press the MENU button on the remote control to show the onscreen menu. 2 Press the CURSOR DOWN button to highlight Features. 3 Press the CURSOR RIGHT button to display the Features menu. 4 Press...
User manual
Page 16
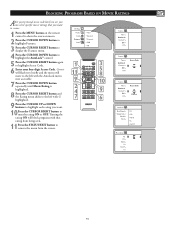
... block programs with G highlighted. 9 Press the CURSOR UP or DOWN buttons to highlight each rating you want to censor. 1 Press the MENU button on the remote control to show the onscreen menu. 2 Press the CURSOR DOWN button to highlight Features. 3 Press the CURSOR RIGHT button to display the Features menu. 4 Press...
... block programs with G highlighted. 9 Press the CURSOR UP or DOWN buttons to highlight each rating you want to censor. 1 Press the MENU button on the remote control to show the onscreen menu. 2 Press the CURSOR DOWN button to highlight Features. 3 Press the CURSOR RIGHT button to display the Features menu. 4 Press...
User manual
Page 17
... 11 9 6 Features Timer AutoLock Contrast+ DNR PIP Features Timer AutoLock Contrast+ DNR PIP Access Code - - - - Then, repeat steps 9-10 to turn the block on the remote control to show the onscreen menu. 2 Press the CURSOR DOWN button to highlight Features. 3 Press the CURSOR RIGHT button to display the Features menu. 4 Press...
... 11 9 6 Features Timer AutoLock Contrast+ DNR PIP Features Timer AutoLock Contrast+ DNR PIP Access Code - - - - Then, repeat steps 9-10 to turn the block on the remote control to show the onscreen menu. 2 Press the CURSOR DOWN button to highlight Features. 3 Press the CURSOR RIGHT button to display the Features menu. 4 Press...
User manual
Page 18
... is disabled. blocking will occur according to On. Blocking: Might be called the "master switch" for AutoLock™. Unrated: All unrated programs based on the remote control to show the onscreen menu. 2 Press the CURSOR UP or CURSOR DOWN button to highlight Features. 3 Press the CURSOR RIGHT button to display the...
... is disabled. blocking will occur according to On. Blocking: Might be called the "master switch" for AutoLock™. Unrated: All unrated programs based on the remote control to show the onscreen menu. 2 Press the CURSOR UP or CURSOR DOWN button to highlight Features. 3 Press the CURSOR RIGHT button to display the...
User manual
Page 19
... according to your AutoLockTM settings. AutoLock Disabled 19 See previous page for violence in the TV-PG category, these blocked subratings will appear on the remote control TWICE.
... according to your AutoLockTM settings. AutoLock Disabled 19 See previous page for violence in the TV-PG category, these blocked subratings will appear on the remote control TWICE.
User manual
Page 20
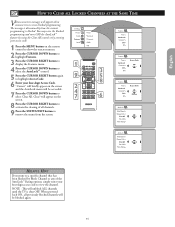
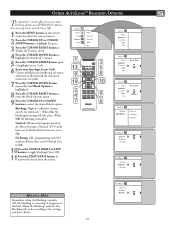
... DNR (Dynamic Noise Reduction) function helps to diminish signal "noise" in darkness and the white portions become brighter. 1 Press the MENU button on the remote control to show the on -screen menu. 2 Press the CURSOR DOWN button to highlight Features. 3 Press the CURSOR RIGHT button to access the Features ...20 The black portions of the picture become richer in the picture or what is known as "speckled" picture. 1 Press the MENU button on the remote control to show the on -screen menu. 2 Press the CURSOR DOWN button to highlight Features. 3 Press the CURSOR RIGHT button to access the ...
... DNR (Dynamic Noise Reduction) function helps to diminish signal "noise" in darkness and the white portions become brighter. 1 Press the MENU button on the remote control to show the on -screen menu. 2 Press the CURSOR DOWN button to highlight Features. 3 Press the CURSOR RIGHT button to access the Features ...20 The black portions of the picture become richer in the picture or what is known as "speckled" picture. 1 Press the MENU button on the remote control to show the on -screen menu. 2 Press the CURSOR DOWN button to highlight Features. 3 Press the CURSOR RIGHT button to access the ...

User manual
Page 21
... button to move the PIP screen horizontally to the desired position. 9 If you can also access the PIP window by pressing the button on the remote control to show the onscreen menu. 2 Press the CURSOR DOWN button to highlight Features. 3 Press the CURSOR RIGHT button access the Features menu. 4 Press the... the CURSOR LEFT or CURSOR RIGHT button to move the PIP screen up a PIP window for details on connections.) 1 Press the MENU button on the remote control.
... button to move the PIP screen horizontally to the desired position. 9 If you can also access the PIP window by pressing the button on the remote control to show the onscreen menu. 2 Press the CURSOR DOWN button to highlight Features. 3 Press the CURSOR RIGHT button access the Features menu. 4 Press the... the CURSOR LEFT or CURSOR RIGHT button to move the PIP screen up a PIP window for details on connections.) 1 Press the MENU button on the remote control.
User manual
Page 22
... Expand 16:9, Subtitle Zoom, Super Zoom or Widescreen. 1 Press the FORMAT button repeatedly to match the type of program you're watching. Depending on the remote control to show the Source menu. 2 Press the CURSOR DOWN button until the desired Mode (TV, AV, REAR/SVHS, CVI-1[SD/HD], CVI-2[SD/HD...
... Expand 16:9, Subtitle Zoom, Super Zoom or Widescreen. 1 Press the FORMAT button repeatedly to match the type of program you're watching. Depending on the remote control to show the Source menu. 2 Press the CURSOR DOWN button until the desired Mode (TV, AV, REAR/SVHS, CVI-1[SD/HD], CVI-2[SD/HD...
User manual
Page 23
... to 90 minute increments, and 60-minute increments up to have it wake you up at two in progress. 1 Press the CC button on the remote control to close the deal. During the last minute of a SLEEP timer setting, an onscreen countdown will appear during the transmission of a program offering... appear in your ears? Nor are pushing to select a caption mode: CC Off, CC1, CC2, or CC Mute if the TV station broadcasting on the remote control. Designed to help the hearing impaired, this week? CC Off 1 CC1 OR CC2 OR CC Mute JOHN: Why did they are all TV programs...
... to 90 minute increments, and 60-minute increments up to have it wake you up at two in progress. 1 Press the CC button on the remote control to close the deal. During the last minute of a SLEEP timer setting, an onscreen countdown will appear during the transmission of a program offering... appear in your ears? Nor are pushing to select a caption mode: CC Off, CC1, CC2, or CC Mute if the TV station broadcasting on the remote control. Designed to help the hearing impaired, this week? CC Off 1 CC1 OR CC2 OR CC Mute JOHN: Why did they are all TV programs...
User manual
Page 24
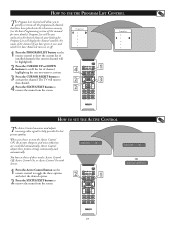
... OR Active Control On With Sensor 24 HOW TO USE THE PROGRAM LIST CONTROL The Program List Control will allow you to turn on the remote control to show the current list of installed channels (the current channel will be highlighted). 2 Press the CURSOR UP or DOWN buttons to... section of three modes: Active Control Off, Active Control On, or Active Control On with Sensor. 1 Press the Active Control button on the remote control to toggle the three options and select the desired option. 2 Press the STATUS/EXIT button to help provide the best picture quality. Active Control...
... OR Active Control On With Sensor 24 HOW TO USE THE PROGRAM LIST CONTROL The Program List Control will allow you to turn on the remote control to show the current list of installed channels (the current channel will be highlighted). 2 Press the CURSOR UP or DOWN buttons to... section of three modes: Active Control Off, Active Control On, or Active Control On with Sensor. 1 Press the Active Control button on the remote control to toggle the three options and select the desired option. 2 Press the STATUS/EXIT button to help provide the best picture quality. Active Control...
User manual
Page 25
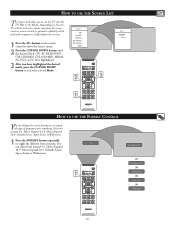
...screen. Surf List 3 Delete? Surf List 3 5 Add? This means that the external A/V Jacks and their channel and use the same steps described on the remote control. You can be shown with "ADD?" to ten channels in its quick viewing list. Use the Source button to tune their channels can easily... side of previously viewed channels can only see the difference in a regular broadcast signal and one enhanced with the SURF button on the remote control. Pexel Plus Demo Pixel Plus Demo Off On 1 2 NOTE: You cannot turn Pixel Plus™ off, it is shown with the Pixel ...
...screen. Surf List 3 Delete? Surf List 3 5 Add? This means that the external A/V Jacks and their channel and use the same steps described on the remote control. You can be shown with "ADD?" to ten channels in its quick viewing list. Use the Source button to tune their channels can easily... side of previously viewed channels can only see the difference in a regular broadcast signal and one enhanced with the SURF button on the remote control. Pexel Plus Demo Pixel Plus Demo Off On 1 2 NOTE: You cannot turn Pixel Plus™ off, it is shown with the Pixel ...


