User manual
Page 5
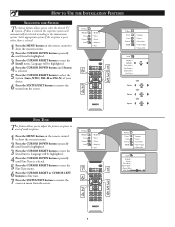
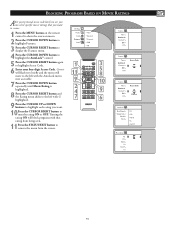
... control that occur during program changes or commercial breaks are reduced, making Connections and Remote Control Operation. 5 Closed Captioning allows the viewer to your own preferences through the onscreen Sound menu. As an Energy Star® Partner, Philips Consumer Electronics has determined this product meets the Energy Star® guidelines for a more...
... control that occur during program changes or commercial breaks are reduced, making Connections and Remote Control Operation. 5 Closed Captioning allows the viewer to your own preferences through the onscreen Sound menu. As an Energy Star® Partner, Philips Consumer Electronics has determined this product meets the Energy Star® guidelines for a more...
User manual
Page 6
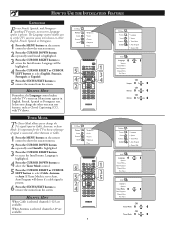
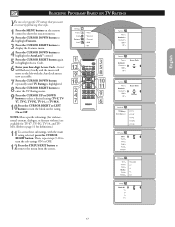
...important for the TV to know what type of signal is connected, either English, French, Spanish or Portuguese. 1 Press the MENU button on the remote control to show the onscreen menu. 2 Press the CURSOR DOWN button repeatedly until Install is present. 6 Press the STATUS/EXIT button to access ...HINT Remember, the Language control makes only the TV's onscreen Menu items appear in either Antenna or Cable. 1 Press the MENU button on the remote control to show the onscreen menu. 2 Press the CURSOR DOWN button repeatedly until Install is highlighted. 3 Press the CURSOR RIGHT button to access...
...important for the TV to know what type of signal is connected, either English, French, Spanish or Portuguese. 1 Press the MENU button on the remote control to show the onscreen menu. 2 Press the CURSOR DOWN button repeatedly until Install is present. 6 Press the STATUS/EXIT button to access ...HINT Remember, the Language control makes only the TV's onscreen Menu items appear in either Antenna or Cable. 1 Press the MENU button on the remote control to show the onscreen menu. 2 Press the CURSOR DOWN button repeatedly until Install is highlighted. 3 Press the CURSOR RIGHT button to access...
User manual
Page 7
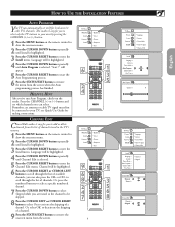
...or cable TV signal must first be connected to your area by pressing the CHANNEL (+) or (-) button. 1 Press the MENU button on the remote control to show the onscreen menu. 2 Press the CURSOR DOWN button repeatedly until Install is selected. 5 Press the CURSOR RIGHT button to enter the Channel... Your TV can automatically set itself for you to select only the TV stations in the TV's memory. 1 Press the MENU button on the remote control to show the onscreen menu. 2 Press the CURSOR DOWN button repeatedly until Install is selected. to enter the Install menu. Language will be...
...or cable TV signal must first be connected to your area by pressing the CHANNEL (+) or (-) button. 1 Press the MENU button on the remote control to show the onscreen menu. 2 Press the CURSOR DOWN button repeatedly until Install is selected. 5 Press the CURSOR RIGHT button to enter the Channel... Your TV can automatically set itself for you to select only the TV stations in the TV's memory. 1 Press the MENU button on the remote control to show the onscreen menu. 2 Press the CURSOR DOWN button repeatedly until Install is selected. to enter the Install menu. Language will be...
User manual
Page 8
... Press the CURSOR RIGHT button to select the System (Auto, NTSC, PAL-M or PAL-N) of weak reception. 1 Press the MENU button on the remote control to show the onscreen menu. 2 Press the CURSOR DOWN button repeatedly until Install is highlighted. 3 Press the CURSOR RIGHT button to remove the onscreen...button to enter the Install menu. Select appropriate system if the reception is poor when Auto is selected. 1 Press the MENU button on the remote control to show the onscreen menu. 2 Press the CURSOR DOWN button repeatedly until Install is highlighted. 3 Press the CURSOR RIGHT button to ...
... Press the CURSOR RIGHT button to select the System (Auto, NTSC, PAL-M or PAL-N) of weak reception. 1 Press the MENU button on the remote control to show the onscreen menu. 2 Press the CURSOR DOWN button repeatedly until Install is highlighted. 3 Press the CURSOR RIGHT button to remove the onscreen...button to enter the Install menu. Select appropriate system if the reception is poor when Auto is selected. 1 Press the MENU button on the remote control to show the onscreen menu. 2 Press the CURSOR DOWN button repeatedly until Install is highlighted. 3 Press the CURSOR RIGHT button to ...

User manual
Page 9
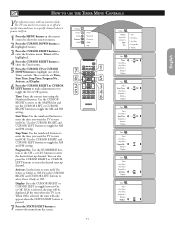
... HOW TO USE THE PICTURE ADJUSTMENT CONTROLS To adjust your TV picture controls, select a channel and follow these steps. 1 Press the MENU button on the remote control to show the onscreen menu. 2 Press the CURSOR RIGHT button to obtain natural skin tones. Picture Brightness Color Picture 42 Sharpness Tint Color Temp...
... HOW TO USE THE PICTURE ADJUSTMENT CONTROLS To adjust your TV picture controls, select a channel and follow these steps. 1 Press the MENU button on the remote control to show the onscreen menu. 2 Press the CURSOR RIGHT button to obtain natural skin tones. Picture Brightness Color Picture 42 Sharpness Tint Color Temp...

User manual
Page 10
Picture will appear on the remote control to 10KHz. Select from Stereo or Mono. Note: If SAP is not available, "No SAP" will be heard apart from the current TV program ...
Picture will appear on the remote control to 10KHz. Select from Stereo or Mono. Note: If SAP is not available, "No SAP" will be heard apart from the current TV program ...
User manual
Page 11
... 7 1 6 5 2 3 5 4 6 Features Timer AutoLock Contrast+ DNR PIP Time Start Time Stop Time Program No. Timer will only appear when the STATUS/EXIT button is on the remote control to show the onscreen menu. 2 Press the CURSOR DOWN button to highlight Features. 3 Press the CURSOR RIGHT button to highlight one of the Timer...
... 7 1 6 5 2 3 5 4 6 Features Timer AutoLock Contrast+ DNR PIP Time Start Time Stop Time Program No. Timer will only appear when the STATUS/EXIT button is on the remote control to show the onscreen menu. 2 Press the CURSOR DOWN button to highlight Features. 3 Press the CURSOR RIGHT button to highlight one of the Timer...

User manual
Page 13
...in the menu. 8 If you will become aware that 0711 is confirmed, the AutoLock menu will appear. 6 Using the numbered buttons on the remote control to show the onscreen menu. 2 Press the CURSOR DOWN button to highlight Features. 3 Press the CURSOR RIGHT button to enter the Features menu. ...Using the numbered buttons on the screen. Enter the code a second time, It will appear on the remote control, enter the access code of your AutoLock access code. 1 Press the MENU button on the remote control, enter the access code. Once the new code is the default AutoLock™ code. If you...
...in the menu. 8 If you will become aware that 0711 is confirmed, the AutoLock menu will appear. 6 Using the numbered buttons on the remote control to show the onscreen menu. 2 Press the CURSOR DOWN button to highlight Features. 3 Press the CURSOR RIGHT button to enter the Features menu. ...Using the numbered buttons on the screen. Enter the code a second time, It will appear on the remote control, enter the access code of your AutoLock access code. 1 Press the MENU button on the remote control, enter the access code. Once the new code is the default AutoLock™ code. If you...
User manual
Page 14
... numbered buttons or the CH+ or CH- Repeat step 7 for any channels you want to block out or censor. 1 Press the MENU button on the remote control to show the onscreen menu. 2 Press the CURSOR DOWN button to highlight Features. 3 Press the CURSOR RIGHT button to display the Features menu. 4 Press...
... numbered buttons or the CH+ or CH- Repeat step 7 for any channels you want to block out or censor. 1 Press the MENU button on the remote control to show the onscreen menu. 2 Press the CURSOR DOWN button to highlight Features. 3 Press the CURSOR RIGHT button to display the Features menu. 4 Press...
User manual
Page 15
... button to activate the clearing of the AutoLock™ Rating options, simply enter your four-digit Access Code, "Correct" will briefly appear on the remote control to show the onscreen menu. 2 Press the CURSOR DOWN button to highlight Features. 3 Press the CURSOR RIGHT button to display the Features menu. 4 Press...
... button to activate the clearing of the AutoLock™ Rating options, simply enter your four-digit Access Code, "Correct" will briefly appear on the remote control to show the onscreen menu. 2 Press the CURSOR DOWN button to highlight Features. 3 Press the CURSOR RIGHT button to display the Features menu. 4 Press...
User manual
Page 16
... block programs with G highlighted. 9 Press the CURSOR UP or DOWN buttons to highlight each rating you want to censor. 1 Press the MENU button on the remote control to show the onscreen menu. 2 Press the CURSOR DOWN button to highlight Features. 3 Press the CURSOR RIGHT button to display the Features menu. 4 Press...
... block programs with G highlighted. 9 Press the CURSOR UP or DOWN buttons to highlight each rating you want to censor. 1 Press the MENU button on the remote control to show the onscreen menu. 2 Press the CURSOR DOWN button to highlight Features. 3 Press the CURSOR RIGHT button to display the Features menu. 4 Press...
User manual
Page 17
... 11 9 6 Features Timer AutoLock Contrast+ DNR PIP Features Timer AutoLock Contrast+ DNR PIP Access Code - - - - Then, repeat steps 9-10 to turn the block on the remote control to show the onscreen menu. 2 Press the CURSOR DOWN button to highlight Features. 3 Press the CURSOR RIGHT button to display the Features menu. 4 Press...
... 11 9 6 Features Timer AutoLock Contrast+ DNR PIP Features Timer AutoLock Contrast+ DNR PIP Access Code - - - - Then, repeat steps 9-10 to turn the block on the remote control to show the onscreen menu. 2 Press the CURSOR DOWN button to highlight Features. 3 Press the CURSOR RIGHT button to display the Features menu. 4 Press...
User manual
Page 18
...;. Correct will flash very briefly and the menu will move to select the desired block option. Unrated: All unrated programs based on the remote control to show the onscreen menu. 2 Press the CURSOR UP or CURSOR DOWN button to highlight Features. 3 Press the CURSOR RIGHT button to display the...
...;. Correct will flash very briefly and the menu will move to select the desired block option. Unrated: All unrated programs based on the remote control to show the onscreen menu. 2 Press the CURSOR UP or CURSOR DOWN button to highlight Features. 3 Press the CURSOR RIGHT button to display the...
User manual
Page 19
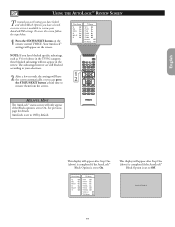
... to remove them from the screen. Your AutoLock™ settings will not appear in the TV-PG category, these blocked subratings will appear on the remote control TWICE. AutoLock is set to Off by default. AutoLock Disabled 19 English USING THE AUTOLOCK™ REVIEW SCREEN To remind you wich rating you...
... to remove them from the screen. Your AutoLock™ settings will not appear in the TV-PG category, these blocked subratings will appear on the remote control TWICE. AutoLock is set to Off by default. AutoLock Disabled 19 English USING THE AUTOLOCK™ REVIEW SCREEN To remind you wich rating you...
User manual
Page 20
...20 The black portions of the picture become richer in the picture or what is known as "speckled" picture. 1 Press the MENU button on the remote control to show the on -screen menu. 2 Press the CURSOR DOWN button to highlight Features. 3 Press the CURSOR RIGHT button to access the ... DNR (Dynamic Noise Reduction) function helps to diminish signal "noise" in darkness and the white portions become brighter. 1 Press the MENU button on the remote control to show the on -screen menu. 2 Press the CURSOR DOWN button to highlight Features. 3 Press the CURSOR RIGHT button to access the Features ...
...20 The black portions of the picture become richer in the picture or what is known as "speckled" picture. 1 Press the MENU button on the remote control to show the on -screen menu. 2 Press the CURSOR DOWN button to highlight Features. 3 Press the CURSOR RIGHT button to access the ... DNR (Dynamic Noise Reduction) function helps to diminish signal "noise" in darkness and the white portions become brighter. 1 Press the MENU button on the remote control to show the on -screen menu. 2 Press the CURSOR DOWN button to highlight Features. 3 Press the CURSOR RIGHT button to access the Features ...

User manual
Page 21
...the CURSOR LEFT or CURSOR RIGHT button to move the PIP screen up a PIP window for details on connections.) 1 Press the MENU button on the remote control. Press once to enter the PIP menu. To enable the PIP function, a HDMI Input source must be highlighted. 6 Press the CURSOR LEFT ...or CURSOR RIGHT button to select the available PIP Size options including Off, On, Small, Medium, Large, or Side-by pressing the button on the remote control to show the onscreen menu. 2 Press the CURSOR DOWN button to highlight Features. 3 Press the CURSOR RIGHT button access the Features menu. 4 Press...
...the CURSOR LEFT or CURSOR RIGHT button to move the PIP screen up a PIP window for details on connections.) 1 Press the MENU button on the remote control. Press once to enter the PIP menu. To enable the PIP function, a HDMI Input source must be highlighted. 6 Press the CURSOR LEFT ...or CURSOR RIGHT button to select the available PIP Size options including Off, On, Small, Medium, Large, or Side-by pressing the button on the remote control to show the onscreen menu. 2 Press the CURSOR DOWN button to highlight Features. 3 Press the CURSOR RIGHT button access the Features menu. 4 Press...
User manual
Page 22
... have their own onscreen menu controls to optimize capability when used with computers or high-definition receivers. 1 Press the AV+ button on the remote control to show the Source menu. 2 Press the CURSOR DOWN button until the desired Mode (TV, AV, REAR/SVHS, CVI-1[SD/HD], CVI-2[SD/HD...
... have their own onscreen menu controls to optimize capability when used with computers or high-definition receivers. 1 Press the AV+ button on the remote control to show the Source menu. 2 Press the CURSOR DOWN button until the desired Mode (TV, AV, REAR/SVHS, CVI-1[SD/HD], CVI-2[SD/HD...
User manual
Page 23
... minute increments, and 60minute increments up to 240 miutes) before the TV will appear in progress. 1 Press the CC button on the remote control to show dialogue and conversations while the TV program is making Closed Captioning available. Well, your area's TV program listings for the... uses onscreen "text boxes" to select a caption mode: CC Off, CC1, CC2, or CC Mute if the TV station broadcasting on the remote control. An onscreen countdown will be cancelled by automatically turning itself off, press the STATUS/EXIT button. Sleep 49 Sleep 9 23 CC Off 1...
... minute increments, and 60minute increments up to 240 miutes) before the TV will appear in progress. 1 Press the CC button on the remote control to show dialogue and conversations while the TV program is making Closed Captioning available. Well, your area's TV program listings for the... uses onscreen "text boxes" to select a caption mode: CC Off, CC1, CC2, or CC Mute if the TV station broadcasting on the remote control. An onscreen countdown will be cancelled by automatically turning itself off, press the STATUS/EXIT button. Sleep 49 Sleep 9 23 CC Off 1...
User manual
Page 24
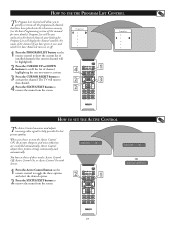
...section of three modes: Active Control Off, Active Control On, or Active Control On with Sensor. 1 Press the Active Control button on the remote control to toggle the three options and select the desired option. 2 Press the STATUS/EXIT button to remove the menu from the screen. 2 Program... List 2 3 4 5 6 HOW TO SET THE ACTIVE CONTROL The Active Control monitors and adjusts incoming video signals to turn on the remote control to show the current list of installed channels (the current channel will be highlighted). 2 Press the CURSOR UP or DOWN buttons to scroll the...
...section of three modes: Active Control Off, Active Control On, or Active Control On with Sensor. 1 Press the Active Control button on the remote control to toggle the three options and select the desired option. 2 Press the STATUS/EXIT button to remove the menu from the screen. 2 Program... List 2 3 4 5 6 HOW TO SET THE ACTIVE CONTROL The Active Control monitors and adjusts incoming video signals to turn on the remote control to show the current list of installed channels (the current channel will be highlighted). 2 Press the CURSOR UP or DOWN buttons to scroll the...
User manual
Page 25
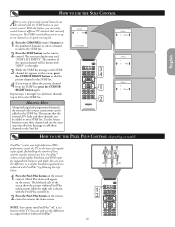
...HOW TO USE THE PIXEL PLUS CONTROL (depending on model) PixelPlus™ creates near high-definition (HD) performance inside the TV on the remote control. You can be added to tune their channels can view the difference in its quick viewing list. The left hand side of... delete the present channel from the SURF list, press the CURSOR RIGHT button again. 1 Repeat steps 1 through 3 to add more channels (up to your remote control. to the right. 3 While the SURF list message or the SURF channel list appears on the screen, press the CURSOR RIGHT button to add...
...HOW TO USE THE PIXEL PLUS CONTROL (depending on model) PixelPlus™ creates near high-definition (HD) performance inside the TV on the remote control. You can be added to tune their channels can view the difference in its quick viewing list. The left hand side of... delete the present channel from the SURF list, press the CURSOR RIGHT button again. 1 Repeat steps 1 through 3 to add more channels (up to your remote control. to the right. 3 While the SURF list message or the SURF channel list appears on the screen, press the CURSOR RIGHT button to add...


