

Operation Manual
Page 1
SLR Digital Camera Operating Manual For optimum camera performance, please read the Operating Manual before using the camera.
SLR Digital Camera Operating Manual For optimum camera performance, please read the Operating Manual before using the camera.

Operation Manual
Page 2
...user to connect the printer and digital camera directly, using extremely high precision technology. Regarding trademarks • PENTAX and smc PENTAX are trademarks of PENTAX Corporation. • The SD logo is manufactured using the unified standard for purchasing the PENTAX J Digital Camera. To use any other than...panel used in order to get the most out of all the camera's capabilities. Please read this camera are not PRINT Image Matching III compliant. Images taken with this manual before using the camera in the LCD display is a trademark. • All other ...
...user to connect the printer and digital camera directly, using extremely high precision technology. Regarding trademarks • PENTAX and smc PENTAX are trademarks of PENTAX Corporation. • The SD logo is manufactured using the unified standard for purchasing the PENTAX J Digital Camera. To use any other than...panel used in order to get the most out of all the camera's capabilities. Please read this camera are not PRINT Image Matching III compliant. Images taken with this manual before using the camera in the LCD display is a trademark. • All other ...
Operation Manual
Page 6
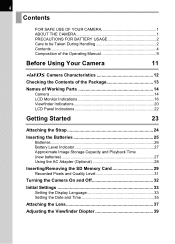
...USAGE 2 Care to be Taken During Handling 2 Contents 4 Composition of the Operating Manual 9 Before Using Your Camera 11 J Camera Characteristics 12 Checking the Contents of the Package 13 Names of Working Parts 14 Camera 14 LCD Monitor Indications 16 Viewfinder Indications 20 LCD Panel Indications 22 Getting Started ...27 Using the AC Adapter (Optional 28 Inserting/Removing the SD Memory Card 29 Recorded Pixels and Quality Level 31 Turning the Camera On and Off 32 Initial Settings 33 Setting the Display Language 33 Setting the Date and Time 35 Attaching the Lens 37 ...
...USAGE 2 Care to be Taken During Handling 2 Contents 4 Composition of the Operating Manual 9 Before Using Your Camera 11 J Camera Characteristics 12 Checking the Contents of the Package 13 Names of Working Parts 14 Camera 14 LCD Monitor Indications 16 Viewfinder Indications 20 LCD Panel Indications 22 Getting Started ...27 Using the AC Adapter (Optional 28 Inserting/Removing the SD Memory Card 29 Recorded Pixels and Quality Level 31 Turning the Camera On and Off 32 Initial Settings 33 Setting the Display Language 33 Setting the Date and Time 35 Attaching the Lens 37 ...

Operation Manual
Page 8
.../Contrast 111 Setting the White Balance 112 Setting the Sensitivity 115 Setting the Color Space 117 Focusing 118 Using the Autofocus 118 Adjusting the Focus Manually (Manual Focus 121 Selecting the Focus Point (Focus Point 123 Fixing the Focus (Focus Lock 125 Setting the Exposure 127 Effect of Aperture and Shutter Speed...
.../Contrast 111 Setting the White Balance 112 Setting the Sensitivity 115 Setting the Color Space 117 Focusing 118 Using the Autofocus 118 Adjusting the Focus Manually (Manual Focus 121 Selecting the Focus Point (Focus Point 123 Fixing the Focus (Focus Lock 125 Setting the Exposure 127 Effect of Aperture and Shutter Speed...

Operation Manual
Page 11
Shows useful information. 9 Composition of the Operating Manual This operating manual contains the following chapters. 1 Before Using Your Camera 1 Explains camera characteristics, accessories and the names of J by buttons and menus. 5 Function Reference Introduces functions to further enhance your first steps from purchasing the camera to taking , playing back, and printing still pictures. Be 3 sure to...
Shows useful information. 9 Composition of the Operating Manual This operating manual contains the following chapters. 1 Before Using Your Camera 1 Explains camera characteristics, accessories and the names of J by buttons and menus. 5 Function Reference Introduces functions to further enhance your first steps from purchasing the camera to taking , playing back, and printing still pictures. Be 3 sure to...

Operation Manual
Page 14
...the format size for high precision and a wide dynamic range. 1 • Features an AF sensor with 11 focusing points. 12 J Camera Characteristics Before Using Your Camera • Features a 23.5×15.7 mm CCD with 6.1 million effective pixels for 35 mm film and CCD are easier to use...) To capture the same image as a 150 mm lens attached to a conventional 35 mm SLR camera, with the J. The central 9 are wide cross area sensors. • Improved manual focusing using a viewfinder similar to a 35 mm camera 150÷1.5=100 Use a 100 mm lens with 0.95× magnification.
...the format size for high precision and a wide dynamic range. 1 • Features an AF sensor with 11 focusing points. 12 J Camera Characteristics Before Using Your Camera • Features a 23.5×15.7 mm CCD with 6.1 million effective pixels for 35 mm film and CCD are easier to use...) To capture the same image as a 150 mm lens attached to a conventional 35 mm SLR camera, with the J. The central 9 are wide cross area sensors. • Improved manual focusing using a viewfinder similar to a 35 mm camera 150÷1.5=100 Use a 100 mm lens with 0.95× magnification.
Operation Manual
Page 15
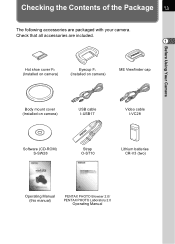
Checking the Contents of the Package 13 The following accessories are included. 1 Hot shoe cover FK (Installed on camera) Eyecup FL (Installed on camera) ME Viewfinder cap Before Using Your Camera Body mount cover (Installed on camera) USB cable I-USB17 Video cable I-VC28 Software (CD-ROM) S-SW28 Strap O-ST10 Lithium batteries CR-V3 (two) Operating Manual (this manual) PENTAX PHOTO Browser 2.0/ PENTAX PHOTO Laboratory 2.0 Operating Manual Check that all accessories are packaged with your camera.
Checking the Contents of the Package 13 The following accessories are included. 1 Hot shoe cover FK (Installed on camera) Eyecup FL (Installed on camera) ME Viewfinder cap Before Using Your Camera Body mount cover (Installed on camera) USB cable I-USB17 Video cable I-VC28 Software (CD-ROM) S-SW28 Strap O-ST10 Lithium batteries CR-V3 (two) Operating Manual (this manual) PENTAX PHOTO Browser 2.0/ PENTAX PHOTO Laboratory 2.0 Operating Manual Check that all accessories are packaged with your camera.
Operation Manual
Page 23
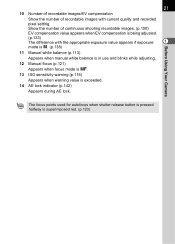
Before Using Your Camera 21 10 Number of recordable images/EV compensation Show the number of continuous shooting recordable images. (p.100) EV compensation value appears when EV compensation is ... the number of recordable images with the appropriate exposure value appears if exposure 1 mode is a. (p.138) 11 Manual white balance (p.113) Appears when manual white balance is in use and blinks while adjusting. 12 Manual focus (p.121) Appears when focus mode is \. 13 ISO sensitivity warning (p.116) Appears when warning value is superimposed...
Before Using Your Camera 21 10 Number of recordable images/EV compensation Show the number of continuous shooting recordable images. (p.100) EV compensation value appears when EV compensation is ... the number of recordable images with the appropriate exposure value appears if exposure 1 mode is a. (p.138) 11 Manual white balance (p.113) Appears when manual white balance is in use and blinks while adjusting. 12 Manual focus (p.121) Appears when focus mode is \. 13 ISO sensitivity warning (p.116) Appears when warning value is superimposed...

Operation Manual
Page 30
.... SD Memory Card and data will be corrupted if disconnected while camera is recording or reading data. • Be sure to read the AC adapter D-AC10 operating manual when using the LCD monitor for a long time or when connecting to your camera will not charge when connected to the AC adapter. 4 Plug ...the AC cord into the power outlet. • Make sure the camera is turned off before opening the terminal cover...
.... SD Memory Card and data will be corrupted if disconnected while camera is recording or reading data. • Be sure to read the AC adapter D-AC10 operating manual when using the LCD monitor for a long time or when connecting to your camera will not charge when connected to the AC adapter. 4 Plug ...the AC cord into the power outlet. • Make sure the camera is turned off before opening the terminal cover...

Operation Manual
Page 46
The flash pops up automatically when necessary. (Manually lift the flash when Flash mode is not set to [Auto].) 1OPERATING THE SHUTTER RELEASE BUTTON (p.45) 1Hard-to determine the size of the subject. ...
The flash pops up automatically when necessary. (Manually lift the flash when Flash mode is not set to [Auto].) 1OPERATING THE SHUTTER RELEASE BUTTON (p.45) 1Hard-to determine the size of the subject. ...

Operation Manual
Page 48
... even when ] (focus indicator) is not perfect. Basic Operations Subject may be focused automatically, set the focus mode lever to \ and use the manual focus mode to manual focusing using the focus indicator ] in the foreground and background within the focus points range. These also apply to focus on the subject with...
... even when ] (focus indicator) is not perfect. Basic Operations Subject may be focused automatically, set the focus mode lever to \ and use the manual focus mode to manual focusing using the focus indicator ] in the foreground and background within the focus points range. These also apply to focus on the subject with...

Operation Manual
Page 51
..., remove the lens hood before shooting. • The built-in flash fully discharges when pre A lenses are changed. D Manl flash+Redeye reduct Discharges flash manually. B Auto discharge Camera automatically determines surrounding light and built-in flash and lens Vignetting (surrounding portions are blackened due to a lack of built-in flash pops up...
..., remove the lens hood before shooting. • The built-in flash fully discharges when pre A lenses are changed. D Manl flash+Redeye reduct Discharges flash manually. B Auto discharge Camera automatically determines surrounding light and built-in flash and lens Vignetting (surrounding portions are blackened due to a lack of built-in flash pops up...

Operation Manual
Page 53
...is fully charged, b appears in the LCD monitor, LCD panel and viewfinder. (p.17, p.20, p.22) Switch between Auto discharge mode and Manual discharge mode (Flash ON) by pressing the K button while the built-in flash is popped up when shooting mode is set , E appears ... .. 2 Press the shutter release button fully. The flash discharges and the picture is set to retract the flash. 3 Basic Operations Using Manual Discharge (Flash ON) b, D 1 Press the K button. Manual discharge mode (Flash ON) is taken. 4 Push down retract. If Auto discharge is taken. 3 Push the flash down on the LCD...
...is fully charged, b appears in the LCD monitor, LCD panel and viewfinder. (p.17, p.20, p.22) Switch between Auto discharge mode and Manual discharge mode (Flash ON) by pressing the K button while the built-in flash is popped up when shooting mode is set , E appears ... .. 2 Press the shutter release button fully. The flash discharges and the picture is set to retract the flash. 3 Basic Operations Using Manual Discharge (Flash ON) b, D 1 Press the K button. Manual discharge mode (Flash ON) is taken. 4 Push down retract. If Auto discharge is taken. 3 Push the flash down on the LCD...

Operation Manual
Page 54
...flash in this camera reduces red-eye by the reflection of the electronic flash in the retina of the eye. The picture may be used to combat it. • Brighten the surroundings when shooting. • Set to b (Manual discharge). (p.51) 2 Confirm that the flash is discharged manually when shooting ...pictures (Auto Picture) 1 Confirm that the flash mode is set C (Red-eye reduction auto flash) in Picture mode or D (Red-eye reduction manual flash) in dark environments. Without Daylight-Sync With Daylight-Sync The main flash is released. To use . • Use the red-eye reduction built-...
...flash in this camera reduces red-eye by the reflection of the electronic flash in the retina of the eye. The picture may be used to combat it. • Brighten the surroundings when shooting. • Set to b (Manual discharge). (p.51) 2 Confirm that the flash is discharged manually when shooting ...pictures (Auto Picture) 1 Confirm that the flash mode is set C (Red-eye reduction auto flash) in Picture mode or D (Red-eye reduction manual flash) in dark environments. Without Daylight-Sync With Daylight-Sync The main flash is released. To use . • Use the red-eye reduction built-...

Operation Manual
Page 60
...r, the shutter will be affected if light enters the viewfinder. The beep is released. Removing the Eyecup FL Attaching the Viewfinder cap 8 Turn the camera off . For g, the self-timer lamp starts blinking slowly and blinks rapidly two seconds before the shutter is heard and the rate increases. "Turning... cap or use the AE lock function (p.142). (Ignore the light entering the viewfinder when the exposure mode is canceled and returns to a (Manual) (p.138).) • Remove the Eyecup FL by pulling one side upward when using accessories such as the viewfinder cap. The next time the ...
...r, the shutter will be affected if light enters the viewfinder. The beep is released. Removing the Eyecup FL Attaching the Viewfinder cap 8 Turn the camera off . For g, the self-timer lamp starts blinking slowly and blinks rapidly two seconds before the shutter is heard and the rate increases. "Turning... cap or use the AE lock function (p.142). (Ignore the light entering the viewfinder when the exposure mode is canceled and returns to a (Manual) (p.138).) • Remove the Eyecup FL by pulling one side upward when using accessories such as the viewfinder cap. The next time the ...

Operation Manual
Page 62
...control wait status. The autofocus system operates. The focus indicator ] appears in the viewfinder when the subject is in default settings. Pop up the flash manually beforehand. (p.51) Basic Operations 4 3 Use the four-way controller (45) to take pictures. 6 Press the shutter release button halfway. The ...self-timer lamp will blink to let you know that the camera is ready to select h or i. Drive Mode Remote Control Unit OK OK 5 Press the 4 button twice. The Drive Mode options screen appears....
...control wait status. The autofocus system operates. The focus indicator ] appears in the viewfinder when the subject is in default settings. Pop up the flash manually beforehand. (p.51) Basic Operations 4 3 Use the four-way controller (45) to take pictures. 6 Press the shutter release button halfway. The ...self-timer lamp will blink to let you know that the camera is ready to select h or i. Drive Mode Remote Control Unit OK OK 5 Press the 4 button twice. The Drive Mode options screen appears....

Operation Manual
Page 63
...lock function (p.142). (Ignore the light entering the viewfinder when the exposure mode is set to a (manual) (p.138).) • Remove the Eyecup FL by pulling one side upward when using the built-in backlit...not work while the flash is left unused for two seconds and will involve a fee.) Contact PENTAX service center to single frame shooting after it has been activated. • The remote control may ...battery can send a remote control signal about 5 m from the front of the camera. The shutter will be affected if light enters the viewfinder. 61 7 Point the remote control unit ...
...lock function (p.142). (Ignore the light entering the viewfinder when the exposure mode is set to a (manual) (p.138).) • Remove the Eyecup FL by pulling one side upward when using the built-in backlit...not work while the flash is left unused for two seconds and will involve a fee.) Contact PENTAX service center to single frame shooting after it has been activated. • The remote control may ...battery can send a remote control signal about 5 m from the front of the camera. The shutter will be affected if light enters the viewfinder. 61 7 Point the remote control unit ...

Operation Manual
Page 65
Playing Back Still Pictures 63 Playing Back Images You can play back using a PC. Basic Operations 100-0046 Refer to play back captured still pictures with the largest file number) is displayed on the LCD monitor. The most recently captured image (image with the camera. Use the included PENTAX PHOTO Browser 2.0 software to the "PENTAX PHOTO Browser 2.0/PENTAX PHOTO Laboratory 2.0 Operating Manual" for details. 3 1 Press the Q button after taking a picture.
Playing Back Still Pictures 63 Playing Back Images You can play back using a PC. Basic Operations 100-0046 Refer to play back captured still pictures with the largest file number) is displayed on the LCD monitor. The most recently captured image (image with the camera. Use the included PENTAX PHOTO Browser 2.0 software to the "PENTAX PHOTO Browser 2.0/PENTAX PHOTO Laboratory 2.0 Operating Manual" for details. 3 1 Press the Q button after taking a picture.

Operation Manual
Page 72
... other end of the AC adapter (optional) is recommended. (p.28) • Refer to the operating manual for the TV or AV device to the video IN jack on the TV. 3 Turn the TV and camera on the camera. 2 Connect the other device with a video IN jack as your monitor. Make sure that both... the TV and the camera are turned off before connecting the cable. 3 1 Connect the video cable to the USB...
... other end of the AC adapter (optional) is recommended. (p.28) • Refer to the operating manual for the TV or AV device to the video IN jack on the TV. 3 Turn the TV and camera on the camera. 2 Connect the other device with a video IN jack as your monitor. Make sure that both... the TV and the camera are turned off before connecting the cable. 3 1 Connect the video cable to the USB...

Operation Manual
Page 85
... if the selected number of copies exceeds 500. • You cannot use the camera to select multiple images for your printer. • See the "PENTAX PHOTO Browser 2.0/PENTAX PHOTO Laboratory 2.0 Operating Manual" when connecting to a PC. Make the settings on the printer. For details,... refer to the operating manual for printing on a single sheet. Printing Using PictBridge 83 Basic...
... if the selected number of copies exceeds 500. • You cannot use the camera to select multiple images for your printer. • See the "PENTAX PHOTO Browser 2.0/PENTAX PHOTO Laboratory 2.0 Operating Manual" when connecting to a PC. Make the settings on the printer. For details,... refer to the operating manual for printing on a single sheet. Printing Using PictBridge 83 Basic...


