

Operation Manual
Page 1
SLR Digital Camera Operating Manual For optimum camera performance, please read the Operating Manual before using the camera.
SLR Digital Camera Operating Manual For optimum camera performance, please read the Operating Manual before using the camera.

Operation Manual
Page 2
...or product names are placed on the recorded image. PRINT Image Matching enabled digital still cameras, printers and software help photographers to produce images more faithful to connect the printer and digital camera directly, using extremely high precision technology. PRINT Image Matching is a trademark .... • All other lens or accessory, see page 37 and 179. Images taken with this manual are for purchasing the PENTAX J Digital Camera. All Rights Reserved. Please take care, as laid out in helping you should be used without permission according to understand all...
...or product names are placed on the recorded image. PRINT Image Matching enabled digital still cameras, printers and software help photographers to produce images more faithful to connect the printer and digital camera directly, using extremely high precision technology. PRINT Image Matching is a trademark .... • All other lens or accessory, see page 37 and 179. Images taken with this manual are for purchasing the PENTAX J Digital Camera. All Rights Reserved. Please take care, as laid out in helping you should be used without permission according to understand all...

Operation Manual
Page 3
...this item could cause serious personal injury. Viewing directly with an unspecified power or voltage can cause a fire, electric shock, or camera breakdown. • If any irregularities occur during use of this product, we request your eyes. This symbol indicates that small ... camera. High voltage areas are present inside the camera, with the telephoto lens attached, as smoke or a strange odor, stop use could cause equipment failure, a fire, or electric shock. Seek medical attention immediately if accidentally swallowed. • Wrapping the strap around your nearest PENTAX ...
...this item could cause serious personal injury. Viewing directly with an unspecified power or voltage can cause a fire, electric shock, or camera breakdown. • If any irregularities occur during use of this product, we request your eyes. This symbol indicates that small ... camera. High voltage areas are present inside the camera, with the telephoto lens attached, as smoke or a strange odor, stop use could cause equipment failure, a fire, or electric shock. Seek medical attention immediately if accidentally swallowed. • Wrapping the strap around your nearest PENTAX ...
Operation Manual
Page 4
...Handling • Take the Worldwide Service Network that it is not possible due to burn yourself during removal. • Some portions of the camera heat up during traveling). 2 Caution • Do not short the battery or dispose of the battery in a vehicle, as thinner or alcohol...inserted correctly with a new one. Do not disassemble the battery. is still working properly, particularly prior to smoke. Do not leave the camera in fire. Recharging and disassembling can get very high. Fingers or clothing may cause explosion or overheating. • The battery should be recharged...
...Handling • Take the Worldwide Service Network that it is not possible due to burn yourself during removal. • Some portions of the camera heat up during traveling). 2 Caution • Do not short the battery or dispose of the battery in a vehicle, as thinner or alcohol...inserted correctly with a new one. Do not disassemble the battery. is still working properly, particularly prior to smoke. Do not leave the camera in fire. Recharging and disassembling can get very high. Fingers or clothing may cause explosion or overheating. • The battery should be recharged...
Operation Manual
Page 5
...and cannot be used in high temperatures and high humidity can cause molding. Use a cushion to protect the camera from case and store in a dry and well-ventilated location. • This camera is 0°C to 40°C. • The LCD display may appear black under high temperatures, but ...8226; The temperature range for cleaning as temperatures normalize. • The LCD display may damage the lens. • Please do not press forcefully on the camera. • Refer to "Precautions When Using the SD Memory Card" (p.30) regarding the SD Memory Card. • Use a blower or lens brush ...
...and cannot be used in high temperatures and high humidity can cause molding. Use a cushion to protect the camera from case and store in a dry and well-ventilated location. • This camera is 0°C to 40°C. • The LCD display may appear black under high temperatures, but ...8226; The temperature range for cleaning as temperatures normalize. • The LCD display may damage the lens. • Please do not press forcefully on the camera. • Refer to "Precautions When Using the SD Memory Card" (p.30) regarding the SD Memory Card. • Use a blower or lens brush ...
Operation Manual
Page 6
... be Taken During Handling 2 Contents 4 Composition of the Operating Manual 9 Before Using Your Camera 11 J Camera Characteristics 12 Checking the Contents of the Package 13 Names of Working Parts 14 Camera 14 LCD Monitor Indications 16 Viewfinder Indications 20 LCD Panel Indications 22 Getting Started 23 Attaching ...27 Using the AC Adapter (Optional 28 Inserting/Removing the SD Memory Card 29 Recorded Pixels and Quality Level 31 Turning the Camera On and Off 32 Initial Settings 33 Setting the Display Language 33 Setting the Date and Time 35 Attaching the Lens 37 Adjusting...
... be Taken During Handling 2 Contents 4 Composition of the Operating Manual 9 Before Using Your Camera 11 J Camera Characteristics 12 Checking the Contents of the Package 13 Names of Working Parts 14 Camera 14 LCD Monitor Indications 16 Viewfinder Indications 20 LCD Panel Indications 22 Getting Started 23 Attaching ...27 Using the AC Adapter (Optional 28 Inserting/Removing the SD Memory Card 29 Recorded Pixels and Quality Level 31 Turning the Camera On and Off 32 Initial Settings 33 Setting the Display Language 33 Setting the Date and Time 35 Attaching the Lens 37 Adjusting...

Operation Manual
Page 7
... 53 Self-Timer Shooting 55 Remote Control Shooting (Remote Control F: Sold Separately) ........59 Using Mirror Lock Up Function to Prevent Camera Shake 62 Playing Back Still Pictures 63 Playing Back Images 63 Enlarging Playback Images 65 Nine-Image Display 66 Slideshow 68 Connecting the...Printing Service (DPOF 79 Printing Single Images 79 Settings for All Images 81 Printing Using PictBridge 83 Setting Transfer Modes 84 Connecting the Camera to the Printer 85 Printing Single Images 86 Printing All Images 88 Printing Images Using the DPOF Settings 90 Disconnecting the Cable from...
... 53 Self-Timer Shooting 55 Remote Control Shooting (Remote Control F: Sold Separately) ........59 Using Mirror Lock Up Function to Prevent Camera Shake 62 Playing Back Still Pictures 63 Playing Back Images 63 Enlarging Playback Images 65 Nine-Image Display 66 Slideshow 68 Connecting the...Printing Service (DPOF 79 Printing Single Images 79 Settings for All Images 81 Printing Using PictBridge 83 Setting Transfer Modes 84 Connecting the Camera to the Printer 85 Printing Single Images 86 Printing All Images 88 Printing Images Using the DPOF Settings 90 Disconnecting the Cable from...

Operation Manual
Page 9
... CCD 180 Optional Accessories 182 AC Adapter D-AC10 182 Cable Switch CS-205 182 Remote Control F 182 Flash Accessories 182 For Viewfinder 183 Camera Case 184 Others 184 Error Messages 185 Troubleshooting 187 7 Distance and Aperture when Using the Built-in Flash 151 Using an External Flash ...(Optional 153 Settings During Playback 160 Changing Playback Display Method 160 Displaying Hot Spot Warning 160 Setting the Slideshow Display Interval 161 Camera Settings 162 Formatting the SD Memory Card 162 Turning the Beep On and Off 163 Changing the Date and Time and the Display...
... CCD 180 Optional Accessories 182 AC Adapter D-AC10 182 Cable Switch CS-205 182 Remote Control F 182 Flash Accessories 182 For Viewfinder 183 Camera Case 184 Others 184 Error Messages 185 Troubleshooting 187 7 Distance and Aperture when Using the Built-in Flash 151 Using an External Flash ...(Optional 153 Settings During Playback 160 Changing Playback Display Method 160 Displaying Hot Spot Warning 160 Setting the Slideshow Display Interval 161 Camera Settings 162 Formatting the SD Memory Card 162 Turning the Beep On and Off 163 Changing the Date and Time and the Display...

Operation Manual
Page 11
... are explained below. 1 Shows reference page number explaining a related operation. 9 Composition of the Operating Manual This operating manual contains the following chapters. 1 Before Using Your Camera 1 Explains camera characteristics, accessories and the names of J by buttons and menus. 5 Function Reference Introduces functions to further enhance your first steps from purchasing the...
... are explained below. 1 Shows reference page number explaining a related operation. 9 Composition of the Operating Manual This operating manual contains the following chapters. 1 Before Using Your Camera 1 Explains camera characteristics, accessories and the names of J by buttons and menus. 5 Function Reference Introduces functions to further enhance your first steps from purchasing the...

Operation Manual
Page 13
J Camera Characteristics 12 Checking the Contents of the Package 13 Names of working parts before use. 1 Before Using Your Camera Check the package contents and names of Working Parts 14
J Camera Characteristics 12 Checking the Contents of the Package 13 Names of working parts before use. 1 Before Using Your Camera Check the package contents and names of Working Parts 14

Operation Manual
Page 14
... mm Angles of view being equal, the focal length of J. The captured area (view angle) will differ for J and 35 mm SLR cameras even if the same lens is used with the J. The central 9 are wide cross area sensors. • Improved manual focusing using a ... monitor features large characters, and buttons are different. Also features a superimpose function in which the focus points on a 35 mm camera. 12 J Camera Characteristics Before Using Your Camera • Features a 23.5×15.7 mm CCD with 6.1 million effective pixels for high precision and a wide dynamic range. ...
... mm Angles of view being equal, the focal length of J. The captured area (view angle) will differ for J and 35 mm SLR cameras even if the same lens is used with the J. The central 9 are wide cross area sensors. • Improved manual focusing using a ... monitor features large characters, and buttons are different. Also features a superimpose function in which the focus points on a 35 mm camera. 12 J Camera Characteristics Before Using Your Camera • Features a 23.5×15.7 mm CCD with 6.1 million effective pixels for high precision and a wide dynamic range. ...
Operation Manual
Page 15
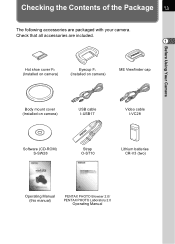
Checking the Contents of the Package 13 The following accessories are included. 1 Hot shoe cover FK (Installed on camera) Eyecup FL (Installed on camera) ME Viewfinder cap Before Using Your Camera Body mount cover (Installed on camera) USB cable I-USB17 Video cable I-VC28 Software (CD-ROM) S-SW28 Strap O-ST10 Lithium batteries CR-V3 (two) Operating Manual (this manual) PENTAX PHOTO Browser 2.0/ PENTAX PHOTO Laboratory 2.0 Operating Manual Check that all accessories are packaged with your camera.
Checking the Contents of the Package 13 The following accessories are included. 1 Hot shoe cover FK (Installed on camera) Eyecup FL (Installed on camera) ME Viewfinder cap Before Using Your Camera Body mount cover (Installed on camera) USB cable I-USB17 Video cable I-VC28 Software (CD-ROM) S-SW28 Strap O-ST10 Lithium batteries CR-V3 (two) Operating Manual (this manual) PENTAX PHOTO Browser 2.0/ PENTAX PHOTO Laboratory 2.0 Operating Manual Check that all accessories are packaged with your camera.

Operation Manual
Page 16
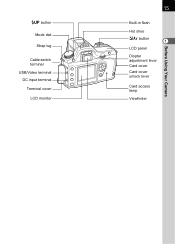
14 Names of Working Parts Before Using Your Camera Camera 1 Lens mount index Shutter release button Main switch Self-Timer lamp/ Remote control receiver Lens unlock button 3 button i button M button Q button Mirror AF coupler Focus mode lever Lens information contacts e-dial L/Z button Four-way controller 4 button { button Battery cover Tripod socket
14 Names of Working Parts Before Using Your Camera Camera 1 Lens mount index Shutter release button Main switch Self-Timer lamp/ Remote control receiver Lens unlock button 3 button i button M button Q button Mirror AF coupler Focus mode lever Lens information contacts e-dial L/Z button Four-way controller 4 button { button Battery cover Tripod socket
Operation Manual
Page 17
K button Mode dial Strap lug Cable switch terminal USB/Video terminal DC input terminal Terminal cover LCD monitor 15 Before Using Your Camera Built-in flash Hot shoe mc button 1 LCD panel Diopter adjustment lever Card cover Card cover unlock lever Card access lamp Viewfinder
K button Mode dial Strap lug Cable switch terminal USB/Video terminal DC input terminal Terminal cover LCD monitor 15 Before Using Your Camera Built-in flash Hot shoe mc button 1 LCD panel Diopter adjustment lever Card cover Card cover unlock lever Card access lamp Viewfinder

Operation Manual
Page 18
... setting is selected. 8 only appears when World Time is On. Select [Off] for three seconds when powered on or setting dial mode. Before Using Your Camera LCD monitor While Power is On or Operating Mode Dial Guides appear on the status of 1 the...
... setting is selected. 8 only appears when World Time is On. Select [Off] for three seconds when powered on or setting dial mode. Before Using Your Camera LCD monitor While Power is On or Operating Mode Dial Guides appear on the status of 1 the...
Operation Manual
Page 19
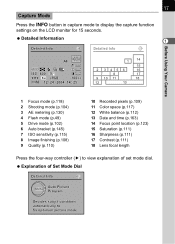
... Detailed Info AF ISO 800 sRGB 100mm 12 / 24 / 2004 14 : 25 1 14 15 2 3456 16 7 8 17 9 10 11 18 12 13 Before Using Your Camera 1 Focus mode (p.118) 2 Shooting mode (p.104) 3 AE metering (p.130) 4 Flash mode (p.49) 5 Drive mode (p.102) 6 Auto bracket (p.145) 7 ISO sensitivity (p.115) 8 Image finishing (p.108) 9 Quality...
... Detailed Info AF ISO 800 sRGB 100mm 12 / 24 / 2004 14 : 25 1 14 15 2 3456 16 7 8 17 9 10 11 18 12 13 Before Using Your Camera 1 Focus mode (p.118) 2 Shooting mode (p.104) 3 AE metering (p.130) 4 Flash mode (p.49) 5 Drive mode (p.102) 6 Auto bracket (p.145) 7 ISO sensitivity (p.115) 8 Image finishing (p.108) 9 Quality...

Operation Manual
Page 20
... screen displays every time you press M button during playback. 1 You can change the information initially displayed by pressing the Q button. (p.160) Before Using Your Camera Detailed Information 100-0001 AF 1 / 2000 F2 . 8 + 1 . 5EV ISO 800 sRGB 100mm 12 / 24 / 2004 14 : 25 2 1 5 7 8 9 11 12 13 14 15 17 18 20 ...
... screen displays every time you press M button during playback. 1 You can change the information initially displayed by pressing the Q button. (p.160) Before Using Your Camera Detailed Information 100-0001 AF 1 / 2000 F2 . 8 + 1 . 5EV ISO 800 sRGB 100mm 12 / 24 / 2004 14 : 25 2 1 5 7 8 9 11 12 13 14 15 17 18 20 ...
Operation Manual
Page 21
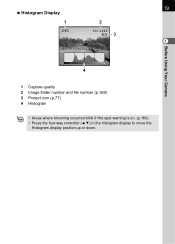
19 Histogram Display 1 2 100-0046 3 1 Before Using Your Camera 4 1 Capture quality 2 Image folder number and file number (p.169) 3 Protect icon (p.77) 4 Histogram • Areas where blooming occurred blink if Hot spot warning is on. (p.160) • Press the four-way controller (23) in the histogram display to move the Histogram display position up or down.
19 Histogram Display 1 2 100-0046 3 1 Before Using Your Camera 4 1 Capture quality 2 Image folder number and file number (p.169) 3 Protect icon (p.77) 4 Histogram • Areas where blooming occurred blink if Hot spot warning is on. (p.160) • Press the four-way controller (23) in the histogram display to move the Histogram display position up or down.

Operation Manual
Page 22
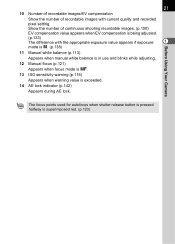
... be adjusted with e-dial). 9 EV compensation (p.141) Appears when EV compensation is available or in use . 20 Viewfinder Indications 23 1 1 5 4 67 1 8 9 10 Before Using Your Camera 11 12 13 14 1 Autofocus frame (p.39) 2 Spot metering frame (p.130) 3 Focus point (p.123) 4 Flash status (p.49) Appears when flash is available and blinks when...
... be adjusted with e-dial). 9 EV compensation (p.141) Appears when EV compensation is available or in use . 20 Viewfinder Indications 23 1 1 5 4 67 1 8 9 10 Before Using Your Camera 11 12 13 14 1 Autofocus frame (p.39) 2 Spot metering frame (p.130) 3 Focus point (p.123) 4 Flash status (p.49) Appears when flash is available and blinks when...
Operation Manual
Page 23
... mode is \. 13 ISO sensitivity warning (p.116) Appears when warning value is exceeded. 14 AE lock indicator (p.142) Appears during AE lock. Before Using Your Camera 21 10 Number of recordable images/EV compensation Show the number of continuous shooting recordable images. (p.100) EV compensation value appears when EV compensation is...
... mode is \. 13 ISO sensitivity warning (p.116) Appears when warning value is exceeded. 14 AE lock indicator (p.142) Appears during AE lock. Before Using Your Camera 21 10 Number of recordable images/EV compensation Show the number of continuous shooting recordable images. (p.100) EV compensation value appears when EV compensation is...


