
Operation Manual
Page 1
... • Specifications and external dimensions are subject to change without notice. 57756 Copyright © PENTAX Corporation 2006 01-200609 Printed in Philippines Digital Camera Operating Manual To ensure the best performance from your camera, please read the Operating Manual before using the camera. PENTAX Corporation 2-36-9, Maeno-cho, Itabashi-ku, Tokyo 174-8639, JAPAN (http://www...
... • Specifications and external dimensions are subject to change without notice. 57756 Copyright © PENTAX Corporation 2006 01-200609 Printed in Philippines Digital Camera Operating Manual To ensure the best performance from your camera, please read the Operating Manual before using the camera. PENTAX Corporation 2-36-9, Maeno-cho, Itabashi-ku, Tokyo 174-8639, JAPAN (http://www...

Operation Manual
Page 2
.... To users of all the camera's capabilities. However, this manual are different from the actual product. • Both SD memory cards and SDHC memory cards are referred to their respective owners. Regarding trademarks • PENTAX, Optio and smc PENTAX are trademarks of PENTAX Corporation. • SD logo ...be used outside the scope of use of Seiko Epson Corporation. Although the level of functioning pixels is manufactured using the PENTAX Digital Camera that the camera may not function correctly when used in surroundings such as laid out in the LCD display is 99.99% or better...
.... To users of all the camera's capabilities. However, this manual are different from the actual product. • Both SD memory cards and SDHC memory cards are referred to their respective owners. Regarding trademarks • PENTAX, Optio and smc PENTAX are trademarks of PENTAX Corporation. • SD logo ...be used outside the scope of use of Seiko Epson Corporation. Although the level of functioning pixels is manufactured using the PENTAX Digital Camera that the camera may not function correctly when used in surroundings such as laid out in the LCD display is 99.99% or better...
Operation Manual
Page 3
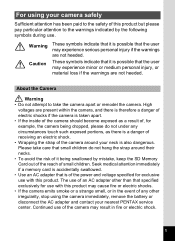
... may experience serious personal injury if the warnings are not heeded. The use of an AC adapter other irregularity, stop using your camera safely Sufficient attention has been paid to the safety of this product but please pay particular attention to take care that it being ...an AC adapter that is possible that specified exclusively for exclusive use . For using the camera immediately, remove the battery or disconnect the AC adapter and contact your nearest PENTAX service center. About the Camera Warning • Do not attempt to the warnings indicated by mistake, keep the SD ...
... may experience serious personal injury if the warnings are not heeded. The use of an AC adapter other irregularity, stop using your camera safely Sufficient attention has been paid to the safety of this product but please pay particular attention to take care that it being ...an AC adapter that is possible that specified exclusively for exclusive use . For using the camera immediately, remove the battery or disconnect the AC adapter and contact your nearest PENTAX service center. About the Camera Warning • Do not attempt to the warnings indicated by mistake, keep the SD ...

Operation Manual
Page 4
...electrical shock. • If the generation of the battery leakage should come in contact with water. • Remove the battery from the camera immediately if it may explode. • Do not charge any of smoke or strange odor from the product or other abnormality occurs, ...immediately discontinue using and consult a PENTAX Service Center. Use with clean water and get medical attention immediately. • If any batteries other than rechargeable lithium-ion battery D-LI8...
...electrical shock. • If the generation of the battery leakage should come in contact with water. • Remove the battery from the camera immediately if it may explode. • Do not charge any of smoke or strange odor from the product or other abnormality occurs, ...immediately discontinue using and consult a PENTAX Service Center. Use with clean water and get medical attention immediately. • If any batteries other than rechargeable lithium-ion battery D-LI8...
Operation Manual
Page 6
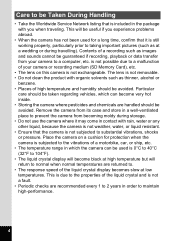
... a computer, etc. This will be useful if you when traveling. The lens is included in which can be avoided. Place the camera on this camera is 0°C to 40°C (32°F to 104°F). • The liquid crystal display will return to normal when normal temperatures are... recommended every 1 to 2 years in contact with you experience problems abroad. • When the camera has not been used is not exchangeable. This is due to the properties of the liquid crystal and is not a fault. • Periodic checks...
... a computer, etc. This will be useful if you when traveling. The lens is included in which can be avoided. Place the camera on this camera is 0°C to 40°C (32°F to 104°F). • The liquid crystal display will return to normal when normal temperatures are... recommended every 1 to 2 years in contact with you experience problems abroad. • When the camera has not been used is not exchangeable. This is due to the properties of the liquid crystal and is not a fault. • Periodic checks...
Operation Manual
Page 7
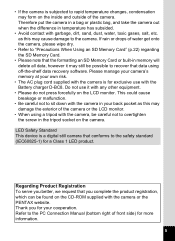
...off-the-shelf data recovery software. Regarding Product Registration To serve you better, we request that conforms to the camera. LED Safety Standard This device is a digital still camera that you for your back pocket as this may still be careful not to recover that data using a tripod ...with the camera in your cooperation. Do not use with the camera or the PENTAX website. This could cause breakage or malfunction. &#...
...off-the-shelf data recovery software. Regarding Product Registration To serve you better, we request that conforms to the camera. LED Safety Standard This device is a digital still camera that you for your back pocket as this may still be careful not to recover that data using a tripod ...with the camera in your cooperation. Do not use with the camera or the PENTAX website. This could cause breakage or malfunction. &#...
Operation Manual
Page 8
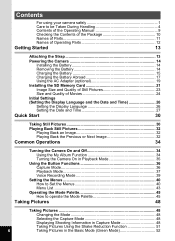
...Checking the Contents of the Package 10 Names of Parts 11 Names of Operating Parts 12 Getting Started 13 Attaching the Strap 13 Powering the Camera 14 Installing the Battery 14 Removing the Battery 14 Charging the Battery 15 Charging the Battery Abroad 17 Using the AC Adapter (optional 19 ... Playing Back an Image 32 Playing Back the Previous or Next Image 32 Common Operations 34 Turning the Camera On and Off 34 Using the My Album Function 34 Turning the Camera On in Playback Mode 35 Using the Button Functions 36 Capture Mode 36 Playback Mode 37 Voice Recording...
...Checking the Contents of the Package 10 Names of Parts 11 Names of Operating Parts 12 Getting Started 13 Attaching the Strap 13 Powering the Camera 14 Installing the Battery 14 Removing the Battery 14 Charging the Battery 15 Charging the Battery Abroad 17 Using the AC Adapter (optional 19 ... Playing Back an Image 32 Playing Back the Previous or Next Image 32 Common Operations 34 Turning the Camera On and Off 34 Using the My Album Function 34 Turning the Camera On in Playback Mode 35 Using the Button Functions 36 Capture Mode 36 Playback Mode 37 Voice Recording...
Operation Manual
Page 9
... the Shooting Scene (Picture Mode 60 Taking Pictures of People (Portrait Mode/Kids Mode 62 Taking Pictures of Dark Scenes (Night Scene Mode 66 Reducing Camera Shake and Blurring in Pictures (Blur reduction Mode 67 Taking Movies (Movie Mode 68 Taking Pictures in Frame Composite mode 70 Using the Self-timer...
... the Shooting Scene (Picture Mode 60 Taking Pictures of People (Portrait Mode/Kids Mode 62 Taking Pictures of Dark Scenes (Night Scene Mode 66 Reducing Camera Shake and Blurring in Pictures (Blur reduction Mode 67 Taking Movies (Movie Mode 68 Taking Pictures in Frame Composite mode 70 Using the Self-timer...
Operation Manual
Page 10
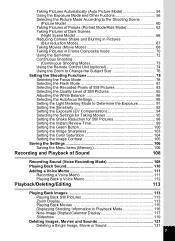
...the Image Size and Quality 137 Cropping Images 139 Rotating the Displayed Image 140 Editing Pictures with Color Filters 141 Editing Pictures with the Digital Filter 143 Editing Pictures with Brightness Filter 145 Editing Movies 147 Removing Red-eye 150 Adding a Frame (Frame Composite 152 Copying Files ...154 Settings 156 Camera Settings 156 Setting Up the Start-up Screen 156 Formatting an SD Memory Card or the Built-in Memory 158 Changing the Sound ...
...the Image Size and Quality 137 Cropping Images 139 Rotating the Displayed Image 140 Editing Pictures with Color Filters 141 Editing Pictures with the Digital Filter 143 Editing Pictures with Brightness Filter 145 Editing Movies 147 Removing Red-eye 150 Adding a Frame (Frame Composite 152 Copying Files ...154 Settings 156 Camera Settings 156 Setting Up the Start-up Screen 156 Formatting an SD Memory Card or the Built-in Memory 158 Changing the Sound ...
Operation Manual
Page 11
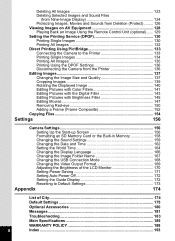
.../Deleting/Editing" and "Settings" chapters. 4 Taking Pictures 4 This chapter explains the various way of capturing images and how to set the camera-related functions. 7 8 Appendix This tells you about the messages displayed on the LCD monitor and what you need to be taken when operating the... camera. 9 Be sure to read it if 2 you want to start taking pictures straightaway. 3 Common Operations This chapter explains common operations such...
.../Deleting/Editing" and "Settings" chapters. 4 Taking Pictures 4 This chapter explains the various way of capturing images and how to set the camera-related functions. 7 8 Appendix This tells you about the messages displayed on the LCD monitor and what you need to be taken when operating the... camera. 9 Be sure to read it if 2 you want to start taking pictures straightaway. 3 Common Operations This chapter explains common operations such...
Operation Manual
Page 12
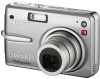
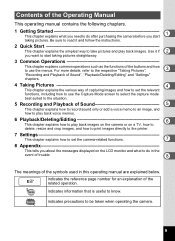
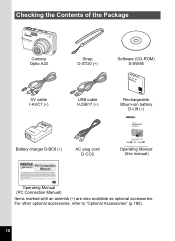
For other optional accessories, refer to "Optional Accessories" (p.180). 10 Checking the Contents of the Package Camera Optio A20 Strap O-ST20 (∗) Software (CD-ROM) S-SW56 AV cable I-AVC7 (∗) USB cable I-USB17 (∗) Rechargeable lithium-ion battery D-LI8 (∗) Battery charger D-BC8 (∗) AC plug cord D-CO2 Operating Manual (this manual) Operating Manual (PC Connection Manual) Items marked with an asterisk (∗) are also available as optional accessories.
For other optional accessories, refer to "Optional Accessories" (p.180). 10 Checking the Contents of the Package Camera Optio A20 Strap O-ST20 (∗) Software (CD-ROM) S-SW56 AV cable I-AVC7 (∗) USB cable I-USB17 (∗) Rechargeable lithium-ion battery D-LI8 (∗) Battery charger D-BC8 (∗) AC plug cord D-CO2 Operating Manual (this manual) Operating Manual (PC Connection Manual) Items marked with an asterisk (∗) are also available as optional accessories.
Operation Manual
Page 16
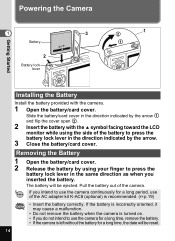
...incorrectly oriented, it may cause a malfunction. • Do not remove the battery when the camera is turned on. • If you do not intend to use the camera for a long time, remove the battery. • If the camera is recommended. (1p.19) • Insert the battery correctly. If you intend to ...your finger to press the battery lock lever in the direction indicated by the arrow 1 and flip the cover open 2 . 2 Insert the battery with the camera. 1 Open the battery/card cover. Pull the battery out of the AC adapter kit K-AC8 (optional) is left without the battery for a long period,...
...incorrectly oriented, it may cause a malfunction. • Do not remove the battery when the camera is turned on. • If you do not intend to use the camera for a long time, remove the battery. • If the camera is recommended. (1p.19) • Insert the battery correctly. If you intend to ...your finger to press the battery lock lever in the direction indicated by the arrow 1 and flip the cover open 2 . 2 Insert the battery with the camera. 1 Open the battery/card cover. Pull the battery out of the AC adapter kit K-AC8 (optional) is left without the battery for a long period,...
Operation Manual
Page 17
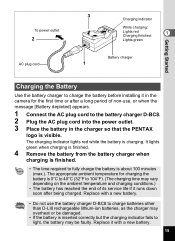
...1 Lights green Battery charger 1 Charging the Battery Use the battery charger to charge the battery before installing it in the charger so that the PENTAX logo is inserted correctly but the charging indicator fails to 104°F). (The charging time may overheat or be faulty. Replace with a new ...Connect the AC plug cord to the battery charger D-BC8. 2 Plug the AC plug cord into the power outlet. 3 Place the battery in the camera for charging the battery is about 100 minutes (max.). It lights green when charging is finished. 4 Remove the battery from the battery charger when charging...
...1 Lights green Battery charger 1 Charging the Battery Use the battery charger to charge the battery before installing it in the charger so that the PENTAX logo is inserted correctly but the charging indicator fails to 104°F). (The charging time may overheat or be faulty. Replace with a new ...Connect the AC plug cord to the battery charger D-BC8. 2 Plug the AC plug cord into the power outlet. 3 Place the battery in the camera for charging the battery is about 100 minutes (max.). It lights green when charging is finished. 4 Remove the battery from the battery charger when charging...
Operation Manual
Page 18
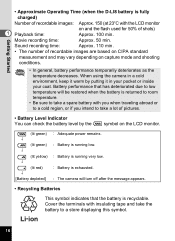
... you intend to take the battery to a store displaying this symbol. 16 Movie recording time: Approx. 50 min. When using the camera in a cold environment, keep it warm by the symbol on capture mode and shooting conditions. • In general, battery performance temporarily... red) ↓ [Battery depleted] : Adequate power remains. : Battery is running low. : Battery is running very low. : Battery is exhausted. : The camera will turn off after the message appears. • Recycling Batteries This symbol indicates that has deteriorated due to low temperature will be restored when the...
... you intend to take the battery to a store displaying this symbol. 16 Movie recording time: Approx. 50 min. When using the camera in a cold environment, keep it warm by the symbol on capture mode and shooting conditions. • In general, battery performance temporarily... red) ↓ [Battery depleted] : Adequate power remains. : Battery is running low. : Battery is running very low. : Battery is exhausted. : The camera will turn off after the message appears. • Recycling Batteries This symbol indicates that has deteriorated due to low temperature will be restored when the...
Operation Manual
Page 19
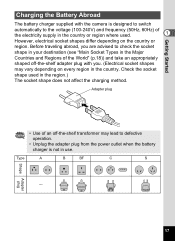
... "Main Socket Types in the Major Countries and Regions of the World" (p.18)) and take an appropriately shaped off-the-shelf adapter plug with the camera is not in use. Adapter plug 17 Before traveling abroad, you . (Electrical socket shapes may vary depending on the country or region. Getting Started Charging...
... "Main Socket Types in the Major Countries and Regions of the World" (p.18)) and take an appropriately shaped off-the-shelf adapter plug with the camera is not in use. Adapter plug 17 Before traveling abroad, you . (Electrical socket shapes may vary depending on the country or region. Getting Started Charging...
Operation Manual
Page 21
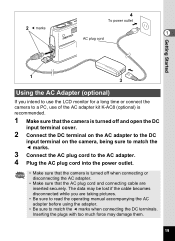
... turned off and open the DC input terminal cover. 2 Connect the DC terminal on the AC adapter to the DC input terminal on the camera, being sure to match the 4 marks. 3 Connect the AC plug cord to the AC adapter. 4 Plug the AC plug cord into the power outlet. • ...Make sure that the camera is turned off when connecting or disconnecting the AC adapter. • Make sure that the AC plug cord and connecting cable are taking pictures. •...
... turned off and open the DC input terminal cover. 2 Connect the DC terminal on the AC adapter to the DC input terminal on the camera, being sure to match the 4 marks. 3 Connect the AC plug cord to the AC adapter. 4 Plug the AC plug cord into the power outlet. • ...Make sure that the camera is turned off when connecting or disconnecting the AC adapter. • Make sure that the AC plug cord and connecting cable are taking pictures. •...

Operation Manual
Page 22
Getting Started Precautions When Using the Battery Charger or AC Adapter To avoid the risk of the battery charger and AC adapter. 20 Refer to page 187 for the specifications of fire or electric shock when using the battery charger or AC adapter, be sure to read the section on "For using your camera 1 safely" on page 1.
Getting Started Precautions When Using the Battery Charger or AC Adapter To avoid the risk of the battery charger and AC adapter. 20 Refer to page 187 for the specifications of fire or electric shock when using the battery charger or AC adapter, be sure to read the section on "For using your camera 1 safely" on page 1.
Operation Manual
Page 23
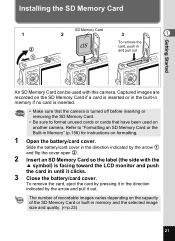
...and flip the cover open 2 . 2 Insert an SD Memory Card so the label (the side with this camera. Captured images are recorded on the SD Memory Card if a card is inserted or in the built-in ...memory if no card is inserted. • Make sure that the camera is turned off before inserting or removing the SD Memory Card. • Be sure to "Formatting an...To remove the card, push in and pull out Getting Started An SD Memory Card can be used on another camera. The number of recordable images varies depending on the capacity of the SD Memory Card or built-in until it...
...and flip the cover open 2 . 2 Insert an SD Memory Card so the label (the side with this camera. Captured images are recorded on the SD Memory Card if a card is inserted or in the built-in ...memory if no card is inserted. • Make sure that the camera is turned off before inserting or removing the SD Memory Card. • Be sure to "Formatting an...To remove the card, push in and pull out Getting Started An SD Memory Card can be used on another camera. The number of recordable images varies depending on the capacity of the SD Memory Card or built-in until it...
Operation Manual
Page 24
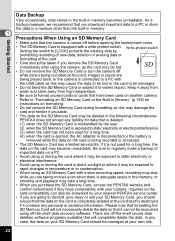
...the battery/card cover. • The SD Memory Card is not used for data that the camera is turned off -the-shelf data recovery software. Inquiries on the SD Memory Card may become unreadable. PENTAX does not accept any case, the data on the card may be taken if you should ensure... that it is equipped with your SD Memory Card should be deleted in memory becomes unreadable. In any liability for a long time, the data on your camera. If it cannot...
...the battery/card cover. • The SD Memory Card is not used for data that the camera is turned off -the-shelf data recovery software. Inquiries on the SD Memory Card may become unreadable. PENTAX does not accept any case, the data on the card may be taken if you should ensure... that it is equipped with your SD Memory Card should be deleted in memory becomes unreadable. In any liability for a long time, the data on your camera. If it cannot...
Operation Manual
Page 25
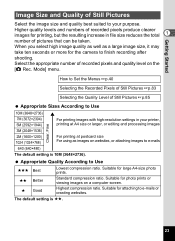
..., or editing and processing images For printing at postcard size For using as a large image size, it may take ten seconds or more for the camera to finish recording after shooting. Higher quality levels and numbers of recorded pixels produce clearer images for large A4-size photo prints.
..., or editing and processing images For printing at postcard size For using as a large image size, it may take ten seconds or more for the camera to finish recording after shooting. Higher quality levels and numbers of recorded pixels produce clearer images for large A4-size photo prints.


