Operation Manual
Page 8
... Operating Manual 9 Checking the Contents of the Package 10 Names of Parts 11 Names of Operating Parts 12 Getting Started 13 Attaching the Strap 13 Powering the Camera 14 Installing the Battery 14 Removing the Battery 14 Charging the Battery 15 Charging the Battery Abroad 17 Using the AC Adapter (optional 19 Installing the SD Memory Card 21 Image Size and Quality of Still Pictures 23 Size and Quality of Movies 24 Initial Settings (Setting the Display Language and the Date...
... Operating Manual 9 Checking the Contents of the Package 10 Names of Parts 11 Names of Operating Parts 12 Getting Started 13 Attaching the Strap 13 Powering the Camera 14 Installing the Battery 14 Removing the Battery 14 Charging the Battery 15 Charging the Battery Abroad 17 Using the AC Adapter (optional 19 Installing the SD Memory Card 21 Image Size and Quality of Still Pictures 23 Size and Quality of Movies 24 Initial Settings (Setting the Display Language and the Date...
Operation Manual
Page 9
... Taking Movies (Movie Mode 68 Taking Pictures in Frame Composite mode 70 Using the Self-timer 72 Continuous Shooting (Continuous Shooting Mode 73 Using the Remote Control Unit (optional 74 Using the Zoom to Change the Subject Size 76 Setting the Shooting Functions 78 Selecting the Focus Mode 78 Selecting the Flash Mode 81 Selecting the Recorded Pixels of Still Pictures 83 Selecting the Quality Level of Still Pictures 85 Adjusting the White Balance 86 Selecting the Autofocus Settings 88 Setting the Light Metering Mode to Determine the Exposure 91 Setting...
... Taking Movies (Movie Mode 68 Taking Pictures in Frame Composite mode 70 Using the Self-timer 72 Continuous Shooting (Continuous Shooting Mode 73 Using the Remote Control Unit (optional 74 Using the Zoom to Change the Subject Size 76 Setting the Shooting Functions 78 Selecting the Focus Mode 78 Selecting the Flash Mode 81 Selecting the Recorded Pixels of Still Pictures 83 Selecting the Quality Level of Still Pictures 85 Adjusting the White Balance 86 Selecting the Autofocus Settings 88 Setting the Light Metering Mode to Determine the Exposure 91 Setting...
Operation Manual
Page 10
... SD Memory Card or the Built-in Memory 158 Changing the Sound Settings 159 Changing the Date and Time 162 Setting the World Time 164 Changing the Display Language 166 Changing the Image Folder Name 167 Changing the USB Connection Mode 168 Changing the Video Output Format 169 Adjusting the Brightness of the LCD Monitor 170 Setting Power Saving 171 Setting Auto Power Off 172 Setting the Guide Display 172 Resetting to Default Settings 173 Appendix 174 List of City 174 Default Settings 175 Optional Accessories 180 Messages 181 Troubleshooting 183 Main Specifications...
... SD Memory Card or the Built-in Memory 158 Changing the Sound Settings 159 Changing the Date and Time 162 Setting the World Time 164 Changing the Display Language 166 Changing the Image Folder Name 167 Changing the USB Connection Mode 168 Changing the Video Output Format 169 Adjusting the Brightness of the LCD Monitor 170 Setting Power Saving 171 Setting Auto Power Off 172 Setting the Guide Display 172 Resetting to Default Settings 173 Appendix 174 List of City 174 Default Settings 175 Optional Accessories 180 Messages 181 Troubleshooting 183 Main Specifications...
Operation Manual
Page 13
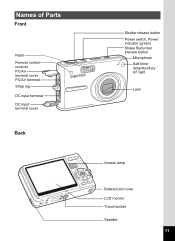
Names of Parts Front Flash Remote control receiver PC/AV terminal cover PC/AV terminal Strap lug DC input terminal DC input terminal cover Back Shutter release button Power switch, Power indicator (green) Shake Reduction preview button Microphone Self-timer lamp/Auxiliary AF light Lens Access lamp Battery/card cover LCD monitor Tripod socket Speaker 11
Names of Parts Front Flash Remote control receiver PC/AV terminal cover PC/AV terminal Strap lug DC input terminal DC input terminal cover Back Shutter release button Power switch, Power indicator (green) Shake Reduction preview button Microphone Self-timer lamp/Auxiliary AF light Lens Access lamp Battery/card cover LCD monitor Tripod socket Speaker 11
Operation Manual
Page 24
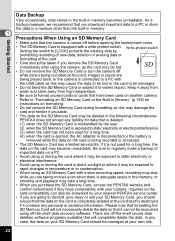
Write-protect switch Setting the switch to [LOCK] protects the existing data by prohibiting recording of new data, deletion of existing data or formatting of important data on the card is mishandled by your nearest PENTAX service center. • If you are being played back, or the camera is connected to condensation. • When using off before opening the battery/card cover. • The SD Memory Card is turned off -the-shelf data recovery software. Keep it away from water and...
Write-protect switch Setting the switch to [LOCK] protects the existing data by prohibiting recording of new data, deletion of existing data or formatting of important data on the card is mishandled by your nearest PENTAX service center. • If you are being played back, or the camera is connected to condensation. • When using off before opening the battery/card cover. • The SD Memory Card is turned off -the-shelf data recovery software. Keep it away from water and...
Operation Manual
Page 28
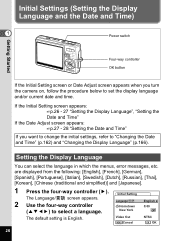
... the four-way controller (5). Initial Setting Hometown New York English 0:00 ODSFTF The default setting is English. Video Out MENU Cancel NTSC OK OK 26 Initial Settings (Setting the Display Language and the Date and Time) 1 Power switch Getting Started Four-way controller OK button If the Initial Setting screen or Date Adjust screen appears when you want to change the initial settings, refer to select a language. Setting the Display Language You can select the language in which the menus, error messages, etc.
... the four-way controller (5). Initial Setting Hometown New York English 0:00 ODSFTF The default setting is English. Video Out MENU Cancel NTSC OK OK 26 Initial Settings (Setting the Display Language and the Date and Time) 1 Power switch Getting Started Four-way controller OK button If the Initial Setting screen or Date Adjust screen appears when you want to change the initial settings, refer to select a language. Setting the Display Language You can select the language in which the menus, error messages, etc.
Operation Manual
Page 31
... Initial Setting or Date Adjust screen will appear next time you turn the camera on. • You can cancel the setting operation and switch to the pages below for details. 1 Language: "Changing the Display Language" (p.166) City, Daylight saving time: "Setting the World Time" (p.164) Date and Time: "Changing the Date and Time" (p.162) • The video output format is different from the one used in your country or region, change the settings on the menu. Refer to Capture mode...
... Initial Setting or Date Adjust screen will appear next time you turn the camera on. • You can cancel the setting operation and switch to the pages below for details. 1 Language: "Changing the Display Language" (p.166) City, Daylight saving time: "Setting the World Time" (p.164) Date and Time: "Changing the Date and Time" (p.162) • The video output format is different from the one used in your country or region, change the settings on the menu. Refer to Capture mode...

Operation Manual
Page 32
Quick Start Quick Start Taking Still Pictures Power switch Shutter release button 2 Zoom button OK button Green button The simplest procedure for 0.5 seconds (Instant Review) and is recorded on the SD Memory Card or in the built-in the center of the LCD monitor indicates the zone of the subject by pressing the zoom button. Zoom button(x) : Enlarges the subject. You can change the size of automatic focusing. The focus frame in memory. 30 The focus frame on the LCD monitor for taking still...
Quick Start Quick Start Taking Still Pictures Power switch Shutter release button 2 Zoom button OK button Green button The simplest procedure for 0.5 seconds (Instant Review) and is recorded on the SD Memory Card or in the built-in the center of the LCD monitor indicates the zone of the subject by pressing the zoom button. Zoom button(x) : Enlarges the subject. You can change the size of automatic focusing. The focus frame in memory. 30 The focus frame on the LCD monitor for taking still...
Operation Manual
Page 35
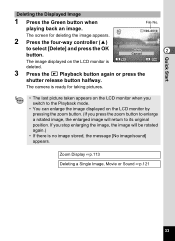
Quick Start Deleting the Displayed Image 1 Press the Green button when File No. The camera is ready for deleting the image appears. 2 Press the four-way controller (2) 100-0010 to the Playback mode. • You can enlarge the image displayed on the LCD monitor is no image stored, the message [No image/sound] appears. Zoom Display 1p.113 Deleting a Single Image, Movie or Sound 1p.121 33 The screen for taking pictures. • The last picture taken appears on the LCD monitor when...
Quick Start Deleting the Displayed Image 1 Press the Green button when File No. The camera is ready for deleting the image appears. 2 Press the four-way controller (2) 100-0010 to the Playback mode. • You can enlarge the image displayed on the LCD monitor is no image stored, the message [No image/sound] appears. Zoom Display 1p.113 Deleting a Single Image, Movie or Sound 1p.121 33 The screen for taking pictures. • The last picture taken appears on the LCD monitor when...
Operation Manual
Page 36
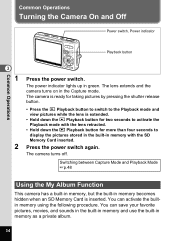
...-in green. The power indicator lights up in memory becomes hidden when an SD Memory Card is extended. • Hold down the Q Playback button for two seconds to activate the Playback mode with the SD Memory Card inserted. The camera is ready for taking pictures by pressing the shutter release button. • Press the Q Playback button to switch to the Playback mode and view pictures while the lens is inserted. You can save your favorite pictures, movies, and sounds in...
...-in green. The power indicator lights up in memory becomes hidden when an SD Memory Card is extended. • Hold down the Q Playback button for two seconds to activate the Playback mode with the SD Memory Card inserted. The camera is ready for taking pictures by pressing the shutter release button. • Press the Q Playback button to switch to the Playback mode and view pictures while the lens is inserted. You can save your favorite pictures, movies, and sounds in...
Operation Manual
Page 38
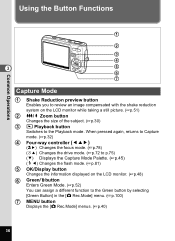
...-way controller (425) (q5) Changes the focus mode. (1p.78) (g2) Changes the drive mode. (1p.72 to p.75) (3) Displays the Capture Mode Palette. (1p.45) (b4) Changes the flash mode. (1p.81) 5 OK/Display button Changes the information displayed on the LCD monitor while taking a still picture. (1p.51) 2 w/x Zoom button Changes the size of the subject. (1p.30) 3 Q Playback button Switches to the Green button by selecting [Green Button] in the [A Rec.Mode] menu. (1p.100) 7 MENU button Displays the [A Rec.Mode] menus...
...-way controller (425) (q5) Changes the focus mode. (1p.78) (g2) Changes the drive mode. (1p.72 to p.75) (3) Displays the Capture Mode Palette. (1p.45) (b4) Changes the flash mode. (1p.81) 5 OK/Display button Changes the information displayed on the LCD monitor while taking a still picture. (1p.51) 2 w/x Zoom button Changes the size of the subject. (1p.30) 3 Q Playback button Switches to the Green button by selecting [Green Button] in the [A Rec.Mode] menu. (1p.100) 7 MENU button Displays the [A Rec.Mode] menus...
Operation Manual
Page 46
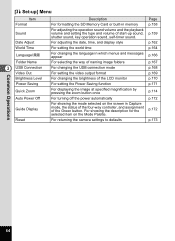
... of naming image folders For changing the USB connection mode For setting the video output format For changing the brightness of the Green button. [H Set-up sound, shutter sound, key operation sound, self-timer sound. For showing the description for the selected item on the screen in memory For adjusting the operation sound volume and the playback volume and setting the type and volume of start-up ] Menu Item Format Sound Date Adjust World Time Language/ Folder Name 3 USB Connection Video Out Brightness Level Power Saving Quick Zoom Auto Power Off Guide Display Reset Description For...
... of naming image folders For changing the USB connection mode For setting the video output format For changing the brightness of the Green button. [H Set-up sound, shutter sound, key operation sound, self-timer sound. For showing the description for the selected item on the screen in memory For adjusting the operation sound volume and the playback volume and setting the type and volume of start-up ] Menu Item Format Sound Date Adjust World Time Language/ Folder Name 3 USB Connection Video Out Brightness Level Power Saving Quick Zoom Auto Power Off Guide Display Reset Description For...
Operation Manual
Page 47
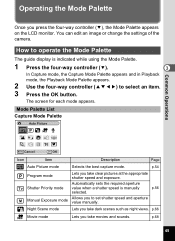
... Playback mode, the Playback Mode Palette appears. 2 Use the four-way controller (2345) to select an item. 3 Press the OK button. The screen for each mode appears. Mode Palette List Capture Mode Palette Auto Picture Common Operations MENU Cancel OK OK Icon Item Description Page Auto Picture mode Selects the best capture mode. Lets you take movies and sounds. p.66 Lets you take clear pictures at the appropriate shutter speed and exposure. How to operate the Mode Palette The guide display is manually...
... Playback mode, the Playback Mode Palette appears. 2 Use the four-way controller (2345) to select an item. 3 Press the OK button. The screen for each mode appears. Mode Palette List Capture Mode Palette Auto Picture Common Operations MENU Cancel OK OK Icon Item Description Page Auto Picture mode Selects the best capture mode. Lets you take movies and sounds. p.66 Lets you take clear pictures at the appropriate shutter speed and exposure. How to operate the Mode Palette The guide display is manually...
Operation Manual
Page 50
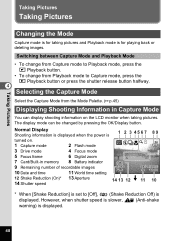
... Capture mode to Playback mode, press the Q Playback button. • To change from the Mode Palette. (1p.45) Displaying Shooting Information in Capture Mode You can be changed by pressing the OK/Display button. The display mode can display shooting information on . 36 1 Capture mode 2 Flash mode 3 Drive mode 4 Focus mode 5 Focus frame 6 Digital zoom 7 Card/Built-in memory 8 Battery indicator 9 Remaining number of recordable images 10 Date and time 11 World time setting 1/160 F2.6 08/25/2006 12:00 12 Shake Reduction (On)* 13 Aperture 14 Shutter speed...
... Capture mode to Playback mode, press the Q Playback button. • To change from the Mode Palette. (1p.45) Displaying Shooting Information in Capture Mode You can be changed by pressing the OK/Display button. The display mode can display shooting information on . 36 1 Capture mode 2 Flash mode 3 Drive mode 4 Focus mode 5 Focus frame 6 Digital zoom 7 Card/Built-in memory 8 Battery indicator 9 Remaining number of recordable images 10 Date and time 11 World time setting 1/160 F2.6 08/25/2006 12:00 12 Shake Reduction (On)* 13 Aperture 14 Shutter speed...
Operation Manual
Page 88
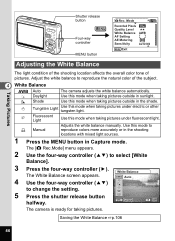
... taking pictures. K Manual Adjusts the white balance manually. Use this mode when taking pictures under electric or other tungsten light. MENU Cancel OK OK The camera is ready for taking pictures outside in Capture mode. Taking Pictures Shutter release button MENU Four-way controller MENU button Rec. Daylight Use this mode to change the setting. 5 Press the shutter release button halfway. AWB Auto 4 Use the four-way controller (23) to reproduce colors more accurately or in the shooting locations with mixed light sources. 1 Press the MENU button in sunlight. Saving...
... taking pictures. K Manual Adjusts the white balance manually. Use this mode when taking pictures under electric or other tungsten light. MENU Cancel OK OK The camera is ready for taking pictures outside in Capture mode. Taking Pictures Shutter release button MENU Four-way controller MENU button Rec. Daylight Use this mode to change the setting. 5 Press the shutter release button halfway. AWB Auto 4 Use the four-way controller (23) to reproduce colors more accurately or in the shooting locations with mixed light sources. 1 Press the MENU button in sunlight. Saving...
Operation Manual
Page 108
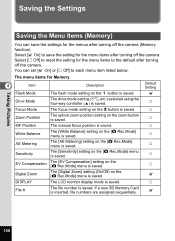
... SD Memory Card is saved. The focus mode setting on the [A Rec.Mode] menu is saved. P White Balance The [White Balance] setting on the zoom button is saved. P File # The file number is saved. Taking Pictures Saving the Settings Saving the Menu Items (Memory) You can set [O On] or [P Off] to each menu item listed below. The drive mode setting (gj, etc.) selected using the four-way controller (2) is saved. The menu items for the menus after turning off the camera. Default Setting O P P Zoom Position The optical zoom position setting on the [A Rec.Mode] menu...
... SD Memory Card is saved. The focus mode setting on the [A Rec.Mode] menu is saved. P White Balance The [White Balance] setting on the zoom button is saved. P File # The file number is saved. Taking Pictures Saving the Settings Saving the Menu Items (Memory) You can set [O On] or [P Off] to each menu item listed below. The drive mode setting (gj, etc.) selected using the four-way controller (2) is saved. The menu items for the menus after turning off the camera. Default Setting O P P Zoom Position The optical zoom position setting on the [A Rec.Mode] menu...
Operation Manual
Page 163
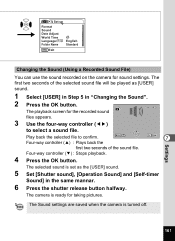
... the selected sound file will be played as the [USER] sound. 5 Set [Shutter sound], [Operation Sound] and [Self-timer Sound] in "Changing the Sound". 2 Press the OK button. The camera is ready for the recorded sound files appears. 3 Use the four-way controller (45) 100-0025 to confirm. Set-up OK Format Sound Date Adjust World Time Language/ English Folder Name Standard MENU Exit Changing the Sound (Using a Recorded Sound File) You can use the sound recorded on the camera for sound settings. Play back the selected file to select a sound file. Settings 161 The...
... the selected sound file will be played as the [USER] sound. 5 Set [Shutter sound], [Operation Sound] and [Self-timer Sound] in "Changing the Sound". 2 Press the OK button. The camera is ready for the recorded sound files appears. 3 Use the four-way controller (45) 100-0025 to confirm. Set-up OK Format Sound Date Adjust World Time Language/ English Folder Name Standard MENU Exit Changing the Sound (Using a Recorded Sound File) You can use the sound recorded on the camera for sound settings. Play back the selected file to select a sound file. Settings 161 The...
Operation Manual
Page 166
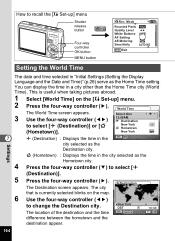
... [H Set-up ] menu Shutter release button MENU Four-way controller OK button MENU button Rec. Select time 3 Use the four-way controller (45) 12:00AM Destination to select [X (Destination)]. 5 Press the four-way controller (5). Mode Recorded Pixels Quality Level White Balance AF Setting AE Metering Sensitivity 10M AWB AUTO 800 MENU Exit Setting the World Time Settings The date and time selected in the city selected as the Home Time setting. W (Hometown) : Displays the time in "Initial Settings (Setting the Display Language and...
... [H Set-up ] menu Shutter release button MENU Four-way controller OK button MENU button Rec. Select time 3 Use the four-way controller (45) 12:00AM Destination to select [X (Destination)]. 5 Press the four-way controller (5). Mode Recorded Pixels Quality Level White Balance AF Setting AE Metering Sensitivity 10M AWB AUTO 800 MENU Exit Setting the World Time Settings The date and time selected in the city selected as the Home Time setting. W (Hometown) : Displays the time in "Initial Settings (Setting the Display Language and...
Operation Manual
Page 183
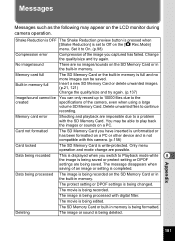
... Memory Card. Data being deleted. The SD Memory Card or built-in memory. Deleting The image or sound is being processed with digital filter. Insert a new SD Memory Card or delete unwanted images. (p.21, 121) Change the quality/size and try again. The movie is being formatted. The image is being processed The image is completed. Only menu operation and mode change are no more images can only record up to 10000 files due to continue recording. Memory card error Shooting and playback are being recorded...
... Memory Card. Data being deleted. The SD Memory Card or built-in memory. Deleting The image or sound is being processed with digital filter. Insert a new SD Memory Card or delete unwanted images. (p.21, 121) Change the quality/size and try again. The movie is being formatted. The image is being processed The image is completed. Only menu operation and mode change are no more images can only record up to 10000 files due to continue recording. Memory card error Shooting and playback are being recorded...
Operation Manual
Page 189
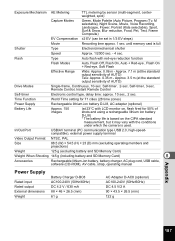
... shots and using a rechargeable lithium ion battery D-LI8) * The battery life is based on , flash fired for 50% of AUTO) Tele: Approx. 0.35 m - Self-timer. 2-sec. Self-timer, 3-sec. Time Function World Time setting for 71 cities (28 time zones) Power Supply Rechargeable lithium-ion battery D-LI8, AC adapter (optional) Battery Life Approx. 150 images (at 23°C with LCD monitor on the CIPA standard measurement, but it may vary with red-eye...
... shots and using a rechargeable lithium ion battery D-LI8) * The battery life is based on , flash fired for 50% of AUTO) Tele: Approx. 0.35 m - Self-timer. 2-sec. Self-timer, 3-sec. Time Function World Time setting for 71 cities (28 time zones) Power Supply Rechargeable lithium-ion battery D-LI8, AC adapter (optional) Battery Life Approx. 150 images (at 23°C with LCD monitor on the CIPA standard measurement, but it may vary with red-eye...

