
Operation Manual
Page 2
... correctly when used in surroundings such as specified in helping you to get the most out of all the camera's capabilities. Regarding trademarks „ PENTAX, Optio and smc PENTAX are trademarks of PENTAX Corporation. „ The SD logo ( ) is a trademark. „ All other than personal enjoyment ...it can be aware that are for anything other brands or product names are placed on taking pictures even for purchasing the PENTAX Digital Camera. EN-2 Images taken with the purpose of obtaining copyrights also cannot be used without permission according to the rights as installations...
... correctly when used in surroundings such as specified in helping you to get the most out of all the camera's capabilities. Regarding trademarks „ PENTAX, Optio and smc PENTAX are trademarks of PENTAX Corporation. „ The SD logo ( ) is a trademark. „ All other than personal enjoyment ...it can be aware that are for anything other brands or product names are placed on taking pictures even for purchasing the PENTAX Digital Camera. EN-2 Images taken with the purpose of obtaining copyrights also cannot be used without permission according to the rights as installations...

Operation Manual
Page 3
EN-3 Regarding PictBridge „ PictBridge allows the user to connect the printer and digital camera directly, using the unified standard for the direct printout of the LCD monitor in this manual are different form the actual product. You can print images directly from the camera through a few simple operations. „ There is a possibility that the illustrations and the display screen of images.
EN-3 Regarding PictBridge „ PictBridge allows the user to connect the printer and digital camera directly, using the unified standard for the direct printout of the LCD monitor in this manual are different form the actual product. You can print images directly from the camera through a few simple operations. „ There is a possibility that the illustrations and the display screen of images.

Operation Manual
Page 4
...avoid the risk of it being dropped, please do not under any other than that it is also dangerous. Please take the camera apart or remodel the camera. The use with this product. Seek medical attention immediately if a memory card is accidentally swallowed. „ Use an AC ...Camera Warning „ Do not attempt to the warnings indicated by mistake, keep the SD Memory Card out of the reach of , for use of any circumstances touch such exposed portions, as there is a danger of receiving an electric shock. „ Wrapping the strap of the camera around your nearest PENTAX...
...avoid the risk of it being dropped, please do not under any other than that it is also dangerous. Please take the camera apart or remodel the camera. The use with this product. Seek medical attention immediately if a memory card is accidentally swallowed. „ Use an AC ...Camera Warning „ Do not attempt to the warnings indicated by mistake, keep the SD Memory Card out of the reach of , for use of any circumstances touch such exposed portions, as there is a danger of receiving an electric shock. „ Wrapping the strap of the camera around your nearest PENTAX...

Operation Manual
Page 5
... batteries to get medical attention immediately. „ If any batteries other type of battery may explode. „ Do not charge any of the camera heat up during use batteries other than rechargeable Ni-MH batteries. Be careful not to burn yourself during removal. „ Some portions of the ...the Ni-MH battery can be recharged. Handling precautions for long periods of burns. „ Do not discharge the flash while it may cause the camera to rupture or cause a fire. „ Do not insert the batteries with new ones. The battery could explode or catch fire. The batteries...
... batteries to get medical attention immediately. „ If any batteries other type of battery may explode. „ Do not charge any of the camera heat up during use batteries other than rechargeable Ni-MH batteries. Be careful not to burn yourself during removal. „ Some portions of the ...the Ni-MH battery can be recharged. Handling precautions for long periods of burns. „ Do not discharge the flash while it may cause the camera to rupture or cause a fire. „ Do not insert the batteries with new ones. The battery could explode or catch fire. The batteries...

Operation Manual
Page 7
... and chemicals are returned to a malfunction of your data to rapid temperature changes, condensation may come in order to maintain high performance. „ If the camera is 0°C to 40°C (32°F to 104°F). „ The liquid crystal display will become very hot inside and outside of high ...vibrations, shocks or pressure. The lens is not removable. „ Do not clean the product with you when you experience problems abroad. „ When the camera has not been used is subjected to a computer, etc. Remove from case and store in a well-ventilated place to prevent the...
... and chemicals are returned to a malfunction of your data to rapid temperature changes, condensation may come in order to maintain high performance. „ If the camera is 0°C to 40°C (32°F to 104°F). „ The liquid crystal display will become very hot inside and outside of high ...vibrations, shocks or pressure. The lens is not removable. „ Do not clean the product with you when you experience problems abroad. „ When the camera has not been used is subjected to a computer, etc. Remove from case and store in a well-ventilated place to prevent the...

Operation Manual
Page 8
.... „ Refer to "Precautions When Using an SD Memory Card" (EN-21) regarding the SD Memory Card. „ Please do not press forcefully on the camera. This could cause breakage or malfunction. „ Be careful not to sit down with garbage, dirt, sand, dust, water, toxic gases, salt, etc. EN-8 If... rain or drops of the camera or the LCD monitor. „ When using a tripod with the camera, be careful not to overtighten the screw in the tripod socket on the LCD monitor. „ Avoid contact with the...
.... „ Refer to "Precautions When Using an SD Memory Card" (EN-21) regarding the SD Memory Card. „ Please do not press forcefully on the camera. This could cause breakage or malfunction. „ Be careful not to sit down with garbage, dirt, sand, dust, water, toxic gases, salt, etc. EN-8 If... rain or drops of the camera or the LCD monitor. „ When using a tripod with the camera, be careful not to overtighten the screw in the tripod socket on the LCD monitor. „ Avoid contact with the...

Operation Manual
Page 9
... Installing the Batteries 18 Using the AC Adapter (Optional Accessory)....... 19 Inserting and Removing an SD Memory Card (Optional Accessory 20 Attaching the Camera Strap 23 GETTING STARTED 24 Turning the Power On/Off 24 Choosing the Screen Language 25 Setting the Date and Time 26 Formatting an SD ...
... Installing the Batteries 18 Using the AC Adapter (Optional Accessory)....... 19 Inserting and Removing an SD Memory Card (Optional Accessory 20 Attaching the Camera Strap 23 GETTING STARTED 24 Turning the Power On/Off 24 Choosing the Screen Language 25 Setting the Date and Time 26 Formatting an SD ...
Operation Manual
Page 10
... 1: Install the USB driver 60 Step 2: Connect the digital camera to your computer 61 Step 3: Download images or movie clips 62 EDITING SOFTWARE INSTALLATION 63 Installing ACDSee for PENTAX 63 USING THE DIGITAL CAMERA AS A PC CAMERA 64 Step 1: Install the PC camera driver 64 Step 2: Connect the digital camera to your computer 65 Step 3: Run your application software...
... 1: Install the USB driver 60 Step 2: Connect the digital camera to your computer 61 Step 3: Download images or movie clips 62 EDITING SOFTWARE INSTALLATION 63 Installing ACDSee for PENTAX 63 USING THE DIGITAL CAMERA AS A PC CAMERA 64 Step 1: Install the PC camera driver 64 Step 2: Connect the digital camera to your computer 65 Step 3: Run your application software...

Operation Manual
Page 11
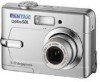
... You may wish to expand the memory capacity (up to 1GB capacity) by using the camera monitor screen and controls. „ Provided editing software: ACDSee for purchasing the new digital still camera! Equipped with a 5.0 Megapixels CCD sensor, your computer by using an additional SD memory ...card. „ USB connection Still images or movie clips that you for PENTAX You can enhance and retouch your images on your camera delivers high quality, 2560...
... You may wish to expand the memory capacity (up to 1GB capacity) by using the camera monitor screen and controls. „ Provided editing software: ACDSee for purchasing the new digital still camera! Equipped with a 5.0 Megapixels CCD sensor, your computer by using an additional SD memory ...card. „ USB connection Still images or movie clips that you for PENTAX You can enhance and retouch your images on your camera delivers high quality, 2560...

Operation Manual
Page 12
Common Product Components: „ Digital Camera „ Software CD-ROM (S-SW49) „ Operating manuals (CD-ROM) „ AV Cable „ Quick Start Guide „ Camera Strap „ USB Cable „ Two AA alkaline batteries (for checking the camera's functionality) Common (Optional) Accessories (not included with the camera): „ AC adapter (supplied by PENTAX) „ SD memory card...
Common Product Components: „ Digital Camera „ Software CD-ROM (S-SW49) „ Operating manuals (CD-ROM) „ AV Cable „ Quick Start Guide „ Camera Strap „ USB Cable „ Two AA alkaline batteries (for checking the camera's functionality) Common (Optional) Accessories (not included with the camera): „ AC adapter (supplied by PENTAX) „ SD memory card...

Operation Manual
Page 13
Shutter release button 2. Flash 4. PC / AV terminal 8. Power switch 5. Self-timer LED 7 8 9 6. Lens EN-13 Mode dial 3. GETTING TO KNOW YOUR CAMERA Front View 1 2 3 4 5 50L 6 1. DC input terminal 9. Microphone 7.
Shutter release button 2. Flash 4. PC / AV terminal 8. Power switch 5. Self-timer LED 7 8 9 6. Lens EN-13 Mode dial 3. GETTING TO KNOW YOUR CAMERA Front View 1 2 3 4 5 50L 6 1. DC input terminal 9. Microphone 7.

Operation Manual
Page 15
... this mode to permit the shutter speed and aperture to achieve the desired effect. 2 34 5 1 6 Mode 1. Movie 87 Description Select this mode to adjust the camera settings. Program 3. Landscape 5. Night Scene 7. Setup 8. Select this mode to record movie clips. Portrait 4. Sport 6. Use this mode to take photographs of distant scenery or...
... this mode to permit the shutter speed and aperture to achieve the desired effect. 2 34 5 1 6 Mode 1. Movie 87 Description Select this mode to adjust the camera settings. Program 3. Landscape 5. Night Scene 7. Setup 8. Select this mode to record movie clips. Portrait 4. Sport 6. Use this mode to take photographs of distant scenery or...

Operation Manual
Page 16
... battery power [ ] AC adapter 8. self-timer [ ] 10+2 sec. self-timer [ ] Timer off 5 67 52 8 9 10 11 01.11.2005 12 9. LCD Monitor Information 1 2 34 „ Camera Mode 1. White balance [No icon] Auto [ ] Daylight [ ] Cloudy [ ] Tungsten [ ] Fluorescent 10. Date 13. Mode indication [ ] Simple Mode [ ] Program Mode [ ] Portrait Mode [ ] Landscape Mode [ ] Sport Mode...
... battery power [ ] AC adapter 8. self-timer [ ] 10+2 sec. self-timer [ ] Timer off 5 67 52 8 9 10 11 01.11.2005 12 9. LCD Monitor Information 1 2 34 „ Camera Mode 1. White balance [No icon] Auto [ ] Daylight [ ] Cloudy [ ] Tungsten [ ] Fluorescent 10. Date 13. Mode indication [ ] Simple Mode [ ] Program Mode [ ] Portrait Mode [ ] Landscape Mode [ ] Sport Mode...
Operation Manual
Page 18
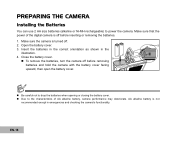
...power of AA alkaline battery, camera performance may deteriorate. PREPARING THE CAMERA Installing the Batteries You can use 2 AA size batteries (alkaline or Ni-MH rechargeable) to the characteristics of the digital camera is off . 2. Make sure the camera is not recommended except in the... illustration. 4. AA alkaline battery is turned off before removing batteries and hold the camera with the battery cover facing upward, then open the ...
...power of AA alkaline battery, camera performance may deteriorate. PREPARING THE CAMERA Installing the Batteries You can use 2 AA size batteries (alkaline or Ni-MH rechargeable) to the characteristics of the digital camera is off . 2. Make sure the camera is not recommended except in the... illustration. 4. AA alkaline battery is turned off before removing batteries and hold the camera with the battery cover facing upward, then open the ...

Operation Manual
Page 19
... power outlet AC power cable „ Make sure to use only the AC adapter specified for a long time or connect the camera to a PC. 1. Connect the other end to the camera jack labeled "DC IN 3.0V". 3. EN-19 Using the AC Adapter (Optional Accessory) Use of the AC power adapter is ...recommended if you intend to use the LCD monitor for the camera. Connect one end of transferring your camera is not covered under the warranty. „ To prevent unexpected auto power off . 2. Make sure your images to the computer, use of...
... power outlet AC power cable „ Make sure to use only the AC adapter specified for a long time or connect the camera to a PC. 1. Connect the other end to the camera jack labeled "DC IN 3.0V". 3. EN-19 Using the AC Adapter (Optional Accessory) Use of the AC power adapter is ...recommended if you intend to use the LCD monitor for the camera. Connect one end of transferring your camera is not covered under the warranty. „ To prevent unexpected auto power off . 2. Make sure your images to the computer, use of...
Operation Manual
Page 20
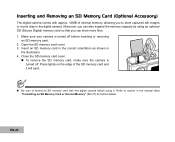
... edge of internal memory, allowing you can also expand the memory capacity by using it will eject. „ Be sure to section in the digital camera. Refer to format an SD memory card with approx. 12MB of the SD memory card and it . EN-20 Close the SD memory card... cover. „ To remove the SD memory card, make sure the camera is turned off . Open the SD memory card cover. 3. Inserting and Removing an SD Memory Card (Optional Accessory) The digital camera comes with this digital camera before inserting or removing an SD memory card. 2. Insert an SD memory card...
... edge of internal memory, allowing you can also expand the memory capacity by using it will eject. „ Be sure to section in the digital camera. Refer to format an SD memory card with approx. 12MB of the SD memory card and it . EN-20 Close the SD memory card... cover. „ To remove the SD memory card, make sure the camera is turned off . Open the SD memory card cover. 3. Inserting and Removing an SD Memory Card (Optional Accessory) The digital camera comes with this digital camera before inserting or removing an SD memory card. 2. Insert an SD memory card...

Operation Manual
Page 21
...recommend that is deleted (1) when the SD Memory Card is mishandled by prohibiting recording of new data, deletion of existing data or formatting of the camera may damage the card and render it unusable. „ The data on the card, images or voice memos are removed while the data on the... LCD monitor in memory. PENTAX does not accept any liability for a long time. (4) when the card is ejected, the AC adapter is disconnected or the batteries are being recorded ...
...recommend that is deleted (1) when the SD Memory Card is mishandled by prohibiting recording of new data, deletion of existing data or formatting of the camera may damage the card and render it unusable. „ The data on the card, images or voice memos are removed while the data on the... LCD monitor in memory. PENTAX does not accept any liability for a long time. (4) when the card is ejected, the AC adapter is disconnected or the batteries are being recorded ...

Operation Manual
Page 23
Attaching the Camera Strap Attach the strap as shown in the illustration. 3 1 2 EN-23
Attaching the Camera Strap Attach the strap as shown in the illustration. 3 1 2 EN-23
Operation Manual
Page 24
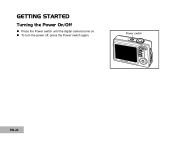
Power switch EN-24 GETTING STARTED Turning the Power On/Off „ Press the Power switch until the digital camera turns on. „ To turn the power off, press the Power switch again.
Power switch EN-24 GETTING STARTED Turning the Power On/Off „ Press the Power switch until the digital camera turns on. „ To turn the power off, press the Power switch again.

Operation Manual
Page 25
... the mode dial to select the language you want. 5. Use the four-way controller (ST) to the Power switch. Choosing the Screen Language When the camera is turned on by pressing 2. Press the button to choose the desired language. 1. Follow the steps below to confirm. Press the four-way controller (X) to... Language Brightness OK : Set-up 2 d/m/y PAL English 3 / 5 Language OK : 1 / 8 EN-25 Use the four-way controller (T) to select the [Set-up2] menu. 3. and turn your camera on for the first time, a language-selection screen will be displayed in the monitor.
... the mode dial to select the language you want. 5. Use the four-way controller (ST) to the Power switch. Choosing the Screen Language When the camera is turned on by pressing 2. Press the button to choose the desired language. 1. Follow the steps below to confirm. Press the four-way controller (X) to... Language Brightness OK : Set-up 2 d/m/y PAL English 3 / 5 Language OK : 1 / 8 EN-25 Use the four-way controller (T) to select the [Set-up2] menu. 3. and turn your camera on for the first time, a language-selection screen will be displayed in the monitor.


