
Operation Manual
Page 2
...can be erased or that are placed on taking pictures even for purchasing the PENTAX Digital Camera. To users of all the camera's capabilities. Regarding copyrights Images taken using the camera in helping you for personal enjoyment during demonstrations, performances or of their respective ...using the PENTAX Digital Camera that the camera may be a valuable tool in order to get the most out of this manual safe, as laid out in the LCD display is manufactured using extremely high precision technology. Regarding trademarks „ PENTAX, Optio and smc PENTAX are trademarks...
...can be erased or that are placed on taking pictures even for purchasing the PENTAX Digital Camera. To users of all the camera's capabilities. Regarding copyrights Images taken using the camera in helping you for personal enjoyment during demonstrations, performances or of their respective ...using the PENTAX Digital Camera that the camera may be a valuable tool in order to get the most out of this manual safe, as laid out in the LCD display is manufactured using extremely high precision technology. Regarding trademarks „ PENTAX, Optio and smc PENTAX are trademarks...

Operation Manual
Page 3
You can print images directly from the camera through a few simple operations. „ There is a possibility that the illustrations and the display screen of images. EN-3 Regarding PictBridge „ PictBridge allows the user to connect the printer and digital camera directly, using the unified standard for the direct printout of the LCD monitor in this manual are different form the actual product.
You can print images directly from the camera through a few simple operations. „ There is a possibility that the illustrations and the display screen of images. EN-3 Regarding PictBridge „ PictBridge allows the user to connect the printer and digital camera directly, using the unified standard for the direct printout of the LCD monitor in this manual are different form the actual product.
Operation Manual
Page 10
...61 Step 3: Download images or movie clips 62 EDITING SOFTWARE INSTALLATION 63 Installing ACDSee for PENTAX 63 USING THE DIGITAL CAMERA AS A PC CAMERA 64 Step 1: Install the PC camera driver 64 Step 2: Connect the digital camera to your computer 65 Step 3: Run your application software (i.e. PLAYBACK MODE - THE ... Video Clips 48 Playing Back Movie Clips 49 PLAYBACK MODE - Windows NetMeeting 65 MENU OPTIONS 66 Camera Menu 66 Movie Menu 70 Playback Menu 71 Setup Menu 73 CONNECTING THE DIGITAL CAMERA TO OTHER DEVICES 76 SPECIFICATIONS 77 APPENDIX 79 WARRANTY POLICY 82 EN-10
...61 Step 3: Download images or movie clips 62 EDITING SOFTWARE INSTALLATION 63 Installing ACDSee for PENTAX 63 USING THE DIGITAL CAMERA AS A PC CAMERA 64 Step 1: Install the PC camera driver 64 Step 2: Connect the digital camera to your computer 65 Step 3: Run your application software (i.e. PLAYBACK MODE - THE ... Video Clips 48 Playing Back Movie Clips 49 PLAYBACK MODE - Windows NetMeeting 65 MENU OPTIONS 66 Camera Menu 66 Movie Menu 70 Playback Menu 71 Setup Menu 73 CONNECTING THE DIGITAL CAMERA TO OTHER DEVICES 76 SPECIFICATIONS 77 APPENDIX 79 WARRANTY POLICY 82 EN-10

Operation Manual
Page 12
... Product Components: „ Digital Camera „ Software CD-ROM (S-SW49) „ Operating manuals (CD-ROM) „ AV Cable „ Quick Start Guide „ Camera Strap „ USB Cable „ Two AA alkaline batteries (for checking the camera's functionality) Common (Optional) Accessories (not included with the camera): „ AC adapter (supplied by PENTAX) „ SD memory card...
... Product Components: „ Digital Camera „ Software CD-ROM (S-SW49) „ Operating manuals (CD-ROM) „ AV Cable „ Quick Start Guide „ Camera Strap „ USB Cable „ Two AA alkaline batteries (for checking the camera's functionality) Common (Optional) Accessories (not included with the camera): „ AC adapter (supplied by PENTAX) „ SD memory card...
Operation Manual
Page 18
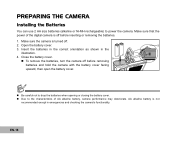
... battery cover. 3 „ To remove the batteries, turn the camera off . 2. AA alkaline battery is off before inserting or removing the batteries. 1. Make sure the camera is turned off before removing batteries and hold the camera with the battery cover facing upward, then open the battery cover. ... closing the battery cover. „ Due to power the camera. PREPARING THE CAMERA Installing the Batteries You can use 2 AA size batteries (alkaline or Ni-MH rechargeable) to the characteristics of the digital camera is not recommended except in the illustration. 4. Make sure ...
... battery cover. 3 „ To remove the batteries, turn the camera off . 2. AA alkaline battery is off before inserting or removing the batteries. 1. Make sure the camera is turned off before removing batteries and hold the camera with the battery cover facing upward, then open the battery cover. ... closing the battery cover. „ Due to power the camera. PREPARING THE CAMERA Installing the Batteries You can use 2 AA size batteries (alkaline or Ni-MH rechargeable) to the characteristics of the digital camera is not recommended except in the illustration. 4. Make sure ...
Operation Manual
Page 20
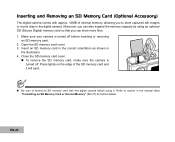
...an SD Memory Card or Internal Memory" (EN-27) for further details. Refer to store captured still images or movie clips in the digital camera. Moreover, you to section in the illustration. 4. Close the SD memory card cover. „ To remove the SD memory card, make sure ... EN-20 Inserting and Removing an SD Memory Card (Optional Accessory) The digital camera comes with this digital camera before inserting or removing an SD memory card. 2. Make sure your camera is turned off before using an optional SD (Secure Digital) memory card so that you can also expand the memory capacity by using...
...an SD Memory Card or Internal Memory" (EN-27) for further details. Refer to store captured still images or movie clips in the digital camera. Moreover, you to section in the illustration. 4. Close the SD memory card cover. „ To remove the SD memory card, make sure ... EN-20 Inserting and Removing an SD Memory Card (Optional Accessory) The digital camera comes with this digital camera before inserting or removing an SD memory card. 2. Make sure your camera is turned off before using an optional SD (Secure Digital) memory card so that you can also expand the memory capacity by using...
Operation Manual
Page 24
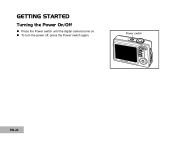
Power switch EN-24 GETTING STARTED Turning the Power On/Off „ Press the Power switch until the digital camera turns on. „ To turn the power off, press the Power switch again.
Power switch EN-24 GETTING STARTED Turning the Power On/Off „ Press the Power switch until the digital camera turns on. „ To turn the power off, press the Power switch again.

Operation Manual
Page 30
... Quality As you get to know the digital camera, you want to shoot.These settings affect the number of images that can resize the images later. Higher resolution and higher quality images provide finer detail but cause the images' file size to , , , , or and turn your camera on the storage size, resolution and...
... Quality As you get to know the digital camera, you want to shoot.These settings affect the number of images that can resize the images later. Higher resolution and higher quality images provide finer detail but cause the images' file size to , , , , or and turn your camera on the storage size, resolution and...
Operation Manual
Page 32
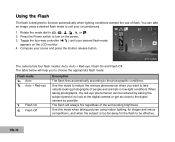
Rotate the mode dial to be reduced by asking the subject (person) to look at the digital camera or get as close to the digital camera as possible. Press the Power switch to turn on the LCD monitor. 4. Toggle the four-way controller (W/ ) until your desired flash mode appears on the... flash to , , , , or . 5 M 52 2. The flash will help you want to suit your scene and press the shutter release button. 01.11.2005 The camera has four flash modes: Auto, Auto + Red-eye, Flash On and Flash Off. The table below will always fire regardless of the surrounding brightness. You...
Rotate the mode dial to be reduced by asking the subject (person) to look at the digital camera or get as close to the digital camera as possible. Press the Power switch to turn on the LCD monitor. 4. Toggle the four-way controller (W/ ) until your desired flash mode appears on the... flash to , , , , or . 5 M 52 2. The flash will help you want to suit your scene and press the shutter release button. 01.11.2005 The camera has four flash modes: Auto, Auto + Red-eye, Flash On and Flash Off. The table below will always fire regardless of the surrounding brightness. You...

Operation Manual
Page 35
... cannot be set the range of EV compensation value from -2.0EV to +2.0EV. 1. The EV compensation value can manually adjust the exposure determined by the digital camera. To exit the menu, press the MENU button. Sensitivity Mode3 0.0 Auto Auto OK : Exit : MENU 1 / 3 EN-35 Use the four-way controller (T) to select [EV...
... cannot be set the range of EV compensation value from -2.0EV to +2.0EV. 1. The EV compensation value can manually adjust the exposure determined by the digital camera. To exit the menu, press the MENU button. Sensitivity Mode3 0.0 Auto Auto OK : Exit : MENU 1 / 3 EN-35 Use the four-way controller (T) to select [EV...
Operation Manual
Page 50
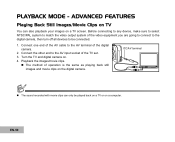
... device, make sure to select NTSC/PAL system to match the video output system of the video equipment you are going to connect to the digital camera, then turn off all devices to the AV input socket of the TV set. 3. Connect the other end to be played back on a TV or... on a TV screen. EN-50 Playback the images/movie clips. „ The method of the digital camera. 2. Connect one end of the AV cable to the AV terminal of operation is the same as playing back still images and movie clips on...
... device, make sure to select NTSC/PAL system to match the video output system of the video equipment you are going to connect to the digital camera, then turn off all devices to the AV input socket of the TV set. 3. Connect the other end to be played back on a TV or... on a TV screen. EN-50 Playback the images/movie clips. „ The method of the digital camera. 2. Connect one end of the AV cable to the AV terminal of operation is the same as playing back still images and movie clips on...
Operation Manual
Page 53
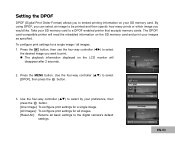
Setting the DPOF DPOF (Digital Print Order Format) allows you to embed printing information on the SD memory card and print your preference, then press the button. [One Image]: To .... Use the four-way controller (ST) to select by your images as specified. Press the button, then use the four-way controller (WX) to the digital camera's default settings. Take your SD memory card. The DPOF/ card-compatible printer will disappear after 2 seconds. 2. OK : Exit : MENU 6 / 7 DPOF One Image All lmages Reset...
Setting the DPOF DPOF (Digital Print Order Format) allows you to embed printing information on the SD memory card and print your preference, then press the button. [One Image]: To .... Use the four-way controller (ST) to select by your images as specified. Press the button, then use the four-way controller (WX) to the digital camera's default settings. Take your SD memory card. The DPOF/ card-compatible printer will disappear after 2 seconds. 2. OK : Exit : MENU 6 / 7 DPOF One Image All lmages Reset...

Operation Manual
Page 59
EDITING SOFTWARE REQUIREMENTS The supplied software (ACDSee for PENTAX) is needed to be pre-installed and updated to the latest version. * Working status is not guaranteed for all qualifying PCs. * Figures within parenthesis above ... Requires CD-ROM drive, Internet Explorer 5.0 or later, Quick Time 6.0 or later, DirectX 9.0 or later, and Windows Media Player 7.1 or later. TRANSFERRING FILES FROM YOUR DIGITAL CAMERA TO COMPUTER For transferring files to view transferred images. When using OS 9.2). * OS should be installed on your computer to PC, you can use either...
EDITING SOFTWARE REQUIREMENTS The supplied software (ACDSee for PENTAX) is needed to be pre-installed and updated to the latest version. * Working status is not guaranteed for all qualifying PCs. * Figures within parenthesis above ... Requires CD-ROM drive, Internet Explorer 5.0 or later, Quick Time 6.0 or later, DirectX 9.0 or later, and Windows Media Player 7.1 or later. TRANSFERRING FILES FROM YOUR DIGITAL CAMERA TO COMPUTER For transferring files to view transferred images. When using OS 9.2). * OS should be installed on your computer to PC, you can use either...
Operation Manual
Page 60
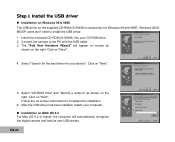
... to the PC with the USB cable. 3. Click on "Next". The "Add New Hardware Wizard" will automatically recognize the digital camera and load its own USB drivers. Follow the on the right. Connect the camera to install the USB driver. 1. EN-60 Click on MAC OS 9.2 For Mac OS 9.2 or higher, the computer...
... to the PC with the USB cable. 3. Click on "Next". The "Add New Hardware Wizard" will automatically recognize the digital camera and load its own USB drivers. Follow the on the right. Connect the camera to install the USB driver. 1. EN-60 Click on MAC OS 9.2 For Mac OS 9.2 or higher, the computer...

Operation Manual
Page 61
Set-up 2 PC 4. Connect your computer 1. Step 2: Connect the digital camera to your camera and the computer via the supplied USB cable. 7. Rotate the mode dial to and turn your recorded images or movie clips. (For Mac users, double-... terminal EN-61 Set-up 1 USB Con. There will be a new "Removable Disk" icon detected in "My Computer", which contains your camera on by pressing the Power switch. 2. PC PictBridge PC Camera OK : 1 / 3 6. Use the four-way controller (T) to select [USB Con.]. 3. OK: 5 / 5 USB Con. Press the four-way controller (X) to select...
Set-up 2 PC 4. Connect your computer 1. Step 2: Connect the digital camera to your camera and the computer via the supplied USB cable. 7. Rotate the mode dial to and turn your recorded images or movie clips. (For Mac users, double-... terminal EN-61 Set-up 1 USB Con. There will be a new "Removable Disk" icon detected in "My Computer", which contains your camera on by pressing the Power switch. 2. PC PictBridge PC Camera OK : 1 / 3 6. Use the four-way controller (T) to select [USB Con.]. 3. OK: 5 / 5 USB Con. Press the four-way controller (X) to select...

Operation Manual
Page 62
... still images or movie clips and then choose "Copy" from the "Edit" menu. You may also drag and drop image files from the digital camera to the desired destination. „ Memory card users may prefer to a desired location. „ Macintosh Open the "untitled" disk icon, ...and the destination location on your hard disk. Drag and drop from the digital camera to use a memory card reader (highly recommended). „ Movie playback application is considered to find more folders. Make sure that movie playback ...
... still images or movie clips and then choose "Copy" from the "Edit" menu. You may also drag and drop image files from the digital camera to the desired destination. „ Memory card users may prefer to a desired location. „ Macintosh Open the "untitled" disk icon, ...and the destination location on your hard disk. Drag and drop from the digital camera to use a memory card reader (highly recommended). „ Movie playback application is considered to find more folders. Make sure that movie playback ...

Operation Manual
Page 63
...(S-SW49) into your computer, and efficiently acquire images from digital cameras, scanners, and other devices. When the welcome screen appears, select "Application Software". 3. EN-63 Also, ACDSee for PENTAX, you can use the ACDSee for PENTAX's full-featured image viewer and media player quickly generates high...-quality displays of ACDSee for PENTAX application software, refer to its respective help documentation. „ For Windows 2000/XP users, please make sure to install and use to create, edit, and touch-up your digital images. Select the desired language. Image...
...(S-SW49) into your computer, and efficiently acquire images from digital cameras, scanners, and other devices. When the welcome screen appears, select "Application Software". 3. EN-63 Also, ACDSee for PENTAX, you can use the ACDSee for PENTAX's full-featured image viewer and media player quickly generates high...-quality displays of ACDSee for PENTAX application software, refer to its respective help documentation. „ For Windows 2000/XP users, please make sure to install and use to create, edit, and touch-up your digital images. Select the desired language. Image...

Operation Manual
Page 64
... installation is not supported for videoconferencing, your computer system must include the items as a PC camera, which allows you to complete the installation. 4. The PC camera function is exclusively for Mac platforms. 1. USING THE DIGITAL CAMERA AS A PC CAMERA Your digital camera can act as below: „ Microphone „ Sound card „ Speakers or headphones „ Network...
... installation is not supported for videoconferencing, your computer system must include the items as a PC camera, which allows you to complete the installation. 4. The PC camera function is exclusively for Mac platforms. 1. USING THE DIGITAL CAMERA AS A PC CAMERA Your digital camera can act as below: „ Microphone „ Sound card „ Speakers or headphones „ Network...

Operation Manual
Page 65
Rotate the mode dial to and turn your computer monitor OK : 3 / 3 or use a tripod. Position the digital camera steadily on top of your camera on by pressing the Power switch. 2. Click the Start Video button to select [USB Con.]. 3. Press the four-way controller ...3. Type the e-mail address or the network address of AC adapter is recommended while the camera is used as a PC camera. Press the button. 4. The person that you are calling. 5. Step 2: Connect the digital camera to your call to start the videoconference. „ The video resolution for videoconferencing: 1. ...
Rotate the mode dial to and turn your computer monitor OK : 3 / 3 or use a tripod. Position the digital camera steadily on top of your camera on by pressing the Power switch. 2. Click the Start Video button to select [USB Con.]. 3. Press the four-way controller ...3. Type the e-mail address or the network address of AC adapter is recommended while the camera is used as a PC camera. Press the button. 4. The person that you are calling. 5. Step 2: Connect the digital camera to your call to start the videoconference. „ The video resolution for videoconferencing: 1. ...

Operation Manual
Page 72
Resizing replaces the original image with a newly compressed image. Refer to the section in this if you to copy your files from the digital camera's internal memory to a lower quality level is available. (Refer to half of prints and date displayed in internal memory. Allows you have an SD memory ...
Resizing replaces the original image with a newly compressed image. Refer to the section in this if you to copy your files from the digital camera's internal memory to a lower quality level is available. (Refer to half of prints and date displayed in internal memory. Allows you have an SD memory ...


