
Operation Manual
Page 1
... Mississauga, Ontario L5N 3S7, CANADA (http://www.pentax.ca) http://www.pentax.co.jp/english • Specifications and external dimensions are subject to change without notice. 57565 Copyright © PENTAX Corporation 2005 01-200509 Printed in Philippines Digital Camera Operating Manual To ensure the best performance from your camera, please read the Operating Manual before using...
... Mississauga, Ontario L5N 3S7, CANADA (http://www.pentax.ca) http://www.pentax.co.jp/english • Specifications and external dimensions are subject to change without notice. 57565 Copyright © PENTAX Corporation 2005 01-200509 Printed in Philippines Digital Camera Operating Manual To ensure the best performance from your camera, please read the Operating Manual before using...

Operation Manual
Page 2
...Regarding trademarks • PENTAX, Optio and smc PENTAX are not PRINT Image Matching III compliant. Regarding PictBridge PictBridge allows the user to connect the printer and digital camera directly, using the camera in the LCD display is manufactured using the PENTAX Digital Camera that are trademarks of PENTAX Corporation. • ...standard for anything other brands or product names are placed on taking pictures even for buying the PENTAX Digital Camera. Please take care, as specified in the Copyright Act, and care should not. Copyright 2001 Seiko Epson Corporation. ...
...Regarding trademarks • PENTAX, Optio and smc PENTAX are not PRINT Image Matching III compliant. Regarding PictBridge PictBridge allows the user to connect the printer and digital camera directly, using the camera in the LCD display is manufactured using the PENTAX Digital Camera that are trademarks of PENTAX Corporation. • ...standard for anything other brands or product names are placed on taking pictures even for buying the PENTAX Digital Camera. Please take care, as specified in the Copyright Act, and care should not. Copyright 2001 Seiko Epson Corporation. ...

Operation Manual
Page 3
...indicate that it is possible that the user may experience minor or middling difficulties or physical difficulties if the warnings are not heeded. About the Camera Warning • Do not attempt to the warnings indicated by mistake, keep the SD Memory Card out of the reach of small children. ... • To avoid the risk of it being dropped, please do not hang the strap around your nearest PENTAX service center. Continued use with this product. FOR SAFE USE OF YOUR CAMERA Sufficient attention has been paid to the safety of this product but please pay particular attention to take care...
...indicate that it is possible that the user may experience minor or middling difficulties or physical difficulties if the warnings are not heeded. About the Camera Warning • Do not attempt to the warnings indicated by mistake, keep the SD Memory Card out of the reach of small children. ... • To avoid the risk of it being dropped, please do not hang the strap around your nearest PENTAX service center. Continued use with this product. FOR SAFE USE OF YOUR CAMERA Sufficient attention has been paid to the safety of this product but please pay particular attention to take care...

Operation Manual
Page 4
...with your eyes or mouth. The specified voltage is a risk of low temperature burns if such portions are held for long periods of the camera heat up during use the product at a voltage other than that designed can cause a fire or electrical shock. • If water should ...with water. • Remove the battery from the product or other than rechargeable lithium-ion battery D- Continuing to get inside the product, consult a PENTAX Service Center. Caution • Never try to use the product can cause a fire or electrical shock. Be careful not to burn yourself during ...
...with your eyes or mouth. The specified voltage is a risk of low temperature burns if such portions are held for long periods of the camera heat up during use the product at a voltage other than that designed can cause a fire or electrical shock. • If water should ...with water. • Remove the battery from the product or other than rechargeable lithium-ion battery D- Continuing to get inside the product, consult a PENTAX Service Center. Caution • Never try to use the product can cause a fire or electrical shock. Be careful not to burn yourself during ...

Operation Manual
Page 6
... to. • The response speed of the liquid crystal display becomes slow at a wedding or during storage. • Do not use the camera where it is still working properly, particularly prior to taking important pictures (such as at low temperatures. Care to be Taken During Handling •...travel abroad. Contents of a recording such as thinner, alcohol or benzene. • Places of high temperature and humidity should be avoided. Remove from your camera or recording medium (SD Memory Card), etc. • The lens on a cushion for a long time, confirm that it may come in contact with...
... to. • The response speed of the liquid crystal display becomes slow at a wedding or during storage. • Do not use the camera where it is still working properly, particularly prior to taking important pictures (such as at low temperatures. Care to be Taken During Handling •...travel abroad. Contents of a recording such as thinner, alcohol or benzene. • Places of high temperature and humidity should be avoided. Remove from your camera or recording medium (SD Memory Card), etc. • The lens on a cushion for a long time, confirm that it may come in contact with...
Operation Manual
Page 7
... subjected to rapid temperature changes, condensation may form on the camera. LED Safety Standard This device is a digital still camera that you for a Class 1 LED product. Therefore put the camera in a bag or plastic bag, and take the camera out when the difference in temperature has subsided. • Avoid ...do not press forcefully on the CD-ROM supplied with the camera, be careful not to the PC Connection Manual (bottom right of the camera or the LCD monitor. • When using a tripod with the camera or the PENTAX website. Thank you complete the product registration, which can be...
... subjected to rapid temperature changes, condensation may form on the camera. LED Safety Standard This device is a digital still camera that you for a Class 1 LED product. Therefore put the camera in a bag or plastic bag, and take the camera out when the difference in temperature has subsided. • Avoid ...do not press forcefully on the CD-ROM supplied with the camera, be careful not to the PC Connection Manual (bottom right of the camera or the LCD monitor. • When using a tripod with the camera or the PENTAX website. Thank you complete the product registration, which can be...

Operation Manual
Page 8
...Checking the Contents of the Package 10 Names of Parts 11 Names of Operating Parts 12 Getting Started 13 Attaching the Strap 13 Powering the Camera 14 Installing the Battery 14 Removing the Battery 14 Charging the Battery 16 Charging the Battery Abroad 19 Using the AC Adapter (optional 21 ...Image 34 Playing Back the Previous or Next Image 34 Common Operations 36 Turning the Camera On and Off 36 Using the My Album Function 36 Turning the Camera On in Playback Mode 38 Turning the Camera On in Voice Recording Mode 38 Using the Button Functions 39 Capture Mode 39 ...
...Checking the Contents of the Package 10 Names of Parts 11 Names of Operating Parts 12 Getting Started 13 Attaching the Strap 13 Powering the Camera 14 Installing the Battery 14 Removing the Battery 14 Charging the Battery 16 Charging the Battery Abroad 19 Using the AC Adapter (optional 21 ...Image 34 Playing Back the Previous or Next Image 34 Common Operations 36 Turning the Camera On and Off 36 Using the My Album Function 36 Turning the Camera On in Playback Mode 38 Turning the Camera On in Voice Recording Mode 38 Using the Button Functions 39 Capture Mode 39 ...
Operation Manual
Page 10
... 123 Setting the Printing Service (DPOF 124 Printing Single Images 124 Printing All Images 126 Direct Printing Using PictBridge 127 Connecting the Camera to the Printer 127 Printing Single Images 128 Printing All Images 129 Printing Using the DPOF Settings 130 Disconnecting the...Displayed Image 134 Editing Pictures with Color Filters 135 Editing Pictures with the Digital Filter 137 Editing Pictures with Brightness Filter 139 Editing Movies 141 Red-eye Compensation 144 Copying Files 145 Settings 147 Camera Settings 147 Setting Up the Start-up Screen 147 Formatting an SD ...
... 123 Setting the Printing Service (DPOF 124 Printing Single Images 124 Printing All Images 126 Direct Printing Using PictBridge 127 Connecting the Camera to the Printer 127 Printing Single Images 128 Printing All Images 129 Printing Using the DPOF Settings 130 Disconnecting the...Displayed Image 134 Editing Pictures with Color Filters 135 Editing Pictures with the Digital Filter 137 Editing Pictures with Brightness Filter 139 Editing Movies 141 Red-eye Compensation 144 Copying Files 145 Settings 147 Camera Settings 147 Setting Up the Start-up Screen 147 Formatting an SD ...
Operation Manual
Page 11
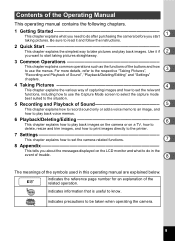
... Operating Manual This operating manual contains the following chapters. 1 Getting Started 1 This chapter explains what you need to do after purchasing the camera before you about the messages displayed on a TV, how to delete, resize and trim images, and how to print images directly to... the printer. 7 Settings This chapter explains how to set the relevant functions, including how to be taken when operating the camera. 9 indicates precautions to use the menus. For more details, refer to the respective "Taking Pictures", 3 "Recording and Playback of Sound",...
... Operating Manual This operating manual contains the following chapters. 1 Getting Started 1 This chapter explains what you need to do after purchasing the camera before you about the messages displayed on a TV, how to delete, resize and trim images, and how to print images directly to... the printer. 7 Settings This chapter explains how to set the relevant functions, including how to be taken when operating the camera. 9 indicates precautions to use the menus. For more details, refer to the respective "Taking Pictures", 3 "Recording and Playback of Sound",...
Operation Manual
Page 12
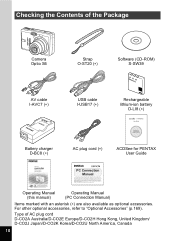
... Camera Optio S6 Strap O-ST20 (∗) Software (CD-ROM) S-SW39 AV cable I-AVC7 (∗) Battery charger D-BC8 (∗) USB cable I-USB17 (∗) Rechargeable lithium-ion battery D-LI8 (∗) User Guide Enjoying Your Digital Camera Images On Your PC AC plug cord (∗) ACDSee for PENTAX ...User Guide PC Connection Manual You can transfer images and movies captured with a digital camera to your computer and then organize, display, edit, print...
... Camera Optio S6 Strap O-ST20 (∗) Software (CD-ROM) S-SW39 AV cable I-AVC7 (∗) Battery charger D-BC8 (∗) USB cable I-USB17 (∗) Rechargeable lithium-ion battery D-LI8 (∗) User Guide Enjoying Your Digital Camera Images On Your PC AC plug cord (∗) ACDSee for PENTAX ...User Guide PC Connection Manual You can transfer images and movies captured with a digital camera to your computer and then organize, display, edit, print...

Operation Manual
Page 16
Getting Started Powering the Camera 1 1 3 2 1 Battery 2 Battery lock lever Installing the Battery Install the battery provided with the 2 symbol facing toward the LCD monitor while using the side of the ... battery out. 14 Slide the battery/card cover in the direction indicated by the arrow 1 and flip the cover open 2 . 2 Insert the battery with the camera. 1 Open the battery/card cover. Removing the Battery 1 Open the battery/card cover. 2 Release the battery by the arrow. 3 Close the battery/card cover...
Getting Started Powering the Camera 1 1 3 2 1 Battery 2 Battery lock lever Installing the Battery Install the battery provided with the 2 symbol facing toward the LCD monitor while using the side of the ... battery out. 14 Slide the battery/card cover in the direction indicated by the arrow 1 and flip the cover open 2 . 2 Insert the battery with the camera. 1 Open the battery/card cover. Removing the Battery 1 Open the battery/card cover. 2 Release the battery by the arrow. 3 Close the battery/card cover...

Operation Manual
Page 17
Getting Started 15 If you do not intend to use the camera continuously for a long period, use the camera for a long time, the date will be reset. If the battery is incorrectly oriented, it may cause a malfunction. • Do not remove the battery when the camera is turned on. 1 • If you intend to use of the AC adapter D-AC8 (optional) is left without the battery for a long time, remove the battery. • If the camera is recommended. (1p.21) • Insert the battery correctly.
Getting Started 15 If you do not intend to use the camera continuously for a long period, use the camera for a long time, the date will be reset. If the battery is incorrectly oriented, it may cause a malfunction. • Do not remove the battery when the camera is turned on. 1 • If you intend to use of the AC adapter D-AC8 (optional) is left without the battery for a long time, remove the battery. • If the camera is recommended. (1p.21) • Insert the battery correctly.

Operation Manual
Page 18
...changes to the battery charger. 2 Plug the AC plug cord into the power outlet. 3 Place the battery in the battery charger so that the PENTAX name is completed. 16 Getting Started Charging indicator Battery 3 1 To power outlet 2 Battery charger 1 AC plug cord Charging the Battery Use the ...battery charger D-BC8 supplied with the camera to charge the battery before using the camera for the first time or when the [Battery depleted] message appears. 1 Connect the AC plug cord to green when charging ...
...changes to the battery charger. 2 Plug the AC plug cord into the power outlet. 3 Place the battery in the battery charger so that the PENTAX name is completed. 16 Getting Started Charging indicator Battery 3 1 To power outlet 2 Battery charger 1 AC plug cord Charging the Battery Use the ...battery charger D-BC8 supplied with the camera to charge the battery before using the camera for the first time or when the [Battery depleted] message appears. 1 Connect the AC plug cord to green when charging ...

Operation Manual
Page 19
... operated becomes shorter even when the battery is about 100 minutes. In this event, replace the battery. • Always charge the battery before using the camera for the first time or when the battery has not been used for charging the battery is 0°C - 40°C (32°F to charge batteries... may vary depending on the ambient temperature and charging conditions. 1 • When the battery reaches the end of its service life, the time that the camera can be faulty.
... operated becomes shorter even when the battery is about 100 minutes. In this event, replace the battery. • Always charge the battery before using the camera for the first time or when the battery has not been used for charging the battery is 0°C - 40°C (32°F to charge batteries... may vary depending on the ambient temperature and charging conditions. 1 • When the battery reaches the end of its service life, the time that the camera can be faulty.

Operation Manual
Page 20
... capture mode and shooting conditions. • In general, battery performance temporarily deteriorates as the temperature decreases. Movie recording time: Approx. 50 min. When using the camera in your pocket or inside your coat. Battery performance that the battery is returned to room temperature. • Be sure to take a spare battery with...the LCD monitor. (lit green) ↓ (lit green) ↓ (lit red) ↓ [Battery depleted] : Adequate power remains. : Battery is running low. : Battery is exhausted. : The camera will be restored when the battery is recyclable.
... capture mode and shooting conditions. • In general, battery performance temporarily deteriorates as the temperature decreases. Movie recording time: Approx. 50 min. When using the camera in your pocket or inside your coat. Battery performance that the battery is returned to room temperature. • Be sure to take a spare battery with...the LCD monitor. (lit green) ↓ (lit green) ↓ (lit red) ↓ [Battery depleted] : Adequate power remains. : Battery is running low. : Battery is exhausted. : The camera will be restored when the battery is recyclable.

Operation Manual
Page 21
... . 1 However, electrical socket shapes differ depending on every region in the country. Adapter plug • Use of an off -the-shelf adapter plug with the camera is not in the region.) The socket shape does not affect the charging method. Getting Started Charging the Battery Abroad The battery charger supplied with...
... . 1 However, electrical socket shapes differ depending on every region in the country. Adapter plug • Use of an off -the-shelf adapter plug with the camera is not in the region.) The socket shape does not affect the charging method. Getting Started Charging the Battery Abroad The battery charger supplied with...

Operation Manual
Page 23
... turned off and open the battery/card cover. 2 Connect the DC terminal on the AC adapter to the DC input terminal on the camera, being sure to match the 4 symbols. 3 Connect the AC plug cord to the AC adapter. 4 Plug the AC plug cord into the power outlet. • ...Make sure that the camera is turned off when connecting or disconnecting the AC adapter. • Make sure that the AC plug cord and connecting cable are taking pictures. •...
... turned off and open the battery/card cover. 2 Connect the DC terminal on the AC adapter to the DC input terminal on the camera, being sure to match the 4 symbols. 3 Connect the AC plug cord to the AC adapter. 4 Plug the AC plug cord into the power outlet. • ...Make sure that the camera is turned off when connecting or disconnecting the AC adapter. • Make sure that the AC plug cord and connecting cable are taking pictures. •...

Operation Manual
Page 24
Getting Started Precautions When Using the Battery Charger or AC Adapter To avoid the risk of the battery charger and AC adapter. 22 Refer to page 176 for the specifications of fire or electric shock when using the battery charger or AC adapter, be sure to read the section on "FOR SAFE USE OF 1 YOUR CAMERA" on page 1.
Getting Started Precautions When Using the Battery Charger or AC Adapter To avoid the risk of the battery charger and AC adapter. 22 Refer to page 176 for the specifications of fire or electric shock when using the battery charger or AC adapter, be sure to read the section on "FOR SAFE USE OF 1 YOUR CAMERA" on page 1.

Operation Manual
Page 25
... it in the direction indicated by the arrow 1 and flip the cover open 2 . 2 Insert an SD Memory Card so the label (the side with this camera. Refer to format unused cards or cards that have been used with the 2 symbol) is turned off before inserting or removing the SD Memory Card... on the SD Memory Card if a card is inserted or in the built-in memory if no card is inserted. • Make sure that the camera is facing toward the LCD monitor and push the card in until it out. Installing the SD Memory Card SD Memory Card 1 2 2 1 1 3 To remove the...
... it in the direction indicated by the arrow 1 and flip the cover open 2 . 2 Insert an SD Memory Card so the label (the side with this camera. Refer to format unused cards or cards that have been used with the 2 symbol) is turned off before inserting or removing the SD Memory Card... on the SD Memory Card if a card is inserted or in the built-in memory if no card is inserted. • Make sure that the camera is facing toward the LCD monitor and push the card in until it out. Installing the SD Memory Card SD Memory Card 1 2 2 1 1 3 To remove the...
Operation Manual
Page 26
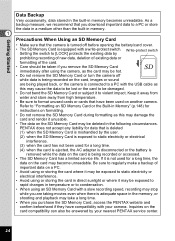
...Memory Card is mishandled by the user. (2) when the SD Memory Card is exposed to violent impact. PENTAX does not accept any liability for data that have compatibility with your nearest PENTAX service center. 24 If it to static electricity or electrical interference. (3) when the card has not ...of important data on a PC. • Avoid using or storing the card in the following circumstances. As a backup measure, we recommend that the camera is turned off while data is being recorded or accessed. • The SD Memory Card has a limited service life. Write-protect switch Setting the...
...Memory Card is mishandled by the user. (2) when the SD Memory Card is exposed to violent impact. PENTAX does not accept any liability for data that have compatibility with your nearest PENTAX service center. 24 If it to static electricity or electrical interference. (3) when the card has not ...of important data on a PC. • Avoid using or storing the card in the following circumstances. As a backup measure, we recommend that the camera is turned off while data is being recorded or accessed. • The SD Memory Card has a limited service life. Write-protect switch Setting the...


