User's Manual
Page 1
...6 Introduction 7 Package Overview 7 Product Overview 8 Main Unit 8 Control Panel 9 Input/Output Connections 10 Remote Control 11 Installation 12 Connecting the Projector 12 Connect to Computer/Notebook......... 12 Connect to Video Sources 13 Connect to 3D Video Devices............14 Using the 3D glasses 16 Powering On/Off...and Protocol Function List 69 RS232 Pin Assignments 69 RS232 Protocol Function List 70 Ceiling Mount Installation 74 Optoma Global Offices 75 Regulation & Safety Notices 77 FCC Notice 77 Declaration of Conformity for EU countries 78 Trademarks 79 1 English
...6 Introduction 7 Package Overview 7 Product Overview 8 Main Unit 8 Control Panel 9 Input/Output Connections 10 Remote Control 11 Installation 12 Connecting the Projector 12 Connect to Computer/Notebook......... 12 Connect to Video Sources 13 Connect to 3D Video Devices............14 Using the 3D glasses 16 Powering On/Off...and Protocol Function List 69 RS232 Pin Assignments 69 RS232 Protocol Function List 70 Ceiling Mount Installation 74 Optoma Global Offices 75 Regulation & Safety Notices 77 FCC Notice 77 Declaration of Conformity for EU countries 78 Trademarks 79 1 English
User's Manual
Page 2
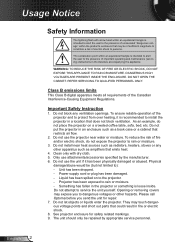
... has been dropped. -- Something has fallen in fire or electric shock. 8. Please call Optoma before you to the presence of fire and/or electric shock, do not place the projector on to persons. The unit should only be repaired by the manufacturer. 6. DANGEROUS HIGH VOLTAGES...or abused. Liquid has been spilled on a crowded coffee table, sofa, bed, etc. They may be (but not limited to install the projector in the literature accompanying the appliance. Class B emissions limits This Class B digital apparatus meets all requirements of important operating and maintenance (servicing)...
... has been dropped. -- Something has fallen in fire or electric shock. 8. Please call Optoma before you to the presence of fire and/or electric shock, do not place the projector on to persons. The unit should only be repaired by the manufacturer. 6. DANGEROUS HIGH VOLTAGES...or abused. Liquid has been spilled on a crowded coffee table, sofa, bed, etc. They may be (but not limited to install the projector in the literature accompanying the appliance. Class B emissions limits This Class B digital apparatus meets all requirements of important operating and maintenance (servicing)...
User's Manual
Page 3
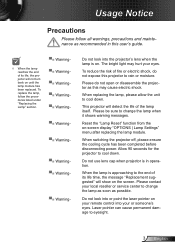
...on -screen display "OPTIONS | Lamp Settings" menu after replacing the lamp module. Please be sure to eyesight. 3 English When switching the projector off, please ensure the cooling cycle has been completed before disconnecting power. Laser pointer can cause permanent damage to change the lamp as soon as...maintenance as possible. Reset the "Lamp Reset" function from the on until the lamp module has been replaced. This projector will detect the life of its life, the projector will show on . NOTE ™™ When the lamp reaches the end of fire or electric shock, do ...
...on -screen display "OPTIONS | Lamp Settings" menu after replacing the lamp module. Please be sure to eyesight. 3 English When switching the projector off, please ensure the cooling cycle has been completed before disconnecting power. Laser pointer can cause permanent damage to change the lamp as soon as...maintenance as possible. Reset the "Lamp Reset" function from the on until the lamp module has been replaced. This projector will detect the life of its life, the projector will show on . NOTE ™™ When the lamp reaches the end of fire or electric shock, do ...
User's Manual
Page 4
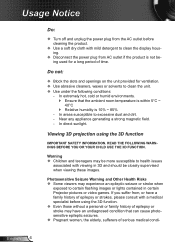
...;™ Use under the following conditions: -- English 4 Warning ™™ Children and teenagers may be more susceptible to health issues associated with viewing in certain Projector pictures or video games. Do not: ™™ Block the slots and openings on the unit provided for a long period of epilepsy or stroke may...
...;™ Use under the following conditions: -- English 4 Warning ™™ Children and teenagers may be more susceptible to health issues associated with viewing in certain Projector pictures or video games. Do not: ™™ Block the slots and openings on the unit provided for a long period of epilepsy or stroke may...
User's Manual
Page 5
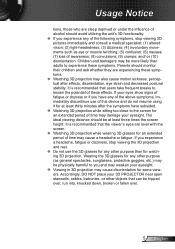
...;™ Watching 3D projection while sitting too close to you and may weaken your eyesight. ™™ Viewing in 3D projection may damage your 3D PROJECTOR near open stairwells, cables, balconies, or other objects that the viewer's eyes are level with the screen. ™™ Watching 3D projection while wearing 3D...
...;™ Watching 3D projection while sitting too close to you and may weaken your eyesight. ™™ Viewing in 3D projection may damage your 3D PROJECTOR near open stairwells, cables, balconies, or other objects that the viewer's eyes are level with the screen. ™™ Watching 3D projection while wearing 3D...

User's Manual
Page 6
Keep your back to the beam as much as possible. ▀■ When projector is used in speakers ▀■ Network support ▀■ Full 3D ▀■ Eco+ and Quick Resume English 6 Product Features ▀■ XGA (1024x768) / ... minimize the lamp power, use room blinds to reduce ambient light levels. Usage Notice Eye Safety Warnings ▀■ Avoid staring/facing directly into the projector beam at all times.
Keep your back to the beam as much as possible. ▀■ When projector is used in speakers ▀■ Network support ▀■ Full 3D ▀■ Eco+ and Quick Resume English 6 Product Features ▀■ XGA (1024x768) / ... minimize the lamp power, use room blinds to reduce ambient light levels. Usage Notice Eye Safety Warnings ▀■ Avoid staring/facing directly into the projector beam at all times.
User's Manual
Page 7
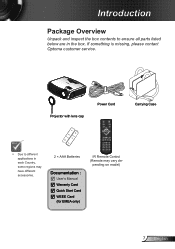
pending on model) 7 English POWER SOURCE Projector with lens cap Power Cord Carrying Case Menu ™™ Due to ensure all parts listed below are in each Country, some regions may have different accessories. 2 × AAA Batteries Documentation : User's Manual Warranty Card Quick Start Card WEEE Card (for EMEA only) IR Remote Control (Remote may vary de- Introduction Package Overview Unpack and inspect the box contents to different applications in the box. If something is missing, please contact Optoma customer service.
pending on model) 7 English POWER SOURCE Projector with lens cap Power Cord Carrying Case Menu ™™ Due to ensure all parts listed below are in each Country, some regions may have different accessories. 2 × AAA Batteries Documentation : User's Manual Warranty Card Quick Start Card WEEE Card (for EMEA only) IR Remote Control (Remote may vary de- Introduction Package Overview Unpack and inspect the box contents to different applications in the box. If something is missing, please contact Optoma customer service.
User's Manual
Page 8
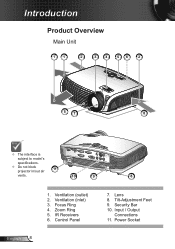
... / YPbPr VGA-OUT RS-232C VIDEO 3ODUST(Y5NVC) AUDIO-OUT A(UVDIDIOE3O-I)N AU(VDGIOA22-)IN AU(VDGIOA11-)IN 12V OUT specifications. ™™ Do not block projector in/out air 11 vents. 10 9 8 English 8 1. Input / Output Connections 11. Power Socket Introduction Product Overview Main Unit 11 2 3 4 56 2 POWER SOURCE...
... / YPbPr VGA-OUT RS-232C VIDEO 3ODUST(Y5NVC) AUDIO-OUT A(UVDIDIOE3O-I)N AU(VDGIOA22-)IN AU(VDGIOA11-)IN 12V OUT specifications. ™™ Do not block projector in/out air 11 vents. 10 9 8 English 8 1. Input / Output Connections 11. Power Socket Introduction Product Overview Main Unit 11 2 3 4 56 2 POWER SOURCE...
User's Manual
Page 12
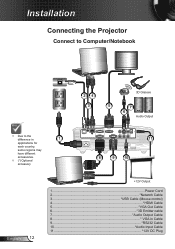
Installation Connecting the Projector Connect to Computer/Notebook ™™ Due to the difference in 1 applications for each country, some regions may have different accessories. ™™ (*) Optional accessory R ...
Installation Connecting the Projector Connect to Computer/Notebook ™™ Due to the difference in 1 applications for each country, some regions may have different accessories. ™™ (*) Optional accessory R ...
User's Manual
Page 14
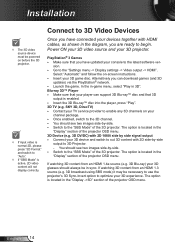
... enabled, switch to the "Settings menu -> Display settings -> Video output -> HDMI". yy Switch to the "SBS Mode" of the 3D projector. yy Switch to the "SBS Mode" of the 3D projector. The option is located in sync. English 14 yy Go to the 3D channel. You should see two images side-by... video is normal 2D, please press "3D Format" and switch to out 3D content with HDMI cables, as shown in the "Display" section of the projector OSD menu. 3D Device (e.g. 3D DV/DC) with 2D 1080i side by -side. Alternatively you can support 3D Blu-ray™ disc and that your...
... enabled, switch to the "Settings menu -> Display settings -> Video output -> HDMI". yy Switch to the "SBS Mode" of the 3D projector. yy Switch to the "SBS Mode" of the 3D projector. The option is located in sync. English 14 yy Go to the 3D channel. You should see two images side-by... video is normal 2D, please press "3D Format" and switch to out 3D content with HDMI cables, as shown in the "Display" section of the projector OSD menu. 3D Device (e.g. 3D DV/DC) with 2D 1080i side by -side. Alternatively you can support 3D Blu-ray™ disc and that your...
User's Manual
Page 15
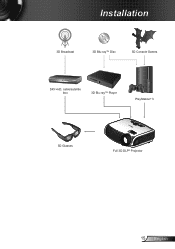
Installation 3D Broadcast 3D Blu-ray™ Disc 3D Console Games SKY+HD, cable/satellite box 3D Blu-ray™ Player PlayStation® 3 POWER SOURCE 3D Glasses Full 3D DLP® Projector 15 English
Installation 3D Broadcast 3D Blu-ray™ Disc 3D Console Games SKY+HD, cable/satellite box 3D Blu-ray™ Player PlayStation® 3 POWER SOURCE 3D Glasses Full 3D DLP® Projector 15 English
User's Manual
Page 16
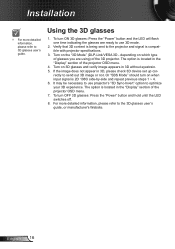
... is located in 3D, please check 3D device set up cor- English 16 If the image does not appear in the "Display" section of the projector OSD menu. 4. Or "SBS Mode" should turn OFF 3D glasses: Press the "Power" button and hold until the LED switches off. 8. The option... 1080i side-by-side and repeat previous steps 1 ~ 4. 6. Verify that 3D content is being sent to optimize your 3D experience. The option is compatible with projector specifications. 3. For more detailed information, please refer to use 3D mode. 2. Using the 3D glasses 1. Turn on the "3D Mode" (DLP-Link/VESA 3D...
... is located in 3D, please check 3D device set up cor- English 16 If the image does not appear in the "Display" section of the projector OSD menu. 4. Or "SBS Mode" should turn OFF 3D glasses: Press the "Power" button and hold until the LED switches off. 8. The option... 1080i side-by-side and repeat previous steps 1 ~ 4. 6. Verify that 3D content is being sent to optimize your 3D experience. The option is compatible with projector specifications. 3. For more detailed information, please refer to use 3D mode. 2. Using the 3D glasses 1. Turn on the "3D Mode" (DLP-Link/VESA 3D...
User's Manual
Page 17
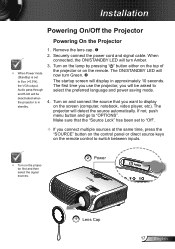
Installation Powering On/Off the Projector Powering On the Projector ™™ When Power mode (Standby) is set to Eco (
Installation Powering On/Off the Projector Powering On the Projector ™™ When Power mode (Standby) is set to Eco (
User's Manual
Page 18
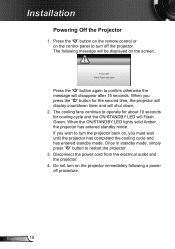
...2. Press the " " button on the remote control or on the control panel to operate for about 10 seconds for the second time, the projector will display countdown timer and will be displayed on , you press the " " button for cooling cycle and the ON/STANDBY LED will disappear...cycle and has entered standby mode. Press Power key again Press the " " button again to restart the projector. 3. Do not turn the projector back on the screen. Installation Powering off the projector 1. The cooling fans continue to turn off procedure. Once in standby mode, simply press " " button to...
...2. Press the " " button on the remote control or on the control panel to operate for about 10 seconds for the second time, the projector will display countdown timer and will be displayed on , you press the " " button for cooling cycle and the ON/STANDBY LED will disappear...cycle and has entered standby mode. Press Power key again Press the " " button again to restart the projector. 3. Do not turn the projector back on the screen. Installation Powering off the projector 1. The cooling fans continue to turn off procedure. Once in standby mode, simply press " " button to...
User's Manual
Page 19
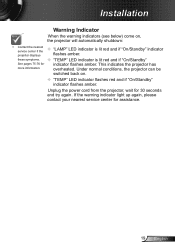
... for assistance. 19 English Under normal conditions, the projector can be switched back on , the projector will automatically shutdown: ™™ Contact the nearest service center if the projector displays these symptoms. See pages 75-76 for more information. "LAMP" LED indicator is .... If the warning indicator light up again, please contact your nearest service center for 30 seconds and try again. This indicates the projector has overheated. Installation Warning Indicator When the warning indicators (see below) come on . "TEMP" LED indicator flashes red and...
... for assistance. 19 English Under normal conditions, the projector can be switched back on , the projector will automatically shutdown: ™™ Contact the nearest service center if the projector displays these symptoms. See pages 75-76 for more information. "LAMP" LED indicator is .... If the warning indicator light up again, please contact your nearest service center for 30 seconds and try again. This indicates the projector has overheated. Installation Warning Indicator When the warning indicators (see below) come on . "TEMP" LED indicator flashes red and...
User's Manual
Page 20
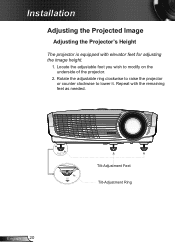
Rotate the adjustable ring clockwise to raise the projector or counter clockwise to modify on the underside of the projector. 2. Installation Adjusting the Projected Image Adjusting the Projector's Height The projector is equipped with the remaining feet as needed. Repeat with elevator feet for adjusting the image height. 1. English 20 Tilt-Adjustment Feet Tilt-Adjustment Ring Locate the adjustable foot you wish to lower it.
Rotate the adjustable ring clockwise to raise the projector or counter clockwise to modify on the underside of the projector. 2. Installation Adjusting the Projected Image Adjusting the Projector's Height The projector is equipped with the remaining feet as needed. Repeat with elevator feet for adjusting the image height. 1. English 20 Tilt-Adjustment Feet Tilt-Adjustment Ring Locate the adjustable foot you wish to lower it.
User's Manual
Page 21
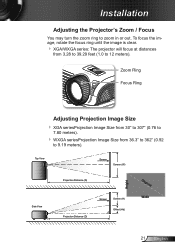
To focus the image, rotate the focus ring until the image is clear. XGA/WXGA series: The projector will focus at distances from 36.3" to 362" (0.92 to 9.19 meters). Zoom Ring Focus Ring Adjusting Projection Image Size XGA seriesProjection Image Size ... or out. Top View Screen Screen (W) Side View Projection Distance (D) Projection Distance (D) Screen Screen (H) Offset (Hd) Height Diagonal Width 21 English ? POWER Installation Adjusting the Projector's Zoom / Focus You may turn the zoom ring to 12 meters).
To focus the image, rotate the focus ring until the image is clear. XGA/WXGA series: The projector will focus at distances from 36.3" to 362" (0.92 to 9.19 meters). Zoom Ring Focus Ring Adjusting Projection Image Size XGA seriesProjection Image Size ... or out. Top View Screen Screen (W) Side View Projection Distance (D) Projection Distance (D) Screen Screen (H) Offset (Hd) Height Diagonal Width 21 English ? POWER Installation Adjusting the Projector's Zoom / Focus You may turn the zoom ring to 12 meters).
User's Manual
Page 23
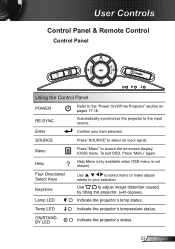
... status. Four Directional Select Keys Keystone Lamp LED Use to the input source. ON/STANDBY LED Indicate the projector's status. 23 English ments to your item selection. Enter Confirm your selection. Help Help Menu (only available when OSD menu is not shown...to launch the on pages 17-18. Menu Press "Menu" to the "Power On/Off the Projector" section on -screen display (OSD) menu. User Controls Control Panel & Remote Control Control Panel ? Automatically synchronize the projector to select items or make adjust- To exit OSD, Press "Menu" again. Temp LED Indicate...
... status. Four Directional Select Keys Keystone Lamp LED Use to the input source. ON/STANDBY LED Indicate the projector's status. 23 English ments to your item selection. Enter Confirm your selection. Help Help Menu (only available when OSD menu is not shown...to launch the on pages 17-18. Menu Press "Menu" to the "Power On/Off the Projector" section on -screen display (OSD) menu. User Controls Control Panel & Remote Control Control Panel ? Automatically synchronize the projector to select items or make adjust- To exit OSD, Press "Menu" again. Temp LED Indicate...
User's Manual
Page 24
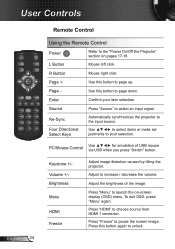
...USB when you press "Switch" button. Press "HDMI" to your item selection. Page - Re-Sync Four Directional Select Keys Automatically synchronizes the projector to launch the on pages 17-18. Press "Menu" to the input source. L Button Mouse left click. To exit OSD, press "...again. PC/Mouse Control Use for emulation of the image. Keystone +/Volume +/Brightness Menu HDMI Freeze Adjust image distortion caused by tilting the projector. Press this button to page down. Use this button again to increase / decrease the volume. Page + Use this button to pause the...
...USB when you press "Switch" button. Press "HDMI" to your item selection. Page - Re-Sync Four Directional Select Keys Automatically synchronizes the projector to launch the on pages 17-18. Press "Menu" to the input source. L Button Mouse left click. To exit OSD, press "...again. PC/Mouse Control Use for emulation of the image. Keystone +/Volume +/Brightness Menu HDMI Freeze Adjust image distortion caused by tilting the projector. Press this button to page down. Use this button again to increase / decrease the volume. Page + Use this button to pause the...
User's Manual
Page 25
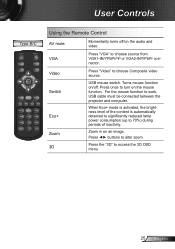
... function to choose source from VGA1-IN/YPbPr/ or VGA2-IN/YPbPr connector. VGA Press "VGA" to work, USB cable must be connected between the projector and computer. Video Switch Eco+ Zoom 3D Press "Video" to access the 3D OSD menu. 25 English Press the "3D" to choose Composite video source...
... function to choose source from VGA1-IN/YPbPr/ or VGA2-IN/YPbPr connector. VGA Press "VGA" to work, USB cable must be connected between the projector and computer. Video Switch Eco+ Zoom 3D Press "Video" to access the 3D OSD menu. 25 English Press the "3D" to choose Composite video source...


