User's Manual
Page 1
...14 Using the 3D glasses 16 Powering On/Off the Projector..........17 Powering On the Projector 17 Powering off the projector 18 Warning Indicator 19 Adjusting the Projected Image..........20 Adjusting the Projector's Height ........ 20 Adjusting the Projector's Zoom / Focus 21 Adjusting Projection Image Size......... 21 User Controls 23 Control Panel & Remote Control.......23 Control Panel 23 On-screen Display Menus 29 How to operate 29 Menu Tree 30 IMAGE 32 IMAGE | Advanced 34 IMAGE | Advanced | Signal 36 DISPLAY 37 DISPLAY | 3D 42 SETUP 43 SETUP | Audio Settings 45 SETUP...
...14 Using the 3D glasses 16 Powering On/Off the Projector..........17 Powering On the Projector 17 Powering off the projector 18 Warning Indicator 19 Adjusting the Projected Image..........20 Adjusting the Projector's Height ........ 20 Adjusting the Projector's Zoom / Focus 21 Adjusting Projection Image Size......... 21 User Controls 23 Control Panel & Remote Control.......23 Control Panel 23 On-screen Display Menus 29 How to operate 29 Menu Tree 30 IMAGE 32 IMAGE | Advanced 34 IMAGE | Advanced | Signal 36 DISPLAY 37 DISPLAY | 3D 42 SETUP 43 SETUP | Audio Settings 45 SETUP...
User's Manual
Page 3
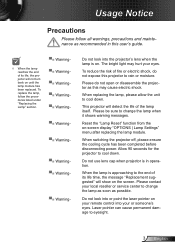
... in operation. Please be sure to change the lamp when it shows warning messages. Do not look into or point the laser pointer on your eyes. When replacing the lamp, please allow the unit to cool down . When the lamp is in this may hurt your remote control into the projector's lens when the lamp is on -screen display "OPTIONS | Lamp Settings" menu after replacing the lamp module. Do not use lens...
... in operation. Please be sure to change the lamp when it shows warning messages. Do not look into or point the laser pointer on your eyes. When replacing the lamp, please allow the unit to cool down . When the lamp is in this may hurt your remote control into the projector's lens when the lamp is on -screen display "OPTIONS | Lamp Settings" menu after replacing the lamp module. Do not use lens...
User's Manual
Page 7
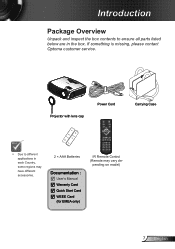
Introduction Package Overview Unpack and inspect the box contents to different applications in the box. pending on model) 7 English POWER SOURCE Projector with lens cap Power Cord Carrying Case Menu ™™ Due to ensure all parts listed below are in each Country, some regions may have different accessories. 2 × AAA Batteries Documentation : User's Manual Warranty Card Quick Start Card WEEE Card (for EMEA only) IR Remote Control (Remote may vary de- If something is missing, please contact Optoma customer service.
Introduction Package Overview Unpack and inspect the box contents to different applications in the box. pending on model) 7 English POWER SOURCE Projector with lens cap Power Cord Carrying Case Menu ™™ Due to ensure all parts listed below are in each Country, some regions may have different accessories. 2 × AAA Batteries Documentation : User's Manual Warranty Card Quick Start Card WEEE Card (for EMEA only) IR Remote Control (Remote may vary de- If something is missing, please contact Optoma customer service.
User's Manual
Page 14
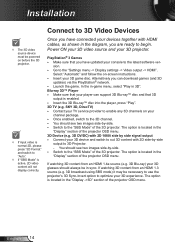
... from an HDMI 1.3 source (e.g. 3D broadcast using SBS mode) it may be necessary to use the projector's 3D Sync-Invert option to the "Settings menu -> Display settings -> Video output -> HDMI". Select "Automatic" and follow the on your channel package. The option is located in sync. sion. Alternatively you have connected your devices together with 2D side-by side signal output yy Connect your TV service provider to 3D Projector. -- SKY 3D...
... from an HDMI 1.3 source (e.g. 3D broadcast using SBS mode) it may be necessary to use the projector's 3D Sync-Invert option to the "Settings menu -> Display settings -> Video output -> HDMI". Select "Automatic" and follow the on your channel package. The option is located in sync. sion. Alternatively you have connected your devices together with 2D side-by side signal output yy Connect your TV service provider to 3D Projector. -- SKY 3D...
User's Manual
Page 17
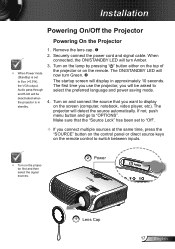
Installation Powering On/Off the Projector Powering On the Projector ™™ When Power mode (Standby) is set to Eco (
Installation Powering On/Off the Projector Powering On the Projector ™™ When Power mode (Standby) is set to Eco (
User's Manual
Page 19
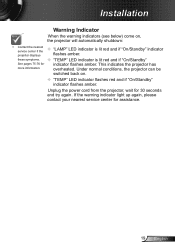
... power cord from the projector, wait for assistance. 19 English Under normal conditions, the projector can be switched back on , the projector will automatically shutdown: ™™ Contact the nearest service center if the projector displays these symptoms. See pages 75-76 for more information. "LAMP" LED indicator is lit red and if "On/Standby" indicator flashes amber. "TEMP" LED indicator is lit red and if "On/Standby" indicator flashes amber. Installation Warning Indicator...
... power cord from the projector, wait for assistance. 19 English Under normal conditions, the projector can be switched back on , the projector will automatically shutdown: ™™ Contact the nearest service center if the projector displays these symptoms. See pages 75-76 for more information. "LAMP" LED indicator is lit red and if "On/Standby" indicator flashes amber. "TEMP" LED indicator is lit red and if "On/Standby" indicator flashes amber. Installation Warning Indicator...
User's Manual
Page 25
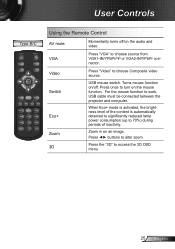
... mouse function. Video Switch Eco+ Zoom 3D Press "Video" to turn on the audio and video. Turns mouse function on an image. Press once to choose Composite video source. User Controls Type B/C Menu Using the Remote Control AV mute Momentarily turns off . When Eco+ mode is activated, the brightness level of the content is automatically detected to significantly reduced lamp power consumption (up to alter zoom. Press ◄► buttons to 70%) during...
... mouse function. Video Switch Eco+ Zoom 3D Press "Video" to turn on the audio and video. Turns mouse function on an image. Press once to choose Composite video source. User Controls Type B/C Menu Using the Remote Control AV mute Momentarily turns off . When Eco+ mode is activated, the brightness level of the content is automatically detected to significantly reduced lamp power consumption (up to alter zoom. Press ◄► buttons to 70%) during...
User's Manual
Page 30
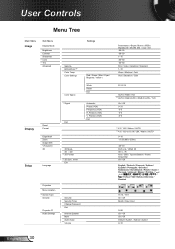
... Security Timer Change Password Exit Internal Speaker Mute Audio Input Volume 16:10 / 16:9 On / Off Month / Day / Hour ʳ 0~99 On / Off On / Off Default / Audio1 / Audio2 / Audio3 0~10 English 30 EW763 OSD Menu Tree.xls User Controls Menu Tree Main Menu Image Sub Menu Display Mode Brightness Contrast Sharpness #1 Color #1 Tint Advanced Display Reset Format Edge Mask Zoom Image Shift V Keystone 3D Setup Language Projection Menu Location #5 Screen Type Security Projector ID Audio Settings Gamma BrilliantColor™ Color Temp. Color Settings Color Space #2 Signal...
... Security Timer Change Password Exit Internal Speaker Mute Audio Input Volume 16:10 / 16:9 On / Off Month / Day / Hour ʳ 0~99 On / Off On / Off Default / Audio1 / Audio2 / Audio3 0~10 English 30 EW763 OSD Menu Tree.xls User Controls Menu Tree Main Menu Image Sub Menu Display Mode Brightness Contrast Sharpness #1 Color #1 Tint Advanced Display Reset Format Edge Mask Zoom Image Shift V Keystone 3D Setup Language Projection Menu Location #5 Screen Type Security Projector ID Audio Settings Gamma BrilliantColor™ Color Temp. Color Settings Color Space #2 Signal...
User's Manual
Page 31
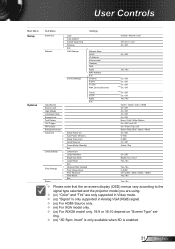
...-screen display (OSD) menus vary according to the signal type selected and the projector model you are using. ™™ (#1) "Color" and "Tint" are only supported in Video mode. ™™ (#2) "Signal" is enabled. 31 English ting. ™™ (#6) "3D Sync Invert" is only available EW763 OSD Menu Tree.xls when 3D is only supported in Analog VGA (RGB) signal. ™™ (#3) For HDMI Source only. ™™ (#4) For XGA model...
...-screen display (OSD) menus vary according to the signal type selected and the projector model you are using. ™™ (#1) "Color" and "Tint" are only supported in Video mode. ™™ (#2) "Signal" is enabled. 31 English ting. ™™ (#6) "3D Sync Invert" is only available EW763 OSD Menu Tree.xls when 3D is only supported in Analog VGA (RGB) signal. ™™ (#3) For HDMI Source only. ™™ (#4) For XGA model...
User's Manual
Page 46
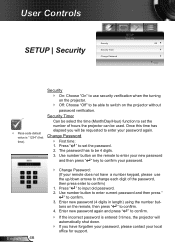
... support. Press " " to confirm. `` If the incorrect password is "1234" (first time). User Controls SETUP Security Security Off SETUP | Security Security Timer Change Password Exit ™™ Pass-code default value is entered 3 times, the projector will be 4 digits. 3. Enter new password again and press " " to set the number of the password, then press enter to switch on the projector. `` Off: Choose "Off" to be used. Once this time has elapsed you will automatically shut...
... support. Press " " to confirm. `` If the incorrect password is "1234" (first time). User Controls SETUP Security Security Off SETUP | Security Security Timer Change Password Exit ™™ Pass-code default value is entered 3 times, the projector will be 4 digits. 3. Enter new password again and press " " to set the number of the password, then press enter to switch on the projector. `` Off: Choose "Off" to be used. Once this time has elapsed you will automatically shut...
User's Manual
Page 47
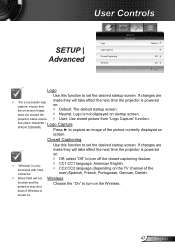
... effect the next time the projector is powered on. `` Default: The default startup screen. `` Neutral: Logo is powered on the TV channel of the picture currently displayed on the Wireless. If changes are made they will take effect the next time the projector is not displayed on . 47 English User Controls SETUP | Advanced Logo Logo Capture Closed Captioning Wireless SETUP Advanced Default Off Off Exit Logo Use this function to turn on screen.
... effect the next time the projector is powered on. `` Default: The default startup screen. `` Neutral: Logo is powered on the TV channel of the picture currently displayed on the Wireless. If changes are made they will take effect the next time the projector is not displayed on . 47 English User Controls SETUP | Advanced Logo Logo Capture Closed Captioning Wireless SETUP Advanced Default Off Off Exit Logo Use this function to turn on screen.
User's Manual
Page 48
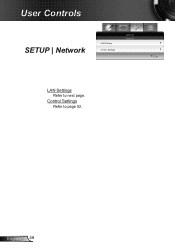
Control Settings Refer to next page. English 48 User Controls SETUP Network LAN Settings SETUP | Network Control Settings Exit LAN Settings Refer to page 52.
Control Settings Refer to next page. English 48 User Controls SETUP Network LAN Settings SETUP | Network Control Settings Exit LAN Settings Refer to page 52.
User's Manual
Page 50
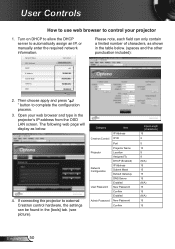
... [tools] tab. (see picture). If connecting the projector to external Crestron control hardware, the settings can only contain a limited number of characters, as below . (spaces and the other punctuation included): Category Item Crestron Control Projector Network Configuration User Password Admin Password IP Address IP ID Port Projector Name Location Assigned To DHCP (Enabled) IP Address Subnet Mask Default Gateway DNS Server Enabled New Password Confirm Enabled New Password Confirm Input-Length (characters) 15...
... [tools] tab. (see picture). If connecting the projector to external Crestron control hardware, the settings can only contain a limited number of characters, as below . (spaces and the other punctuation included): Category Item Crestron Control Projector Network Configuration User Password Admin Password IP Address IP ID Port Projector Name Location Assigned To DHCP (Enabled) IP Address Subnet Mask Default Gateway DNS Server Enabled New Password Confirm Enabled New Password Confirm Input-Length (characters) 15...
User's Manual
Page 52
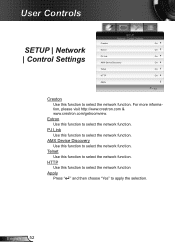
... select the network function. PJ Link Use this function to select the network function. English 52 Telnet Use this function to select the network function. For more information, please visit http://www.crestron.com & www.crestron.com/getroomview. AMX Device Discovery Use this function to select the network function. HTTP Use this function to select the network function. User Controls SETUP | Network | Control Settings SETUP Network : Control Settings Creston...
... select the network function. PJ Link Use this function to select the network function. English 52 Telnet Use this function to select the network function. For more information, please visit http://www.crestron.com & www.crestron.com/getroomview. AMX Device Discovery Use this function to select the network function. HTTP Use this function to select the network function. User Controls SETUP | Network | Control Settings SETUP Network : Control Settings Creston...
User's Manual
Page 55
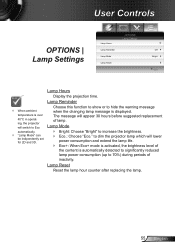
... to show or to hide the warning message when the changing lamp message is automatically detected to significantly reduced lamp power consumption (up to Eco automatically. ™™ "Lamp Mode" can be indipendently set for 2D and 3D. to increase the brightness. `` Eco.: Choose "Eco." Lamp Hours Display the projection time. Lamp Reset Reset the lamp hour counter after replacing the lamp. 55 English User Controls OPTIONS | Lamp Settings Lamp Hours Lamp Reminder Lamp Mode Lamp Reset OPTIONS Lamp Settings Off Bright Exit ™™ When...
... to show or to hide the warning message when the changing lamp message is automatically detected to significantly reduced lamp power consumption (up to Eco automatically. ™™ "Lamp Mode" can be indipendently set for 2D and 3D. to increase the brightness. `` Eco.: Choose "Eco." Lamp Hours Display the projection time. Lamp Reset Reset the lamp hour counter after replacing the lamp. 55 English User Controls OPTIONS | Lamp Settings Lamp Hours Lamp Reminder Lamp Mode Lamp Reset OPTIONS Lamp Settings Off Bright Exit ™™ When...
User's Manual
Page 56
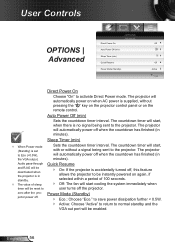
User Controls OPTIONS | Advanced Direct Power On OPTIONS Advanced Auto Power Off (min) Sleep Timer (min) Quick Resume Power Mode (Standby) Off Off Active Exit ™™ When Power mode (Standby) is set to Eco (
User Controls OPTIONS | Advanced Direct Power On OPTIONS Advanced Auto Power Off (min) Sleep Timer (min) Quick Resume Power Mode (Standby) Off Off Active Exit ™™ When Power mode (Standby) is set to Eco (

User's Manual
Page 58
... have removed the lens cap and the projector is switched on. `` Ensure that the resolution setting of connectors are using a PC: For Windows 95, 98, 2000, XP, Windows 7: 1. Open the "My Computer" icon, the "Control Panel" folder, and then double click on the remote control or control panel. `` If you are using . choose the resolution mode you need to the following information. Appendices Troubleshooting If you experience a problem with your display resolution setting is...
... have removed the lens cap and the projector is switched on. `` Ensure that the resolution setting of connectors are using a PC: For Windows 95, 98, 2000, XP, Windows 7: 1. Open the "My Computer" icon, the "Control Panel" folder, and then double click on the remote control or control panel. `` If you are using . choose the resolution mode you need to the following information. Appendices Troubleshooting If you experience a problem with your display resolution setting is...
User's Manual
Page 61
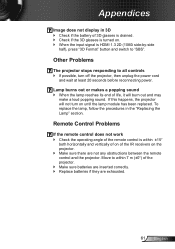
... switch to "SBS". Appendices Image does not display in the "Replacing the Lamp" section. If this happens, the projector will burn out and may make a loud popping sound. Move to all controls `` If possible, turn on the projector. `` Make sure there are exhausted. 61 English Remote Control Problems If the remote control does not work `` Check the operating angle of life, it will not turn off the projector, then unplug the power cord...
... switch to "SBS". Appendices Image does not display in the "Replacing the Lamp" section. If this happens, the projector will burn out and may make a loud popping sound. Move to all controls `` If possible, turn on the projector. `` Make sure there are exhausted. 61 English Remote Control Problems If the remote control does not work `` Check the operating angle of life, it will not turn off the projector, then unplug the power cord...
User's Manual
Page 62
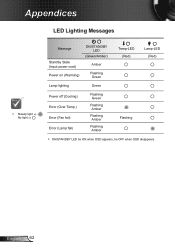
Appendices LED Lighting Messages ™™ Steady light No light Message Standby State (Input power cord) Power on (Warming) ON/STANDBY LED (Green/Amber) Amber Flashing Green Temp-LED (Red) Lamp-LED (Red) Lamp lighting Green Power off (Cooling) Error (Over Temp.) Error (Fan fail) Error (Lamp fail) Flashing Green Flashing Amber Flashing Amber Flashing Amber Flashing * ON/STANDBY LED be ON when OSD appears, be OFF when OSD disappears. English 62
Appendices LED Lighting Messages ™™ Steady light No light Message Standby State (Input power cord) Power on (Warming) ON/STANDBY LED (Green/Amber) Amber Flashing Green Temp-LED (Red) Lamp-LED (Red) Lamp lighting Green Power off (Cooling) Error (Over Temp.) Error (Fan fail) Error (Lamp fail) Flashing Green Flashing Amber Flashing Amber Flashing Amber Flashing * ON/STANDBY LED be ON when OSD appears, be OFF when OSD disappears. English 62
User's Manual
Page 72
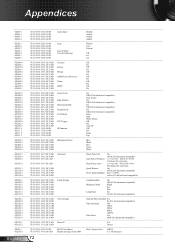
...Audio Input Default ~XX89 1 7E 30 30 38 39 20 31 0D Audio1 ~XX89 3 7E 30 30 38 39 20 33 0D Audio2 ~XX89 4 7E 30 30 38 39 20 34 0D Audio3 ~XX82 1 7E 30 30 38 32 20 31 0D Logo Default ~XX82 2 7E 30 30 38 32 20 32 0D User...Color Blue ~XX104 2 7E 30 30 31 30 34 20 32 0D Black ~XX104 3 7E 30 30 31 30 34 20 33 0D Red ~XX104 4 7E 30 30 31 30 34 20 34 0D Green ~XX104 5 7E 30 30 31 30 34 20 35 0D White...30 31 30 36 20 a 0D Auto Power Off (min) n = 0 (a=30) ~ 180 (a=31 38 30) (5 minutes for each step). ~XX107 n 7E 30 30 31 30 37 20 a 0D Sleep Timer (min) n = 0 (a=30) ...
...Audio Input Default ~XX89 1 7E 30 30 38 39 20 31 0D Audio1 ~XX89 3 7E 30 30 38 39 20 33 0D Audio2 ~XX89 4 7E 30 30 38 39 20 34 0D Audio3 ~XX82 1 7E 30 30 38 32 20 31 0D Logo Default ~XX82 2 7E 30 30 38 32 20 32 0D User...Color Blue ~XX104 2 7E 30 30 31 30 34 20 32 0D Black ~XX104 3 7E 30 30 31 30 34 20 33 0D Red ~XX104 4 7E 30 30 31 30 34 20 34 0D Green ~XX104 5 7E 30 30 31 30 34 20 35 0D White...30 31 30 36 20 a 0D Auto Power Off (min) n = 0 (a=30) ~ 180 (a=31 38 30) (5 minutes for each step). ~XX107 n 7E 30 30 31 30 37 20 a 0D Sleep Timer (min) n = 0 (a=30) ...


