
User's Manual
Page 1
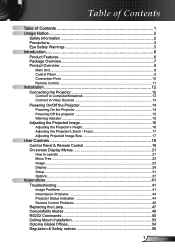
... 12 Connecting the Projector 12 Connect to Computer/Notebook 12 Connect to Video Sources 13 Powering On/Off the Projector 14 Powering On the Projector 14 Powering Off the projector 15 Warning Indicator ...15 Adjusting the Projected Image 16 Adjusting the Projector's Height 16 Adjusting the Projector's Zoom /... 41 Troubleshooting 41 Image Problems 41 Intermission Problems 44 Projector Status Indication 44 Remote Control Problems 46 Replacing the Lamp 47 Compatibility Modes 49...
... 12 Connecting the Projector 12 Connect to Computer/Notebook 12 Connect to Video Sources 13 Powering On/Off the Projector 14 Powering On the Projector 14 Powering Off the projector 15 Warning Indicator ...15 Adjusting the Projected Image 16 Adjusting the Projector's Height 16 Adjusting the Projector's Zoom /... 41 Troubleshooting 41 Image Problems 41 Intermission Problems 44 Projector Status Indication 44 Remote Control Problems 46 Replacing the Lamp 47 Compatibility Modes 49...
User's Manual
Page 2
... personnel. Clean only with the manufacturer's instructions : A. Please call Optoma to be referred to qualified service personnel. WARNING: TO REDUCE THE RISK OF FIRE OR ELECTRIC SHOCK, DO NOT EXPOSE THE PROJECTOR TO RAIN OR MOISTURE. Read these instructions -for safety related markings...any ventilation openings. B. Servicing is damaged. Liquids have spilled or objects have fallen into the apparatus. The projector has been exposed to dangerous voltages or other apparatus (including amplifiers) that may keep air from overheating, put it from flowing through...
... personnel. Clean only with the manufacturer's instructions : A. Please call Optoma to be referred to qualified service personnel. WARNING: TO REDUCE THE RISK OF FIRE OR ELECTRIC SHOCK, DO NOT EXPOSE THE PROJECTOR TO RAIN OR MOISTURE. Read these instructions -for safety related markings...any ventilation openings. B. Servicing is damaged. Liquids have spilled or objects have fallen into the apparatus. The projector has been exposed to dangerous voltages or other apparatus (including amplifiers) that may keep air from overheating, put it from flowing through...
User's Manual
Page 3
...messages. ▀■ Warning- Please contact your eyes. ▀■ Warning- See pages 47-48. ▀■ Warning- When switching the projector off, please ensure the cooling cycle has been completed before disconnecting the power. will detect the life of injury to the eyes, do not look...the lamp module (refer to cool down , and follow the procedures listed under "Replacing the Lamp" section on . Allow 90 seconds for the projector to page 40). When the lamp reaches the end of its life, the message "Lamp Warning: Lamp life exceeded." The bright ...
...messages. ▀■ Warning- Please contact your eyes. ▀■ Warning- See pages 47-48. ▀■ Warning- When switching the projector off, please ensure the cooling cycle has been completed before disconnecting the power. will detect the life of injury to the eyes, do not look...the lamp module (refer to cool down , and follow the procedures listed under "Replacing the Lamp" section on . Allow 90 seconds for the projector to page 40). When the lamp reaches the end of its life, the message "Lamp Warning: Lamp life exceeded." The bright ...
User's Manual
Page 5
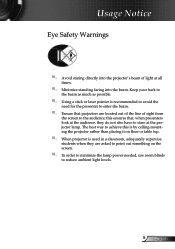
...enter the beam. ▀■ Ensure that , when presenters look at the audience, they are located out of the line of light at the projector lamp. The best way to the audience; Usage Notice Eye Safety Warnings ▀■ Avoid staring directly into the beam. Keep your back to the...students when they do not also have to stare at all times. ▀■ Minimize standing facing into the projector's beam of sight from the screen to achieve this ensures that projectors are asked to point out something on the screen. ▀■ In order to minimize the lamp power needed...
...enter the beam. ▀■ Ensure that , when presenters look at the audience, they are located out of the line of light at the projector lamp. The best way to the audience; Usage Notice Eye Safety Warnings ▀■ Avoid staring directly into the beam. Keep your back to the...students when they do not also have to stare at all times. ▀■ Minimize standing facing into the projector's beam of sight from the screen to achieve this ensures that projectors are asked to point out something on the screen. ▀■ In order to minimize the lamp power needed...

User's Manual
Page 6
Introduction Product Features This product is a single chip 0.55" DLP® projector. Outstanding features include: Texas Instruments Single chip DLP® Technology Computer Compatibility: Apple Macintosh, iMac, and VESA Standards: UXGA, SXGA+, SXGA, WXGA, XGA, ...
Introduction Product Features This product is a single chip 0.55" DLP® projector. Outstanding features include: Texas Instruments Single chip DLP® Technology Computer Compatibility: Apple Macintosh, iMac, and VESA Standards: UXGA, SXGA+, SXGA, WXGA, XGA, ...
User's Manual
Page 7
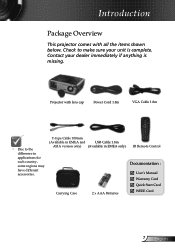
Projector with all the items shown below. Check to the difference in EMEA only) Carrying Case 2 x AAA Batteries IR Remote Control Documentation : User's Manual ... in EMEA and USB Cable 1.8m ASIA version only) (Available in applications for each country, some regions may have different accessories. Introduction Package Overview This projector comes with lens cap Power Cord 1.8m VGA Cable 1.8m Due to make sure your dealer immediately if anything is complete. Contact your unit...
Projector with all the items shown below. Check to the difference in EMEA only) Carrying Case 2 x AAA Batteries IR Remote Control Documentation : User's Manual ... in EMEA and USB Cable 1.8m ASIA version only) (Available in applications for each country, some regions may have different accessories. Introduction Package Overview This projector comes with lens cap Power Cord 1.8m VGA Cable 1.8m Due to make sure your dealer immediately if anything is complete. Contact your unit...
User's Manual
Page 12
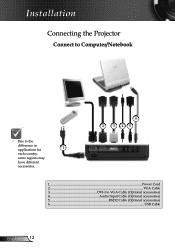
Installation Connecting the Projector Connect to Computer/Notebook Due to the difference in applications for 1 each country, some regions may have different accessories. 6 2 3 45 1...Power Cord 2...VGA Cable 3 DVI-I to VGA Cable (Optional accessories) 4 Audio Input Cable (Optional accessories) 5 RS232 Cable (Optional accessories) 6...USB Cable English 12
Installation Connecting the Projector Connect to Computer/Notebook Due to the difference in applications for 1 each country, some regions may have different accessories. 6 2 3 45 1...Power Cord 2...VGA Cable 3 DVI-I to VGA Cable (Optional accessories) 4 Audio Input Cable (Optional accessories) 5 RS232 Cable (Optional accessories) 6...USB Cable English 12
User's Manual
Page 14
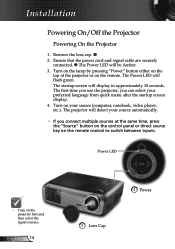
...cable are securely connected. The Power LED will display in approximately 10 seconds. Turn on the remote control to switch between inputs. The projector will flash green. The startup screen will be Amber. 3. Power LED Turn on the remote. Turn on the lamp by pressing ...detect your source automatically. If you can select your source (computer, notebook, video player, etc.). The first time you use the projector, you connect multiple sources at the same time, press the "Source" button on the control panel or direct source key on your preferred ...
...cable are securely connected. The Power LED will display in approximately 10 seconds. Turn on the remote control to switch between inputs. The projector will flash green. The startup screen will be Amber. 3. Power LED Turn on the remote. Turn on the lamp by pressing ...detect your source automatically. If you can select your source (computer, notebook, video player, etc.). The first time you use the projector, you connect multiple sources at the same time, press the "Source" button on the control panel or direct source key on your preferred ...

User's Manual
Page 15
...Please contact your local dealer or our service center. See pages 54-55. When the "TEMP" indicator flashes red, it indicates the projector has overheated. Once in standby mode, simply press "Power" button to operate for about 10 seconds for cooling cycle. Warning Indicator When... the "LAMP" indicator lights red, the projector will disappear after it has cooled down . See pages 54-55. 15 English Press the "Power" button again to confirm, otherwise the message...
...Please contact your local dealer or our service center. See pages 54-55. When the "TEMP" indicator flashes red, it indicates the projector has overheated. Once in standby mode, simply press "Power" button to operate for about 10 seconds for cooling cycle. Warning Indicator When... the "LAMP" indicator lights red, the projector will disappear after it has cooled down . See pages 54-55. 15 English Press the "Power" button again to confirm, otherwise the message...

User's Manual
Page 16
... 2 Elevator Foot 1 Elevator Button English 16 Use screw in foot to lock the elevator feet into position. 3. Installation Adjusting the Projected Image Adjusting the Projector's Height The projector is equipped with elevator foot for adjusting the image height. To lower the image: 1. To raise the image: 1. Press the elevator button. 2.
... 2 Elevator Foot 1 Elevator Button English 16 Use screw in foot to lock the elevator feet into position. 3. Installation Adjusting the Projected Image Adjusting the Projector's Height The projector is equipped with elevator foot for adjusting the image height. To lower the image: 1. To raise the image: 1. Press the elevator button. 2.

User's Manual
Page 17
....2cm) 24.78" (62.9cm) Distance 3.9' (1.2m) 9.8' (3.0m) 16.4' (5.0m) 23.0' (7.0m) 29.5' (9.0m) 39.4' (12.0m) This graph is clear. Installation Adjusting the Projector's Zoom / Focus You may turn the zoom lever to 12.0 meters). To focus the image, rotate the focus ring until the image is for user...
....2cm) 24.78" (62.9cm) Distance 3.9' (1.2m) 9.8' (3.0m) 16.4' (5.0m) 23.0' (7.0m) 29.5' (9.0m) 39.4' (12.0m) This graph is clear. Installation Adjusting the Projector's Zoom / Focus You may turn the zoom lever to 12.0 meters). To focus the image, rotate the focus ring until the image is for user...
User's Manual
Page 18
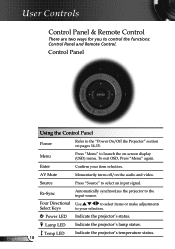
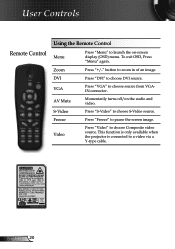
...adjustments Select Keys to launch the on the audio and video. Source Press "Source" to the input source. Temp LED Indicate the projector's temperature status. 18 Menu Press "Menu" to your item selection. AV Mute Momentarily turns off/on -screen display (OSD) menu.... Re-Sync Automatically synchronizes the projector to select an input signal. Power LED Indicate the projector's status. To exit OSD, Press "Menu" again. Control Panel English Using the Control Panel Power Refer to...
...adjustments Select Keys to launch the on the audio and video. Source Press "Source" to the input source. Temp LED Indicate the projector's temperature status. 18 Menu Press "Menu" to your item selection. AV Mute Momentarily turns off/on -screen display (OSD) menu.... Re-Sync Automatically synchronizes the projector to select an input signal. Power LED Indicate the projector's status. To exit OSD, Press "Menu" again. Control Panel English Using the Control Panel Power Refer to...
User's Manual
Page 19
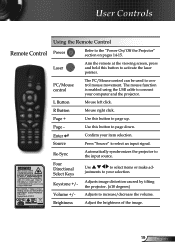
...image. 19 English R Button Mouse right click. Page + Use this button to page down. Use this button to your computer and the projector. justments to page up. Laser Aim the remote at the viewing screen, press and hold this button to select an input signal. L...the volume. Four Directional Select Keys Use to the input source. Adjusts image distortion caused by tilting the projector. (±18 degrees) Volume +/- Re-Sync Automatically synchronizes the projector to select items or make ad- Page - Enter Source Confirm your item selection. User Controls Remote ...
...image. 19 English R Button Mouse right click. Page + Use this button to page down. Use this button to your computer and the projector. justments to page up. Laser Aim the remote at the viewing screen, press and hold this button to select an input signal. L...the volume. Four Directional Select Keys Use to the input source. Adjusts image distortion caused by tilting the projector. (±18 degrees) Volume +/- Re-Sync Automatically synchronizes the projector to select items or make ad- Page - Enter Source Confirm your item selection. User Controls Remote ...
User's Manual
Page 20
... "Menu" again. VGA Press "VGA" to pause the screen image. S-Video Press "S-Video" to a video via a Y-type cable. This function is only available when the projector is connected to choose S-Video source. Zoom Press "+/-" button to zoom in of an image.
... "Menu" again. VGA Press "VGA" to pause the screen image. S-Video Press "S-Video" to a video via a Y-type cable. This function is only available when the projector is connected to choose S-Video source. Zoom Press "+/-" button to zoom in of an image.
User's Manual
Page 21
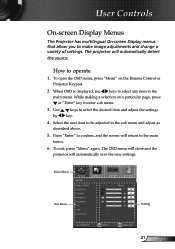
... 2 When OSD is displayed, use keys to select the desired item and adjust the settings key. 4. The OSD menu will close and the projector will automatically save the new settings. How to enter sub menu. 3. Main Menu Sub Menu Setting 21 English Select the next item to make image... adjustments and change a variety of settings. To exit, press "Menu" again. User Controls On-screen Display Menus The Projector has multilingual On-screen Display menus that allow you to be adjusted in the main menu. To open the OSD menu, press "Menu" on a particular...
... 2 When OSD is displayed, use keys to select the desired item and adjust the settings key. 4. The OSD menu will close and the projector will automatically save the new settings. How to enter sub menu. 3. Main Menu Sub Menu Setting 21 English Select the next item to make image... adjustments and change a variety of settings. To exit, press "Menu" again. User Controls On-screen Display Menus The Projector has multilingual On-screen Display menus that allow you to be adjusted in the main menu. To open the OSD menu, press "Menu" on a particular...
User's Manual
Page 27
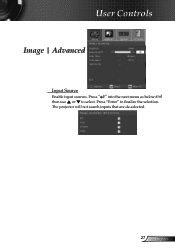
Press " " into the next menu as below and then use or to finalize the selection. Press "Enter" to select. The projector will not search inputs that are de-selected. 27 English User Controls Image | Advanced Input Source Enable input sources.
Press " " into the next menu as below and then use or to finalize the selection. Press "Enter" to select. The projector will not search inputs that are de-selected. 27 English User Controls Image | Advanced Input Source Enable input sources.
User's Manual
Page 28
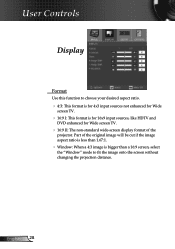
Part of the projector. English 28 User Controls Display Format Use this function to choose your desired aspect ratio. 4:3: This format is for 4x3 input sources not enhanced ...
Part of the projector. English 28 User Controls Display Format Use this function to choose your desired aspect ratio. 4:3: This format is for 4x3 input sources not enhanced ...
User's Manual
Page 32
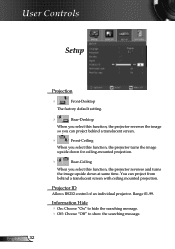
You can project behind a translucent screen with ceiling mounted projection. Projector ID Allows RS232 control of an individual projector. Information Hide On: Choose "On" to hide the searching message. Off: Choose "Off" to show the searching message. Range 01-99. ...The factory default setting. Rear-Desktop When you can project from behind a translucent screen. Front-Ceiling When you select this function, the projector turns the image upside down for ceiling-mounted projection. Rear-Ceiling When you select this function, the...
You can project behind a translucent screen with ceiling mounted projection. Projector ID Allows RS232 control of an individual projector. Information Hide On: Choose "On" to hide the searching message. Off: Choose "Off" to show the searching message. Range 01-99. ...The factory default setting. Rear-Desktop When you can project from behind a translucent screen. Front-Ceiling When you select this function, the projector turns the image upside down for ceiling-mounted projection. Rear-Ceiling When you select this function, the...

User's Manual
Page 34
English 34 Security Timer Can be select the time (Month/Day/Hour) function to enter your password again. Once this time has elapsed you will be requested to set the number of hours the projector can be able to switch on the projector without password verification. User Controls Setup | Security Security On: Choose "On" to use security verification when the turning on the projector. Off: Choose "Off" to be used.
English 34 Security Timer Can be select the time (Month/Day/Hour) function to enter your password again. Once this time has elapsed you will be requested to set the number of hours the projector can be able to switch on the projector without password verification. User Controls Setup | Security Security On: Choose "On" to use security verification when the turning on the projector. Off: Choose "Off" to be used.
User's Manual
Page 37
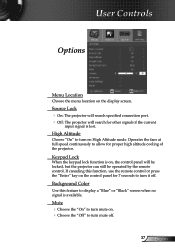
... turn mute on. Choose the "Off" to allow for proper high altitude cooling of the projector. Source Lock On: The projector will search specified connection port. Off: The projector will be locked, but the projector can still be operated by the remote control. Keypad Lock When the keypad lock function is...
... turn mute on. Choose the "Off" to allow for proper high altitude cooling of the projector. Source Lock On: The projector will search specified connection port. Off: The projector will be locked, but the projector can still be operated by the remote control. Keypad Lock When the keypad lock function is...


